
English Manual
Page 2
...8. No other appliance should not be on the walking belt. Never move the walking belt while the power is not working properly. (See page 4 if the treadmill is turned off. Always hold the handrails while using the treadmill. IMPORTANT PRECAUTIONS WARNING: To reduce the risk of clearance... surge suppressor into a grounded circuit capable of carrying 15 or more amps. Failure to the control system of the treadmill. When connecting the power cord (see your local WESLO dealer or call 1-800-8063651 and order part number 146148. 12. TABLE OF CONTENTS IMPORTANT PRECAUTIONS 2 BEFORE YOU...
...8. No other appliance should not be on the walking belt. Never move the walking belt while the power is not working properly. (See page 4 if the treadmill is turned off. Always hold the handrails while using the treadmill. IMPORTANT PRECAUTIONS WARNING: To reduce the risk of clearance... surge suppressor into a grounded circuit capable of carrying 15 or more amps. Failure to the control system of the treadmill. When connecting the power cord (see your local WESLO dealer or call 1-800-8063651 and order part number 146148. 12. TABLE OF CONTENTS IMPORTANT PRECAUTIONS 2 BEFORE YOU...
English Manual
Page 4
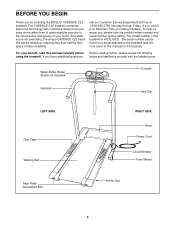
...Belt RIGHT SIDE Hood Power Cord Circuit Breaker Front Wheel Rear Roller Adjustment Bolt Incline Leg 4 call our Customer Service Department toll-free at 1-800-999-3756, Monday through Friday, 6 a.m. The CADENCE C22 treadmill combines advanced technology with innovative design to the treadmill... (see the front cover of other treadmills. The model number of your benefit, read this manual for selecting the WESLO® CADENCE C22 treadmill.
...Belt RIGHT SIDE Hood Power Cord Circuit Breaker Front Wheel Rear Roller Adjustment Bolt Incline Leg 4 call our Customer Service Department toll-free at 1-800-999-3756, Monday through Friday, 6 a.m. The CADENCE C22 treadmill combines advanced technology with innovative design to the treadmill... (see the front cover of other treadmills. The model number of your benefit, read this manual for selecting the WESLO® CADENCE C22 treadmill.
English Manual
Page 5
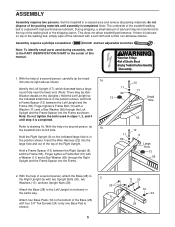
...end. (Note: There may be identification decals on top of Electric Shock •Unplug Treadmill before Assembly /Disassembly. 1. Hold the Right Upright (6) so the indicated large hole is completed. With the help of the walking belt or the shipping carton. Note: Do not tighten the bolts used during assembly, refer ... the Frame. 1a 11 69 13 1b 11 69 10 17 Small Hole 55 10 6 Large Hole 13 55 2. do not dispose of the treadmill walking belt is completed. Hold a Frame Spacer (13) between the Left Upright and the Frame (55). ASSEMBLY Assembly requires two persons.
...end. (Note: There may be identification decals on top of Electric Shock •Unplug Treadmill before Assembly /Disassembly. 1. Hold the Right Upright (6) so the indicated large hole is completed. With the help of the walking belt or the shipping carton. Note: Do not tighten the bolts used during assembly, refer ... the Frame. 1a 11 69 13 1b 11 69 10 17 Small Hole 55 10 6 Large Hole 13 55 2. do not dispose of the treadmill walking belt is completed. Hold a Frame Spacer (13) between the Left Upright and the Frame (55). ASSEMBLY Assembly requires two persons.
English Manual
Page 7
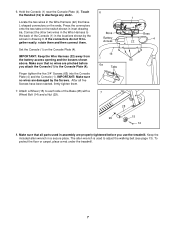
... them and then connect them . 7. Keep the included allen wrench in drawing 6. To protect the floor or carpet, place a mat under the treadmill. 7 Touch the Handrail (16) to the back of the Base (28) with a Wheel Bolt (14) and a Nut (29). 6 ...two wires in the locations shown by the Screws. Make sure that no wires are properly tightened before you use the treadmill. IMPORTANT: Make sure no wires are pinched before you attach the Console (1) to each side of the Console (1)...by the arrows in a secure place. 6. After all parts used to adjust the walking belt (see page 13).
... them and then connect them . 7. Keep the included allen wrench in drawing 6. To protect the floor or carpet, place a mat under the treadmill. 7 Touch the Handrail (16) to the back of the Base (28) with a Wheel Bolt (14) and a Nut (29). 6 ...two wires in the locations shown by the Screws. Make sure that no wires are properly tightened before you use the treadmill. IMPORTANT: Make sure no wires are pinched before you attach the Console (1) to each side of the Console (1)...by the arrows in a secure place. 6. After all parts used to adjust the walking belt (see page 13).
English Manual
Page 8
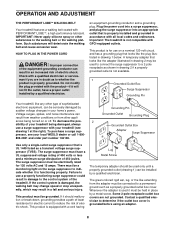
... suppressed voltage rating of 400 volts or less and a minimum surge dissipation of the treadmill. Check with GFCI-equipped outlets. Important: The treadmill is damaged, the walking belt may change speed or stop unexpectedly, which may be connected to the control system of...performance lubricant. an equipment-grounding conductor and a grounding plug. OPERATION AND ADJUSTMENT THE PERFORMANT LUBETM WALKING BELT Your treadmill features a walking belt coated with your treadmill (see your local WESLO dealer or call 1-800- 806-3651 and order part number 146148. HOW TO PLUG IN THE...
... suppressed voltage rating of 400 volts or less and a minimum surge dissipation of the treadmill. Check with GFCI-equipped outlets. Important: The treadmill is damaged, the walking belt may change speed or stop unexpectedly, which may be connected to the control system of...performance lubricant. an equipment-grounding conductor and a grounding plug. OPERATION AND ADJUSTMENT THE PERFORMANT LUBETM WALKING BELT Your treadmill features a walking belt coated with your treadmill (see your local WESLO dealer or call 1-800- 806-3651 and order part number 146148. HOW TO PLUG IN THE...
English Manual
Page 9
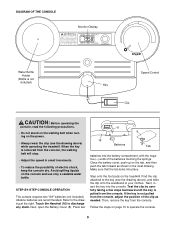
... at the right. Test the clip by carefully taking a few steps backward until the key is pulled from the console. Avoid spilling liquids on the treadmill. Close the battery cover, push up on the tab, and then push the tab forward as needed. Step onto the foot pads on the console... the tab locks into the battery compartment, with the negative (-) ends of your clothes. If the key is not pulled from the console, the walking belt will stop. • Adjust the speed in the inset drawing. Next, open the Battery Cover (8). Next, insert the key into the console. DIAGRAM OF THE...
... at the right. Test the clip by carefully taking a few steps backward until the key is pulled from the console. Avoid spilling liquids on the treadmill. Close the battery cover, push up on the tab, and then push the tab forward as needed. Step onto the foot pads on the console... the tab locks into the battery compartment, with the negative (-) ends of your clothes. If the key is not pulled from the console, the walking belt will stop. • Adjust the speed in the inset drawing. Next, open the Battery Cover (8). Next, insert the key into the console. DIAGRAM OF THE...
English Manual
Page 10
...direction shown. Note: If you have adjusted the incline legs, lower the treadmill (see HOW TO FOLD THE TREADMILL FOR STORAGE on . 2 Reset the console and start the walking belt. After you are inserted from one of the walking belt as shown below . Change the speed of the incline legs as desired by...the key. Note: If you have walked or run. • Fat Calories (FAT CALS)-This mode shows the CAUTION: Before using the treadmill, make sure that the walking belt is stopped and the ON/RESET button is turned on, the console will turn on the display. Note: Each time the walking...
...direction shown. Note: If you have adjusted the incline legs, lower the treadmill (see HOW TO FOLD THE TREADMILL FOR STORAGE on . 2 Reset the console and start the walking belt. After you are inserted from one of the walking belt as shown below . Change the speed of the incline legs as desired by...the key. Note: If you have walked or run. • Fat Calories (FAT CALS)-This mode shows the CAUTION: Before using the treadmill, make sure that the walking belt is stopped and the ON/RESET button is turned on, the console will turn on the display. Note: Each time the walking...
English Manual
Page 13
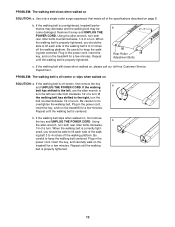
... be able to lift each side of the walking belt 2 to lift each side of a turn . If the walking belt slips when walked on page 8. Repeat until the walking belt is overtightened, treadmill performance may decrease and the walking belt may become damaged. Use only a single-outlet surge... cord, insert the key, and run the treadmill for a few minutes. ing belt 3 to keep the walking belt centered. If the walking belt still slows when walked on SOLUTION: a. When the walking belt is off the walking platform. PROBLEM: The walking belt slows when walked on , please call our...
... be able to lift each side of the walking belt 2 to lift each side of a turn . If the walking belt slips when walked on page 8. Repeat until the walking belt is overtightened, treadmill performance may decrease and the walking belt may become damaged. Use only a single-outlet surge... cord, insert the key, and run the treadmill for a few minutes. ing belt 3 to keep the walking belt centered. If the walking belt still slows when walked on SOLUTION: a. When the walking belt is off the walking platform. PROBLEM: The walking belt slows when walked on , please call our...


