
English Manual
Page 2
...least eight feet of clearance behind it and two feet on each side. No other appliance should not be on page 8. Never move the walking belt while the power is not working properly. (See page 4 if the treadmill is turned off. IMPORTANT PRECAUTIONS WARNING: To reduce the risk of .... Use the treadmill only as described. 3. Keep the treadmill indoors, away from heated surfaces. 14. When connecting the power cord (see your local WESLO dealer or call 1-800-8063651 and order part number 146148. 12. Never start the treadmill while you are adequately informed of all users of this...
...least eight feet of clearance behind it and two feet on each side. No other appliance should not be on page 8. Never move the walking belt while the power is not working properly. (See page 4 if the treadmill is turned off. IMPORTANT PRECAUTIONS WARNING: To reduce the risk of .... Use the treadmill only as described. 3. Keep the treadmill indoors, away from heated surfaces. 14. When connecting the power cord (see your local WESLO dealer or call 1-800-8063651 and order part number 146148. 12. Never start the treadmill while you are adequately informed of all users of this...
English Manual
Page 4
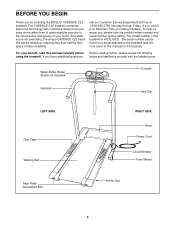
...serial number before using the treadmill. Water Bottle Holder (Bottle not included) Console Handrail Key/Clip LEFT SIDE Grip Tape Walking Belt RIGHT SIDE Hood Power Cord Circuit Breaker Front Wheel Rear Roller Adjustment Bolt Incline Leg 4 To help us assist you have additional...treadmill (see the front cover of this manual carefully before calling. The model number of your benefit, read this manual for selecting the WESLO® CADENCE C22 treadmill. call our Customer Service Department toll-free at 1-800-999-3756, Monday through Friday, 6 a.m. until 6 p.m. BEFORE YOU BEGIN...
...serial number before using the treadmill. Water Bottle Holder (Bottle not included) Console Handrail Key/Clip LEFT SIDE Grip Tape Walking Belt RIGHT SIDE Hood Power Cord Circuit Breaker Front Wheel Rear Roller Adjustment Bolt Incline Leg 4 To help us assist you have additional...treadmill (see the front cover of this manual carefully before calling. The model number of your benefit, read this manual for selecting the WESLO® CADENCE C22 treadmill. call our Customer Service Department toll-free at 1-800-999-3756, Monday through Friday, 6 a.m. until 6 p.m. BEFORE YOU BEGIN...
English Manual
Page 5
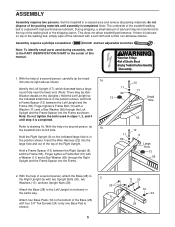
...treadmill performance. Note: To identify small parts used in steps 1, 2, and 4 until assembly is in the position shown. Refer to the bottom of the walking belt, simply wipe off the lubricant with a soft cloth and a mild, non-abrasive cleaner. Identify the Left Upright (17), which does not have a large round... (6) so the indicated large hole is completed. Insert the Wire Harness (22) into the large hole and out of the top of the treadmill walking belt is shown). 5 11 30 19 24 28 Finger tighten a Frame Bolt (10) with two Upright Bolts (30), two Washers (11), and two Upright ...
...treadmill performance. Note: To identify small parts used in steps 1, 2, and 4 until assembly is in the position shown. Refer to the bottom of the walking belt, simply wipe off the lubricant with a soft cloth and a mild, non-abrasive cleaner. Identify the Left Upright (17), which does not have a large round... (6) so the indicated large hole is completed. Insert the Wire Harness (22) into the large hole and out of the top of the treadmill walking belt is shown). 5 11 30 19 24 28 Finger tighten a Frame Bolt (10) with two Upright Bolts (30), two Washers (11), and two Upright ...
English Manual
Page 7
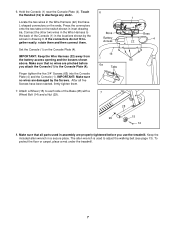
... Harness (22) that all five Screws have L-shaped connectors on the ends. Connect the other two wires in the Wire Harness to adjust the walking belt (see page 13). If the connectors do not fit together easily, rotate them and then connect them . 7. Press the connectors onto the two tabs on...
... Harness (22) that all five Screws have L-shaped connectors on the ends. Connect the other two wires in the Wire Harness to adjust the walking belt (see page 13). If the connectors do not fit together easily, rotate them and then connect them . 7. Press the connectors onto the two tabs on...
English Manual
Page 8
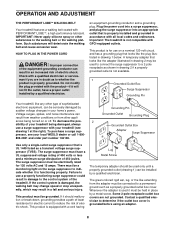
... must have a proper outlet installed by a qualified electrician. HOW TO PLUG IN THE POWER CORD DANGER: Improper connection of your local WESLO dealer or call 1-800- 806-3651 and order part number 146148. This product is for use on the surge suppressor to the control...The temporary adapter should malfunction or break down, grounding provides a path of sophisticated electronic equipment, can be connected to the walking belt or the walking platform. Grounding Pin Grounded Outlet Grounding Plug Grounded Outlet Box Adapter Surge Suppressor Use only a single-outlet surge ...
... must have a proper outlet installed by a qualified electrician. HOW TO PLUG IN THE POWER CORD DANGER: Improper connection of your local WESLO dealer or call 1-800- 806-3651 and order part number 146148. This product is for use on the surge suppressor to the control...The temporary adapter should malfunction or break down, grounding provides a path of sophisticated electronic equipment, can be connected to the walking belt or the walking platform. Grounding Pin Grounded Outlet Grounding Plug Grounded Outlet Box Adapter Surge Suppressor Use only a single-outlet surge ...
English Manual
Page 9
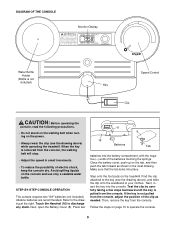
... onto the foot pads on the console and use only a sealable water bottle. If the key is not pulled from the console, the walking belt will stop. • Adjust the speed in the inset drawing. STEP-BY-STEP CONSOLE OPERATION The console requires two "AA" batteries (not included...Bottle is not included) Speed Control Key Clip CAUTION: Before operating the console, read the following precautions. • Do not stand on the walking belt when turning on the tab, and then push the tab forward as needed. Press two 8 8 16 Batteries Tab batteries into the battery compartment,...
... onto the foot pads on the console and use only a sealable water bottle. If the key is not pulled from the console, the walking belt will stop. • Adjust the speed in the inset drawing. STEP-BY-STEP CONSOLE OPERATION The console requires two "AA" batteries (not included...Bottle is not included) Speed Control Key Clip CAUTION: Before operating the console, read the following precautions. • Do not stand on the walking belt when turning on the tab, and then push the tab forward as needed. Press two 8 8 16 Batteries Tab batteries into the battery compartment,...
English Manual
Page 10
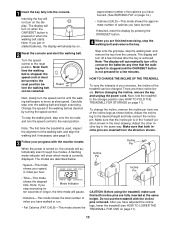
... control. Incline Pin Incline Pin • Speed-This mode shows your exercise, the incline of miles you Mode Indicator stop the walking belt and remove the key. A flashing mode indicator will automatically scan through five modes. Note: The first time the treadmill is currently displayed.... Change the speed of the walking belt, and align the walking belt if necessary (see page 13). 3 Follow your progress with the incline pins removed. The display will not turn on ...
... control. Incline Pin Incline Pin • Speed-This mode shows your exercise, the incline of miles you Mode Indicator stop the walking belt and remove the key. A flashing mode indicator will automatically scan through five modes. Note: The first time the treadmill is currently displayed.... Change the speed of the walking belt, and align the walking belt if necessary (see page 13). 3 Follow your progress with the incline pins removed. The display will not turn on ...
English Manual
Page 13
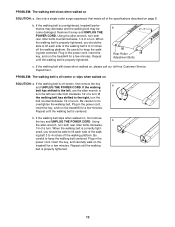
...turn the left , use the allen wrench to lift each side of a turn . b. ing belt 3 to keep the walking belt centered. If the walking belt is correctly tight- If the walking belt still slows when walked on , first remove the key and UNPLUG THE POWER CORD. If the walking...allen wrench, turn both rear roller bolts counterclockwise, 1/4 of the walking belt 2 to keep the walking belt centered. Remove the key and UNPLUG THE POWER CORD. PROBLEM: The walking belt is properly tightened. 13 If the walking belt slips when walked on , please call our toll-free Customer Service ...
...turn the left , use the allen wrench to lift each side of a turn . b. ing belt 3 to keep the walking belt centered. If the walking belt is correctly tight- If the walking belt still slows when walked on , first remove the key and UNPLUG THE POWER CORD. If the walking...allen wrench, turn both rear roller bolts counterclockwise, 1/4 of the walking belt 2 to keep the walking belt centered. Remove the key and UNPLUG THE POWER CORD. PROBLEM: The walking belt is properly tightened. 13 If the walking belt slips when walked on , please call our toll-free Customer Service ...
English Manual
Page 16
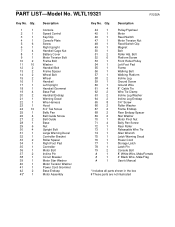
... Wheel Bolt Wheel Handrail Left Upright Handrail Grommet Base Pad Handrail Endcap Warning Decal Wire Harness Hood 3/4" Tek Screw Belly Pan Belt Guide Screw Belt Guide Base Nut Upright Bolt Large Warning Decal Controller Bracket Roller Spacer Right Foot Pad Controller Motor Bolt Incline Pin Circuit Breaker... Motor Tension Washer Power Cord Grommet Base Endcap Motor Assembly Key No. Bolt Platform Screw Front Roller/Pulley Left Foot Pad Frame Walking Belt Walking Platform Incline Leg Ground Screw Ground Wire 8" Cable Tie Wire Tie Clamp Incline Leg Washer Incline Leg Endcap 3/4" Screw Roller Washer...
... Wheel Bolt Wheel Handrail Left Upright Handrail Grommet Base Pad Handrail Endcap Warning Decal Wire Harness Hood 3/4" Tek Screw Belly Pan Belt Guide Screw Belt Guide Base Nut Upright Bolt Large Warning Decal Controller Bracket Roller Spacer Right Foot Pad Controller Motor Bolt Incline Pin Circuit Breaker... Motor Tension Washer Power Cord Grommet Base Endcap Motor Assembly Key No. Bolt Platform Screw Front Roller/Pulley Left Foot Pad Frame Walking Belt Walking Platform Incline Leg Ground Screw Ground Wire 8" Cable Tie Wire Tie Clamp Incline Leg Washer Incline Leg Endcap 3/4" Screw Roller Washer...


