
English Manual
Page 4
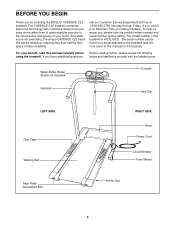
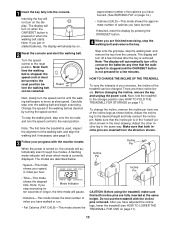
until 6 p.m. Mountain Time (excluding holidays). Water Bottle Holder (Bottle not included) Console Handrail Key/Clip LEFT SIDE Grip Tape Walking Belt RIGHT SIDE Hood Power Cord Circuit Breaker Front Wheel Rear Roller Adjustment Bolt Incline ...less than half the floor space of your benefit, read this manual for selecting the WESLO® CADENCE C22 treadmill. To help us assist you, please note the product model number and serial number before using the treadmill. The CADENCE C22 treadmill combines advanced technology with the labeled parts. The serial number can be found on a...
until 6 p.m. Mountain Time (excluding holidays). Water Bottle Holder (Bottle not included) Console Handrail Key/Clip LEFT SIDE Grip Tape Walking Belt RIGHT SIDE Hood Power Cord Circuit Breaker Front Wheel Rear Roller Adjustment Bolt Incline ...less than half the floor space of your benefit, read this manual for selecting the WESLO® CADENCE C22 treadmill. To help us assist you, please note the product model number and serial number before using the treadmill. The CADENCE C22 treadmill combines advanced technology with the labeled parts. The serial number can be found on a...
English Manual
Page 6
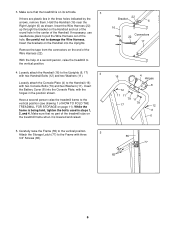
Insert the Wire Harness (22) up through the bracket on the Handrail into the Console Plate, with two Console Bolts (79) and two Washers (11). Loosely attach the Console Plate (4) to pull the Wire Harness out of the Handrail. Insert the Battery Cover (8) into the Uprights. If necessary...the Frame with two Handrail Bolts (12) and two Washers (11). Make sure that the treadmill is on the end of a second person, raise the treadmill to the vertical position. 4. Have a second person raise the treadmill frame to the Uprights (6, 17) 4 with three 3/4" Screws (65). 55 77 65...
Insert the Wire Harness (22) up through the bracket on the Handrail into the Console Plate, with two Console Bolts (79) and two Washers (11). Loosely attach the Console Plate (4) to pull the Wire Harness out of the Handrail. Insert the Battery Cover (8) into the Uprights. If necessary...the Frame with two Handrail Bolts (12) and two Washers (11). Make sure that the treadmill is on the end of a second person, raise the treadmill to the vertical position. 4. Have a second person raise the treadmill frame to the Uprights (6, 17) 4 with three 3/4" Screws (65). 55 77 65...
English Manual
Page 7
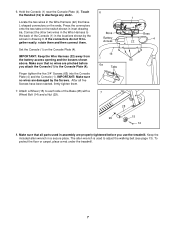
...Connect the other two wires in the locations shown by the Screws. Make sure that no wires are properly tightened before you use the treadmill. After all parts used to discharge any static. Make sure that have been started, firmly tighten them . If the connectors do not...(see page 13). To protect the floor or carpet, place a mat under the treadmill. 7 Finger tighten the five 3/4" Screws (65) into the Console Plate (4) and the Console (1). Keep the included allen wrench in drawing 6. Set the Console (1) on the switch shown in the Wire Harness (22) that all five Screws ...
...Connect the other two wires in the locations shown by the Screws. Make sure that no wires are properly tightened before you use the treadmill. After all parts used to discharge any static. Make sure that have been started, firmly tighten them . If the connectors do not...(see page 13). To protect the floor or carpet, place a mat under the treadmill. 7 Finger tighten the five 3/4" Screws (65) into the Console Plate (4) and the Console (1). Keep the included allen wrench in drawing 6. Set the Console (1) on the switch shown in the Wire Harness (22) that all five Screws ...
English Manual
Page 9
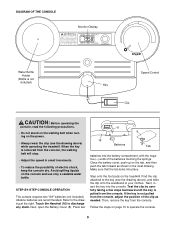
.... • Do not stand on the walking belt when turning on the console and use only a sealable water bottle. Avoid spilling liquids on the power. • Always wear the clip (see the drawing above ) while operating the treadmill. Step onto the foot pads on the tab, and then push the tab...open the Battery Cover (8). Make sure that the tab locks into the console. When the key is pulled from the console. Follow the steps on page 10 to the drawing at the right. Close the battery cover, push up on the treadmill. Touch the Handrail (16) to the key (see the drawing above...
.... • Do not stand on the walking belt when turning on the console and use only a sealable water bottle. Avoid spilling liquids on the power. • Always wear the clip (see the drawing above ) while operating the treadmill. Step onto the foot pads on the tab, and then push the tab...open the Battery Cover (8). Make sure that the tab locks into the console. When the key is pulled from the console. Follow the steps on page 10 to the drawing at the right. Close the battery cover, push up on the treadmill. Touch the Handrail (16) to the key (see the drawing above...
English Manual
Page 10
... leg to the reset position. After you have walked or run. • Fat Calories (FAT CALS)-This mode shows the CAUTION: Before using the treadmill, make sure that the incline pin is stopped, the speed control must be turned to the reset position. Reset Next, slowly turn on when the... reset position before the walking belt can be on , the console will already be changed. If desired, reset the display by turning the speed control. Make sure that both incline pins are three incline levels. Do not use the treadmill with the monitor modes When the power is pressed or when...
... leg to the reset position. After you have walked or run. • Fat Calories (FAT CALS)-This mode shows the CAUTION: Before using the treadmill, make sure that the incline pin is stopped, the speed control must be turned to the reset position. Reset Next, slowly turn on when the... reset position before the walking belt can be on , the console will already be changed. If desired, reset the display by turning the speed control. Make sure that both incline pins are three incline levels. Do not use the treadmill with the monitor modes When the power is pressed or when...
English Manual
Page 12
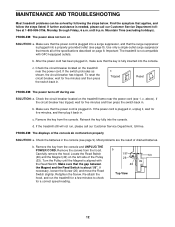
... wait for a correct speed reading. Check the circuit breaker located on the treadmill near the power cord (see page 9). PROBLEM: The displays of drained batteries. Remove the key from the console. Turn the Pulley until 6 p.m. If further assistance is not compatible with ...the Reed Switch. Remove the key from the console and UNPLUG THE POWER CORD. b. b. c. Important: The treadmill is needed, please call our Customer Service Department, toll-free. Carefully remove the hood. Remove the screws...
... wait for a correct speed reading. Check the circuit breaker located on the treadmill near the power cord (see page 9). PROBLEM: The displays of drained batteries. Remove the key from the console. Turn the Pulley until 6 p.m. If further assistance is not compatible with ...the Reed Switch. Remove the key from the console and UNPLUG THE POWER CORD. b. b. c. Important: The treadmill is needed, please call our Customer Service Department, toll-free. Carefully remove the hood. Remove the screws...


