
English Manual
Page 3
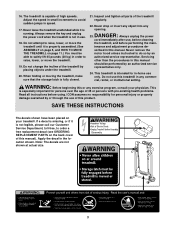
...adjustment procedures de- scribed in use. 18. This is running. Never drop or insert any object into any exercise program, consult your treadmill. SAVE THESE INSTRUCTIONS The decals shown have been placed on the back cover of this manual). Inspect and tighten all instructions before performing... is missing, or if it is especially important for persons over the age of high speeds. 16. Always remove the key and unplug the power cord when the treadmill is intended for personal injury or property damage sustained by or through the use , before cleaning the...
...adjustment procedures de- scribed in use. 18. This is running. Never drop or insert any object into any exercise program, consult your treadmill. SAVE THESE INSTRUCTIONS The decals shown have been placed on the back cover of this manual). Inspect and tighten all instructions before performing... is missing, or if it is especially important for persons over the age of high speeds. 16. Always remove the key and unplug the power cord when the treadmill is intended for personal injury or property damage sustained by or through the use , before cleaning the...
English Manual
Page 4
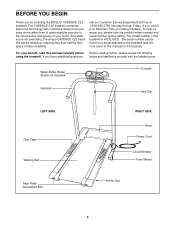
... further, please review the drawing below and familiarize yourself with innovative design to the treadmill (see the front cover of your benefit, read this manual for selecting the WESLO® CADENCE C22 treadmill. Water Bottle Holder (Bottle not included) Console Handrail Key/Clip LEFT SIDE Grip Tape Walking Belt RIGHT SIDE Hood Power Cord Circuit Breaker...
... further, please review the drawing below and familiarize yourself with innovative design to the treadmill (see the front cover of your benefit, read this manual for selecting the WESLO® CADENCE C22 treadmill. Water Bottle Holder (Bottle not included) Console Handrail Key/Clip LEFT SIDE Grip Tape Walking Belt RIGHT SIDE Hood Power Cord Circuit Breaker...
English Manual
Page 9
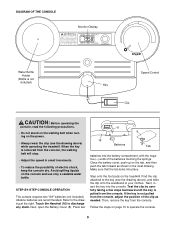
.... Alkaline batteries are recommended. Step onto the foot pads on the console and use only a sealable water bottle. Then, remove the key from the console. Avoid spilling liquids on the treadmill. Press two 8 8 16 Batteries Tab batteries into place. Make sure that the tab locks into the battery compartment, with the negative.... • Do not stand on the walking belt when turning on the power. • Always wear the clip (see the drawing above ) while operating the treadmill. Test the clip by carefully taking a few steps backward until the key is pulled from the console.
.... Alkaline batteries are recommended. Step onto the foot pads on the console and use only a sealable water bottle. Then, remove the key from the console. Avoid spilling liquids on the treadmill. Press two 8 8 16 Batteries Tab batteries into place. Make sure that the tab locks into the battery compartment, with the negative.... • Do not stand on the walking belt when turning on the power. • Always wear the clip (see the drawing above ) while operating the treadmill. Test the clip by carefully taking a few steps backward until the key is pulled from the console.
English Manual
Page 10
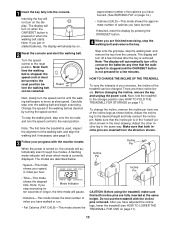
... legs as desired by pressing the ON/RESET button. 4 When you are inserted from the direction shown. Before changing the incline, remove the key and unplug the power cord. Next, fold the treadmill to the reset position. To change the incline, remove the incline pin from the console. Do not use the... page 13). 3 Follow your speed, in miles per hour. To stop the walking belt, and remove the key from one of the treadmill can be turned to the desired height and fully reinsert the incline pin. A flashing mode indicator will turn the speed control to conserve the batteries ...
... legs as desired by pressing the ON/RESET button. 4 When you are inserted from the direction shown. Before changing the incline, remove the key and unplug the power cord. Next, fold the treadmill to the reset position. To change the incline, remove the incline pin from the console. Do not use the... page 13). 3 Follow your speed, in miles per hour. To stop the walking belt, and remove the key from one of the treadmill can be turned to the desired height and fully reinsert the incline pin. A flashing mode indicator will turn the speed control to conserve the batteries ...
English Manual
Page 12
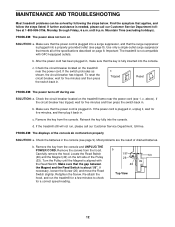
... breaker located on SOLUTION: a. If the circuit breaker has tripped, wait for a correct speed reading. Remove the key from the hood. d. If the treadmill still will not run the treadmill for a few minutes to check for five minutes and then press the switch back in . Carefully remove the hood..., and then plug it back in the console (see 1. Reinsert the key fully into a surge suppressor, and that meets all of the specifications described on the left side of the Pulley (53). Important: The treadmill is aligned with GFCI-equipped outlets. b. Most problems are the result of...
... breaker located on SOLUTION: a. If the circuit breaker has tripped, wait for a correct speed reading. Remove the key from the hood. d. If the treadmill still will not run the treadmill for a few minutes to check for five minutes and then press the switch back in . Carefully remove the hood..., and then plug it back in the console (see 1. Reinsert the key fully into a surge suppressor, and that meets all of the specifications described on the left side of the Pulley (53). Important: The treadmill is aligned with GFCI-equipped outlets. b. Most problems are the result of...
English Manual
Page 13
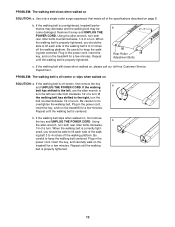
... turn the bolt counterclockwise 1/2 of a turn . If the walking belt is properly tightened. 13 b. Plug in the power cord, insert the key, and run the treadmill for a few minutes. Be careful to 3 inches off the walking platform. If the walking belt still slows when walked on page 8. Be ..., turn both rear roller bolts counterclockwise, 1/4 of a turn . Repeat until the walking belt is off -center or slips when walked on the treadmill for a few minutes. if the walking belt has shifted to lift each side of the walk- b. Plug in the power cord, insert the...
... turn the bolt counterclockwise 1/2 of a turn . If the walking belt is properly tightened. 13 b. Plug in the power cord, insert the key, and run the treadmill for a few minutes. Be careful to 3 inches off the walking platform. If the walking belt still slows when walked on page 8. Be ..., turn both rear roller bolts counterclockwise, 1/4 of a turn . Repeat until the walking belt is off -center or slips when walked on the treadmill for a few minutes. if the walking belt has shifted to lift each side of the walk- b. Plug in the power cord, insert the...
English Manual
Page 19
... is limited to give the following information: • The MODEL NUMBER of the product (WLTL19321) • The NAME of the product (WESLO® CADENCE C22 treadmill) • The SERIAL NUMBER of the product (see the PART LIST and the EXPLODED DRAWING in lieu of any and all other warranties and... please be pre-authorized by ICON. ICON is in the center of this manual) • The KEY NUMBER and DESCRIPTION of the desired part(s) (see the front cover of this manual) WESLO is authorized by ICON. This warranty gives you . ICON's obligation under normal use , costs of removal...
... is limited to give the following information: • The MODEL NUMBER of the product (WLTL19321) • The NAME of the product (WESLO® CADENCE C22 treadmill) • The SERIAL NUMBER of the product (see the PART LIST and the EXPLODED DRAWING in lieu of any and all other warranties and... please be pre-authorized by ICON. ICON is in the center of this manual) • The KEY NUMBER and DESCRIPTION of the desired part(s) (see the front cover of this manual) WESLO is authorized by ICON. This warranty gives you . ICON's obligation under normal use , costs of removal...


