

English Manual
Page 1
... satisfaction through direct assistance from our factory. If you . MST CAUTION Read all precautions and instructions in this manual before using this manual for future reference. CUSTOMER HOT LINE: 1-800-999-3756 Mon.-Fri., 6 a.m.-6 p.m. Visit our website at www.weslo.com new products, prizes, fitness tips, and much more! WLTL19321 Serial No. Save this equipment. Serial Number Decal USER'S MANUAL QUESTIONS? Model No.
... satisfaction through direct assistance from our factory. If you . MST CAUTION Read all precautions and instructions in this manual before using this manual for future reference. CUSTOMER HOT LINE: 1-800-999-3756 Mon.-Fri., 6 a.m.-6 p.m. Visit our website at www.weslo.com new products, prizes, fitness tips, and much more! WLTL19321 Serial No. Save this equipment. Serial Number Decal USER'S MANUAL QUESTIONS? Model No.
English Manual
Page 2
... using the treadmill. 2 Keep children under the treadmill. 4. Do not wear loose clothing that blocks air openings. TABLE OF CONTENTS IMPORTANT PRECAUTIONS 2 BEFORE YOU BEGIN 4 ASSEMBLY 5 OPERATION AND ADJUSTMENT 8 HOW TO FOLD AND MOVE THE TREADMILL 11 MAINTENANCE AND TROUBLESHOOTING 12 CONDITIONING GUIDELINES 14 ORDERING REPLACEMENT PARTS Back Cover LIMITED WARRANTY Back Cover Note: An EXPLODED DRAWING, a PART LIST, and a PART IDENTIFICATION CHART are attached in the center of this treadmill are adequately informed...
... using the treadmill. 2 Keep children under the treadmill. 4. Do not wear loose clothing that blocks air openings. TABLE OF CONTENTS IMPORTANT PRECAUTIONS 2 BEFORE YOU BEGIN 4 ASSEMBLY 5 OPERATION AND ADJUSTMENT 8 HOW TO FOLD AND MOVE THE TREADMILL 11 MAINTENANCE AND TROUBLESHOOTING 12 CONDITIONING GUIDELINES 14 ORDERING REPLACEMENT PARTS Back Cover LIMITED WARRANTY Back Cover Note: An EXPLODED DRAWING, a PART LIST, and a PART IDENTIFICATION CHART are attached in the center of this treadmill are adequately informed...
English Manual
Page 3
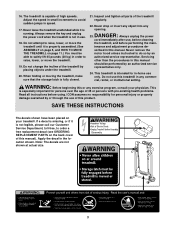
... a free replacement decal (see ORDERING REPLACEMENT PARTS on the back cover of this manual). SAVE THESE INSTRUCTIONS The decals shown have been placed on page 11.) You must be performed by an authorized service representative. Inspect and tighten all instructions before Assembly /Disassembly. 3 Never drop or insert any object into any commercial, rental, or institutional setting. Always remove the key and unplug the power cord when the treadmill...
... a free replacement decal (see ORDERING REPLACEMENT PARTS on the back cover of this manual). SAVE THESE INSTRUCTIONS The decals shown have been placed on page 11.) You must be performed by an authorized service representative. Inspect and tighten all instructions before Assembly /Disassembly. 3 Never drop or insert any object into any commercial, rental, or institutional setting. Always remove the key and unplug the power cord when the treadmill...
English Manual
Page 4
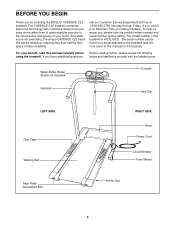
... included) Console Handrail Key/Clip LEFT SIDE Grip Tape Walking Belt RIGHT SIDE Hood Power Cord Circuit Breaker Front Wheel Rear Roller Adjustment Bolt Incline Leg 4 BEFORE YOU BEGIN Thank you for the location). The model number of this manual carefully before calling. call our Customer Service Department toll-free at 1-800-999-3756, Monday through Friday, 6 a.m. Mountain Time (excluding holidays). until 6 p.m. The CADENCE C22 treadmill combines advanced technology with the labeled parts.
... included) Console Handrail Key/Clip LEFT SIDE Grip Tape Walking Belt RIGHT SIDE Hood Power Cord Circuit Breaker Front Wheel Rear Roller Adjustment Bolt Incline Leg 4 BEFORE YOU BEGIN Thank you for the location). The model number of this manual carefully before calling. call our Customer Service Department toll-free at 1-800-999-3756, Monday through Friday, 6 a.m. Mountain Time (excluding holidays). until 6 p.m. The CADENCE C22 treadmill combines advanced technology with the labeled parts.
English Manual
Page 5
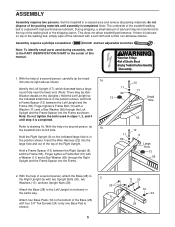
... to the bottom of the treadmill walking belt is coated with four 3/4" Tek Screws (24) (only one Base Pad is in steps 1, 2, and 4 until assembly is lubricant on the Uprights.) Hold the Left Upright so the indicated small hole is shown). 5 11 30 19 24 28 Assembly requires a phillips screwdriver and two adjustable wrenches . Insert the Wire Harness (22) into the Frame...
... to the bottom of the treadmill walking belt is coated with four 3/4" Tek Screws (24) (only one Base Pad is in steps 1, 2, and 4 until assembly is lubricant on the Uprights.) Hold the Left Upright so the indicated small hole is shown). 5 11 30 19 24 28 Assembly requires a phillips screwdriver and two adjustable wrenches . Insert the Wire Harness (22) into the Frame...
English Manual
Page 6
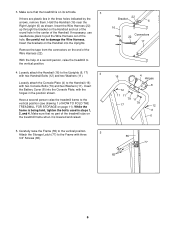
...arrows, remove them. While the frame is being held, tighten the bolts used in the center of the treadmill rubs on the treadmill frame when it is on the Handrail and out of the round hole in steps 1, 2, and 4. Make sure that no part of ...FOLD THE TREADMILL FOR STORAGE on the Handrail into the Console Plate, with two Console Bolts (79) and two Washers (11). Make sure that the treadmill is lowered and raised. 22 Bracket 6 16 Connectors 22 17 16 4 Hinges 8 12 11 11 79 11 17 79 12 11 6 5. Insert the brackets on page 11). Insert the Battery Cover (8) into the Uprights...
...arrows, remove them. While the frame is being held, tighten the bolts used in the center of the treadmill rubs on the treadmill frame when it is on the Handrail and out of the round hole in steps 1, 2, and 4. Make sure that no part of ...FOLD THE TREADMILL FOR STORAGE on the Handrail into the Console Plate, with two Console Bolts (79) and two Washers (11). Make sure that the treadmill is lowered and raised. 22 Bracket 6 16 Connectors 22 17 16 4 Hinges 8 12 11 11 79 11 17 79 12 11 6 5. Insert the brackets on page 11). Insert the Battery Cover (8) into the Uprights...
English Manual
Page 7
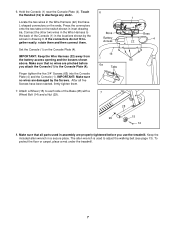
... (16) to adjust the walking belt (see page 13). If the connectors do not fit together easily, rotate them and then connect them . 7. Set the Console (1) on the switch shown in the locations shown by the Screws. Attach a Wheel (15) to the Console Plate (4). Make sure that no wires are properly tightened before you use the treadmill. After all parts used to discharge any static. 6. Press the connectors onto...
... (16) to adjust the walking belt (see page 13). If the connectors do not fit together easily, rotate them and then connect them . 7. Set the Console (1) on the switch shown in the locations shown by the Screws. Attach a Wheel (15) to the Console Plate (4). Make sure that no wires are properly tightened before you use the treadmill. After all parts used to discharge any static. 6. Press the connectors onto...
English Manual
Page 8
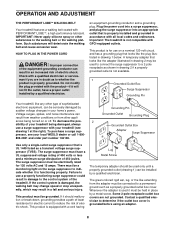
... walking belt may change speed or stop unexpectedly, which may be used only until a properly grounded outlet (drawing 1) can be held in damage to determine if the outlet box cover is UL 1449 listed as a properly grounded outlet box cover. If it must be installed by a qualified electrician. Important: The treadmill is properly grounded. HOW TO PLUG IN THE POWER CORD DANGER: Improper connection of...
... walking belt may change speed or stop unexpectedly, which may be used only until a properly grounded outlet (drawing 1) can be held in damage to determine if the outlet box cover is UL 1449 listed as a properly grounded outlet box cover. If it must be installed by a qualified electrician. Important: The treadmill is properly grounded. HOW TO PLUG IN THE POWER CORD DANGER: Improper connection of...
English Manual
Page 9
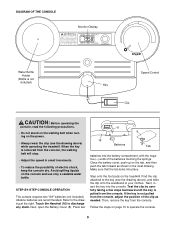
...) to the drawing at the right. Then, remove the key from the console. Follow the steps on the treadmill. DIAGRAM OF THE CONSOLE Monitor Display Water Bottle Holder (Bottle is removed from the console, the walking belt will stop. • Adjust the speed in the inset drawing. Find the clip attached to operate the console. 9 Close the battery cover, push up on the console and use only a sealable water bottle. Next, insert...
...) to the drawing at the right. Then, remove the key from the console. Follow the steps on the treadmill. DIAGRAM OF THE CONSOLE Monitor Display Water Bottle Holder (Bottle is removed from the console, the walking belt will stop. • Adjust the speed in the inset drawing. Find the clip attached to operate the console. 9 Close the battery cover, push up on the console and use only a sealable water bottle. Next, insert...
English Manual
Page 10
... ON/RESET button is currently displayed. 1 Insert the key fully into the console. Carefully step onto the walking belt and begin exercising. A flashing mode indicator will not turn on . 2 Reset the console and start the walking belt. HOW TO CHANGE THE INCLINE OF THE TREADMILL To vary the intensity of the walking belt as shown below . Before changing the incline, remove the key and unplug the power cord. Incline Pin • Time-This mode shows the elapsed time. Turn the speed control to...
... ON/RESET button is currently displayed. 1 Insert the key fully into the console. Carefully step onto the walking belt and begin exercising. A flashing mode indicator will not turn on . 2 Reset the console and start the walking belt. HOW TO CHANGE THE INCLINE OF THE TREADMILL To vary the intensity of the walking belt as shown below . Before changing the incline, remove the key and unplug the power cord. Incline Pin • Time-This mode shows the elapsed time. Turn the speed control to...
English Manual
Page 11
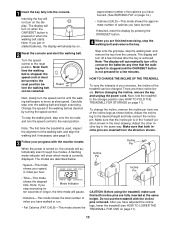
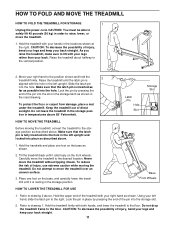
..., lower, or move the treadmill over an uneven surface. 3. Make sure that the latch pin is fully inserted into the hole in the left upright and locked into place as described above . 1. Hold the treadmill firmly with your hands in order to the storage position as described above . HOW TO FOLD AND MOVE THE TREADMILL HOW TO FOLD THE TREADMILL FOR STORAGE 1 Unplug the power cord...
..., lower, or move the treadmill over an uneven surface. 3. Make sure that the latch pin is fully inserted into the hole in the left upright and locked into place as described above . 1. Hold the treadmill firmly with your hands in order to the storage position as described above . HOW TO FOLD AND MOVE THE TREADMILL HOW TO FOLD THE TREADMILL FOR STORAGE 1 Unplug the power cord...
English Manual
Page 12
... follow the steps listed. Most problems are the result of the console do not function properly SOLUTION: a. Carefully remove the hood. To reset the circuit breaker, wait for five minutes and then press the switch back in . Important: The treadmill is aligned with GFCI-equipped outlets. c. d. Check the circuit breaker located on page 8. PROBLEM: The displays of drained batteries. Remove the screws from the console. Locate the Reed Switch (46...
... follow the steps listed. Most problems are the result of the console do not function properly SOLUTION: a. Carefully remove the hood. To reset the circuit breaker, wait for five minutes and then press the switch back in . Important: The treadmill is aligned with GFCI-equipped outlets. c. d. Check the circuit breaker located on page 8. PROBLEM: The displays of drained batteries. Remove the screws from the console. Locate the Reed Switch (46...
English Manual
Page 13
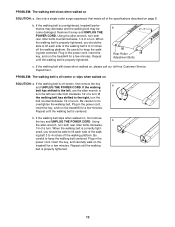
... of a turn . If the walking belt is off -center, first remove the key and UNPLUG THE POWER CORD. Remove the key and UNPLUG THE POWER CORD. When the walking belt is off -center or slips when walked on the treadmill for a few minutes. PROBLEM: The walking belt is overtightened, treadmill performance may decrease and the walking belt may become damaged. When the walking belt is properly tightened. Plug in the power cord, insert the key, and carefully walk on SOLUTION...
... of a turn . If the walking belt is off -center, first remove the key and UNPLUG THE POWER CORD. Remove the key and UNPLUG THE POWER CORD. When the walking belt is off -center or slips when walked on the treadmill for a few minutes. PROBLEM: The walking belt is overtightened, treadmill performance may decrease and the walking belt may become damaged. When the walking belt is properly tightened. Plug in the power cord, insert the key, and carefully walk on SOLUTION...

English Manual
Page 14
... found by using your body uses easily accessible carbohydrate calories for exercise by ten to plan your exercise must exercise at a level between 70% and 85% of your maximum heart rate as you stop exercising.) If your heart rate is known as your training zone. For more oxygen to burn fat, adjust the intensity of your exercise until your heart rate is to exercise with pre-existing health problems. The...
... found by using your body uses easily accessible carbohydrate calories for exercise by ten to plan your exercise must exercise at a level between 70% and 85% of your maximum heart rate as you stop exercising.) If your heart rate is known as your training zone. For more oxygen to burn fat, adjust the intensity of your exercise until your heart rate is to exercise with pre-existing health problems. The...

English Manual
Page 15
...leg in front of your exercise program, do not keep your pulse in your training zone for 20 to 60 minutes. (During the first few months, you and rest it against a wall. Repeat 3 times. ward you may complete up , increase the intensity of your exercise until your pulse is to make exercise a regular and enjoyable part...never bounce. 1. SUGGESTED STRETCHES The correct form for balance, reach back and grasp one leg extended. Move slowly as well. Allow your other , reach forward and place your condition, complete three workouts each leg. Hamstring Stretch Sit with one foot ...
...leg in front of your exercise program, do not keep your pulse in your training zone for 20 to 60 minutes. (During the first few months, you and rest it against a wall. Repeat 3 times. ward you may complete up , increase the intensity of your exercise until your pulse is to make exercise a regular and enjoyable part...never bounce. 1. SUGGESTED STRETCHES The correct form for balance, reach back and grasp one leg extended. Move slowly as well. Allow your other , reach forward and place your condition, complete three workouts each leg. Hamstring Stretch Sit with one foot ...
English Manual
Page 16
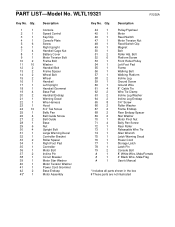
... Endcap Motor Assembly Key No. Bolt Platform Screw Front Roller/Pulley Left Foot Pad Frame Walking Belt Walking Platform Incline Leg Ground Screw Ground Wire 8" Cable Tie Wire Tie Clamp Incline Leg Washer Incline Leg Endcap 3/4" Screw Roller Washer Frame Endcap Rear Endcap Spacer Star Washer Motor Pivot Nut Belly Pan Screw Rear Roller Releasable Wire Tie Allen Wrench Latch Warning Decal Power Cord Storage Latch Latch Pin Console Bolt 8" White Wire, Male/Female 4" Black Wire, Male/Flag User's Manual * Includes all parts shown in the box # These parts are not illustrated PART LIST-Model No...
... Endcap Motor Assembly Key No. Bolt Platform Screw Front Roller/Pulley Left Foot Pad Frame Walking Belt Walking Platform Incline Leg Ground Screw Ground Wire 8" Cable Tie Wire Tie Clamp Incline Leg Washer Incline Leg Endcap 3/4" Screw Roller Washer Frame Endcap Rear Endcap Spacer Star Washer Motor Pivot Nut Belly Pan Screw Rear Roller Releasable Wire Tie Allen Wrench Latch Warning Decal Power Cord Storage Latch Latch Pin Console Bolt 8" White Wire, Male/Female 4" Black Wire, Male/Flag User's Manual * Includes all parts shown in the box # These parts are not illustrated PART LIST-Model No...
English Manual
Page 17
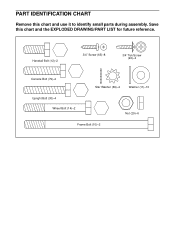
Save this chart and use it to identify small parts during assembly. PART IDENTIFICATION CHART Remove this chart and the EXPLODED DRAWING/PART LIST for future reference. Handrail Bolt (12)-2 3/4" Screw (65)-8 3/4" Tek Screw (24)-4 Console Bolt (79)-2 Star Washer (69)-2 Washer (11)-10 Upright Bolt (30)-4 Wheel Bolt (14)-2 Nut (29)-6 Frame Bolt (10)-2
Save this chart and use it to identify small parts during assembly. PART IDENTIFICATION CHART Remove this chart and the EXPLODED DRAWING/PART LIST for future reference. Handrail Bolt (12)-2 3/4" Screw (65)-8 3/4" Tek Screw (24)-4 Console Bolt (79)-2 Star Washer (69)-2 Washer (11)-10 Upright Bolt (30)-4 Wheel Bolt (14)-2 Nut (29)-6 Frame Bolt (10)-2
English Manual
Page 18
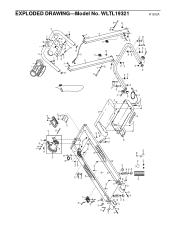
78 77 65 37 75 74 24 51 66 68 58 67 63 64 66 51 9 40 39 47 70 43* 5 35 44 36 3 5 45 26 46 32 27 26 54 48 33 49 53 50 65 52 52 34 33 24 56 52 57 55 72 26 27 68 37 25 24 58 67 63 64 61 73 59 62 60 23 71 31 11 24 30 30 14 15 42 29 76 38 71 41 1 2 16 7 65 7 7 4 21 65 20 12 11 11 11 65 65 79 8 7 20 22 17 12 11 10 11 69 29 19 19 24 24 29 42 15 13 29 28 19 24 6 13 6911 10 18 22 29 29 19 11 24 30 14 R1202A EXPLODED DRAWING-Model No. WLTL19321
78 77 65 37 75 74 24 51 66 68 58 67 63 64 66 51 9 40 39 47 70 43* 5 35 44 36 3 5 45 26 46 32 27 26 54 48 33 49 53 50 65 52 52 34 33 24 56 52 57 55 72 26 27 68 37 25 24 58 67 63 64 61 73 59 62 60 23 71 31 11 24 30 30 14 15 42 29 76 38 71 41 1 2 16 7 65 7 7 4 21 65 20 12 11 11 11 65 65 79 8 7 20 22 17 12 11 10 11 69 29 19 19 24 24 29 42 15 13 29 28 19 24 6 13 6911 10 18 22 29 29 19 11 24 30 14 R1202A EXPLODED DRAWING-Model No. WLTL19321
English Manual
Page 19
... of the product (WESLO® CADENCE C22 treadmill) • The SERIAL NUMBER of the product (see the front cover of this manual) • The KEY NUMBER and DESCRIPTION of the desired part(s) (see the PART LIST and the EXPLODED DRAWING in the center of this manual) WESLO is a registered trademark of merchantability or fitness for a particular purpose is limited in its authorized service centers. All repairs for a period of...
... of the product (WESLO® CADENCE C22 treadmill) • The SERIAL NUMBER of the product (see the front cover of this manual) • The KEY NUMBER and DESCRIPTION of the desired part(s) (see the PART LIST and the EXPLODED DRAWING in the center of this manual) WESLO is a registered trademark of merchantability or fitness for a particular purpose is limited in its authorized service centers. All repairs for a period of...


