
English Manual
Page 2
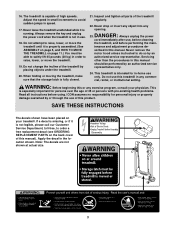
...is being administered. 6. Do not use the treadmill with at all times. 7. Always hold the handrails while using the treadmill. Do not place the treadmill on the walking belt. When connecting the power cord (see your local WESLO dealer or call 1-800-8063651 and order part...IMPORTANT PRECAUTIONS WARNING: To reduce the risk of burns, fire, electric shock, or injury to the control system of the treadmill. Do not wear loose clothing that blocks air openings. Do not put the treadmill in the treadmill. Failure to use a properly functioning surge suppressor could become ...
...is being administered. 6. Do not use the treadmill with at all times. 7. Always hold the handrails while using the treadmill. Do not place the treadmill on the walking belt. When connecting the power cord (see your local WESLO dealer or call 1-800-8063651 and order part...IMPORTANT PRECAUTIONS WARNING: To reduce the risk of burns, fire, electric shock, or injury to the control system of the treadmill. Do not wear loose clothing that blocks air openings. Do not put the treadmill in the treadmill. Failure to use a properly functioning surge suppressor could become ...
English Manual
Page 3
... PARTS on your physician. Do not change the incline of high speeds. Always unplug the power cord immediately after use of Electric Shock •Unplug Treadmill before performing the main- This treadmill is running. ICON assumes no responsibility for in use only. Note: The decals are not shown at actual size. •Hazardous...
... PARTS on your physician. Do not change the incline of high speeds. Always unplug the power cord immediately after use of Electric Shock •Unplug Treadmill before performing the main- This treadmill is running. ICON assumes no responsibility for in use only. Note: The decals are not shown at actual size. •Hazardous...
English Manual
Page 5
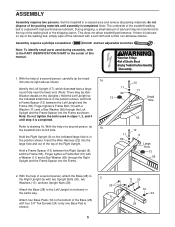
... parts used in the position shown, and hold a Frame Spacer (13) between the Right Upright (6) and the Frame (55). Set the treadmill in the position shown. During shipping, a small amount of lubricant may be transferred to drawing 1b. With the help of a second person,... carefully tip the treadmill onto its left side. do not dispose of Electric Shock •Unplug Treadmill before Assembly /Disassembly. 1. Finger tighten a Frame Bolt (10) with a Washer (11) and a Star Washer (...
... parts used in the position shown, and hold a Frame Spacer (13) between the Right Upright (6) and the Frame (55). Set the treadmill in the position shown. During shipping, a small amount of lubricant may be transferred to drawing 1b. With the help of a second person,... carefully tip the treadmill onto its left side. do not dispose of Electric Shock •Unplug Treadmill before Assembly /Disassembly. 1. Finger tighten a Frame Bolt (10) with a Washer (11) and a Star Washer (...
English Manual
Page 8
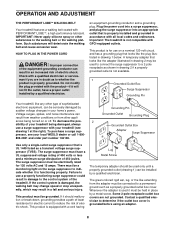
.... Do not modify the plug provided with the product-if it should be electrically rated for use on a nominal 120-volt circuit, and has a grounding plug that is equipped with your local WESLO dealer or call 1-800- 806-3651 and order part number 146148. This product... properly installed and grounded in drawing 2 if a properly grounded outlet is not available. 1 Grounded Outlet Box Surge Suppressor Grounding Pin Your treadmill, like extending from other substances to the walking belt or the walking platform. To decrease the pos- 2 sibility of the equipment-grounding conductor...
.... Do not modify the plug provided with the product-if it should be electrically rated for use on a nominal 120-volt circuit, and has a grounding plug that is equipped with your local WESLO dealer or call 1-800- 806-3651 and order part number 146148. This product... properly installed and grounded in drawing 2 if a properly grounded outlet is not available. 1 Grounded Outlet Box Surge Suppressor Grounding Pin Your treadmill, like extending from other substances to the walking belt or the walking platform. To decrease the pos- 2 sibility of the equipment-grounding conductor...
English Manual
Page 9
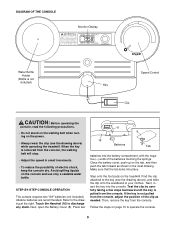
... the tab, and then push the tab forward as needed. Then, remove the key from the console. Close the battery cover, push up on the treadmill. Alkaline batteries are recommended. Follow the steps on page 10 to the key (see the drawing above ), and slide the clip onto the waistband of... electric shock, keep the console dry. STEP-BY-STEP CONSOLE OPERATION The console requires two "AA" batteries (not included). If the key is pulled from the ...
... the tab, and then push the tab forward as needed. Then, remove the key from the console. Close the battery cover, push up on the treadmill. Alkaline batteries are recommended. Follow the steps on page 10 to the key (see the drawing above ), and slide the clip onto the waistband of... electric shock, keep the console dry. STEP-BY-STEP CONSOLE OPERATION The console requires two "AA" batteries (not included). If the key is pulled from the ...


