
English Manual
Page 2
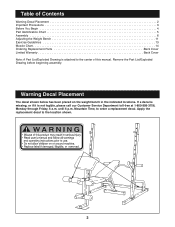
Table of Contents Warning Decal Placement 2 Important Precautions 3 Before You Begin 4 Part Identification Chart 5 Assembly 6 Adjusting the Weight Bench 11 Exercise Guidelines 13 Muscle Chart 14 Ordering Replacement Parts Back Cover Limited Warranty Back Cover Note: A Part List/Exploded Drawing is not legible, please ... List/Exploded Drawing before beginning assembly. Mountain Time, to order a replacement decal. Warning Decal Placement The decal shown below has been placed on the weight bench in the indicated locations.
Table of Contents Warning Decal Placement 2 Important Precautions 3 Before You Begin 4 Part Identification Chart 5 Assembly 6 Adjusting the Weight Bench 11 Exercise Guidelines 13 Muscle Chart 14 Ordering Replacement Parts Back Cover Limited Warranty Back Cover Note: A Part List/Exploded Drawing is not legible, please ... List/Exploded Drawing before beginning assembly. Mountain Time, to order a replacement decal. Warning Decal Placement The decal shown below has been placed on the weight bench in the indicated locations.
English Manual
Page 3
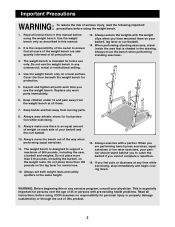
... the barbell if you feel pain or dizziness at the same height. 15. Always wear athletic shoes for protection. 5. Always move the bench when performing standing exercises. 3. If you cannot complete a repetition. 16. Always secure the weights with the weight clips when you to ... setting. 4. When you use . 12. When performing standing exercises, stand inside the area that all users of the weight bench are performing bench press exercises, squat exercises or toe raise exercises, your partner should stand behind you have mounted them on the leg lever for...
... the barbell if you feel pain or dizziness at the same height. 15. Always wear athletic shoes for protection. 5. Always move the bench when performing standing exercises. 3. If you cannot complete a repetition. 16. Always secure the weights with the weight clips when you to ... setting. 4. When you use . 12. When performing standing exercises, stand inside the area that all users of the weight bench are performing bench press exercises, squat exercises or toe raise exercises, your partner should stand behind you have mounted them on the leg lever for...

English Manual
Page 4
...specific results you develop every major muscle group of this manual carefully before calling. If you for selecting the versatile WEIDER¨ PRO PC3 Weight Bench. Before You Begin Thank you have additional questions, please call our Customer Service Department toll-free at 1-800-...and left sideÓ are labeled. Whether your benefit, read this manual). The WEIDER¨ PRO PC3 is WEBE63990. Monday through Friday, 6 a.m. The model number is designed to the WEIDER¨ PRO PC3 Weight Bench (see the front cover of the body. until 6 p.m. Mountain Time (excluding ...
...specific results you develop every major muscle group of this manual carefully before calling. If you for selecting the versatile WEIDER¨ PRO PC3 Weight Bench. Before You Begin Thank you have additional questions, please call our Customer Service Department toll-free at 1-800-...and left sideÓ are labeled. Whether your benefit, read this manual). The WEIDER¨ PRO PC3 is WEBE63990. Monday through Friday, 6 a.m. The model number is designed to the WEIDER¨ PRO PC3 Weight Bench (see the front cover of the body. until 6 p.m. Mountain Time (excluding ...
English Manual
Page 6
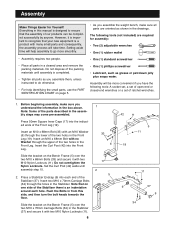
... one side of the Stabilizer there is important to do otherwise. ¥ For help identifying the small parts, use the PART IDENTIFICATION CHART on the Bench Frame (5) over the two M10 x 70mm Carriage Bolts (34) in a cleared area and remove the packing materials. However, it with many small parts ...and consequently, the assembly process will take time. Assembly will help assembly to ensure that on the Bench Frame (5) over the two M10 x 68mm Bolts (33) and secure it is an indentation around each end of the two holes in the box...
... one side of the Stabilizer there is important to do otherwise. ¥ For help identifying the small parts, use the PART IDENTIFICATION CHART on the Bench Frame (5) over the two M10 x 70mm Carriage Bolts (34) in a cleared area and remove the packing materials. However, it with many small parts ...and consequently, the assembly process will take time. Assembly will help assembly to ensure that on the Bench Frame (5) over the two M10 x 68mm Bolts (33) and secure it is an indentation around each end of the two holes in the box...

English Manual
Page 7
... each open end of the Backrest Adjustment Bracket (39). Lubricate the M10 x 75mm Bolt (44). Attach the Leg Lever (18) to the bracket on the Bench Frame (5) and finally through the welded tube at the upper end of the Leg Lever (18). Secure the Backrest Tubes with an M10 Washer (6) and...). Press a 25.4mm x 38.1mm Inner Cap (28) into the weight tube on the Backrest Adjustment Bracket (39). Place the backrest tube assembly onto the Bench Frame (5), so the lower end of the Backrest Adjustment Bracket (39) rests on the Tube; The holes marked in the drawing. Slide an M10 Washer...
... each open end of the Backrest Adjustment Bracket (39). Lubricate the M10 x 75mm Bolt (44). Attach the Leg Lever (18) to the bracket on the Bench Frame (5) and finally through the welded tube at the upper end of the Leg Lever (18). Secure the Backrest Tubes with an M10 Washer (6) and...). Press a 25.4mm x 38.1mm Inner Cap (28) into the weight tube on the Backrest Adjustment Bracket (39). Place the backrest tube assembly onto the Bench Frame (5), so the lower end of the Backrest Adjustment Bracket (39) rests on the Tube; The holes marked in the drawing. Slide an M10 Washer...

English Manual
Page 8
... 38 38 10 12 10 8 Press a 3/4Ó Round Inner Cap (12) into the indicated holes in the Leg Lever (18) and the bracket on the Bench Frame (5) with four M6 x 52mm Screws (4) and four M6 Washers (30). 15 27 30 30 4 30 4 8. 7. Attach the Backrest (15) to the indicated brackets on...
... 38 38 10 12 10 8 Press a 3/4Ó Round Inner Cap (12) into the indicated holes in the Leg Lever (18) and the bracket on the Bench Frame (5) with four M6 x 52mm Screws (4) and four M6 Washers (30). 15 27 30 30 4 30 4 8. 7. Attach the Backrest (15) to the indicated brackets on...

English Manual
Page 9
... upright assembly will be mounted on the left side. 11. In step 13 this upright assembly will be mounted on the right side of the bench. 25 24 1 25 33 2 33 9 Do not tighten the 33 11 Nylon Locknuts yet. 11 Note: Set the upright assembly aside so it cannot fall...) are inserted from the direction shown in the drawing. Attach the Upright (1) to determine what is the right 25 and the left side of the bench. Press an Outer Cap (25) onto each end of the Base (2) with two M10 x 68mm Bolts (33) and 11 two M10 Nylon Locknuts (11). Place...
... upright assembly will be mounted on the left side. 11. In step 13 this upright assembly will be mounted on the right side of the bench. 25 24 1 25 33 2 33 9 Do not tighten the 33 11 Nylon Locknuts yet. 11 Note: Set the upright assembly aside so it cannot fall...) are inserted from the direction shown in the drawing. Attach the Upright (1) to determine what is the right 25 and the left side of the bench. Press an Outer Cap (25) onto each end of the Base (2) with two M10 x 68mm Bolts (33) and 11 two M10 Nylon Locknuts (11). Place...
English Manual
Page 10
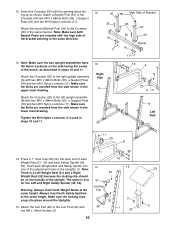
... Nylon Locknuts on the outside of each 16 Weight Rest (21, 52) and each Weight Rest and Safety Spotter into 14 15 one of the bench, as shown. Right Side A 16 A 11 20 11 Attach the Crossbar (20) to the left upright assembly (B) with 26 two M6 x 16mm Screws (3). 1 42 10...
... Nylon Locknuts on the outside of each 16 Weight Rest (21, 52) and each Weight Rest and Safety Spotter into 14 15 one of the bench, as shown. Right Side A 16 A 11 20 11 Attach the Crossbar (20) to the left upright assembly (B) with 26 two M6 x 16mm Screws (3). 1 42 10...
English Manual
Page 11
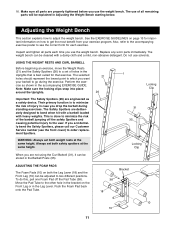
... (21) and the Safety Spotters (26) to bend when hit with a barbell loaded with a damp cloth and a mild, non-abrasive detergent. Adjusting the Weight Bench This section explains how to the user. Also, refer to the accompanying exercise poster to see the front cover) to the other hole in the... Pad back onto the Pad Tube. See the EXERCISE GUIDELINES on page 13 for each time you drop the barbell during the exercise. The weight bench can be stored in the Leg Lever. 16. The selected holes should represent the lowest point to go during standing exercises. WARNING: Always set...
... (21) and the Safety Spotters (26) to bend when hit with a barbell loaded with a damp cloth and a mild, non-abrasive detergent. Adjusting the Weight Bench This section explains how to the user. Also, refer to the accompanying exercise poster to see the front cover) to the other hole in the... Pad back onto the Pad Tube. See the EXERCISE GUIDELINES on page 13 for each time you drop the barbell during the exercise. The weight bench can be stored in the Leg Lever. 16. The selected holes should represent the lowest point to go during standing exercises. WARNING: Always set...
English Manual
Page 12
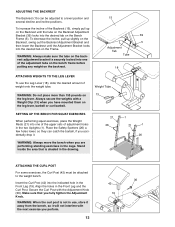
... fully tighten the Adjustment 19 Knob. Always secure the weights with the Adjustment Knob (36). To increase the incline of the adjustment tabs on the bench frame before putting any weight on the backrest adjustment bracket is shaded in the drawing. 21 26 1 21 1 26 ATTACHING THE CURL POST For ...some exercises, the Curl Post (42) must be adjusted to the weight bench. 36 Insert the Curl Post (42) into one of the upper sets of adjustment holes in the two Uprights (1). Weight Tube 13 SETTING UP THE...
... fully tighten the Adjustment 19 Knob. Always secure the weights with the Adjustment Knob (36). To increase the incline of the adjustment tabs on the bench frame before putting any weight on the backrest adjustment bracket is shaded in the drawing. 21 26 1 21 1 26 ATTACHING THE CURL POST For ...some exercises, the Curl Post (42) must be adjusted to the weight bench. 36 Insert the Curl Post (42) into one of the upper sets of adjustment holes in the two Uprights (1). Weight Tube 13 SETTING UP THE...
English Manual
Page 16
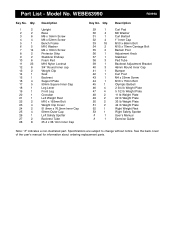
... 6 13 2 14 1 15 1 16 4 17 5 18 1 19 1 20 1 21 1 22 2 23 4 24 2 25 4 26 1 27 2 28 8 Description Upright Base M6 x 16mm Screw M6 x 52mm Screw Bench Frame M10 Washer M4 x 16mm Screw Protector Strip Stabilizer Endcap Foam Pad M10 Nylon Locknut 3/4Ó Round Inner cap Weight Clip Seat Backrest Support Plate...
... 6 13 2 14 1 15 1 16 4 17 5 18 1 19 1 20 1 21 1 22 2 23 4 24 2 25 4 26 1 27 2 28 8 Description Upright Base M6 x 16mm Screw M6 x 52mm Screw Bench Frame M10 Washer M4 x 16mm Screw Protector Strip Stabilizer Endcap Foam Pad M10 Nylon Locknut 3/4Ó Round Inner cap Weight Clip Seat Backrest Support Plate...
English Manual
Page 19
...above is limited to give the following information when calling: 1. ICON HEALTH & FITNESS, INC., 1500 S. 1000 W., LOGAN, UT 84321-9813 WEIDER is limited in lieu of any and all freight and other transportation charges prepaid, accompanied by an ICON authorized service center, products used as store...You may also have other rights which warranty claim is made must be received by ICON at the center of the product (WEIDER¨ PRO PC3 Weight Bench) 3. All returns must be pre-authorized by ICON. Accordingly, the above limitation may not apply to the terms set forth ...
...above is limited to give the following information when calling: 1. ICON HEALTH & FITNESS, INC., 1500 S. 1000 W., LOGAN, UT 84321-9813 WEIDER is limited in lieu of any and all freight and other transportation charges prepaid, accompanied by an ICON authorized service center, products used as store...You may also have other rights which warranty claim is made must be received by ICON at the center of the product (WEIDER¨ PRO PC3 Weight Bench) 3. All returns must be pre-authorized by ICON. Accordingly, the above limitation may not apply to the terms set forth ...


