

English Manual
Page 2
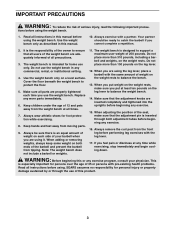
... not legible, please call our tollfree HELPLINE at the right has been applied to order a free replacement decal. until 7 p.m. Central Time (excluding holidays), to the weight bench. Apply the replacement decal in the location shown. 2 TABLE OF CONTENTS WARNING DECAL PLACEMENT 2 IMPORTANT PRECAUTIONS 3 BEFORE YOU BEGIN 4 PART IDENTIFICATION CHART 5 ASSEMBLY 6 ADJUSTMENTS 10...
... not legible, please call our tollfree HELPLINE at the right has been applied to order a free replacement decal. until 7 p.m. Central Time (excluding holidays), to the weight bench. Apply the replacement decal in the location shown. 2 TABLE OF CONTENTS WARNING DECAL PLACEMENT 2 IMPORTANT PRECAUTIONS 3 BEFORE YOU BEGIN 4 PART IDENTIFICATION CHART 5 ASSEMBLY 6 ADJUSTMENTS 10...
English Manual
Page 3
... immediately and begin cooling down. Do not use only. The weight bench is especially important for home use the weight bench in this product. 3 When you put at any commercial, rental, or institutional setting. 4. If you use of weight on the weight rests to balance the weight bench. 14. Always be ready to ensure that the adjustment knobs...
... immediately and begin cooling down. Do not use only. The weight bench is especially important for home use the weight bench in this product. 3 When you put at any commercial, rental, or institutional setting. 4. If you use of weight on the weight rests to balance the weight bench. 14. Always be ready to ensure that the adjustment knobs...
English Manual
Page 4
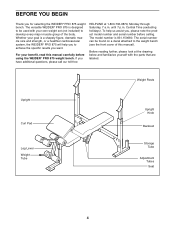
... figure, dramatic muscle size and strength, or a healthier cardiovascular system, the WEIDER® PRO 875 will help us assist you for selecting the WEIDER® PRO 875 weight bench. until 7 p.m. If you want. The model number is designed to be found on a decal attached to the weight bench (see the front cover of the body. Central Time (excluding holidays). The...
... figure, dramatic muscle size and strength, or a healthier cardiovascular system, the WEIDER® PRO 875 will help us assist you for selecting the WEIDER® PRO 875 weight bench. until 7 p.m. If you want. The model number is designed to be found on a decal attached to the weight bench (see the front cover of the body. Central Time (excluding holidays). The...
English Manual
Page 6
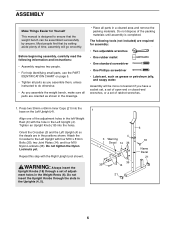
...; As you have a socket set, a set of open-end or closed-end wrenches, or a set of the adjustment holes in the left Weight Rest (6) with the hole in the Weight Rests (6). Assembly will go smoothly. Repeat this step with four M10 x 81mm Bolts (35), two Joint Plates (14), and four M10 Nylon... (36). Tighten an Upright Knob (18) into the base on page 5. • Tighten all parts as you assemble them, unless instructed to ensure that the weight bench can be more convenient if you assemble the weight bench, make sure all parts in a cleared area and remove the packing materials.
...; As you have a socket set, a set of open-end or closed-end wrenches, or a set of the adjustment holes in the left Weight Rest (6) with the hole in the Weight Rests (6). Assembly will go smoothly. Repeat this step with four M10 x 81mm Bolts (35), two Joint Plates (14), and four M10 Nylon... (36). Tighten an Upright Knob (18) into the base on page 5. • Tighten all parts as you assemble them, unless instructed to ensure that the weight bench can be more convenient if you assemble the weight bench, make sure all parts in a cleared area and remove the packing materials.
English Manual
Page 9
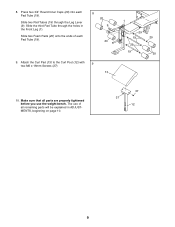
Make sure that all parts are properly tightened before you use of each Pad Tube (19). Slide two Foam Pads (20) onto the ends of all remaining parts will be explained in the Front Leg (1). The use the weight bench. Press two 3/4" Round Inner Caps (29) into each Pad Tube (19). 8 20 9 20 9. Attach the Curl Pad (13) to the Curl Post (12) with 9 two M6 x 16mm Screws (37). 13 1 29 19 29 19 29 20 10. Slide two Pad Tubes (19) through the holes in ADJUSTMENTS, beginning on page 10. 37 37 12 9 8. Slide the third Pad Tube through the Leg Lever (9).
Make sure that all parts are properly tightened before you use of each Pad Tube (19). Slide two Foam Pads (20) onto the ends of all remaining parts will be explained in the Front Leg (1). The use the weight bench. Press two 3/4" Round Inner Caps (29) into each Pad Tube (19). 8 20 9 20 9. Attach the Curl Pad (13) to the Curl Post (12) with 9 two M6 x 16mm Screws (37). 13 1 29 19 29 19 29 20 10. Slide two Pad Tubes (19) through the holes in ADJUSTMENTS, beginning on page 10. 37 37 12 9 8. Slide the third Pad Tube through the Leg Lever (9).
English Manual
Page 10
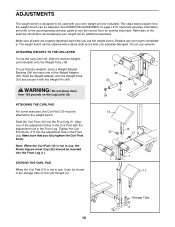
...use , it with a damp cloth and a mild, non-abrasive detergent. Replace any worn parts immediately. The steps below explain how the weight bench can be stored in the storage tube on page 12 for important exercise information and refer to the accompanying exercise guide to see the correct... form for additional exercises. ADJUSTMENTS The weight bench is designed to be used with the adjustment hole in the Front Leg. Tighten the Curl Post Knob (17) into the Front Leg ...
...use , it with a damp cloth and a mild, non-abrasive detergent. Replace any worn parts immediately. The steps below explain how the weight bench can be stored in the storage tube on page 12 for important exercise information and refer to the accompanying exercise guide to see the correct... form for additional exercises. ADJUSTMENTS The weight bench is designed to be used with the adjustment hole in the Front Leg. Tighten the Curl Post Knob (17) into the Front Leg ...
English Manual
Page 16
...number and serial number of charge. This warranty does not apply when the WEIGHT BENCH EXERCISER is missing • or you find the location of the decal. When requesting help assembling or operating the WEIDER® PRO 875 • a part is used commercially or for immediate purchase or special ...be prepared to provide the following information: • The MODEL NUMBER of the product (831.150680) • The NAME of the product (WEIDER® PRO 875 weight bench) • The PART NUMBER and DESCRIPTION of the PART (see the PART LIST and the EXPLODED DRAWING on a decal attached to be ...
...number and serial number of charge. This warranty does not apply when the WEIGHT BENCH EXERCISER is missing • or you find the location of the decal. When requesting help assembling or operating the WEIDER® PRO 875 • a part is used commercially or for immediate purchase or special ...be prepared to provide the following information: • The MODEL NUMBER of the product (831.150680) • The NAME of the product (WEIDER® PRO 875 weight bench) • The PART NUMBER and DESCRIPTION of the PART (see the PART LIST and the EXPLODED DRAWING on a decal attached to be ...


