
English Manual
Page 1
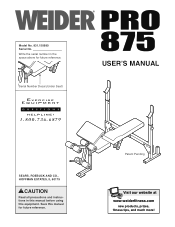
Model No. 831.150680 Serial No. Serial Number Decal (Under Seat) USER'S MANUAL SEARS, ROEBUCK AND CO., HOFFMAN ESTATES, IL 60179 CAUTION Read all precautions and instructions in the space above for future reference. Write the serial number in this manual before using this manual for future reference. Patent Pending Visit our website at www.weiderfitness.com new products, prizes, fitness tips, and much more! Save this equipment.
Model No. 831.150680 Serial No. Serial Number Decal (Under Seat) USER'S MANUAL SEARS, ROEBUCK AND CO., HOFFMAN ESTATES, IL 60179 CAUTION Read all precautions and instructions in the space above for future reference. Write the serial number in this manual before using this manual for future reference. Patent Pending Visit our website at www.weiderfitness.com new products, prizes, fitness tips, and much more! Save this equipment.

English Manual
Page 2
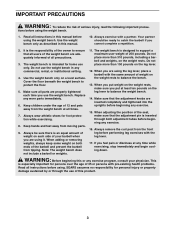
Central Time (excluding holidays), to the weight bench. Apply the replacement decal in the location shown. 2 TABLE OF CONTENTS WARNING DECAL PLACEMENT 2 IMPORTANT PRECAUTIONS 3 BEFORE YOU BEGIN 4 PART IDENTIFICATION CHART 5 ASSEMBLY 6 ADJUSTMENTS 10 EXERCISE GUIDELINES 12 PART LIST 14 EXPLODED DRAWING 15 ORDERING REPLACEMENT PARTS Back Cover FULL 90 DAY WARRANTY Back Cover WARNING DECAL PLACEMENT The decal shown at 1-800-736-6879, Monday through Saturday, 7 a.m. If...
Central Time (excluding holidays), to the weight bench. Apply the replacement decal in the location shown. 2 TABLE OF CONTENTS WARNING DECAL PLACEMENT 2 IMPORTANT PRECAUTIONS 3 BEFORE YOU BEGIN 4 PART IDENTIFICATION CHART 5 ASSEMBLY 6 ADJUSTMENTS 10 EXERCISE GUIDELINES 12 PART LIST 14 EXPLODED DRAWING 15 ORDERING REPLACEMENT PARTS Back Cover FULL 90 DAY WARRANTY Back Cover WARNING DECAL PLACEMENT The decal shown at 1-800-736-6879, Monday through Saturday, 7 a.m. If...
English Manual
Page 3
... amount of weight on the weight rests to support a maximum user weight of weight on the leg lever. 12. Make sure that all users of the weight bench are properly tightened each side of the owner to balance the weight bench. 14. When adjusting the position of all instructions before beginning any exercise program, consult your barbell when you cannot complete a repetition. 2. WARNING: Before beginning this manual. 10. SEARS assumes...
... amount of weight on the weight rests to support a maximum user weight of weight on the leg lever. 12. Make sure that all users of the weight bench are properly tightened each side of the owner to balance the weight bench. 14. When adjusting the position of all instructions before beginning any exercise program, consult your barbell when you cannot complete a repetition. 2. WARNING: Before beginning this manual. 10. SEARS assumes...
English Manual
Page 4
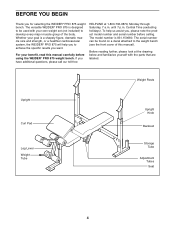
... Leg Lever Weight Tube Upright Knob Backrest Storage Tube Adjustment Tubes Seat 4 The model number is designed to be found on a decal attached to achieve the specific results you to the weight bench (see the front cover of the body. For your goal is a shapely figure, dramatic muscle size and strength, or a healthier cardiovascular system, the WEIDER® PRO 875 will help us assist you for selecting the WEIDER® PRO 875 weight bench...
... Leg Lever Weight Tube Upright Knob Backrest Storage Tube Adjustment Tubes Seat 4 The model number is designed to be found on a decal attached to achieve the specific results you to the weight bench (see the front cover of the body. For your goal is a shapely figure, dramatic muscle size and strength, or a healthier cardiovascular system, the WEIDER® PRO 875 will help us assist you for selecting the WEIDER® PRO 875 weight bench...
English Manual
Page 5
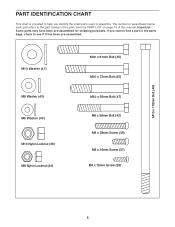
... Screw (38) 5 The number in parenthesis below each part refers to see if it has been pre-assembled. If you identify the small parts used in assembly. PART IDENTIFICATION CHART This chart is provided to help you cannot find a part in the parts bags, check to the part number of the part, from the PART LIST on page 14 of this manual. Important: Some parts may have been pre-assembled...
... Screw (38) 5 The number in parenthesis below each part refers to see if it has been pre-assembled. If you identify the small parts used in assembly. PART IDENTIFICATION CHART This chart is provided to help you cannot find a part in the parts bags, check to the part number of the part, from the PART LIST on page 14 of this manual. Important: Some parts may have been pre-assembled...
English Manual
Page 6
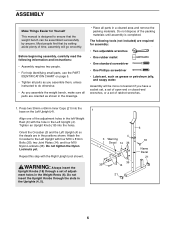
...; Tighten all parts as you assemble them, unless instructed to ensure that by anyone. Orient the Crossbar (3) and the Left Upright (4) so the decals are oriented as grease or petroleum jelly, and soapy water. Do not insert the Upright Knobs through a set of adjustment holes in a cleared area and remove the packing materials. Assembly will be assembled successfully by setting aside plenty of the adjustment...
...; Tighten all parts as you assemble them, unless instructed to ensure that by anyone. Orient the Crossbar (3) and the Left Upright (4) so the decals are oriented as grease or petroleum jelly, and soapy water. Do not insert the Upright Knobs through a set of adjustment holes in a cleared area and remove the packing materials. Assembly will be assembled successfully by setting aside plenty of the adjustment...
English Manual
Page 7
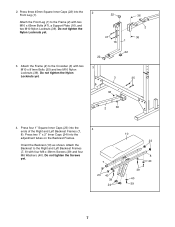
... Frames (7, 8). Do not tighten the Screws yet. 7 23 40 39 24 10 23 8 40 39 40 39 7 Do not tighten the Nylon Locknuts yet. 22 47 16 1 36 2 36 3. Attach the Front Leg (1) to the Right and Left Backrest Frames (7, 8) with four M6 x 38mm Screws (39) and four M6 ... not tighten the Nylon Locknuts yet. 22 3 22 3 35 36 2 36 4. Attach the Backrest to the Frame (2) with two M10 x 81mm Bolts (35) and two M10 Nylon Locknuts (36). Attach the Frame (2) to the Crossbar (3) with two M10 x 65mm Bolts (47), a Support Plate (16), and two M10 Nylon Locknuts (36). Press four...
... Frames (7, 8). Do not tighten the Screws yet. 7 23 40 39 24 10 23 8 40 39 40 39 7 Do not tighten the Nylon Locknuts yet. 22 47 16 1 36 2 36 3. Attach the Front Leg (1) to the Right and Left Backrest Frames (7, 8) with four M6 x 38mm Screws (39) and four M6 ... not tighten the Nylon Locknuts yet. 22 3 22 3 35 36 2 36 4. Attach the Backrest to the Frame (2) with two M10 x 81mm Bolts (35) and two M10 Nylon Locknuts (36). Attach the Frame (2) to the Crossbar (3) with two M10 x 65mm Bolts (47), a Support Plate (16), and two M10 Nylon Locknuts (36). Press four...

English Manual
Page 8
...the Backrest Pin (26) through the Frame and the Backrest Frames, and secure it with the wide end on the side shown. Press the 1" Angled Cap (28) onto the back of the Weight Tube (15). the Leg Lever must be able to the Frame (2) with four M6 x 16mm Screws (37... 11 Wide End 45 Lubricate 1 2 37 37 8 Attach the Seat to pivot easily. 7. Tighten all of the M10 Nylon Locknuts (36) used in steps 1-3. Tighten the four M6 x 38mm Screws (39) used in step 4. 5 Lubricate 46 41 7 26 8 41 36 2 25 6. Attach the Weight Tube (15) to the Frame (2) with the M8 x 58mm Bolt (42), two M8 ...
...the Backrest Pin (26) through the Frame and the Backrest Frames, and secure it with the wide end on the side shown. Press the 1" Angled Cap (28) onto the back of the Weight Tube (15). the Leg Lever must be able to the Frame (2) with four M6 x 16mm Screws (37... 11 Wide End 45 Lubricate 1 2 37 37 8 Attach the Seat to pivot easily. 7. Tighten all of the M10 Nylon Locknuts (36) used in steps 1-3. Tighten the four M6 x 38mm Screws (39) used in step 4. 5 Lubricate 46 41 7 26 8 41 36 2 25 6. Attach the Weight Tube (15) to the Frame (2) with the M8 x 58mm Bolt (42), two M8 ...
English Manual
Page 9
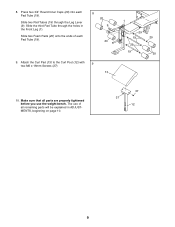
8. Slide two Pad Tubes (19) through the holes in ADJUSTMENTS, beginning on page 10. 37 37 12 9 Make sure that all remaining parts will be explained in the Front Leg (1). The use the weight bench. Slide two Foam Pads (20) onto the ends of all parts are properly tightened before you use of each Pad Tube (19). Slide the third Pad Tube through the Leg Lever (9). Attach the Curl Pad (13) to the Curl Post (12) with 9 two M6 x 16mm Screws (37). 13 1 29 19 29 19 29 20 10. Press two 3/4" Round Inner Caps (29) into each Pad Tube (19). 8 20 9 20 9.
8. Slide two Pad Tubes (19) through the holes in ADJUSTMENTS, beginning on page 10. 37 37 12 9 Make sure that all remaining parts will be explained in the Front Leg (1). The use the weight bench. Slide two Foam Pads (20) onto the ends of all parts are properly tightened before you use of each Pad Tube (19). Slide the third Pad Tube through the Leg Lever (9). Attach the Curl Pad (13) to the Curl Post (12) with 9 two M6 x 16mm Screws (37). 13 1 29 19 29 19 29 20 10. Press two 3/4" Round Inner Caps (29) into each Pad Tube (19). 8 20 9 20 9.
English Manual
Page 10
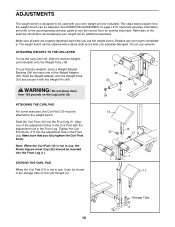
... be cleaned with your weight set (not included). Tighten the Curl Post Knob (17) into the Front Leg (1). STORING THE CURL PAD When the Curl Pad (13) is not in use Olympic weights, press a Weight Adapter Bushing (34) into the Front Leg (1). ATTACHING WEIGHTS TO THE LEG LEVER To use solvents. ADJUSTMENTS The weight bench is designed to the exercise information accompanying your own weight set for additional exercises. Slide the Curl Post...
... be cleaned with your weight set (not included). Tighten the Curl Post Knob (17) into the Front Leg (1). STORING THE CURL PAD When the Curl Pad (13) is not in use Olympic weights, press a Weight Adapter Bushing (34) into the Front Leg (1). ATTACHING WEIGHTS TO THE LEG LEVER To use solvents. ADJUSTMENTS The weight bench is designed to the exercise information accompanying your own weight set for additional exercises. Slide the Curl Post...
English Manual
Page 11
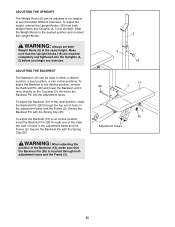
... one of the lower two sets of the Backrest (10), make sure that the Upright Knobs (18) are inserted completely and tightened into the adjustment tubes. Re-insert the Backrest Pin into the Uprights (4, 5) before you begin any exercise. To adjust the height, remove the Upright Knobs (18) from both Weight Rests (6) at the same height. ADJUSTING THE UPRIGHTS The Weight Rests (6) can be adjusted to six heights...
... one of the lower two sets of the Backrest (10), make sure that the Upright Knobs (18) are inserted completely and tightened into the adjustment tubes. Re-insert the Backrest Pin into the Uprights (4, 5) before you begin any exercise. To adjust the height, remove the Upright Knobs (18) from both Weight Rests (6) at the same height. ADJUSTING THE UPRIGHTS The Weight Rests (6) can be adjusted to six heights...
English Manual
Page 12
... of your exercise program. It is important to warm up prepares your body for each set " is right for you , stick with 3 sets of weight for more strenuous exercise by using high amounts of each exercise you will reshape and strengthen your body, and develop your limits and select the amount of weight. Find out what is important. Cross Training Cross training is an essential part of...
... of your exercise program. It is important to warm up prepares your body for each set " is right for you , stick with 3 sets of weight for more strenuous exercise by using high amounts of each exercise you will reshape and strengthen your body, and develop your limits and select the amount of weight. Find out what is important. Cross Training Cross training is an essential part of...
English Manual
Page 13
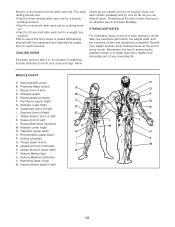
.... Include stretches for both your weight and key body measurements at the end of each set for a weight loss workout. STAYING MOTIVATED For motivation, keep a record of each exercise. Pectoralis Major (chest) AA C. Biceps (front of...set for a muscle building workout. • Rest for one minute after each set. List the date, the exercises performed, the weight used, and the numbers of calf) F F LL L. Remember, the key to achieving the greatest results is an effective way to make exercise a regular and enjoyable part of arm) JJ R. Soleus (front of sets...
.... Include stretches for both your weight and key body measurements at the end of each set for a weight loss workout. STAYING MOTIVATED For motivation, keep a record of each exercise. Pectoralis Major (chest) AA C. Biceps (front of...set for a muscle building workout. • Rest for one minute after each set. List the date, the exercises performed, the weight used, and the numbers of calf) F F LL L. Remember, the key to achieving the greatest results is an effective way to make exercise a regular and enjoyable part of arm) JJ R. Soleus (front of sets...

English Manual
Page 14
... 1 Weight Adapter 34 2 Weight Adapter Bushing 35 10 M10 x 81mm Bolt 36 14 M10 Nylon Locknut 37 6 M6 x 16mm Screw 38 4 M4 x 16mm Screw 39 4 M6 x 38mm Screw 40 4 M6 Washer 41 2 M10 Washer 42 1 M8 x 58mm Bolt 43 2 M8 Washer 44 1 M8 Nylon Locknut 45 1 M10 x 72mm Bolt 46 1 M10 x 178mm Bolt 47 2 M10 x 65mm Bolt 48 1 Weight Pin # 1 User's Manual # 1 Exercise Guide "#" Indicates a non-illustrated part. Specifications are...
... 1 Weight Adapter 34 2 Weight Adapter Bushing 35 10 M10 x 81mm Bolt 36 14 M10 Nylon Locknut 37 6 M6 x 16mm Screw 38 4 M4 x 16mm Screw 39 4 M6 x 38mm Screw 40 4 M6 Washer 41 2 M10 Washer 42 1 M8 x 58mm Bolt 43 2 M8 Washer 44 1 M8 Nylon Locknut 45 1 M10 x 72mm Bolt 46 1 M10 x 178mm Bolt 47 2 M10 x 65mm Bolt 48 1 Weight Pin # 1 User's Manual # 1 Exercise Guide "#" Indicates a non-illustrated part. Specifications are...
English Manual
Page 15
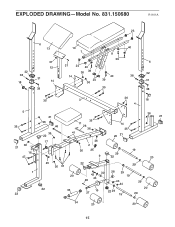
EXPLODED DRAWING-Model No. 831.150680 R1101A 23 6 13 10 7 40 8 39 37 6 12 37 23 40 32 38 31 18 14 36 39 14 40 24 39 36 32 38 31 38 35 38 5 35 36 21 16 47 1 22 35 3 36 18 4 21 36 46 36 22 17 35 11 26 36 41 36 2 36 25 9 14 35 20 21 19 29 22 36 21 20 45 22 36 37 29 20 42 30 28 29 19 43 48 43 29 44 22 20 33 15 27 22 29 19 29 34 20 20 15
EXPLODED DRAWING-Model No. 831.150680 R1101A 23 6 13 10 7 40 8 39 37 6 12 37 23 40 32 38 31 18 14 36 39 14 40 24 39 36 32 38 31 38 35 38 5 35 36 21 16 47 1 22 35 3 36 18 4 21 36 46 36 22 17 35 11 26 36 41 36 2 36 25 9 14 35 20 21 19 29 22 36 21 20 45 22 36 37 29 20 42 30 28 29 19 43 48 43 29 44 22 20 33 15 27 22 29 19 29 34 20 20 15
English Manual
Page 16
...) The model number and serial number of the decal. This warranty gives you specific legal rights, and you visit your WEIDER® PRO 875 are available for rental purposes. If you find the location of your nearest SEARS Service Center. All replacement parts are listed on pages 14 and 15 of this SEARS WEIGHT BENCH EXERCISER, contact the nearest SEARS Service Center throughout the United States and SEARS will repair or replace the WEIGHT BENCH EXERCISER, free of...
...) The model number and serial number of the decal. This warranty gives you specific legal rights, and you visit your WEIDER® PRO 875 are available for rental purposes. If you find the location of your nearest SEARS Service Center. All replacement parts are listed on pages 14 and 15 of this SEARS WEIGHT BENCH EXERCISER, contact the nearest SEARS Service Center throughout the United States and SEARS will repair or replace the WEIGHT BENCH EXERCISER, free of...


