

English Manual
Page 2
.... SEARS, ROEBUCK AND CO., DEPT. 817WA, HOFFMAN ESTATES, IL 60179 2 TABLE OF CONTENTS FULL 90 DAY WARRANTY 2 IMPORTANT PRECAUTIONS 3 BEFORE YOU BEGIN 4 ASSEMBLY 5 ADJUSTING THE WEIDER PRO 635 12 EXERCISE GUIDELINES 14 PART LIST 18 EXPLODED DRAWING 19 ORDERING REPLACEMENT PARTS Back Cover Note: A PART IDENTIFICATION CHART is used commercially or for rental purposes.
.... SEARS, ROEBUCK AND CO., DEPT. 817WA, HOFFMAN ESTATES, IL 60179 2 TABLE OF CONTENTS FULL 90 DAY WARRANTY 2 IMPORTANT PRECAUTIONS 3 BEFORE YOU BEGIN 4 ASSEMBLY 5 ADJUSTING THE WEIDER PRO 635 12 EXERCISE GUIDELINES 14 PART LIST 18 EXPLODED DRAWING 19 ORDERING REPLACEMENT PARTS Back Cover Note: A PART IDENTIFICATION CHART is used commercially or for rental purposes.

English Manual
Page 3
..., on the leg lever. 11. When using the backrest, make sure that all users of the weight bench are adequately informed of all parts each side of your physician. WARNING: Before beginning this manual before using the weight bench. 2. IMPORTANT PRECAUTIONS WARNING: To reduce the risk ... weight carriage, be sure there is fully inserted through the use only. Keep hands and feet away from the weight bench at any worn parts immediately. 5. This is intended for persons over the age of this manual. 3. The weight bench is especially important for home use of...
..., on the leg lever. 11. When using the backrest, make sure that all users of the weight bench are adequately informed of all parts each side of your physician. WARNING: Before beginning this manual before using the weight bench. 2. IMPORTANT PRECAUTIONS WARNING: To reduce the risk ... weight carriage, be sure there is fully inserted through the use only. Keep hands and feet away from the weight bench at any worn parts immediately. 5. This is intended for persons over the age of this manual. 3. The weight bench is especially important for home use of...

English Manual
Page 4
... Tube 4 If you , please note the product model number and serial number before using the WEIDER® PRO 635 Weight Bench. until 7 p.m. The serial number can be used with the parts that are labeled. To help you to the PRO 635 Weight Bench (see the front cover of the body. The model number is designed to...
... Tube 4 If you , please note the product model number and serial number before using the WEIDER® PRO 635 Weight Bench. until 7 p.m. The serial number can be used with the parts that are labeled. To help you to the PRO 635 Weight Bench (see the front cover of the body. The model number is designed to...
English Manual
Page 5
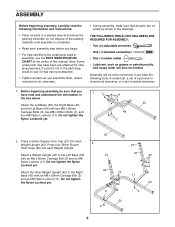
...them, unless instructed to do otherwise. • During assembly, make sure that you begin. • For help identifying the small parts used in assembly, use the PART IDENTIFICATION CHART at the center of ratchet wrenches. 1. Press four 25mm Round 2 Inner Caps (23) into each Weight Upright (42).... (48) with an M8 x 60mm Carriage Bolt (3) and an M8 Nylon Locknut (11). Note: Some small parts may have the following information and instructions: • Place all parts are oriented as shown in the drawings. Press a 50mm Square Inner Cap (21) into each assembly step before you...
...them, unless instructed to do otherwise. • During assembly, make sure that you begin. • For help identifying the small parts used in assembly, use the PART IDENTIFICATION CHART at the center of ratchet wrenches. 1. Press four 25mm Round 2 Inner Caps (23) into each Weight Upright (42).... (48) with an M8 x 60mm Carriage Bolt (3) and an M8 Nylon Locknut (11). Note: Some small parts may have the following information and instructions: • Place all parts are oriented as shown in the drawings. Press a 50mm Square Inner Cap (21) into each assembly step before you...

English Manual
Page 11
Wet the ends of the Lat Bar (31) with soapy water. 18 Slide a Handgrip (18) onto each end of the Adjustment Weight Rests (54). Be sure that all remaining parts will be explained in ADJUSTING THE WEIDER PRO 635 beginning on page 12 of this manual. 11 Press 25mm Round Inner Caps (23) into each end of all parts have been tightened properly. Press an Adapter Insert (57) into the ends of the Olympic Adapter (58). 57 58 18 31 23 18 23 54 19. 18. CAUTION: Allow the Handgrips to dry before using them. The use of the Lat Bar.
Wet the ends of the Lat Bar (31) with soapy water. 18 Slide a Handgrip (18) onto each end of the Adjustment Weight Rests (54). Be sure that all remaining parts will be explained in ADJUSTING THE WEIDER PRO 635 beginning on page 12 of this manual. 11 Press 25mm Round Inner Caps (23) into each end of all parts have been tightened properly. Press an Adapter Insert (57) into the ends of the Olympic Adapter (58). 57 58 18 31 23 18 23 54 19. 18. CAUTION: Allow the Handgrips to dry before using them. The use of the Lat Bar.

English Manual
Page 12
Inspect and tighten all parts each side of the weight tube. Weight Do not place more than 50 pounds on the Weight Carriage while performing ab crunch exercises.) Weight 19 ... the Backrest to see the correct form for additional exercises. ADJUSTING THE WEIDER PRO 635 The weight bench is on each time you are using olympic weights, slide the Olympic Adapter (58) onto the Leg Lever (28) before sliding any worn parts immediately. The steps below explain how the weight bench can be cleaned...
Inspect and tighten all parts each side of the weight tube. Weight Do not place more than 50 pounds on the Weight Carriage while performing ab crunch exercises.) Weight 19 ... the Backrest to see the correct form for additional exercises. ADJUSTING THE WEIDER PRO 635 The weight bench is on each time you are using olympic weights, slide the Olympic Adapter (58) onto the Leg Lever (28) before sliding any worn parts immediately. The steps below explain how the weight bench can be cleaned...

English Manual
Page 14
... schedule that is right for each set . To give your body time to regenerate. Rest for 3 minutes after each exercise, and moving only the appropriate parts of the body. A description of each exercise is a series of repetitions performed consecutively.) The proper amount of weight for each set . Remember that you to...
... schedule that is right for each set . To give your body time to regenerate. Rest for 3 minutes after each exercise, and moving only the appropriate parts of the body. A description of each exercise is a series of repetitions performed consecutively.) The proper amount of weight for each set . Remember that you to...

English Manual
Page 15
Move slowly as you can be photocopied and used to make exercise a regular and enjoyable part of each exercise. List the date, exercises performed, weight, and numbers of this manual can without strain. doing a weight loss workout. Include stretches for both ...
Move slowly as you can be photocopied and used to make exercise a regular and enjoyable part of each exercise. List the date, exercises performed, weight, and numbers of this manual can without strain. doing a weight loss workout. Include stretches for both ...

English Manual
Page 18
... Weight Carriage 57 2 128739 Adapter Insert 58 1 132888 Olympic Adapter # 1 132486 User's Manual # 1 131065 Exercise Poster Note: "#" indicates a non-illustrated part. Not used 14 4 019020 14mm x 15mm Spacer 15 20 014172 M8 Washer 16 4 130286 M10 Washer 17 1 014033 M6 Washer 18 2 119702 Handgrip 19...Foam Pad 27 4 132685 20mm x 40mm Inner Cap 28 1 132659 Leg Lever 29 1 123396 Angled Round Cap 30 4 132688 Spring Clip Cover Key Part No. Not used 9 2 013431 M6 x 16mm Screw 10 4 132658 M6 x 50mm Screw 11 25 012042 M8 Nylon Locknut 12 6 012077 M10 ...
... Weight Carriage 57 2 128739 Adapter Insert 58 1 132888 Olympic Adapter # 1 132486 User's Manual # 1 131065 Exercise Poster Note: "#" indicates a non-illustrated part. Not used 14 4 019020 14mm x 15mm Spacer 15 20 014172 M8 Washer 16 4 130286 M10 Washer 17 1 014033 M6 Washer 18 2 119702 Handgrip 19...Foam Pad 27 4 132685 20mm x 40mm Inner Cap 28 1 132659 Leg Lever 29 1 123396 Angled Round Cap 30 4 132688 Spring Clip Cover Key Part No. Not used 9 2 013431 M6 x 16mm Screw 10 4 132658 M6 x 50mm Screw 11 25 012042 M8 Nylon Locknut 12 6 012077 M10 ...

English Manual
Page 22
...on pages 18 and 19 of your nearest SEARS Service Center. When requesting help assembling or operating the WEIDER® PRO 635 • a part is missing • or you visit your WEIDER® PRO 635 are available for immediate purchase or special order when you need to be prepared to provide the following... information: • The MODEL NUMBER of the product (831.150390). • The NAME of the product (WEIDER® PRO 635 Weight Bench). • The PART NUMBER of the PART (see the PART LIST and the EXPLODED DRAWING on pages 18 and 19 of this manual). • The DESCRIPTION of the...
...on pages 18 and 19 of your nearest SEARS Service Center. When requesting help assembling or operating the WEIDER® PRO 635 • a part is missing • or you visit your WEIDER® PRO 635 are available for immediate purchase or special order when you need to be prepared to provide the following... information: • The MODEL NUMBER of the product (831.150390). • The NAME of the product (WEIDER® PRO 635 Weight Bench). • The PART NUMBER of the PART (see the PART LIST and the EXPLODED DRAWING on pages 18 and 19 of this manual). • The DESCRIPTION of the...


