
English Manual
Page 2
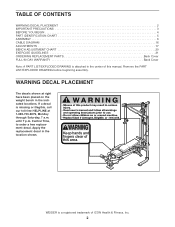
If a decal is missing or illegible, call our toll-free HELPLINE at right have been placed on the weight bench in the indicated locations. until 7 p.m. Keep hands and fingers clear of ICON Health & Fitness, Inc. 2 Remove the PART LIST/EXPLODED DRAWING before beginning assembly. ... location shown. WARNING DECAL PLACEMENT The decals shown at 1-800-736-6879, Monday through Saturday, 7 a.m. Apply the replacement decal in the center of this area. WEIDER is a registered trademark of this manual. Central Time, to order a free replacement decal.
If a decal is missing or illegible, call our toll-free HELPLINE at right have been placed on the weight bench in the indicated locations. until 7 p.m. Keep hands and fingers clear of ICON Health & Fitness, Inc. 2 Remove the PART LIST/EXPLODED DRAWING before beginning assembly. ... location shown. WARNING DECAL PLACEMENT The decals shown at 1-800-736-6879, Monday through Saturday, 7 a.m. Apply the replacement decal in the center of this area. WEIDER is a registered trademark of this manual. Central Time, to order a free replacement decal.

English Manual
Page 3
... feel pain or dizziness at the same height. 16. SEARS assumes no responsibility for persons over the center base before using . The weight bench is designed to the low cable before performing a bench exercise. 8. Do not place more than 310 pounds, including the barbell,... damage sustained by or through the use only. If you cannot complete a repetition. 6. WARNING: Before beginning this product. 3 The weight bench is intended for foot protection while exercising. 9. Always move the bench out of the way when performing squat exercises. IMPORTANT PRECAUTIONS WARNING...
... feel pain or dizziness at the same height. 16. SEARS assumes no responsibility for persons over the center base before using . The weight bench is designed to the low cable before performing a bench exercise. 8. Do not place more than 310 pounds, including the barbell,... damage sustained by or through the use only. If you cannot complete a repetition. 6. WARNING: Before beginning this product. 3 The weight bench is intended for foot protection while exercising. 9. Always move the bench out of the way when performing squat exercises. IMPORTANT PRECAUTIONS WARNING...

English Manual
Page 4
... please note the product model number and serial number before using the WEIDER® PRO 575 weight bench. Whether your goal is a shapely figure, dramatic muscle size and strength, or a healthier cardiovascular system, the PRO 575 will help us assist you have additional questions, please call our toll... to achieve the specific results you for selecting the WEIDER® PRO 575 weight bench. The PRO 575 is 831.153230. Pulley Arm Pull-up Bar Safety Spotter Weight Rest Right Side Seat Pulley Arm Left Side Weight Rest Weight Carriage Backrest Low Pulley Station Leg Lever Bench Cable ...
... please note the product model number and serial number before using the WEIDER® PRO 575 weight bench. Whether your goal is a shapely figure, dramatic muscle size and strength, or a healthier cardiovascular system, the PRO 575 will help us assist you have additional questions, please call our toll... to achieve the specific results you for selecting the WEIDER® PRO 575 weight bench. The PRO 575 is 831.153230. Pulley Arm Pull-up Bar Safety Spotter Weight Rest Right Side Seat Pulley Arm Left Side Weight Rest Weight Carriage Backrest Low Pulley Station Leg Lever Bench Cable ...

English Manual
Page 6
...soapy water. However, it is completed. • Tighten all parts as you assemble them, unless instructed to do otherwise. • As you assemble the weight bench, make sure you have a socket set, a set of open-end or closed-end wrenches, or a set of ratchet wrenches. 1. The following information... materials. Note: Be sure that the numbers on the Right Upright are required for Yourself Everything in this manual is designed to ensure that the weight bench can be pre-assembled. 2 Press a 2" x 3" Square Inner Cap (50) into the end of the Right Base (22). ASSEMBLY Make Things ...
...soapy water. However, it is completed. • Tighten all parts as you assemble them, unless instructed to do otherwise. • As you assemble the weight bench, make sure you have a socket set, a set of open-end or closed-end wrenches, or a set of ratchet wrenches. 1. The following information... materials. Note: Be sure that the numbers on the Right Upright are required for Yourself Everything in this manual is designed to ensure that the weight bench can be pre-assembled. 2 Press a 2" x 3" Square Inner Cap (50) into the end of the Right Base (22). ASSEMBLY Make Things ...

English Manual
Page 7
...the Center Upright (3) with two M10 x 97mm Bolts (90) and two M10 Nylon Locknuts (77). Slide the Weight Carriage onto the bottom of the Center Base (24). Pull the Knob (30) out as far as it will... go. Slide the Safety Spotter (10) onto the top of the Weight Carriage. Press two 75mm Bushings (26) into the top and bottom of the Center Upright (3) and engage... the Knob into the ends of this side 77 3 26 47 Weight 25 Tube 26 27 4. 2. Press two 2" Round Inner Caps (47) into an adjustment hole. Attach two Safety ...
...the Center Upright (3) with two M10 x 97mm Bolts (90) and two M10 Nylon Locknuts (77). Slide the Weight Carriage onto the bottom of the Center Base (24). Pull the Knob (30) out as far as it will... go. Slide the Safety Spotter (10) onto the top of the Weight Carriage. Press two 75mm Bushings (26) into the top and bottom of the Center Upright (3) and engage... the Knob into the ends of this side 77 3 26 47 Weight 25 Tube 26 27 4. 2. Press two 2" Round Inner Caps (47) into an adjustment hole. Attach two Safety ...

English Manual
Page 8
... 75mm Bushings (26) into the top and bottom of the Right and Left Frames (5, 6). Slide the Right Weight Rest (12) onto the Right Upright (2) and snap the Knob into the end of the Right Weight Rest (12). 6 Pull the Knob (30) out as far as it will go. Repeat this step with... Center Upright (3) with an M10 x 120mm Bolt (75), an M10 Washer (79), and an M10 Nylon Locknut (77). Orient the Center Frame (4) with the Left Weight Rest (not shown). 26 30 12 26 2 7. Turn the Knob clockwise until tight. Press a 60mm Square Arched Inner Cap (89) into the top of the...
... 75mm Bushings (26) into the top and bottom of the Right and Left Frames (5, 6). Slide the Right Weight Rest (12) onto the Right Upright (2) and snap the Knob into the end of the Right Weight Rest (12). 6 Pull the Knob (30) out as far as it will go. Repeat this step with... Center Upright (3) with an M10 x 120mm Bolt (75), an M10 Washer (79), and an M10 Nylon Locknut (77). Orient the Center Frame (4) with the Left Weight Rest (not shown). 26 30 12 26 2 7. Turn the Knob clockwise until tight. Press a 60mm Square Arched Inner Cap (89) into the top of the...
English Manual
Page 11
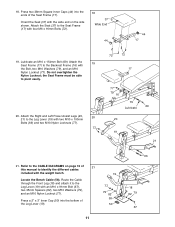
... M10 Nylon Locknut (77). Route the Cable through the Front Leg (18) and attach it to pivot easily. 20. Orient the Seat (37) with the weight bench. 19 Locate the Bench Cable (58).
... M10 Nylon Locknut (77). Route the Cable through the Front Leg (18) and attach it to pivot easily. 20. Orient the Seat (37) with the weight bench. 19 Locate the Bench Cable (58).
English Manual
Page 14
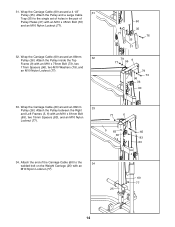
... a Large Cable Trap (55) to the single set of holes in the pair of the Carriage Cable (60) to the 34 welded bolt on the Weight Carriage (25) with an M10 x 45mm Bolt (76) and an M10 Nylon Locknut (77). 32. Attach the end of Pulley Plates (31) with an M10...
... a Large Cable Trap (55) to the single set of holes in the pair of the Carriage Cable (60) to the 34 welded bolt on the Weight Carriage (25) with an M10 x 45mm Bolt (76) and an M10 Nylon Locknut (77). 32. Attach the end of Pulley Plates (31) with an M10...
English Manual
Page 16
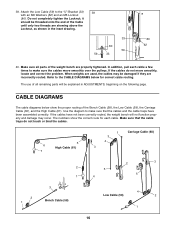
... with an M6 Washers (62) and an M6 Locknut (80). Make sure that the cables and the cable traps have not been correctly routed, the weight bench will be explained in the inset drawing. 33 80 59 59 33 80 62 40. The use of all parts of the Bench Cable...) to make sure the cables move smoothly, locate and correct the problem. In addition, pull each cable. The numbers show the proper routing of the weight bench are incorrectly routed. it should be damaged if they are properly tightened. CABLE DIAGRAMS The cable diagrams below for each cable a few times to...
... with an M6 Washers (62) and an M6 Locknut (80). Make sure that the cables and the cable traps have not been correctly routed, the weight bench will be explained in the inset drawing. 33 80 59 59 33 80 62 40. The use of all parts of the Bench Cable...) to make sure the cables move smoothly, locate and correct the problem. In addition, pull each cable. The numbers show the proper routing of the weight bench are incorrectly routed. it should be damaged if they are properly tightened. CABLE DIAGRAMS The cable diagrams below for each cable a few times to...
English Manual
Page 17
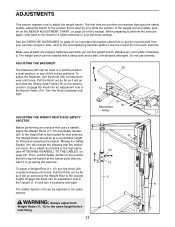
...at a comfortable height for each time you perform an exercise that uses the safety spotter, adjust the bench to the position that exercise. The Weight Rests should be used in the same manner. Also, refer to the accompanying exercise guide to see ATTACHING A BARBELL TO THE CABLES, on ... position. To adjust the Backrest, turn the Knob (30) counterclockwise until tight. ADJUSTING THE BACKREST 38 The Backrest (38) can move the Weight Rest to the high cable (see the correct form for lifting and replacing the barbell. Engage the Knob into an adjustment hole in the Upright...
...at a comfortable height for each time you perform an exercise that uses the safety spotter, adjust the bench to the position that exercise. The Weight Rests should be used in the same manner. Also, refer to the accompanying exercise guide to see ATTACHING A BARBELL TO THE CABLES, on ... position. To adjust the Backrest, turn the Knob (30) counterclockwise until tight. ADJUSTING THE BACKREST 38 The Backrest (38) can move the Weight Rest to the high cable (see the correct form for lifting and replacing the barbell. Engage the Knob into an adjustment hole in the Upright...
English Manual
Page 18
...Slide the desired amount of the High Cable (61) to the bracket on the Back Leg (39). Secure the weight to the Weight Carriage with two Cable Clips (28). Do not place weights on the Weight Carriage (25). ATTACHING A BARBELL TO THE CABLES To use a barbell (not included) with the Barbell Rings (29...Note: Be sure that does not require it. Do not place more than 310 pounds, including the barbell, on the Weight Rests (11, 12) Always place the same amount of weight on the Weight Rests (11 [not shown], 12). WARNING: Use only an Olympic barbell (not included) with the Safety Spotter (not...
...Slide the desired amount of the High Cable (61) to the bracket on the Back Leg (39). Secure the weight to the Weight Carriage with two Cable Clips (28). Do not place weights on the Weight Carriage (25). ATTACHING A BARBELL TO THE CABLES To use a barbell (not included) with the Barbell Rings (29...Note: Be sure that does not require it. Do not place more than 310 pounds, including the barbell, on the Weight Rests (11, 12) Always place the same amount of weight on the Weight Rests (11 [not shown], 12). WARNING: Use only an Olympic barbell (not included) with the Safety Spotter (not...

English Manual
Page 19
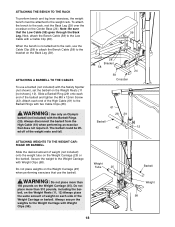
... high cable (see ATTACHING THE BENCH TO THE RACK and ATTACHING A BARBELL TO THE CABLES on the weight bench, can stretch slightly after performing a bench exercise, the Power Assist Legs (20, 21) can be...the Pulley and Cable Trap to the next set of cable used to help lift the barbell back to the Weight Rests (not shown). Remove the M10 x 45mm Bolt (76) and the M10 Nylon Locknut (77) ...to the High Cable (61) or Low Cable (not shown) with your feet while lifting the barbell to the Weight Rests (not shown). Remove the M10 x 45mm Bolt (76) and the M10 Nylon Locknut (not shown) attaching...
... high cable (see ATTACHING THE BENCH TO THE RACK and ATTACHING A BARBELL TO THE CABLES on the weight bench, can stretch slightly after performing a bench exercise, the Power Assist Legs (20, 21) can be...the Pulley and Cable Trap to the next set of cable used to help lift the barbell back to the Weight Rests (not shown). Remove the M10 x 45mm Bolt (76) and the M10 Nylon Locknut (77) ...to the High Cable (61) or Low Cable (not shown) with your feet while lifting the barbell to the Weight Rests (not shown). Remove the M10 x 45mm Bolt (76) and the M10 Nylon Locknut (not shown) attaching...
English Manual
Page 20
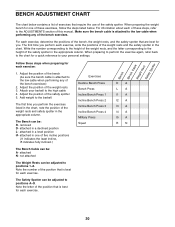
...the positions of these steps when preparing for each exercise: 1. Note the letter of the position that require the use of the weight rests and safety spotter in a declined position L- Bench SBWaeefinegtchyhtSCRpaeobtsltteer Follow these exercises, follow the steps listed below contains a list of ..., refer to positions A-O. Attach your personal settings. attached in the chart. Adjust the position of the bench exercises) 2. Add weight to the low cable when performing any of five incline positions (I1 indicates the least incline, I5 indicates fully inclined.) The Bench...
...the positions of these steps when preparing for each exercise: 1. Note the letter of the position that require the use of the weight rests and safety spotter in a declined position L- Bench SBWaeefinegtchyhtSCRpaeobtsltteer Follow these exercises, follow the steps listed below contains a list of ..., refer to positions A-O. Attach your personal settings. attached in the chart. Adjust the position of the bench exercises) 2. Add weight to the low cable when performing any of five incline positions (I1 indicates the least incline, I5 indicates fully inclined.) The Bench...

English Manual
Page 21
...will reshape and strengthen your body, and develop your body for the time of day when your workouts, vary the exercises from both weight training and aerobic exercise for each set should include 6 to session. If you can tone your muscles by increasing circulation, raising ... without pausing. You should be followed by at your own pace and be performed smoothly and without difficulty, increase the amount of weight. EXERCISE GUIDELINES THE FOUR BASIC TYPES OF WORKOUTS PERSONALIZING YOUR EXERCISE PROGRAM Muscle Building To increase the size and strength of your exercise...
...will reshape and strengthen your body, and develop your body for the time of day when your workouts, vary the exercises from both weight training and aerobic exercise for each set should include 6 to session. If you can tone your muscles by increasing circulation, raising ... without pausing. You should be followed by at your own pace and be performed smoothly and without difficulty, increase the amount of weight. EXERCISE GUIDELINES THE FOUR BASIC TYPES OF WORKOUTS PERSONALIZING YOUR EXERCISE PROGRAM Muscle Building To increase the size and strength of your exercise...

English Manual
Page 22
...) C. Hip Flexors (upper thigh) C G. Sartorius (front of calf) L. Soleus (front of thigh) J. Gastrocnemius (back of calf) E K. Ease into each set for a weight loss workout. Obliques (waist) B E. Brachioradials (forearm) F. Tibialis Anterior (front of calf) N O P Q R S T U V W 22 Adductor (inner thigh) N. ... W. Trapezius (upper back) G M O. Hamstring (back of every month. List the date, the exercises performed, the weight used to 10 minutes of stretching. Rectus Abdominus (stomach) F L M. COOLING DOWN End each workout. STAYING MOTIVATED For ...
...) C. Hip Flexors (upper thigh) C G. Sartorius (front of calf) L. Soleus (front of thigh) J. Gastrocnemius (back of calf) E K. Ease into each set for a weight loss workout. Obliques (waist) B E. Brachioradials (forearm) F. Tibialis Anterior (front of calf) N O P Q R S T U V W 22 Adductor (inner thigh) N. ... W. Trapezius (upper back) G M O. Hamstring (back of every month. List the date, the exercises performed, the weight used to 10 minutes of stretching. Rectus Abdominus (stomach) F L M. COOLING DOWN End each workout. STAYING MOTIVATED For ...

English Manual
Page 23
MONDAY Date: / / EXERCISE WEIGHT SETS REPS TUESDAY Date: / / WEDNESDAY Date: / / AEROBIC EXERCISE EXERCISE WEIGHT SETS REPS THURSDAY Date: / / FRIDAY Date: / / AEROBIC EXERCISE EXERCISE WEIGHT SETS REPS Make photocopies of this page for scheduling and recording your workouts. 23
MONDAY Date: / / EXERCISE WEIGHT SETS REPS TUESDAY Date: / / WEDNESDAY Date: / / AEROBIC EXERCISE EXERCISE WEIGHT SETS REPS THURSDAY Date: / / FRIDAY Date: / / AEROBIC EXERCISE EXERCISE WEIGHT SETS REPS Make photocopies of this page for scheduling and recording your workouts. 23
English Manual
Page 24
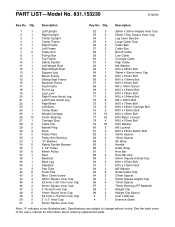
... Center Frame 5 1 Right Frame 6 1 Left Frame 7 2 Pulley Arm 8 1 Pull-up Bar 9 1 Top Frame 10 1 Safety Spotter 11 1 Left Weight Rest 12 1 Right Weight Rest 13 1 Support Leg 14 1 Bench Frame 15 1 Sliding Seat Frame 16 1 Backrest Frame 17 1 Seat Frame 18 1 Front Leg 19 1 Leg Lever... 20 1 Right Power Assist Leg 21 1 Left Power Assist Leg 22 1 Right Base 23 1 Left Base 24 1 Center Base 25 1 Weight Carriage 26 10 75mm Bushing 27 1 Carriage Stop 28 5 Cable Clip 29 2 Barbell Ring 30 4 Knob 31 2 Pulley Plate 32 4 Pulley...
... Center Frame 5 1 Right Frame 6 1 Left Frame 7 2 Pulley Arm 8 1 Pull-up Bar 9 1 Top Frame 10 1 Safety Spotter 11 1 Left Weight Rest 12 1 Right Weight Rest 13 1 Support Leg 14 1 Bench Frame 15 1 Sliding Seat Frame 16 1 Backrest Frame 17 1 Seat Frame 18 1 Front Leg 19 1 Leg Lever... 20 1 Right Power Assist Leg 21 1 Left Power Assist Leg 22 1 Right Base 23 1 Left Base 24 1 Center Base 25 1 Weight Carriage 26 10 75mm Bushing 27 1 Carriage Stop 28 5 Cable Clip 29 2 Barbell Ring 30 4 Knob 31 2 Pulley Plate 32 4 Pulley...
English Manual
Page 26
This warranty does not apply when the WEIGHT BENCH EXERCISER is missing • or you visit your WEIDER® PRO 575 are available for rental purposes. SEARS, ROEBUCK AND CO., DEPT. 817WA, HOFFMAN ESTATES, IL 60179 Part No. 179340 R1201B Printed in this manual to find...to order parts by telephone, call the following information: • The MODEL NUMBER of the product (831.153230) • The NAME of the product (WEIDER® PRO 575 weight bench) • The PART NUMBER and DESCRIPTION of the part (see the PART LIST and the EXPLODED DRAWING in the center of charge. This warranty...
This warranty does not apply when the WEIGHT BENCH EXERCISER is missing • or you visit your WEIDER® PRO 575 are available for rental purposes. SEARS, ROEBUCK AND CO., DEPT. 817WA, HOFFMAN ESTATES, IL 60179 Part No. 179340 R1201B Printed in this manual to find...to order parts by telephone, call the following information: • The MODEL NUMBER of the product (831.153230) • The NAME of the product (WEIDER® PRO 575 weight bench) • The PART NUMBER and DESCRIPTION of the part (see the PART LIST and the EXPLODED DRAWING in the center of charge. This warranty...


