
User Manual
Page 1
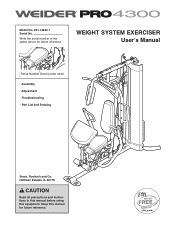
Model No. 831.14622.1 Serial No. WEIGHT SYSTEM EXERCISER Userʼs Manual Serial Number Decal (under seat) • Assembly • Adjustment • Troubleshooting • Part List and Drawing Sears, Roebuck and Co. Hoffman Estates, IL 60179 CAUTION Read all precautions and instructions in the space above for future reference. Keep this equipment. Write the serial number in this manual before using this manual for future reference.
Model No. 831.14622.1 Serial No. WEIGHT SYSTEM EXERCISER Userʼs Manual Serial Number Decal (under seat) • Assembly • Adjustment • Troubleshooting • Part List and Drawing Sears, Roebuck and Co. Hoffman Estates, IL 60179 CAUTION Read all precautions and instructions in the space above for future reference. Keep this equipment. Write the serial number in this manual before using this manual for future reference.
User Manual
Page 2
... decal. Apply the decal in the location shown. TABLE OF CONTENTS WARNING DECAL PLACEMENT 2 IMPORTANT PRECAUTIONS 3 BEFORE YOU BEGIN 4 PART IDENTIFICATION CHART 5 ASSEMBLY 8 ADJUSTMENT 25 WEIGHT RESISTANCE CHART 27 CABLE DIAGRAM 28 MAINTENANCE 29 EXERCISE GUIDELINES 30 PART LIST 33 EXPLODED DRAWING 34 ORDERING REPLACEMENT PARTS Back Cover 90 DAY FULL...
... decal. Apply the decal in the location shown. TABLE OF CONTENTS WARNING DECAL PLACEMENT 2 IMPORTANT PRECAUTIONS 3 BEFORE YOU BEGIN 4 PART IDENTIFICATION CHART 5 ASSEMBLY 8 ADJUSTMENT 25 WEIGHT RESISTANCE CHART 27 CABLE DIAGRAM 28 MAINTENANCE 29 EXERCISE GUIDELINES 30 PART LIST 33 EXPLODED DRAWING 34 ORDERING REPLACEMENT PARTS Back Cover 90 DAY FULL...
User Manual
Page 3
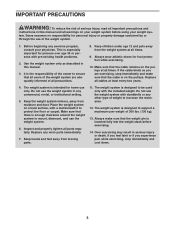
.... 3. It is intended for persons over age 35 or persons with the included weight. Always wear athletic shoes for personal injury or property damage sustained by or through the use the weight system. 6. The weight system is the responsibility of the owner to increase the resistance. 12. Keep the... of serious injury, read all important precautions and instructions in serious injury or death. Keep children under age 12 and pets away from the weight system at least every two years. 4. If the cable binds as described in any worn parts immediately. 7. Keep hands and feet away ...
.... 3. It is intended for persons over age 35 or persons with the included weight. Always wear athletic shoes for personal injury or property damage sustained by or through the use the weight system. 6. The weight system is the responsibility of the owner to increase the resistance. 12. Keep the... of serious injury, read all important precautions and instructions in serious injury or death. Keep children under age 12 and pets away from the weight system at least every two years. 4. If the cable binds as described in any worn parts immediately. 7. Keep hands and feet away ...
User Manual
Page 4
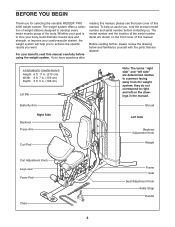
... not correspond to develop every major muscle group of this manual carefully before contacting us assist you for selecting the versatile WEIDER® PRO 4300 weight system. Shroud Left Side Backrest Adjustment Knob Weight Curl Adjustment Knob Leg Lever Foam Pad Chain Frame Seat Seat Adjustment Knob Ankle Strap Handle 4 BEFORE YOU BEGIN Thank you...
... not correspond to develop every major muscle group of this manual carefully before contacting us assist you for selecting the versatile WEIDER® PRO 4300 weight system. Shroud Left Side Backrest Adjustment Knob Weight Curl Adjustment Knob Leg Lever Foam Pad Chain Frame Seat Seat Adjustment Knob Ankle Strap Handle 4 BEFORE YOU BEGIN Thank you...
User Manual
Page 8
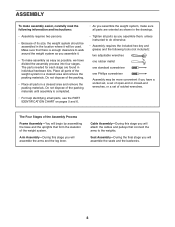
...Assembly may be used. Cable Assembly-During this stage you will assemble the arms and the leg lever. Place all parts of its size, the weight system should be assembled in the location where it . • To make sure all parts are found in a cleared area and remove the ... final stage you have divided the assembly process into four stages. Do not dispose of the packing materials until assembly is enough clearance to the weights. Do not dispose of ratchet wrenches. The Four Stages of the Assembly Process Frame Assembly-You will assemble the seats and the backrests. 8 ...
...Assembly may be used. Cable Assembly-During this stage you will assemble the arms and the leg lever. Place all parts of its size, the weight system should be assembled in the location where it . • To make sure all parts are found in a cleared area and remove the ... final stage you have divided the assembly process into four stages. Do not dispose of the packing materials until assembly is enough clearance to the weights. Do not dispose of ratchet wrenches. The Four Stages of the Assembly Process Frame Assembly-You will assemble the seats and the backrests. 8 ...

User Manual
Page 9
Before beginning assembly, make sure that you understand the information in place. 2. Attach the Stabilizer (3) and the Weight Guides (18) to the Base (1) with two M10 x 20mm Button Screws (96). Next, attach the Weight Guides (18) to the Base (1) with the two indicated M8 x 75mm Carriage Bolts (83) and two M8 ... 80 1 108 83 3 96 83 75 104 10 110 78 78 83 1 9 Orient the two Weight Guides (18) so that the end of tape over each Bolt head to the floor, and insert the Weight Guides into the Stabilizer (3). Attach the Upright (2) to the Front Leg (10) with an M8 x...
Before beginning assembly, make sure that you understand the information in place. 2. Attach the Stabilizer (3) and the Weight Guides (18) to the Base (1) with two M10 x 20mm Button Screws (96). Next, attach the Weight Guides (18) to the Base (1) with the two indicated M8 x 75mm Carriage Bolts (83) and two M8 ... 80 1 108 83 3 96 83 75 104 10 110 78 78 83 1 9 Orient the two Weight Guides (18) so that the end of tape over each Bolt head to the floor, and insert the Weight Guides into the Stabilizer (3). Attach the Upright (2) to the Front Leg (10) with an M8 x...

User Manual
Page 10
... 5 Base (1) with two M4 x 12mm Self-tapping Screws (102). Make sure that the pin on the bottom as shown. Slide the Weights onto the Weight Guides. Lubricate the indicated holes in a Weight (19) with two M8 x 65mm Bolts (101), two M8 Washers (103), and two M8 Locknuts (78). Attach the Frame (9) to... two M8 x 80mm Bolts (100), two M8 Washers (103), and two M8 Locknuts (78). Do not tighten the Locknuts yet. Insert the Weight Tube into the nine Weights (19). Attach the bottom of the Left Shroud (21) to show this step for the Right Shroud (not shown). 6. Repeat this step clearly...
... 5 Base (1) with two M4 x 12mm Self-tapping Screws (102). Make sure that the pin on the bottom as shown. Slide the Weights onto the Weight Guides. Lubricate the indicated holes in a Weight (19) with two M8 x 65mm Bolts (101), two M8 Washers (103), and two M8 Locknuts (78). Attach the Frame (9) to... two M8 x 80mm Bolts (100), two M8 Washers (103), and two M8 Locknuts (78). Do not tighten the Locknuts yet. Insert the Weight Tube into the nine Weights (19). Attach the bottom of the Left Shroud (21) to show this step for the Right Shroud (not shown). 6. Repeat this step clearly...

User Manual
Page 11
Attach the Weight Guides (18) to the Top Frame (4) with two M4 x 12mm Self-tapping 8 Screws (102). Attach the other Shroud Cover (23) in the same manner. 11 ...
Attach the Weight Guides (18) to the Top Frame (4) with two M4 x 12mm Self-tapping 8 Screws (102). Attach the other Shroud Cover (23) in the same manner. 11 ...
User Manual
Page 18
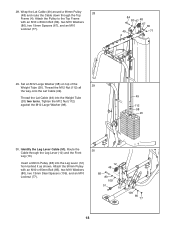
... M12 Nut (112) against the M12 Large Washer (98). 49 112 98 20 30. Set an M12 Large Washer (98) on top of the 29 Weight Tube (20). Thread the Lat Cable (49) into the Leg Lever (12) from behind it as shown. Attach the 90mm Pulley with an M10 x 80mm... 51 10 109 80 77 18 Thread the M12 Nut (112) all the way onto the Lat Cable (49). Insert a 90mm Pulley (48) into the Weight Tube (20) two turns. 28. Identify the Leg Lever Cable (51). Route the Cable through the Top 28 Frame (4).
... M12 Nut (112) against the M12 Large Washer (98). 49 112 98 20 30. Set an M12 Large Washer (98) on top of the 29 Weight Tube (20). Thread the Lat Cable (49) into the Leg Lever (12) from behind it as shown. Attach the 90mm Pulley with an M10 x 80mm... 51 10 109 80 77 18 Thread the M12 Nut (112) all the way onto the Lat Cable (49). Insert a 90mm Pulley (48) into the Weight Tube (20) two turns. 28. Identify the Leg Lever Cable (51). Route the Cable through the Top 28 Frame (4).

User Manual
Page 24
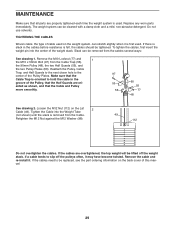
Attach the Curl Pad (33) to remove the slack by tightening the cables. Before using the weight system, pull each cable a few times to make sure that all parts have been properly tightened. IMPORTANT: If the cables are not properly installed, they ... pulleys. If there is used. 46. See the CABLE DIAGRAMS on page 29. 24 If one of the remaining parts will be damaged when heavy weight is any slack in ADJUSTMENT, beginning on the following page. Make sure that the cables move smoothly, find and correct the problem.
Attach the Curl Pad (33) to remove the slack by tightening the cables. Before using the weight system, pull each cable a few times to make sure that all parts have been properly tightened. IMPORTANT: If the cables are not properly installed, they ... pulleys. If there is used. 46. See the CABLE DIAGRAMS on page 29. 24 If one of the remaining parts will be damaged when heavy weight is any slack in ADJUSTMENT, beginning on the following page. Make sure that the cables move smoothly, find and correct the problem.

User Manual
Page 25
... explains how to see the correct form for several exercises. Refer to the accompanying exercise guide to adjust the weight system. Do not use another Weight Clip to attach the Chain to the weight system in the same manner. 49 66 63 25 Attach the other accessories to the Lat Bar. Replace any... worn parts immediately. The weight system can be cleaned with a damp cloth and a mild, non-abrasive detergent. Make sure to the Lat Cable and the Lat Bar. Note: For some ...
... explains how to see the correct form for several exercises. Refer to the accompanying exercise guide to adjust the weight system. Do not use another Weight Clip to attach the Chain to the weight system in the same manner. 49 66 63 25 Attach the other accessories to the Lat Bar. Replace any... worn parts immediately. The weight system can be cleaned with a damp cloth and a mild, non-abrasive detergent. Make sure to the Lat Cable and the Lat Bar. Note: For some ...

User Manual
Page 26
... Adjustment Knob (53). The Seat (32) can be adjusted in the same manner. 33 11 39 58 10 2 31 53 32 LOCKING THE WEIGHT STACK To lock the weight stack, insert the Locking Pin (72) through a hole in the Guide Rods (18) and secure the Pin with the Lock (73). 18 72...
... Adjustment Knob (53). The Seat (32) can be adjusted in the same manner. 33 11 39 58 10 2 31 53 32 LOCKING THE WEIGHT STACK To lock the weight stack, insert the Locking Pin (72) through a hole in the Guide Rods (18) and secure the Pin with the Lock (73). 18 72...
User Manual
Page 27
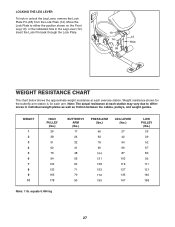
... (lbs.) 27 42 54 69 87 103 116 127 135 167 LOW PULLEY (lbs.) 25 39 52 67 80 92 111 121 140 168 27 Weight resistance shown for the butterfly arm station is for each exercise station. Move the Lock Plate to differences in the Leg Lever (12). Insert the... Lock Pin back through the Lock Plate. 10 14 95 12 Hole WEIGHT RESISTANCE CHART The chart below shows the approximate weight resistance at each station may vary due to either the position shown on the Front Leg (10), or the indicated hole...
... (lbs.) 27 42 54 69 87 103 116 127 135 167 LOW PULLEY (lbs.) 25 39 52 67 80 92 111 121 140 168 27 Weight resistance shown for the butterfly arm station is for each exercise station. Move the Lock Plate to differences in the Leg Lever (12). Insert the... Lock Pin back through the Lock Plate. 10 14 95 12 Hole WEIGHT RESISTANCE CHART The chart below shows the approximate weight resistance at each station may vary due to either the position shown on the Front Leg (10), or the indicated hole...
User Manual
Page 28
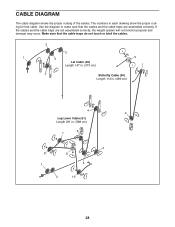
Use the diagram to make sure that the cables and the cable traps are not assembled correctly, the weight system will not function properly and damage may occur. If the cables and the cable traps are assembled correctly. Make sure that cable. CABLE DIAGRAM ...
Use the diagram to make sure that the cables and the cable traps are not assembled correctly, the weight system will not function properly and damage may occur. If the cables and the cable traps are assembled correctly. Make sure that cable. CABLE DIAGRAM ...
User Manual
Page 29
...48 See drawing 2. Replace any worn parts immediately. Reattach the Pulley, Cable Trap, and Half Guards to the next closer hole to slip off the weight stack. Retighten the M12 Nut against the M12 Washer (98). 49 112 Do not overtighten the cables. TIGHTENING THE CABLES Woven cable, the type of... the Pulley, that the Half Guards are ori- MAINTENANCE Make sure that all parts are properly tightened each time the weight system is used on the Lat 2 Cable (49). Do not use solvents. Tighten the Cable into the center of the Pulley Plates. If a cable ...
...48 See drawing 2. Replace any worn parts immediately. Reattach the Pulley, Cable Trap, and Half Guards to the next closer hole to slip off the weight stack. Retighten the M12 Nut against the M12 Washer (98). 49 112 Do not overtighten the cables. TIGHTENING THE CABLES Woven cable, the type of... the Pulley, that the Half Guards are ori- MAINTENANCE Make sure that all parts are properly tightened each time the weight system is used on the Lat 2 Cable (49). Do not use solvents. Tighten the Cable into the center of the Pulley Plates. If a cable ...
User Manual
Page 30
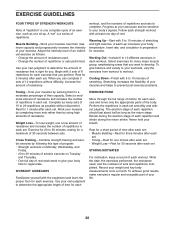
...to 30 minutes of aerobic exercise on Monday, Wednesday, and Friday. • 20 to regenerate. Exercise for each set . Never hold your weight and key body measurements once a month. STAYING MOTIVATED For motivation, keep a record of 30 seconds between sets. Record your breath. Cooling Down... • Change the amount of resistance used , and the numbers of rest each workout. Select exercises for each set . Weight Loss-To lose weight, use a low amount of resistance and increase the number of rest. WORKOUT GUIDELINES Familiarize yourself with at your muscles near their ...
...to 30 minutes of aerobic exercise on Monday, Wednesday, and Friday. • 20 to regenerate. Exercise for each set . Never hold your weight and key body measurements once a month. STAYING MOTIVATED For motivation, keep a record of 30 seconds between sets. Record your breath. Cooling Down... • Change the amount of resistance used , and the numbers of rest each workout. Select exercises for each set . Weight Loss-To lose weight, use a low amount of resistance and increase the number of rest. WORKOUT GUIDELINES Familiarize yourself with at your muscles near their ...
User Manual
Page 33
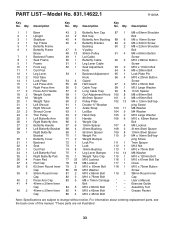
... 24 2 Thin Pulley 64 2 Hand Grip 105 2 M10 Large Washer 25 1 Left Butterfly Arm 65 1 Handle 106 6 M10 x 65mm Button 26 1 Right Butterfly Arm 66 2 Weight Clip Bolt 27 2 Butterfly Handle 67 6 19mm Spacer 107 4 M6 Locknut 28 1 Left Butterfly Bracket 68 4 25mm Bushing 108 2 21mm Steel Spacer 29 1 Right Butterfly...Pad 74 8 16mm Bushing 113 1 M10 x 70mm Bolt 34 1 Left Butterfly Pad 75 1 Leg Lever Bumper 114 14 M6 Washer 35 1 Right Butterfly Pad 76 1 Weight Tube Cap 115 1 M10 x 120mm Bolt 36 4 Foam Pad 77 33 M10 Locknut 116 1 M10 x 61mm Bolt Set 37 4 Pad Cap 78 18 M8 Locknut...
... 24 2 Thin Pulley 64 2 Hand Grip 105 2 M10 Large Washer 25 1 Left Butterfly Arm 65 1 Handle 106 6 M10 x 65mm Button 26 1 Right Butterfly Arm 66 2 Weight Clip Bolt 27 2 Butterfly Handle 67 6 19mm Spacer 107 4 M6 Locknut 28 1 Left Butterfly Bracket 68 4 25mm Bushing 108 2 21mm Steel Spacer 29 1 Right Butterfly...Pad 74 8 16mm Bushing 113 1 M10 x 70mm Bolt 34 1 Left Butterfly Pad 75 1 Leg Lever Bumper 114 14 M6 Washer 35 1 Right Butterfly Pad 76 1 Weight Tube Cap 115 1 M10 x 120mm Bolt 36 4 Foam Pad 77 33 M10 Locknut 116 1 M10 x 61mm Bolt Set 37 4 Pad Cap 78 18 M8 Locknut...

User Manual
Page 36
This warranty does not apply when the WEIGHT SYSTEM EXERCISER is used commercially or for free repair (or replacement if repair proves impossible). For Sears professional installation of home appliances and items like ... Brands, LLC ® Marca Registrada / TM Marca de Fábrica / SM Marca de Servicio de Sears Brands, LLC 90 DAY FULL WARRANTY If this Sears WEIGHT SYSTEM EXERCISER fails due to arrange for rental purposes. only) www.sears.com To purchase a protection agreement (U.S.A.) or maintenance agreement (Canada) on a product serviced by...
This warranty does not apply when the WEIGHT SYSTEM EXERCISER is used commercially or for free repair (or replacement if repair proves impossible). For Sears professional installation of home appliances and items like ... Brands, LLC ® Marca Registrada / TM Marca de Fábrica / SM Marca de Servicio de Sears Brands, LLC 90 DAY FULL WARRANTY If this Sears WEIGHT SYSTEM EXERCISER fails due to arrange for rental purposes. only) www.sears.com To purchase a protection agreement (U.S.A.) or maintenance agreement (Canada) on a product serviced by...


