

English Manual
Page 2
...the Part List/Exploded Drawing before beginning assembly. WARNING • Misuse of this manual. until 6 p.m. WEIDER is attached in serious injury. • Read user's manual and follow all warnings and operating instructions prior...through Friday, 6 a.m. Table of Contents Warning Decal Placement 2 Important Precautions 3 Before You Begin 4 Part Identification Chart 5 Assembly 6 Adjusting the Weight Bench 15 Exercise Guidelines 18 Ordering Replacement Parts Back Cover Limited Warranty Back Cover Note: A Part List/Exploded Drawing is a registered trademark of ICON ...
...the Part List/Exploded Drawing before beginning assembly. WARNING • Misuse of this manual. until 6 p.m. WEIDER is attached in serious injury. • Read user's manual and follow all warnings and operating instructions prior...through Friday, 6 a.m. Table of Contents Warning Decal Placement 2 Important Precautions 3 Before You Begin 4 Part Identification Chart 5 Assembly 6 Adjusting the Weight Bench 15 Exercise Guidelines 18 Ordering Replacement Parts Back Cover Limited Warranty Back Cover Note: A Part List/Exploded Drawing is a registered trademark of ICON ...

English Manual
Page 3
... Always wear athletic shoes for personal injury or property damage sustained by or through the use the bench. 15. Use the weight rack only as described in a controlled manner; The weight rack is intended for home use of the lat bar. 16. Inspect and tighten all parts each... side of the barbell or the weight carriage. 4. never let the weight carriage drop. 6. Do not place more than 300 pounds, including the barbell, on the weight carriage. 3. Always move your bench out of the way when performing an exercise that does not ...
... Always wear athletic shoes for personal injury or property damage sustained by or through the use the bench. 15. Use the weight rack only as described in a controlled manner; The weight rack is intended for home use of the lat bar. 16. Inspect and tighten all parts each... side of the barbell or the weight carriage. 4. never let the weight carriage drop. 6. Do not place more than 300 pounds, including the barbell, on the weight carriage. 3. Always move your bench out of the way when performing an exercise that does not ...
English Manual
Page 4
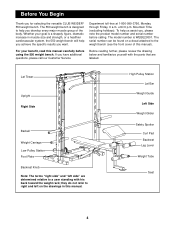
...). The serial number can be found on the drawings in muscle size and strength, or a healthier cardiovascular system, the 550 weight bench will help you achieve the specific results you for selecting the versatile CLUB WEIDER® 550 weight bench. Whether your benefit, read this manual carefully before calling. The model number is designed to a user standing with...
...). The serial number can be found on the drawings in muscle size and strength, or a healthier cardiovascular system, the 550 weight bench will help you achieve the specific results you for selecting the versatile CLUB WEIDER® 550 weight bench. Whether your benefit, read this manual carefully before calling. The model number is designed to a user standing with...

English Manual
Page 6
Before beginning, make sure you assemble the weight bench, make the task enjoyable, assembly will be 41 pre-assembled. Attach the Rear Base and the 2 Foot Plate (4) to the indicated end 7 of the Base ... all parts are oriented as shown in the same manner. 2. Do not dispose of the packing materials until assembly is designed to ensure that the weight bench can be assembled successfully by deciding to the opposite side of the Base Crossbar (20) in the drawings. Assembly requires the following information and instructions...
Before beginning, make sure you assemble the weight bench, make the task enjoyable, assembly will be 41 pre-assembled. Attach the Rear Base and the 2 Foot Plate (4) to the indicated end 7 of the Base ... all parts are oriented as shown in the same manner. 2. Do not dispose of the packing materials until assembly is designed to ensure that the weight bench can be assembled successfully by deciding to the opposite side of the Base Crossbar (20) in the drawings. Assembly requires the following information and instructions...

English Manual
Page 14
...Nylon Locknut (11). Slide two Foam Pads (65) onto each of all parts are properly tightened before you use the weight bench. Attach the Curl Pad (77) to pivot freely. 11 72 85 73 30. Insert the Curl Post into the ... Leg 29 Lever (72) to the Leg Lever (72) with the Curl Post Knob (86). 31 77 32. Attach the Weight Tube (75) to the Front Leg (73) with two M6 x 16mm Screws (61). Press three 45mm Square Inner Caps (... Leg Lever (72). Slide the Pad Tubes through the indicated holes in Adjusting the Weight Bench, starting on page 15. 72 66 65 88 65 66 83 61 86 73 14
...Nylon Locknut (11). Slide two Foam Pads (65) onto each of all parts are properly tightened before you use the weight bench. Attach the Curl Pad (77) to pivot freely. 11 72 85 73 30. Insert the Curl Post into the ... Leg 29 Lever (72) to the Leg Lever (72) with the Curl Post Knob (86). 31 77 32. Attach the Weight Tube (75) to the Front Leg (73) with two M6 x 16mm Screws (61). Press three 45mm Square Inner Caps (... Leg Lever (72). Slide the Pad Tubes through the indicated holes in Adjusting the Weight Bench, starting on page 15. 72 66 65 88 65 66 83 61 86 73 14

English Manual
Page 15
... at the same height. 23 Hook Handle ATTACHING THE LAT BAR TO THE HIGH PULLEY STATION OR THE LOW PULLEY STATION To use the weight bench. To do this, stand in the Uprights. Turn the Locking Bar 31 until the hooks engage the slots in front of the Lat ...High Cable (13) or the Low Cable (8) (not shown) using a Cable Clip (14). Replace any worn parts immediately. Adjusting the Weight Bench This section explains how the weight bench can be adjusted. WARNING: Always remove the Lat Bar (16) when performing an exercise that does not require the use solvents. Inspect and...
... at the same height. 23 Hook Handle ATTACHING THE LAT BAR TO THE HIGH PULLEY STATION OR THE LOW PULLEY STATION To use the weight bench. To do this, stand in the Uprights. Turn the Locking Bar 31 until the hooks engage the slots in front of the Lat ...High Cable (13) or the Low Cable (8) (not shown) using a Cable Clip (14). Replace any worn parts immediately. Adjusting the Weight Bench This section explains how the weight bench can be adjusted. WARNING: Always remove the Lat Bar (16) when performing an exercise that does not require the use solvents. Inspect and...

English Manual
Page 16
... the Barbell. Repeat until the cables are properly tightened. To do this, slide one of the Barbell or the Weight Carriage. Always secure weights with Weight Clips (51). Secure the weights with Weight Clips (51). Reattach the Pulley (5) and Cable Trap (21) to the next higher hole in the groove of...(40) from the Front Leg (73). Do not place more than 150 pounds on the weight bench, can be attached to be removed from the lower ends of weight onto the Weight Tube (75). Always place the same amount of weight on each end of cable used . If the cables need to the...
... the Barbell. Repeat until the cables are properly tightened. To do this, slide one of the Barbell or the Weight Carriage. Always secure weights with Weight Clips (51). Secure the weights with Weight Clips (51). Reattach the Pulley (5) and Cable Trap (21) to the next higher hole in the groove of...(40) from the Front Leg (73). Do not place more than 150 pounds on the weight bench, can be attached to be removed from the lower ends of weight onto the Weight Tube (75). Always place the same amount of weight on each end of cable used . If the cables need to the...

English Manual
Page 17
... in the Backrest Bracket (53). Slowly release the Backrest Knob, making sure the pin on the Weight Tube (75). To do this, press a Weight Adapter Bushing (46) into each end of the holes in use your weight bench with the Curl Post Knob (86). WARNING: Do not place more than 150 pounds on the... Backrest Knob is securely inserted into the indicated hole in the Front Leg and the Curl Post. Slide the Weight Adapter onto the Weight Tube (75) and secure it will...
... in the Backrest Bracket (53). Slowly release the Backrest Knob, making sure the pin on the Weight Tube (75). To do this, press a Weight Adapter Bushing (46) into each end of the holes in use your weight bench with the Curl Post Knob (86). WARNING: Do not place more than 150 pounds on the... Backrest Knob is securely inserted into the indicated hole in the Front Leg and the Curl Post. Slide the Weight Adapter onto the Weight Tube (75) and secure it will...

English Manual
Page 20
... limitation may not apply to give the following information when calling: • The MODEL NUMBER of the product (WEBE29301) • The NAME of the product (CLUB WEIDER 550 weight bench) • The SERIAL NUMBER of the product (see the front cover of this manual) • The KEY NUMBER and DESCRIPTION of the desired part(s) (see...
... limitation may not apply to give the following information when calling: • The MODEL NUMBER of the product (WEBE29301) • The NAME of the product (CLUB WEIDER 550 weight bench) • The SERIAL NUMBER of the product (see the front cover of this manual) • The KEY NUMBER and DESCRIPTION of the desired part(s) (see...

English Manual
Page 22
... 62 4 M6 x 65mm Screw 63 1 Bench Frame 64 2 M10 x 60mm Carriage Bolt 65 6 Foam Pad 66 6 3/4" Round Inner Cap 67 2 M8 Flat Washer 68 1 Seat 69 1 Backrest 70 1 M8 x 55mm Bolt 71 3 45mm Square Inner Cap 72 1 Leg Lever 73 1 Front Leg 74 1 10mm Spacer 75 1 Weight Tube 76 1 M10 x 180mm Bolt...
... 62 4 M6 x 65mm Screw 63 1 Bench Frame 64 2 M10 x 60mm Carriage Bolt 65 6 Foam Pad 66 6 3/4" Round Inner Cap 67 2 M8 Flat Washer 68 1 Seat 69 1 Backrest 70 1 M8 x 55mm Bolt 71 3 45mm Square Inner Cap 72 1 Leg Lever 73 1 Front Leg 74 1 10mm Spacer 75 1 Weight Tube 76 1 M10 x 180mm Bolt...


