
English Manual
Page 2
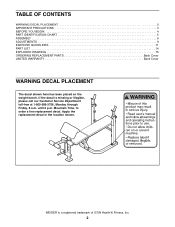
... WARNING DECAL PLACEMENT The decal shown here has been placed on the weight bench. If the decal is a registered trademark of ICON Health & Fitness, Inc. 2 Apply the replacement decal in the location shown. Mountain Time, to order a free replacement decal. WEIDER is missing or illegible, please call our Customer Service Department toll-free...
... WARNING DECAL PLACEMENT The decal shown here has been placed on the weight bench. If the decal is a registered trademark of ICON Health & Fitness, Inc. 2 Apply the replacement decal in the location shown. Mountain Time, to order a free replacement decal. WEIDER is missing or illegible, please call our Customer Service Department toll-free...

English Manual
Page 3
... under the age of serious injury, read the following important precautions before using the weight bench. 1. Use the weight bench only on both ends of 460 pounds, including the user, a weight bar, and weights. Make sure all parts are inserted completely and tightened into the uprights before using...instructions in any worn parts immediately. 7. If you to protect the floor. 6. ICON assumes no responsibility for home use the weight bench in this manual. 10. Read all instructions before beginning any exercise program, consult your partner should stand behind you feel pain ...
... under the age of serious injury, read the following important precautions before using the weight bench. 1. Use the weight bench only on both ends of 460 pounds, including the user, a weight bar, and weights. Make sure all parts are inserted completely and tightened into the uprights before using...instructions in any worn parts immediately. 7. If you to protect the floor. 6. ICON assumes no responsibility for home use the weight bench in this manual. 10. Read all instructions before beginning any exercise program, consult your partner should stand behind you feel pain ...
English Manual
Page 4
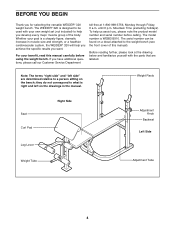
... drawings in muscle size and strength, or a healthier cardiovascular system, the WEIDER® 320 will help you want. Weight Rests Seat Curl Pad Leg Lever Right Side Adjustment Knob Backrest Left Side Weight Tube Adjustment Tube 4 If you for selecting the versatile WEIDER® 320 weight bench. The serial number can be used with the parts that are...
... drawings in muscle size and strength, or a healthier cardiovascular system, the WEIDER® 320 will help you want. Weight Rests Seat Curl Pad Leg Lever Right Side Adjustment Knob Backrest Left Side Weight Tube Adjustment Tube 4 If you for selecting the versatile WEIDER® 320 weight bench. The serial number can be used with the parts that are...
English Manual
Page 6
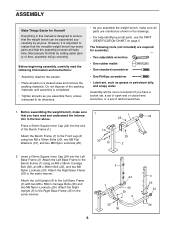
... until assembly is completed. • Tighten all parts are required for Yourself Everything in this manual is important to realize that the versatile weight bench has many parts and that the assembly process will take time. tion in the drawings. • For help identifying small parts, use... the PART IDENTIFICATION CHART on page 5. Before assembling the weight bench, make sure all parts as grease or petroleum jelly, and soapy water. Insert a 50mm Square Inner Cap (24) into the end of time...
... until assembly is completed. • Tighten all parts are required for Yourself Everything in this manual is important to realize that the versatile weight bench has many parts and that the assembly process will take time. tion in the drawings. • For help identifying small parts, use... the PART IDENTIFICATION CHART on page 5. Before assembling the weight bench, make sure all parts as grease or petroleum jelly, and soapy water. Insert a 50mm Square Inner Cap (24) into the end of time...
English Manual
Page 8
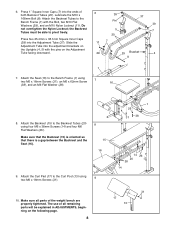
... (1) using two M6 x 16mm Screws (31), an M6 x 62mm Screw 7 16 (38), and an M6 Flat Washer (26). 8. Attach the Seat (16) to the Bench Frame (1) with the pins on the following page. 8 31 17 13 Make sure all remaining parts will be able to pivot freely. 20 37 39 7 ... the Curl Post (13) using four M6 x 38mm Screws (14) and four M6 Flat Washers (26). Press 1" Square Inner Caps (7) into the ends of the weight bench are properly tightened.
... (1) using two M6 x 16mm Screws (31), an M6 x 62mm Screw 7 16 (38), and an M6 Flat Washer (26). 8. Attach the Seat (16) to the Bench Frame (1) with the pins on the following page. 8 31 17 13 Make sure all remaining parts will be able to pivot freely. 20 37 39 7 ... the Curl Post (13) using four M6 x 38mm Screws (14) and four M6 Flat Washers (26). Press 1" Square Inner Caps (7) into the ends of the weight bench are properly tightened.
English Manual
Page 9
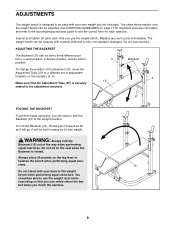
... to a different set (not included). Always place 50 pounds on the leg lever to the upright position. ADJUSTMENTS The weight bench is designed to be used with your own weight set of adjustment brackets on the Uprights (4, 5). 4 15 Make sure that you can safely return the barbell when you ... detergent. You should be adjusted. See EXERCISE GUIDELINES on the seat when the Backrest is securely seated in place by its own weight. The weight bench can be able to see the correct form for important exercise information and refer to the accompanying exercise guide to see the...
... to a different set (not included). Always place 50 pounds on the leg lever to the upright position. ADJUSTMENTS The weight bench is designed to be used with your own weight set of adjustment brackets on the Uprights (4, 5). 4 15 Make sure that you can safely return the barbell when you ... detergent. You should be adjusted. See EXERCISE GUIDELINES on the seat when the Backrest is securely seated in place by its own weight. The weight bench can be able to see the correct form for important exercise information and refer to the accompanying exercise guide to see the...
English Manual
Page 10
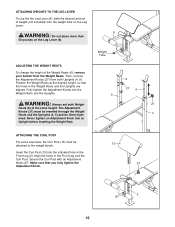
... an Adjustment Knob into an Upright before inserting the Weight Rest. 6 27 6 5 27 4 ATTACHING THE CURL POST For some exercises, the Curl Post (13) must be inserted through the Weight Rests and the Uprights (4, 5) and be attached to the weight bench. Make sure that the holes in the Front Leg... and the Curl Post. Align the holes in the Weight Rests and the Uprights are aligned. WARNING: Always set both ...
... an Adjustment Knob into an Upright before inserting the Weight Rest. 6 27 6 5 27 4 ATTACHING THE CURL POST For some exercises, the Curl Post (13) must be inserted through the Weight Rests and the Uprights (4, 5) and be attached to the weight bench. Make sure that the holes in the Front Leg... and the Curl Post. Align the holes in the Weight Rests and the Uprights are aligned. WARNING: Always set both ...
English Manual
Page 14
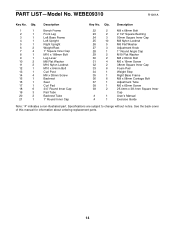
...1 1 2 1 3 1 4 1 5 1 6 2 7 4 8 1 9 1 10 2 11 2 12 1 13 1 14 4 15 1 16 1 17 1 18 6 19 3 20 2 21 1 Description Bench Frame Front Leg Left Base Frame Left Upright Right Upright Weight Rest 1" Square Inner Cap M10 x 168mm Bolt Leg Lever M8 Flat Washer M10 Nylon Locknut M10 x 64mm Bolt Curl Post M6 x 38mm Screw...Flat Washer Adjustment Knob 1" Round Angle Cap M10 Flat Washer M8 x 60mm Bolt M6 x 16mm Screw 38mm Square Inner Cap Foam Pad Weight Stop Right Base Frame M8 x 58mm Carriage Bolt Adjustment Tube M6 x 62mm Screw 25.4mm x 38.1mm Square Inner Cap User's ...
...1 1 2 1 3 1 4 1 5 1 6 2 7 4 8 1 9 1 10 2 11 2 12 1 13 1 14 4 15 1 16 1 17 1 18 6 19 3 20 2 21 1 Description Bench Frame Front Leg Left Base Frame Left Upright Right Upright Weight Rest 1" Square Inner Cap M10 x 168mm Bolt Leg Lever M8 Flat Washer M10 Nylon Locknut M10 x 64mm Bolt Curl Post M6 x 38mm Screw...Flat Washer Adjustment Knob 1" Round Angle Cap M10 Flat Washer M8 x 60mm Bolt M6 x 16mm Screw 38mm Square Inner Cap Foam Pad Weight Stop Right Base Frame M8 x 58mm Carriage Bolt Adjustment Tube M6 x 62mm Screw 25.4mm x 38.1mm Square Inner Cap User's ...
English Manual
Page 16
... limitation may not apply to give the following information when calling: • The MODEL NUMBER of the product (WEBE09310) • The NAME of the product (WEIDER® 320 weight bench) • The SERIAL NUMBER of the product (see the front cover of this manual). This warranty gives you . All products for a particular purpose is...
... limitation may not apply to give the following information when calling: • The MODEL NUMBER of the product (WEBE09310) • The NAME of the product (WEIDER® 320 weight bench) • The SERIAL NUMBER of the product (see the front cover of this manual). This warranty gives you . All products for a particular purpose is...


