

English Manual
Page 3
...parts immediately. 6. Note: The weight bench does not include a barbell or weights. 2. Keep the weight bench indoors, away from moving parts. 8. Inspect and properly tighten all times. 14. When using the backrest in a commercial, rental, or institutional setting. 4. If a decal is intended for... personal injury or property damage sustained by or through the uprights and turned to prevent the barbell from the weight bench at all parts regularly. Always place equal amounts of...
...parts immediately. 6. Note: The weight bench does not include a barbell or weights. 2. Keep the weight bench indoors, away from moving parts. 8. Inspect and properly tighten all times. 14. When using the backrest in a commercial, rental, or institutional setting. 4. If a decal is intended for... personal injury or property damage sustained by or through the uprights and turned to prevent the barbell from the weight bench at all parts regularly. Always place equal amounts of...

English Manual
Page 4
... at the drawing below and familiarize yourself with your goal is WEEVBE0726.0. Whether your own weight set (not included) to develop the major muscle groups of this manual). The versatile WEIDER 215 weight bench is designed to the weight bench (see the front cover of this manual. ASSEMBLED DIMENSIONS: Height: 114 cm (45 in.) Width...
... at the drawing below and familiarize yourself with your goal is WEEVBE0726.0. Whether your own weight set (not included) to develop the major muscle groups of this manual). The versatile WEIDER 215 weight bench is designed to the weight bench (see the front cover of this manual. ASSEMBLED DIMENSIONS: Height: 114 cm (45 in.) Width...

English Manual
Page 5
... (25) M6 x 16mm Screw (21) M6 x 38mm Screw (22) M8 x 43mm Carriage Bolt (29) M8 x 53mm Bolt (14) M10 x 55mm Bolt (30) M10 x 52mm Bolt Set (24) M10 x 137mm Bolt (28) 5 The number in parenthesis below each part refers to see if it has been pre-assembled. PART IDENTIFICATION CHART This...
... (25) M6 x 16mm Screw (21) M6 x 38mm Screw (22) M8 x 43mm Carriage Bolt (29) M8 x 53mm Bolt (14) M10 x 55mm Bolt (30) M10 x 52mm Bolt Set (24) M10 x 137mm Bolt (28) 5 The number in parenthesis below each part refers to see if it has been pre-assembled. PART IDENTIFICATION CHART This...

English Manual
Page 6
.... Do not tighten the Nylon Locknuts yet. 1 13 13 3 13 13 1 12 14 2. Most people find that the weight bench can be assembled successfully by setting aside plenty of time, assembly will be required for assembly: • Two adjustable spanners • One rubber mallet • One standard... to do otherwise. • As you assemble the weight bench, make sure that you have read the following tools (not included) may be more convenient if you have a socket set, a set of open-end or closed-end spanners, or a set of ratchet spanners. 1. ASSEMBLY Make Assembly Easier This manual is...
.... Do not tighten the Nylon Locknuts yet. 1 13 13 3 13 13 1 12 14 2. Most people find that the weight bench can be assembled successfully by setting aside plenty of time, assembly will be required for assembly: • Two adjustable spanners • One rubber mallet • One standard... to do otherwise. • As you assemble the weight bench, make sure that you have read the following tools (not included) may be more convenient if you have a socket set, a set of open-end or closed-end spanners, or a set of ratchet spanners. 1. ASSEMBLY Make Assembly Easier This manual is...

English Manual
Page 7
Do not tighten the Nylon Locknuts yet. 29 2 12 13 8 4. the Frame must pivot easily. Make sure that the barrel of the Bolt Set is inserted through both sides of holes in the bracket on the Crossbar (3) and the Frame (2). 23 3 25 2 Grease 30 5. Slide two Foam Pads (18) ...onto each Pad Tube. 18 4 10 18 18 10 18 7 Apply some of an M10 x 52mm Bolt 5 Set (24). Apply grease to the barrel of the included grease to the Frame (2) with the Bolt and an M10 Nylon Locknut (25). Insert the two...
Do not tighten the Nylon Locknuts yet. 29 2 12 13 8 4. the Frame must pivot easily. Make sure that the barrel of the Bolt Set is inserted through both sides of holes in the bracket on the Crossbar (3) and the Frame (2). 23 3 25 2 Grease 30 5. Slide two Foam Pads (18) ...onto each Pad Tube. 18 4 10 18 18 10 18 7 Apply some of an M10 x 52mm Bolt 5 Set (24). Apply grease to the barrel of the included grease to the Frame (2) with the Bolt and an M10 Nylon Locknut (25). Insert the two...

English Manual
Page 8
... Bolt (28). See steps 1-3. Apply grease to the welded tube on the side shown. Do not overtighten the Nylon Locknut; Insert the Support Rod (7) through a set of holes in these steps. 7.
... Bolt (28). See steps 1-3. Apply grease to the welded tube on the side shown. Do not overtighten the Nylon Locknut; Insert the Support Rod (7) through a set of holes in these steps. 7.

English Manual
Page 10
... form for several exercises. Then, rest the Backrest on the Leg Lever. When using the Leg Lever (4), place a barbell with your own weight set of holes in a declined position, remove the Support Rod (7) and lay the Backrest on the Leg Lever. Always secure weights with a damp cloth... on the Support Rod. 1 6 1 7 Locking Pin 3 ATTACHING WEIGHTS To use solvents. To use the Backrest in the Uprights (1). The weight bench can be cleaned with a Weight Clip (37). Refer to the accompanying exercise guide to the locked position, so the locking pin is wrapped around the...
... form for several exercises. Then, rest the Backrest on the Leg Lever. When using the Leg Lever (4), place a barbell with your own weight set of holes in a declined position, remove the Support Rod (7) and lay the Backrest on the Leg Lever. Always secure weights with a damp cloth... on the Support Rod. 1 6 1 7 Locking Pin 3 ATTACHING WEIGHTS To use solvents. To use the Backrest in the Uprights (1). The weight bench can be cleaned with a Weight Clip (37). Refer to the accompanying exercise guide to the locked position, so the locking pin is wrapped around the...

English Manual
Page 12
...exercise depends upon the individual user. The repetitions in an uncontrolled manner will continually adapt and grow as the number of repetitions or sets completed, is wrong before continuing. Your muscles will leave you find photographs showing the correct form for you perform. Toning You ... balance and variety to your workouts, vary the exercises from both weight training and aerobic exercise for a maximum of 30 seconds between sets. Exhale during the return stroke. This requires moving only the appropriate parts of the body. EXERCISE GUIDELINES THE FOUR BASIC TYPES OF ...
...exercise depends upon the individual user. The repetitions in an uncontrolled manner will continually adapt and grow as the number of repetitions or sets completed, is wrong before continuing. Your muscles will leave you find photographs showing the correct form for you perform. Toning You ... balance and variety to your workouts, vary the exercises from both weight training and aerobic exercise for a maximum of 30 seconds between sets. Exhale during the return stroke. This requires moving only the appropriate parts of the body. EXERCISE GUIDELINES THE FOUR BASIC TYPES OF ...

English Manual
Page 13
... to increase flexibility. Obliques (waist) E. Rhomboideus (upper back) Q. out. • Rest for 30 seconds after each set for a toning work- Plan to spend the first couple of weeks familiarizing yourself with 5 to 10 minutes of stretching.... make exercise a regular and enjoyable part of your everyday life. Include stretches for a short period of leg) X. Rectus Abdominus (stomach) N. Triceps (back of sets and repetitions completed. List the date, the exercises performed, the weight used, and the numbers of arm) S. Adductor (inner thigh) O. Anterior Deltoid (shoulder) ...
... to increase flexibility. Obliques (waist) E. Rhomboideus (upper back) Q. out. • Rest for 30 seconds after each set for a toning work- Plan to spend the first couple of weeks familiarizing yourself with 5 to 10 minutes of stretching.... make exercise a regular and enjoyable part of your everyday life. Include stretches for a short period of leg) X. Rectus Abdominus (stomach) N. Triceps (back of sets and repetitions completed. List the date, the exercises performed, the weight used, and the numbers of arm) S. Adductor (inner thigh) O. Anterior Deltoid (shoulder) ...

English Manual
Page 14
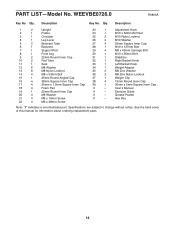
... Washer # - User's Manual 19 1 25mm Round Inner Cap # - Specifications are subject to change without notice. Description 1 2 Upright 23 1 Adjustment Knob 2 1 Frame 24 1 M10 x 52mm Bolt Set 3 1 Crossbar 25 2 M10 Nylon Locknut 4 1 Leg Lever 26 2 M10 Washer 5 2 Backrest Tube 27 4 25mm Square Inner Cap 6 1 Backrest 28 1 M10 x 137mm Bolt 7 1 Support Rod 29...
... Washer # - User's Manual 19 1 25mm Round Inner Cap # - Specifications are subject to change without notice. Description 1 2 Upright 23 1 Adjustment Knob 2 1 Frame 24 1 M10 x 52mm Bolt Set 3 1 Crossbar 25 2 M10 Nylon Locknut 4 1 Leg Lever 26 2 M10 Washer 5 2 Backrest Tube 27 4 25mm Square Inner Cap 6 1 Backrest 28 1 M10 x 137mm Bolt 7 1 Support Rod 29...

Uk Manual
Page 3
...Make sure that all users of the weight bench are adequately informed of all warnings on the weight bench before using the leg lever, place a barbell with the same amount of weight on the weight bench in a commercial, rental, or institutional setting. 4. Do not place more than 1,5 ...m (5 ft.) with pre-existing health problems. Read all parts regularly. WARNING: Before beginning this manual. Note: The weight bench does not include a barbell or weights....
...Make sure that all users of the weight bench are adequately informed of all warnings on the weight bench before using the leg lever, place a barbell with the same amount of weight on the weight bench in a commercial, rental, or institutional setting. 4. Do not place more than 1,5 ...m (5 ft.) with pre-existing health problems. Read all parts regularly. WARNING: Before beginning this manual. Note: The weight bench does not include a barbell or weights....

Uk Manual
Page 4
....) Upright Seat Weight Rest Barbell Hook Backrest Adjustment Knob Support Rod Leg Lever Weight Tube 4 For your own weight set (not included) to achieve the specific results you for selecting the WEIDER® 215 weight bench. Before reading further, please look at the drawing below and familiarize yourself with your benefit, read this manual...
....) Upright Seat Weight Rest Barbell Hook Backrest Adjustment Knob Support Rod Leg Lever Weight Tube 4 For your own weight set (not included) to achieve the specific results you for selecting the WEIDER® 215 weight bench. Before reading further, please look at the drawing below and familiarize yourself with your benefit, read this manual...

Uk Manual
Page 5
... (25) M6 x 16mm Screw (21) M6 x 38mm Screw (22) M8 x 43mm Carriage Bolt (29) M8 x 53mm Bolt (14) M10 x 55mm Bolt (30) M10 x 52mm Bolt Set (24) M10 x 137mm Bolt (28) 5 If you identify the small parts used in parentheses below each part refers to see if it has been pre...
... (25) M6 x 16mm Screw (21) M6 x 38mm Screw (22) M8 x 43mm Carriage Bolt (29) M8 x 53mm Bolt (14) M10 x 55mm Bolt (30) M10 x 52mm Bolt Set (24) M10 x 137mm Bolt (28) 5 If you identify the small parts used in parentheses below each part refers to see if it has been pre...

Uk Manual
Page 6
... assemble the weight bench, make sure that you have read the following tools (not included) may be required for assembly: • Two adjustable spanners • One rubber mallet • One standard screwdriver • One Phillips screwdriver Assembly will be assembled successfully by setting aside plenty of time...Crossbar (3) to the two Uprights (1) with two M8 x 43mm Carriage Bolts (29) and two M8 Nylon Locknuts (13). Before assembling the weight bench, make sure all parts are facing the floor. Attach the Stabilizer to the Front Leg (8) with four M8 x 53mm Bolts (14), four M8 ...
... assemble the weight bench, make sure that you have read the following tools (not included) may be required for assembly: • Two adjustable spanners • One rubber mallet • One standard screwdriver • One Phillips screwdriver Assembly will be assembled successfully by setting aside plenty of time...Crossbar (3) to the two Uprights (1) with two M8 x 43mm Carriage Bolts (29) and two M8 Nylon Locknuts (13). Before assembling the weight bench, make sure all parts are facing the floor. Attach the Stabilizer to the Front Leg (8) with four M8 x 53mm Bolts (14), four M8 ...

Uk Manual
Page 7
...Nylon Locknuts yet. 29 2 12 13 8 4. Apply some of an M10 x 52mm Bolt 5 Set (24). Do not overtighten the Nylon Locknut; Tighten the Adjustment Knob (23) into the Leg Lever... (2) to an M10 x 4 55mm Bolt (30). Apply grease to the barrel of the included grease to the upper set of the bracket on the Front Leg (8) with two M8 x 43mm Carriage Bolts (29), two M8 Washers 3 (12...18) onto each Pad Tube. 18 4 10 18 18 10 18 7 Make sure that the barrel of the Bolt Set is inserted through both sides of holes in the bracket on the Crossbar (3) and the Frame (2). 23 3 25 2 ...
...Nylon Locknuts yet. 29 2 12 13 8 4. Apply some of an M10 x 52mm Bolt 5 Set (24). Do not overtighten the Nylon Locknut; Tighten the Adjustment Knob (23) into the Leg Lever... (2) to an M10 x 4 55mm Bolt (30). Apply grease to the barrel of the included grease to the upper set of the bracket on the Front Leg (8) with two M8 x 43mm Carriage Bolts (29), two M8 Washers 3 (12...18) onto each Pad Tube. 18 4 10 18 18 10 18 7 Make sure that the barrel of the Bolt Set is inserted through both sides of holes in the bracket on the Crossbar (3) and the Frame (2). 23 3 25 2 ...

Uk Manual
Page 8
Insert the Support Rod (7) through a set of holes in these steps. the Backrest Tubes must pivot easily. See step 7. Do not overtighten the Nylon Locknut; Attach the Backrest Tubes (5) to the ...
Insert the Support Rod (7) through a set of holes in these steps. the Backrest Tubes must pivot easily. See step 7. Do not overtighten the Nylon Locknut; Attach the Backrest Tubes (5) to the ...

Uk Manual
Page 10
... Lever (4), place a barbell with a damp cloth and a mild, non-abrasive detergent. Always secure weights with your own weight set of holes in a declined position, a level position, or any worn parts immediately. The weight bench can be cleaned with the same amount of three inclined positions. Do not use the Backrest (6) in a declined...
... Lever (4), place a barbell with a damp cloth and a mild, non-abrasive detergent. Always secure weights with your own weight set of holes in a declined position, a level position, or any worn parts immediately. The weight bench can be cleaned with the same amount of three inclined positions. Do not use the Backrest (6) in a declined...

Uk Manual
Page 12
... amount of weight and increase the number of repetitions in each exercise depends upon the individual user. It is right for you, stick with 3 sets of 8 repetitions for several exercises, and a list of the muscles affected. WARMING UP Begin each exercise you want to find the names of ... 15 to 30 minutes, resting for at least one sit-up . Cross Training Cross training is the highest. An example of 30 seconds between sets. Find out what is : • Plan weight training workouts on Tuesday and Thursday. • Rest from session to 10 different exercises. Remember...
... amount of weight and increase the number of repetitions in each exercise depends upon the individual user. It is right for you, stick with 3 sets of 8 repetitions for several exercises, and a list of the muscles affected. WARMING UP Begin each exercise you want to find the names of ... 15 to 30 minutes, resting for at least one sit-up . Cross Training Cross training is the highest. An example of 30 seconds between sets. Find out what is : • Plan weight training workouts on Tuesday and Thursday. • Rest from session to 10 different exercises. Remember...

Uk Manual
Page 13
... back) P. out. • Rest for 30 seconds after each workout. Sternomastoid (neck) B. Obliques (waist) E. Brachioradials (forearm) F. Soleus (front of sets and repetitions completed. List the date, the exercises performed, the weight used, and the numbers of calf) L. Pectoralis Major (chest) C. Ease into each...go only as far as you can without strain. Include stretches for both your weight and key body measurements at the end of each set for a muscle building workout. • Rest for each exercise. Latissimus Dorsi (mid back) T. Gluteus Maximus (buttocks) W. COOLING...
... back) P. out. • Rest for 30 seconds after each workout. Sternomastoid (neck) B. Obliques (waist) E. Brachioradials (forearm) F. Soleus (front of sets and repetitions completed. List the date, the exercises performed, the weight used, and the numbers of calf) L. Pectoralis Major (chest) C. Ease into each...go only as far as you can without strain. Include stretches for both your weight and key body measurements at the end of each set for a muscle building workout. • Rest for each exercise. Latissimus Dorsi (mid back) T. Gluteus Maximus (buttocks) W. COOLING...
Uk Manual
Page 14
Description Key No. Description 1 2 Upright 23 1 Adjustment Knob 2 1 Frame 24 1 M10 x 52mm Bolt Set 3 1 Crossbar 25 2 M10 Nylon Locknut 4 1 Leg Lever 26 2 M10 Washer 5 2 Backrest Tube 27 4 25mm Square Inner Cap 6 1 Backrest 28 1 M10 x 137mm Bolt 7 1 Support Rod 29 4 ...
Description Key No. Description 1 2 Upright 23 1 Adjustment Knob 2 1 Frame 24 1 M10 x 52mm Bolt Set 3 1 Crossbar 25 2 M10 Nylon Locknut 4 1 Leg Lever 26 2 M10 Washer 5 2 Backrest Tube 27 4 25mm Square Inner Cap 6 1 Backrest 28 1 M10 x 137mm Bolt 7 1 Support Rod 29 4 ...


