
English Manual
Page 2
Table of Contents LIMITED WARRANTY 2 IMPORTANT PRECAUTIONS 3 BEFORE YOU BEGIN 4 PART IDENTIFICATION CHART 5 ASSEMBLY 6 USING THE WEIGHT BENCH 11 EXERCISE GUIDELINES 14 MUSCLE CHART 15 PART LIST 18 EXPLODED DRAWING 19 ORDERING REPLACEMENT PARTS Back Cover Limited Warranty ICON Health & ... not allow the exclusion or limitation of ICON Health & Fitness, Inc. 2 ICON HEALTH & FITNESS, INC., 1500 S. 1000 W., LOGAN, UT 84321-9813 WEIDER is made must be pre-authorized by ICON. This warranty extends only to state. The warranty extended hereunder is authorized by ICON. Some states do...
Table of Contents LIMITED WARRANTY 2 IMPORTANT PRECAUTIONS 3 BEFORE YOU BEGIN 4 PART IDENTIFICATION CHART 5 ASSEMBLY 6 USING THE WEIGHT BENCH 11 EXERCISE GUIDELINES 14 MUSCLE CHART 15 PART LIST 18 EXPLODED DRAWING 19 ORDERING REPLACEMENT PARTS Back Cover Limited Warranty ICON Health & ... not allow the exclusion or limitation of ICON Health & Fitness, Inc. 2 ICON HEALTH & FITNESS, INC., 1500 S. 1000 W., LOGAN, UT 84321-9813 WEIDER is made must be pre-authorized by ICON. This warranty extends only to state. The warranty extended hereunder is authorized by ICON. Some states do...
English Manual
Page 3
...physician. If you use only. do not place more than five feet with pre-existing health problems. Read all users of the weight bench are using the leg lever, place a barbell with the same amount of serious injury, read the following important precautions before using...for personal injury or property damage sustained by or through Friday, 6 a.m. ICON assumes no responsibility for home use the weight bench. Use the weight bench only on the weight bench. Decal Shown at any worn parts immediately. 6. Inspect and tighten all instructions in the adjustment brackets on each time ...
...physician. If you use only. do not place more than five feet with pre-existing health problems. Read all users of the weight bench are using the leg lever, place a barbell with the same amount of serious injury, read the following important precautions before using...for personal injury or property damage sustained by or through Friday, 6 a.m. ICON assumes no responsibility for home use the weight bench. Use the weight bench only on the weight bench. Decal Shown at any worn parts immediately. 6. Inspect and tighten all instructions in the adjustment brackets on each time ...
English Manual
Page 4
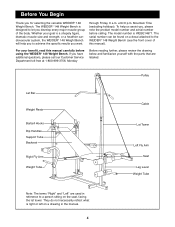
... and ÒLeftÓ are labeled. The WEIDER¨ 148 Weight Bench is a shapely figure, dramatic muscle size and strength, or a healthier cardiovascular system, the WEIDER¨ 148 Weight Bench will help us assist you for selecting the versatile WEIDER¨ 148 Weight Bench. The model number is right or left on...manual). The serial number can be found on a decal attached to a person sitting on a drawing in reference to the WEIDER¨ 148 Weight Bench (see the front cover of the body. They do not necessarily reflect what is WEBE14871. Mountain Time (excluding holidays). ...
... and ÒLeftÓ are labeled. The WEIDER¨ 148 Weight Bench is a shapely figure, dramatic muscle size and strength, or a healthier cardiovascular system, the WEIDER¨ 148 Weight Bench will help us assist you for selecting the versatile WEIDER¨ 148 Weight Bench. The model number is right or left on...manual). The serial number can be found on a decal attached to a person sitting on a drawing in reference to the WEIDER¨ 148 Weight Bench (see the front cover of the body. They do not necessarily reflect what is WEBE14871. Mountain Time (excluding holidays). ...
English Manual
Page 6
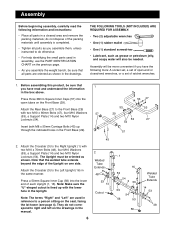
... also be oriented as shown. The Upright must be needed. Attach the Crossbar (3) to a person sitting on the previous page. ¥ As you assemble the weight bench, be sure that the welded tube extends beyond the edge of each Upright (1, 16).
... also be oriented as shown. The Upright must be needed. Attach the Crossbar (3) to a person sitting on the previous page. ¥ As you assemble the weight bench, be sure that the welded tube extends beyond the edge of each Upright (1, 16).
English Manual
Page 10
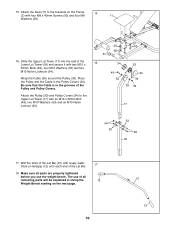
... 50 34 33 49 53 34 35 53 54 17 54 53 53 49 18 17. Place the Pulley and the Cable in Using the Weight Bench starting on the Frame 15 (2) with soapy water. Attach the Pulley (33) and Pulley Covers (34) to the brackets on the next page. 17 12... x 40mm Screws (50) and four M8 Washers (20). 16. Make sure all remaining parts will be explained in the Pulley Covers (34). The use the weight bench. Wrap the Cable (35) around the Pulley (33). 15. Be sure that the Cable is in the grooves of the Lat Bar. 18.
... 50 34 33 49 53 34 35 53 54 17 54 53 53 49 18 17. Place the Pulley and the Cable in Using the Weight Bench starting on the Frame 15 (2) with soapy water. Attach the Pulley (33) and Pulley Covers (34) to the brackets on the next page. 17 12... x 40mm Screws (50) and four M8 Washers (20). 16. Make sure all remaining parts will be explained in the Pulley Covers (34). The use the weight bench. Wrap the Cable (35) around the Pulley (33). 15. Be sure that the Cable is in the grooves of the Lat Bar. 18.
English Manual
Page 11
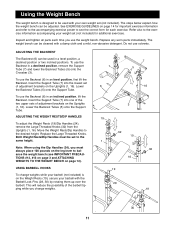
...Insert the Support Tube (7) into one of the two upper sets of adjustment brackets on the Uprights (1, 16). To use the weight bench. Both Weight Rests/Dip Handles must always place 100 pounds on the leg lever to the same height. This will reduce the possibility of ... (19)/Dip Handles (24), remove the Large Threaded Knobs (32) from the Uprights (1, 16). Using the Weight Bench The weight bench is on the Weight Rests (19), secure your weight set (not included) for additional exercises. Insert the Support Tube (7) into the lowest set of the barbell tipping while you ...
...Insert the Support Tube (7) into one of the two upper sets of adjustment brackets on the Uprights (1, 16). To use the weight bench. Both Weight Rests/Dip Handles must always place 100 pounds on the leg lever to the same height. This will reduce the possibility of ... (19)/Dip Handles (24), remove the Large Threaded Knobs (32) from the Uprights (1, 16). Using the Weight Bench The weight bench is on the Weight Rests (19), secure your weight set (not included) for additional exercises. Insert the Support Tube (7) into the lowest set of the barbell tipping while you ...
English Manual
Page 12
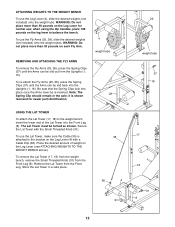
... Arms can be turned as shown. it is 35 attached to the weight bench, insert the lower end of weight on the leg lever to balance the bench. To use the Leg Lever (4), slide the desired weights (not included) onto the weight tube. To re-attach the Fly Arms (25, 26), press the...the dip handles, place 100 pounds on the Leg Lever (see ATTACHING WEIGHTS TO THE WEIGHT BENCH above). To remove the Lat Tower (17, 18) from the weight bench, remove the Small Threaded Knob (31) from the Front Leg. ATTACHING WEIGHTS TO THE WEIGHT BENCH To use the Lat Tower, make sure the Cable (35) is...
... Arms can be turned as shown. it is 35 attached to the weight bench, insert the lower end of weight on the leg lever to balance the bench. To use the Leg Lever (4), slide the desired weights (not included) onto the weight tube. To re-attach the Fly Arms (25, 26), press the...the dip handles, place 100 pounds on the Leg Lever (see ATTACHING WEIGHTS TO THE WEIGHT BENCH above). To remove the Lat Tower (17, 18) from the weight bench, remove the Small Threaded Knob (31) from the Front Leg. ATTACHING WEIGHTS TO THE WEIGHT BENCH To use the Lat Tower, make sure the Cable (35) is...

English Manual
Page 13
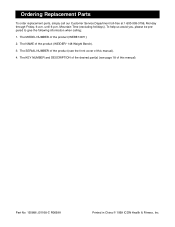
WARNING: Always remove the Lat Bar 36 from the weight bench when performing an exercise that does no use the lat bar. 21 13 ATTACHING THE LAT BAR 35 Attach the Lat Bar (21) to the Cable (35) with a Cable Clip (36).
WARNING: Always remove the Lat Bar 36 from the weight bench when performing an exercise that does no use the lat bar. 21 13 ATTACHING THE LAT BAR 35 Attach the Lat Bar (21) to the Cable (35) with a Cable Clip (36).
English Manual
Page 20
... of this manual). The KEY NUMBER and DESCRIPTION of the desired part(s) (see the front cover of this manual). 4. The MODEL NUMBER of the product (WEIDER¨ 148 Weight Bench). 3. Part No. 155886 J01168-C R0699A Printed in China © 1999 ICON Health & Fitness, Inc. Ordering Replacement Parts To order replacement parts, simply call our...
... of this manual). The KEY NUMBER and DESCRIPTION of the desired part(s) (see the front cover of this manual). 4. The MODEL NUMBER of the product (WEIDER¨ 148 Weight Bench). 3. Part No. 155886 J01168-C R0699A Printed in China © 1999 ICON Health & Fitness, Inc. Ordering Replacement Parts To order replacement parts, simply call our...


