
English Manual
Page 2
...states do not allow limitations on how long an implied warranty lasts. You may also have other warranty beyond that specifically set forth herein. LIMITED WARRANTY ICON Health & Fitness. ICON's obligation under normal use and service conditions, consistent with applicable instructions... WARRANTY IMPORTANT PRECAUTIONS BEFORE YOU BEGIN PART IDENTIFICATION CHART ASSEMBLY USING THE WEIGHT BENCH EXERCISE GUIDELINES PART LIST EXPLODED DRAWING ORDERING REPLACEMENT PARTS 2 3 4 5 6 10 11 14 15 Back Cover WEIDER is a registered trademark of whatsoever nature. No other rights which warranty...
...states do not allow limitations on how long an implied warranty lasts. You may also have other warranty beyond that specifically set forth herein. LIMITED WARRANTY ICON Health & Fitness. ICON's obligation under normal use and service conditions, consistent with applicable instructions... WARRANTY IMPORTANT PRECAUTIONS BEFORE YOU BEGIN PART IDENTIFICATION CHART ASSEMBLY USING THE WEIGHT BENCH EXERCISE GUIDELINES PART LIST EXPLODED DRAWING ORDERING REPLACEMENT PARTS 2 3 4 5 6 10 11 14 15 Back Cover WEIDER is a registered trademark of whatsoever nature. No other rights which warranty...

English Manual
Page 3
... that the support rod is especially important for only. exercising, stop immediately and begin cool- Use the weight bench only on each fly arm; commercial, rental, or institutional setting. 5. Always be sure there is designed to the locked position. If the decal is the responsibility of... the weight bench are using the leg lever, place the barbell with the same amount of weight on the weight bench. Inspect and tighten all ...
... that the support rod is especially important for only. exercising, stop immediately and begin cool- Use the weight bench only on each fly arm; commercial, rental, or institutional setting. 5. Always be sure there is designed to the locked position. If the decal is the responsibility of... the weight bench are using the leg lever, place the barbell with the same amount of weight on the weight bench. Inspect and tighten all ...

English Manual
Page 6
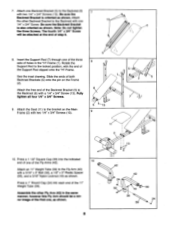
... (27) and two 5/16" Nylon Locknuts (19). 1 High Side of the "H"-Frame (1). Press a 1 3/4" Square Inner Cap (21) into each end of the weight rests must be sure that all parts are oriented as shown in assembly, use the PART IDENTIFICATION CHART on the side indicated. 2. Before you have... jelly, and soapy water will be more convenient if you assemble the weight bench, be on the previous page. • As you have read the following tools: A socket set, a set of open-end or closed-end wrenches, or a set of ratchet wrenches. 1. The high side of the Stabilizer (3). do ...
... (27) and two 5/16" Nylon Locknuts (19). 1 High Side of the "H"-Frame (1). Press a 1 3/4" Square Inner Cap (21) into each end of the weight rests must be sure that all parts are oriented as shown in assembly, use the PART IDENTIFICATION CHART on the side indicated. 2. Before you have... jelly, and soapy water will be more convenient if you assemble the weight bench, be on the previous page. • As you have read the following tools: A socket set, a set of open-end or closed-end wrenches, or a set of ratchet wrenches. 1. The high side of the Stabilizer (3). do ...
English Manual
Page 8
.... - Attach the Seat (11) to the bracket on the Frame (2). . 1 Attach the free end of the Support Rod clipped onto the "H"-Frame. Attach an 11" Weight Tube (39) to the Backrest (6) 7 with the end of the Backrest Bracket (5) to the Backrest (6) with a 5/16" x 5" Bolt (32), a 1/2" x ...1/4" x 3/4" Screws (13). 9 6 5 - 2 5 7 .." 10. The fourth 1/4" x 3/4" Screw will be a mirror Image of the first one of the three sets of the Fly Arms (42). Be sure the Backrest Bracket is also oriented as shown. Assemble the other Backrest Bracket to the locked position, with...
.... - Attach the Seat (11) to the bracket on the Frame (2). . 1 Attach the free end of the Support Rod clipped onto the "H"-Frame. Attach an 11" Weight Tube (39) to the Backrest (6) 7 with the end of the Backrest Bracket (5) to the Backrest (6) with a 5/16" x 5" Bolt (32), a 1/2" x ...1/4" x 3/4" Screws (13). 9 6 5 - 2 5 7 .." 10. The fourth 1/4" x 3/4" Screw will be a mirror Image of the first one of the three sets of the Fly Arms (42). Be sure the Backrest Bracket is also oriented as shown. Assemble the other Backrest Bracket to the locked position, with...
English Manual
Page 10
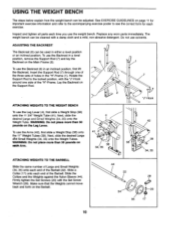
... first slide a Weight Stop (38) onto the 11 3/4" Weight Tube (41). Next, slide the desired Large and Small Weights (34, 35) onto the Weight Tube. Lay the Backrest on the Leg Lever. Firmly tighten the Set Screws (20) with the Set Screw Wrench (29). USING THE WEIGHT BENCH The steps below... explain how the weight bench can be cleaned with a damp cloth...
... first slide a Weight Stop (38) onto the 11 3/4" Weight Tube (41). Next, slide the desired Large and Small Weights (34, 35) onto the Weight Tube. Lay the Backrest on the Leg Lever. Firmly tighten the Set Screws (20) with the Set Screw Wrench (29). USING THE WEIGHT BENCH The steps below... explain how the weight bench can be cleaned with a damp cloth...
English Manual
Page 11
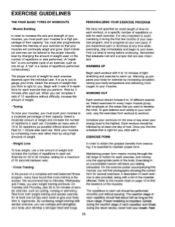
... exercising, it . Each individual exercise can be followed by increasing circulation, raising your body temperature and delivering more sets rather than by changing the amount of weight used, or the number of repetitions or sets performed. (A "repetition" is very important to avoid overdoing it during the return stroke; Rest for every major muscle...
... exercising, it . Each individual exercise can be followed by increasing circulation, raising your body temperature and delivering more sets rather than by changing the amount of weight used, or the number of repetitions or sets performed. (A "repetition" is very important to avoid overdoing it during the return stroke; Rest for every major muscle...
English Manual
Page 12
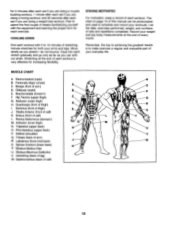
...) J. Plan to schedule and record your everyday life. Sartorius (front of thigh) I. Triceps (back of sets and repetitions completed. List the date, exercises performed, weight, and numbers of arm) Latissimus Dorsi (mid back) S. Remember, the key to achieving the greatest results ...equipment and learning the proper form for both your weight and key body measurements at the end of calf) A B G K -N O O ty R 8nAtil S L t 12 Include stretches for each workout is to 10 minutes of each set if you are doing a weight loss workout. MUSCLE CHART A. Sternomastoid (neck) ...
...) J. Plan to schedule and record your everyday life. Sartorius (front of thigh) I. Triceps (back of sets and repetitions completed. List the date, exercises performed, weight, and numbers of arm) Latissimus Dorsi (mid back) S. Remember, the key to achieving the greatest results ...equipment and learning the proper form for both your weight and key body measurements at the end of calf) A B G K -N O O ty R 8nAtil S L t 12 Include stretches for each workout is to 10 minutes of each set if you are doing a weight loss workout. MUSCLE CHART A. Sternomastoid (neck) ...
English Manual
Page 13
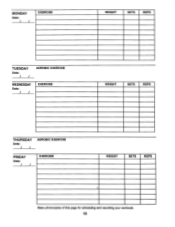
MONDAY Date: / / EXERCISE WEIGHT SETS REPS TUESDAY Date: / / AEROBIC EXERCISE WEDNESDAY Date: / / EXERCISE WEIGHT SETS REPS THURSDAY Date: / / AEROBIC EXERCISE FRIDAY Date: / / EXERCISE WEIGHT SETS REPS Make photocopies of this page for scheduling and recording your workouts. 13
MONDAY Date: / / EXERCISE WEIGHT SETS REPS TUESDAY Date: / / AEROBIC EXERCISE WEDNESDAY Date: / / EXERCISE WEIGHT SETS REPS THURSDAY Date: / / AEROBIC EXERCISE FRIDAY Date: / / EXERCISE WEIGHT SETS REPS Make photocopies of this page for scheduling and recording your workouts. 13
English Manual
Page 14
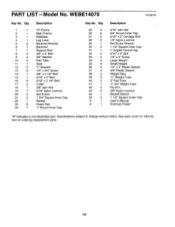
... Cap 5/16" x 2" Carriage Bolt 1/4" Nylon Locknut Set Screw Wrench 1 1/2" Square Inner Cap 1" Angled Round Cap 5/16" x 5" Bolt 1/4" x 2" Screw Large Weight Small Weight 1/2" x 3" Plastic Spacer 3/8" Plastic Sleeve Weight Stop 11" Weight Tube 9" Pad Tube 11 3/4" Weight Tube Fly Arm 3/8" Nylon Locknut Barbell Sleeve 1 1/2" Square... 3/4" Screw 3/8" x 2 1/4" Bolt 5/16" x 2" Bolt 5/16" x 2 1/4" Bolt Collar 3/8" Jam Nut 5/16" Nylon Locknut Set Screw 1 3/4" Square Inner Cap Barbell Foam Pad 1" Round Inner Cap Key No. Specifications subject to change without notice. See back cover for information...
... Cap 5/16" x 2" Carriage Bolt 1/4" Nylon Locknut Set Screw Wrench 1 1/2" Square Inner Cap 1" Angled Round Cap 5/16" x 5" Bolt 1/4" x 2" Screw Large Weight Small Weight 1/2" x 3" Plastic Spacer 3/8" Plastic Sleeve Weight Stop 11" Weight Tube 9" Pad Tube 11 3/4" Weight Tube Fly Arm 3/8" Nylon Locknut Barbell Sleeve 1 1/2" Square... 3/4" Screw 3/8" x 2 1/4" Bolt 5/16" x 2" Bolt 5/16" x 2 1/4" Bolt Collar 3/8" Jam Nut 5/16" Nylon Locknut Set Screw 1 3/4" Square Inner Cap Barbell Foam Pad 1" Round Inner Cap Key No. Specifications subject to change without notice. See back cover for information...


