
English Manual
Page 2
... of the product or damages with applicable instructions and warnings, for a period of ninety (90) days from state to the terms set forth above is a registered trademark of ICON Health & Fitness, Inc. All products for commercial or rental purposes, or products used ...CONTENTS LIMITED WARRANTY IMPORTANT PRECAUTIONS BEFORE YOU BEGIN PART IDENTIFICATION CHART ASSEMBLY USING THE WEIGHT BENCH EXERCISE GUIDELINES PART LIST EXPLODED DRAWING ORDERING REPLACEMENT PARTS 2 3 4 5 6 10 11 14 15 Back Cover WEIDER is authorized by sufficient proof of purchase. LIMITED WARRANTY ICON Health & Fitness. ...
... of the product or damages with applicable instructions and warnings, for a period of ninety (90) days from state to the terms set forth above is a registered trademark of ICON Health & Fitness, Inc. All products for commercial or rental purposes, or products used ...CONTENTS LIMITED WARRANTY IMPORTANT PRECAUTIONS BEFORE YOU BEGIN PART IDENTIFICATION CHART ASSEMBLY USING THE WEIGHT BENCH EXERCISE GUIDELINES PART LIST EXPLODED DRAWING ORDERING REPLACEMENT PARTS 2 3 4 5 6 10 11 14 15 Back Cover WEIDER is authorized by sufficient proof of purchase. LIMITED WARRANTY ICON Health & Fitness. ...

English Manual
Page 3
...exercising. It is an equal amount of weight on the weight rests to balance the bench. 10. commercial, rental, or institutional setting. 5. Always be sure there is the responsibility of 360 pounds, Including the user, a weight bar, and weights. Read Wert manual and tiow instructims. ...Decal Shown at 1-800-999-3756, Monday through Friday, 6 a.m. O 12. The weight bench is inserted completely ...
...exercising. It is an equal amount of weight on the weight rests to balance the bench. 10. commercial, rental, or institutional setting. 5. Always be sure there is the responsibility of 360 pounds, Including the user, a weight bar, and weights. Read Wert manual and tiow instructims. ...Decal Shown at 1-800-999-3756, Monday through Friday, 6 a.m. O 12. The weight bench is inserted completely ...

English Manual
Page 6
Before you assemble the weight bench, be more convenient if you have the following information and instructions: • Place all parts as you ...25) as grease or petroleum jelly, and soapy water will be sure that you have read the following tools: A socket set, a set of open-end or closed-end wrenches, or a set of Weight Rests 16 2 2 .... 12 4..., 21 16 12 25 a eg0-21 2 19 45 3 27 45 6 Attach ... materials until assembly is completed. • Tighten all parts in the drawings. do not dispose of the weight rests must be on the previous page. • As you assemble the...
Before you assemble the weight bench, be more convenient if you have the following information and instructions: • Place all parts as you ...25) as grease or petroleum jelly, and soapy water will be sure that you have read the following tools: A socket set, a set of open-end or closed-end wrenches, or a set of Weight Rests 16 2 2 .... 12 4..., 21 16 12 25 a eg0-21 2 19 45 3 27 45 6 Attach ... materials until assembly is completed. • Tighten all parts in the drawings. do not dispose of the weight rests must be on the previous page. • As you assemble the...
English Manual
Page 8
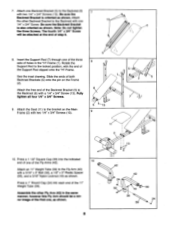
... - Press a 1" Round Cap (24) into the indicated end of one of the three sets of holes in the "H"-Frame (1). Attach the other Fly Arm (42) In the same manner; Insert the Support Rod (7) through one of the 11" Weight Tube (39). See the inset drawing. Press a 1 1/2" Square Cap (30) into each... Note: Do not tighten the three Screws. Slide the ends of the Backrest Bracket (5) to the Fly Arm (42) with a 1/4" x 3/4" Screw (13). Attach an 11" Weight Tube (39) to the Backrest (6) with a 5/16" x 5" Bolt (32), a 1/2" x 3" Plastic Spacer (36), and a 5/16" Nylon Locknut (19) as shown.
... - Press a 1" Round Cap (24) into the indicated end of one of the three sets of holes in the "H"-Frame (1). Attach the other Fly Arm (42) In the same manner; Insert the Support Rod (7) through one of the 11" Weight Tube (39). See the inset drawing. Press a 1 1/2" Square Cap (30) into each... Note: Do not tighten the three Screws. Slide the ends of the Backrest Bracket (5) to the Fly Arm (42) with a 1/4" x 3/4" Screw (13). Attach an 11" Weight Tube (39) to the Backrest (6) with a 5/16" x 5" Bolt (32), a 1/2" x 3" Plastic Spacer (36), and a 5/16" Nylon Locknut (19) as shown.
English Manual
Page 10
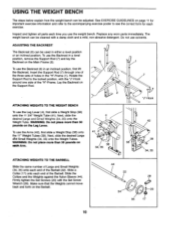
... exercise. Do not use the Backrest in an inclined position, first lift the Backrest. Firmly tighten the Set Screws (20) with a damp cloth and a mild, non-abrasive detergent. The weight bench can be adjusted. Lay the Backrest on the Barbell. 44 22 29 0, 34 • 20... exercise information and refer to the accompanying exercise poster to the locked position, with the "J"-Hook around one of the three sets of the Barbell (22). Make sure that the Weights cannot move back and forth on the Support Rod. See EXERCISE GUIDELINES on eabh Arm. 6 • 2 1 0 7 0 V "J"-Hook...
... exercise. Do not use the Backrest in an inclined position, first lift the Backrest. Firmly tighten the Set Screws (20) with a damp cloth and a mild, non-abrasive detergent. The weight bench can be adjusted. Lay the Backrest on the Barbell. 44 22 29 0, 34 • 20... exercise information and refer to the accompanying exercise poster to the locked position, with the "J"-Hook around one of the three sets of the Barbell (22). Make sure that the Weights cannot move back and forth on the Support Rod. See EXERCISE GUIDELINES on eabh Arm. 6 • 2 1 0 7 0 V "J"-Hook...
English Manual
Page 11
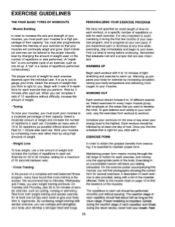
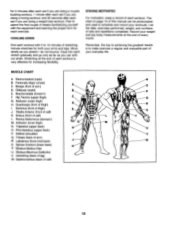
...of rest. Rest for each set . We have found that you want to develop the most. WARMING UP Begin each set . EXERCISE FORM • Weight Loss To lose weight, use a low amount of weight and increase the number of repetitions in each set should be followed by increasing ...circulation, raising your body temperature and delivering more sets rather than by changing the amount of weight used, or the number of repetitions or sets performed. (A "repetition" is the answer. Exercising in each set . The exertion stage of each repetition and inhale during the...
...of rest. Rest for each set . We have found that you want to develop the most. WARMING UP Begin each set . EXERCISE FORM • Weight Loss To lose weight, use a low amount of weight and increase the number of repetitions in each set should be followed by increasing ...circulation, raising your body temperature and delivering more sets rather than by changing the amount of weight used, or the number of repetitions or sets performed. (A "repetition" is the answer. Exercising in each set . The exertion stage of each repetition and inhale during the...
English Manual
Page 12
...you can without strain. Tibialis Anterior (front of arm) D. Ease into each workout is to schedule and record your weight and key body measurements at the end of each set if you are doing a toning workout, and 30 seconds after each workout. Obliques (waist) E. Brachioradials (forearm) ... as you stretch-do not bounce. Sartorius (front of thigh) I. for 3 minutes after each set if you are doing a muscle building workout, 1 minute after each set if you are doing a weight loss workout. Quadriceps (front of thigh) J. Remember, the key to achieving the greatest results is...
...you can without strain. Tibialis Anterior (front of arm) D. Ease into each workout is to schedule and record your weight and key body measurements at the end of each set if you are doing a toning workout, and 30 seconds after each workout. Obliques (waist) E. Brachioradials (forearm) ... as you stretch-do not bounce. Sartorius (front of thigh) I. for 3 minutes after each set if you are doing a muscle building workout, 1 minute after each set if you are doing a weight loss workout. Quadriceps (front of thigh) J. Remember, the key to achieving the greatest results is...
English Manual
Page 13
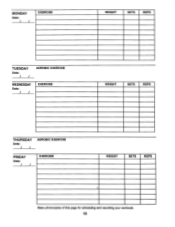
MONDAY Date: / / EXERCISE WEIGHT SETS REPS TUESDAY Date: / / AEROBIC EXERCISE WEDNESDAY Date: / / EXERCISE WEIGHT SETS REPS THURSDAY Date: / / AEROBIC EXERCISE FRIDAY Date: / / EXERCISE WEIGHT SETS REPS Make photocopies of this page for scheduling and recording your workouts. 13
MONDAY Date: / / EXERCISE WEIGHT SETS REPS TUESDAY Date: / / AEROBIC EXERCISE WEDNESDAY Date: / / EXERCISE WEIGHT SETS REPS THURSDAY Date: / / AEROBIC EXERCISE FRIDAY Date: / / EXERCISE WEIGHT SETS REPS Make photocopies of this page for scheduling and recording your workouts. 13
English Manual
Page 14
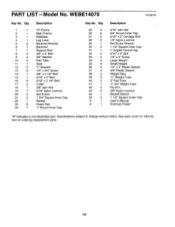
...Jam Nut 3/4" Round Inner Cap 5/16" x 2" Carriage Bolt 1/4" Nylon Locknut Set Screw Wrench 1 1/2" Square Inner Cap 1" Angled Round Cap 5/16" x 5" Bolt 1/4" x 2" Screw Large Weight Small Weight 1/2" x 3" Plastic Spacer 3/8" Plastic Sleeve Weight Stop 11" Weight Tube 9" Pad Tube 11 3/4" Weight Tube Fly Arm 3/8" Nylon Locknut Barbell Sleeve 1 1/2" Square Outer Cap User's Manual... Pad Tube Seat "L"-Bracket 1/4" x 3/4" Screw 3/8" x 2 1/4" Bolt 5/16" x 2" Bolt 5/16" x 2 1/4" Bolt Collar 3/8" Jam Nut 5/16" Nylon Locknut Set Screw 1 3/4" Square Inner Cap Barbell Foam Pad 1" Round Inner Cap Key No.
...Jam Nut 3/4" Round Inner Cap 5/16" x 2" Carriage Bolt 1/4" Nylon Locknut Set Screw Wrench 1 1/2" Square Inner Cap 1" Angled Round Cap 5/16" x 5" Bolt 1/4" x 2" Screw Large Weight Small Weight 1/2" x 3" Plastic Spacer 3/8" Plastic Sleeve Weight Stop 11" Weight Tube 9" Pad Tube 11 3/4" Weight Tube Fly Arm 3/8" Nylon Locknut Barbell Sleeve 1 1/2" Square Outer Cap User's Manual... Pad Tube Seat "L"-Bracket 1/4" x 3/4" Screw 3/8" x 2 1/4" Bolt 5/16" x 2" Bolt 5/16" x 2 1/4" Bolt Collar 3/8" Jam Nut 5/16" Nylon Locknut Set Screw 1 3/4" Square Inner Cap Barbell Foam Pad 1" Round Inner Cap Key No.


