
English Manual
Page 1
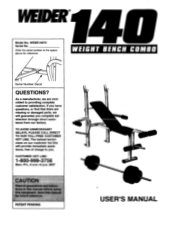
WEBE14070 Serial No. Write the serial number in this manual before using this manual for reference. As a manufacturer, we are missing or damaged parts, we will provide immediate assistance, free of charge to providing complete customer satisfaction. PATENT PENDING USER'S MANUAL WEIDERMIll Model No. TO AVOID UNNECESSARY DELAYS, PLEASE CALL DIRECT TO OUR TOLL-FREE CUSTOMER HOT LINE. The trained technicians on our customer hot...
WEBE14070 Serial No. Write the serial number in this manual before using this manual for reference. As a manufacturer, we are missing or damaged parts, we will provide immediate assistance, free of charge to providing complete customer satisfaction. PATENT PENDING USER'S MANUAL WEIDERMIll Model No. TO AVOID UNNECESSARY DELAYS, PLEASE CALL DIRECT TO OUR TOLL-FREE CUSTOMER HOT LINE. The trained technicians on our customer hot...
English Manual
Page 2
... transportation charges prepaid, accompanied by ICON at one of whatsoever nature. Some states do not allow the exclusion or limitation of incidental or consequential damages. This warranty gives you . TABLE OF CONTENTS LIMITED WARRANTY IMPORTANT PRECAUTIONS BEFORE YOU BEGIN PART IDENTIFICATION CHART ASSEMBLY USING THE WEIGHT BENCH EXERCISE GUIDELINES PART LIST EXPLODED DRAWING ORDERING REPLACEMENT PARTS 2 3 4 5 6 10 11 14 15 Back Cover WEIDER is a registered trademark of purchase...
... transportation charges prepaid, accompanied by ICON at one of whatsoever nature. Some states do not allow the exclusion or limitation of incidental or consequential damages. This warranty gives you . TABLE OF CONTENTS LIMITED WARRANTY IMPORTANT PRECAUTIONS BEFORE YOU BEGIN PART IDENTIFICATION CHART ASSEMBLY USING THE WEIGHT BENCH EXERCISE GUIDELINES PART LIST EXPLODED DRAWING ORDERING REPLACEMENT PARTS 2 3 4 5 6 10 11 14 15 Back Cover WEIDER is a registered trademark of purchase...

English Manual
Page 3
... Instructions before using the leg lever, place the barbell with the same amount of weight on each fly arm; AVA T1 Donotabstchildrenonor around machine. Keephands and teed wayfrom moving parts. ICON assumes no responsibility for only. It is missing, or if it . 16. commercial, rental, or institutional setting. 5. Inspect and tighten all instructions in this manual before using the backrest in this or any exercise program...
... Instructions before using the leg lever, place the barbell with the same amount of weight on each fly arm; AVA T1 Donotabstchildrenonor around machine. Keephands and teed wayfrom moving parts. ICON assumes no responsibility for only. It is missing, or if it . 16. commercial, rental, or institutional setting. 5. Inspect and tighten all instructions in this manual before using the backrest in this or any exercise program...

English Manual
Page 4
... calling. Whether your benefit, read this manual). Mountain Time (excluding holidays). The serial number can be found on a decal attached to achieve the specific results you , please note the product model number and serial number before using the WEIDER® 140 Weight Bench. "H"-Frame Right Arm 0 Seat 0 Leg Lever Weight Tube 0 Large Weight Locking Collar Barbell Rest Backrest Support Rod Left Arm Weight Tube Barbell Small Weight 4 For your goal is a shapely...
... calling. Whether your benefit, read this manual). Mountain Time (excluding holidays). The serial number can be found on a decal attached to achieve the specific results you , please note the product model number and serial number before using the WEIDER® 140 Weight Bench. "H"-Frame Right Arm 0 Seat 0 Leg Lever Weight Tube 0 Large Weight Locking Collar Barbell Rest Backrest Support Rod Left Arm Weight Tube Barbell Small Weight 4 For your goal is a shapely...
English Manual
Page 5
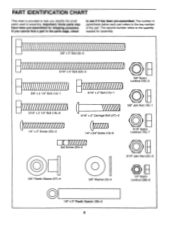
... needed for shipping purposes. PART IDENTIFICATION CHART This chart is provided to see if it has been pre-assembled. The number in assembly. Important: Some parts may have been pre-assembled for assembly. 111111111111\1\11\1111111111111\1\11111111111111\1111 3/8" x 5" Bolt (8)-2 1 CO) \6 \x\ "\M I 3/8" Nylon Locknut (43)-2 \\1111111111111\11111g 1111111111111111\111111 3/8" x 2 1/4" Bolt (14)-1 5/16" x 2" Bolt (15)-1 \\\111111111111111\11111A 5/16" x 2 1/4" Bolt (16)-6 5/16" x 2" Carriage Bolt (27)-2 ( V. 1/4" x 2" Screw (33)-2 (\\\\\\\\\ 1/4" x 3/4" Screw...
... needed for shipping purposes. PART IDENTIFICATION CHART This chart is provided to see if it has been pre-assembled. The number in assembly. Important: Some parts may have been pre-assembled for assembly. 111111111111\1\11\1111111111111\1\11111111111111\1111 3/8" x 5" Bolt (8)-2 1 CO) \6 \x\ "\M I 3/8" Nylon Locknut (43)-2 \\1111111111111\11111g 1111111111111111\111111 3/8" x 2 1/4" Bolt (14)-1 5/16" x 2" Bolt (15)-1 \\\111111111111111\11111A 5/16" x 2 1/4" Bolt (16)-6 5/16" x 2" Carriage Bolt (27)-2 ( V. 1/4" x 2" Screw (33)-2 (\\\\\\\\\ 1/4" x 3/4" Screw...

English Manual
Page 6
... you assemble the weight bench, be sure that you have the following information and instructions: • Place all parts as you assemble them, unless instructed to the indicated side of the "H"-Frame (1) with the two 5/16" x 2" Carriage Bolts (27) and two 5/16" Nylon Locknuts (19). 1 High Side of the packing materials until assembly is completed. • Tighten all parts in assembly, use the PART IDENTIFICATION CHART...
... you assemble the weight bench, be sure that you have the following information and instructions: • Place all parts as you assemble them, unless instructed to the indicated side of the "H"-Frame (1) with the two 5/16" x 2" Carriage Bolts (27) and two 5/16" Nylon Locknuts (19). 1 High Side of the packing materials until assembly is completed. • Tighten all parts in assembly, use the PART IDENTIFICATION CHART...

English Manual
Page 7
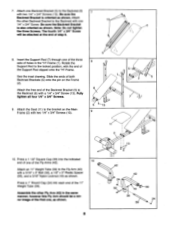
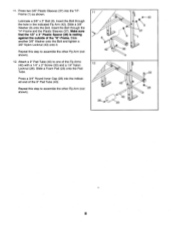
... (10). The high side of the weight rests must be on the side indicated. The Leg Lever must be able to the Main Frame (2) with two 5/16" x 2 1/4" Bolts (16) and two 5/16" Nylon Locknuts (19). 4. 3. Press the 1" Angled Round Cap (31) onto the Weight Tube. Attach the Leg Lever (4) to pivot freely. 5 Lubricate-14 2 4 . . 0- 0 0 18 ro 6. s 10 7 23...
... (10). The high side of the weight rests must be on the side indicated. The Leg Lever must be able to the Main Frame (2) with two 5/16" x 2 1/4" Bolts (16) and two 5/16" Nylon Locknuts (19). 4. 3. Press the 1" Angled Round Cap (31) onto the Weight Tube. Attach the Leg Lever (4) to pivot freely. 5 Lubricate-14 2 4 . . 0- 0 0 18 ro 6. s 10 7 23...
English Manual
Page 8
... the ends of both Backrest Brackets (5) onto the pin on the Main Frame (2) with a 5/16" x 5" Bolt (32), a 1/2" x 3" Plastic Spacer (36), and a 5/16" Nylon Locknut (19) as shown. 10 . 7. Attach the other Fly Arm (42) In the same manner; Note: Do not tighten the three Screws. Fully tighten all four 1/4" x 3/4" Screws. - Press a 1" Round Cap (24) into the indicated end of...
... the ends of both Backrest Brackets (5) onto the pin on the Main Frame (2) with a 5/16" x 5" Bolt (32), a 1/2" x 3" Plastic Spacer (36), and a 5/16" Nylon Locknut (19) as shown. 10 . 7. Attach the other Fly Arm (42) In the same manner; Note: Do not tighten the three Screws. Fully tighten all four 1/4" x 3/4" Screws. - Press a 1" Round Cap (24) into the indicated end of...
English Manual
Page 9
...) into the "H"Frame (1) as shown. Lubricate a 3/8" x 5" Bolt (8). Repeat this step to assemble the other Fly Arm (not shown). 12. Slide a 3/8" Washer (9) onto the Bolt. Slide another 3/8" Washer onto the Bolt and tighten a 3/8" Nylon Locknut (43) onto it. 11. Repeat this step to one of the Fly Arms (42) with a 1/4" x 2" Screw (33) and a 1/4" Nylon Locknut (28). Press two 3/8" Plastic Sleeves (37) into the...
...) into the "H"Frame (1) as shown. Lubricate a 3/8" x 5" Bolt (8). Repeat this step to assemble the other Fly Arm (not shown). 12. Slide a 3/8" Washer (9) onto the Bolt. Slide another 3/8" Washer onto the Bolt and tighten a 3/8" Nylon Locknut (43) onto it. 11. Repeat this step to one of the Fly Arms (42) with a 1/4" x 2" Screw (33) and a 1/4" Nylon Locknut (28). Press two 3/8" Plastic Sleeves (37) into the...
English Manual
Page 10
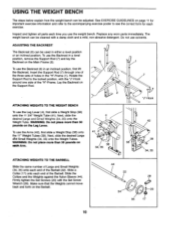
... Frame (2). Inspect and tighten all parts each end of holes in a level position, remove the Support Rod (7) and lay the Backrest on the Leg Lever. Firmly tighten the Set Screws (20) with the "J"-Hook around one of the three sets of the Barbell. The weight bench can be adjusted. To use the weight bench. USING THE WEIGHT BENCH The steps below explain how the weight bench can be used in either a level...
... Frame (2). Inspect and tighten all parts each end of holes in a level position, remove the Support Rod (7) and lay the Backrest on the Leg Lever. Firmly tighten the Set Screws (20) with the "J"-Hook around one of the three sets of the Barbell. The weight bench can be adjusted. To use the weight bench. USING THE WEIGHT BENCH The steps below explain how the weight bench can be used in either a level...
English Manual
Page 11
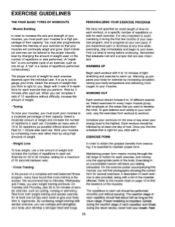
... a maximum of 30 seconds between sets. • Cross Training In the pursuit of a complete and well-balanced fitness program, many sets of 15 to 20 repetitions as the return stage. Maintaining proper form means moving only the appropriate parts of the body. On the exercise poster accompanying this manual, you will find photographs showing the correct form for each exercise that your breath. Proper breathing...
... a maximum of 30 seconds between sets. • Cross Training In the pursuit of a complete and well-balanced fitness program, many sets of 15 to 20 repetitions as the return stage. Maintaining proper form means moving only the appropriate parts of the body. On the exercise poster accompanying this manual, you will find photographs showing the correct form for each exercise that your breath. Proper breathing...
English Manual
Page 12
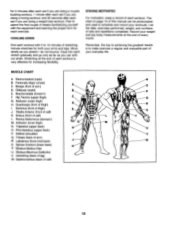
STAYING MOTIVATED For motivation, keep a record of sets and repetitions completed. List the date, exercises performed, weight, and numbers of each workout. Sternomastoid (neck) B. Quadriceps (front of arm) Latissimus Dorsi (mid back) S. Triceps (back of thigh) I. Gluteus Maximus (buttocks) V. The chart on page 13 of your everyday life. Remember, the key to achieving the greatest results is very effective for...
STAYING MOTIVATED For motivation, keep a record of sets and repetitions completed. List the date, exercises performed, weight, and numbers of each workout. Sternomastoid (neck) B. Quadriceps (front of arm) Latissimus Dorsi (mid back) S. Triceps (back of thigh) I. Gluteus Maximus (buttocks) V. The chart on page 13 of your everyday life. Remember, the key to achieving the greatest results is very effective for...
English Manual
Page 13
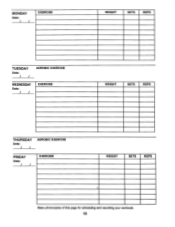
MONDAY Date: / / EXERCISE WEIGHT SETS REPS TUESDAY Date: / / AEROBIC EXERCISE WEDNESDAY Date: / / EXERCISE WEIGHT SETS REPS THURSDAY Date: / / AEROBIC EXERCISE FRIDAY Date: / / EXERCISE WEIGHT SETS REPS Make photocopies of this page for scheduling and recording your workouts. 13
MONDAY Date: / / EXERCISE WEIGHT SETS REPS TUESDAY Date: / / AEROBIC EXERCISE WEDNESDAY Date: / / EXERCISE WEIGHT SETS REPS THURSDAY Date: / / AEROBIC EXERCISE FRIDAY Date: / / EXERCISE WEIGHT SETS REPS Make photocopies of this page for scheduling and recording your workouts. 13
English Manual
Page 14
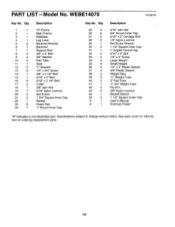
... 3/4" Weight Tube Fly Arm 3/8" Nylon Locknut Barbell Sleeve 1 1/2" Square Outer Cap User's Manual Exercise Poster "#" Indicates a non-illustrated part. Specifications subject to change without notice. Qty. 1 1 2 1 3 1 4 1 5 2 6 1 7 1 8 2 9 4 10 2 11 1 12 2 13 6 14 1 15 1 16 6 17 2 18 1 19 7 20 2 21 2 22 1 23 6 24 7 Description "H"-Frame Main Frame Stabilizer Leg Lever Backrest Bracket Backrest Support Rod 3/8" x 5" Bolt 3/8" Washer Pad Tube Seat "L"-Bracket 1/4" x 3/4" Screw 3/8" x 2 1/4" Bolt 5/16" x 2" Bolt 5/16" x 2 1/4" Bolt Collar...
... 3/4" Weight Tube Fly Arm 3/8" Nylon Locknut Barbell Sleeve 1 1/2" Square Outer Cap User's Manual Exercise Poster "#" Indicates a non-illustrated part. Specifications subject to change without notice. Qty. 1 1 2 1 3 1 4 1 5 2 6 1 7 1 8 2 9 4 10 2 11 1 12 2 13 6 14 1 15 1 16 6 17 2 18 1 19 7 20 2 21 2 22 1 23 6 24 7 Description "H"-Frame Main Frame Stabilizer Leg Lever Backrest Bracket Backrest Support Rod 3/8" x 5" Bolt 3/8" Washer Pad Tube Seat "L"-Bracket 1/4" x 3/4" Screw 3/8" x 2 1/4" Bolt 5/16" x 2" Bolt 5/16" x 2 1/4" Bolt Collar...
English Manual
Page 15
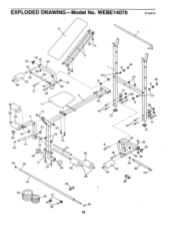
a 26 ''42 33 8 19 36 30 32 6. 40 28 23 26 24 39 24 38 CD 34 CD 35 17 20 24 15 EXPLODED DRAWING Model No. WEBE14070 R1097A 6 O O 7 13 33 30-4 , 42 • 40 24 23 26 8 39 . 13 *-'s- 19 24 0 36 32 11 26 23 14 4 0 31 19 30 41 15 24 18 19 13 r. 10 45 22 3 27 45 23 44 29 5 2 0 9 43 0 37 16 16 I- 19 12 5 9 0 9 4: 37 25 21 - 12 16 21 23 6.
a 26 ''42 33 8 19 36 30 32 6. 40 28 23 26 24 39 24 38 CD 34 CD 35 17 20 24 15 EXPLODED DRAWING Model No. WEBE14070 R1097A 6 O O 7 13 33 30-4 , 42 • 40 24 23 26 8 39 . 13 *-'s- 19 24 0 36 32 11 26 23 14 4 0 31 19 30 41 15 24 18 19 13 r. 10 45 22 3 27 45 23 44 29 5 2 0 9 43 0 37 16 16 I- 19 12 5 9 0 9 4: 37 25 21 - 12 16 21 23 6.
English Manual
Page 16
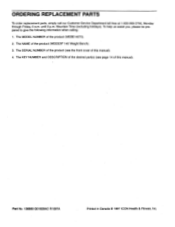
... the following information when calling: 1. The MODEL NUMBER of the product (WEIDER® 140 Weight Bench). 3. The KEY NUMBER and DESCRIPTION of the desired part(s) (see the front cover of this manual). 4. The NAME of the product (WEBE14070). 2. ORDERING REPLACEMENT PARTS To order replacement parts, simply call our Customer Service Department toll-free at 1-800-999-3756, Monday through Friday, 6 a.m. Mountain Time (excluding holidays). The SERIAL NUMBER of the...
... the following information when calling: 1. The MODEL NUMBER of the product (WEIDER® 140 Weight Bench). 3. The KEY NUMBER and DESCRIPTION of the desired part(s) (see the front cover of this manual). 4. The NAME of the product (WEBE14070). 2. ORDERING REPLACEMENT PARTS To order replacement parts, simply call our Customer Service Department toll-free at 1-800-999-3756, Monday through Friday, 6 a.m. Mountain Time (excluding holidays). The SERIAL NUMBER of the...


