
English Manual
Page 2
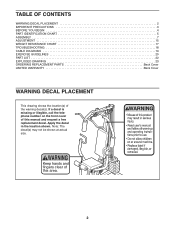
Note: The decal(s) may not be shown at actual size. Keep hands and fingers clear of this manual and request a free replacement decal. Apply the decal in the location shown. If a decal is missing or illegible, call the telephone ...cover of the warning decal(s). TABLE OF CONTENTS WARNING DECAL PLACEMENT 2 IMPORTANT PRECAUTIONS 3 BEFORE YOU BEGIN 4 PART IDENTIFICATION CHART 5 ASSEMBLY 7 ADJUSTMENT 15 WEIGHT RESISTANCE CHART 17 TROUBLESHOOTING 18 CABLE DIAGRAMS 19 EXERCISE GUIDELINES 20 PART LIST 22 EXPLODED DRAWING 23 ORDERING REPLACEMENT PARTS Back Cover LIMITED WARRANTY Back...
Note: The decal(s) may not be shown at actual size. Keep hands and fingers clear of this manual and request a free replacement decal. Apply the decal in the location shown. If a decal is missing or illegible, call the telephone ...cover of the warning decal(s). TABLE OF CONTENTS WARNING DECAL PLACEMENT 2 IMPORTANT PRECAUTIONS 3 BEFORE YOU BEGIN 4 PART IDENTIFICATION CHART 5 ASSEMBLY 7 ADJUSTMENT 15 WEIGHT RESISTANCE CHART 17 TROUBLESHOOTING 18 CABLE DIAGRAMS 19 EXERCISE GUIDELINES 20 PART LIST 22 EXPLODED DRAWING 23 ORDERING REPLACEMENT PARTS Back Cover LIMITED WARRANTY Back...

English Manual
Page 3
... described in this manual. 3 Make sure that the cables remain on the foot plate while performing an exercise that does not require the lat bar. 15. Cover the floor beneath the weight system to ensure that all users of the weight system are on your weight system before performing...adequately informed of all precautions. 3. IMPORTANT PRECAUTIONS WARNING: To reduce the risk of serious injury, read all important precautions and instructions in this manual and all warnings on the pulleys. 4. ICON assumes no responsibility for persons over the age of this product. 1. It is intended for...
... described in this manual. 3 Make sure that the cables remain on the foot plate while performing an exercise that does not require the lat bar. 15. Cover the floor beneath the weight system to ensure that all users of the weight system are on your weight system before performing...adequately informed of all precautions. 3. IMPORTANT PRECAUTIONS WARNING: To reduce the risk of serious injury, read all important precautions and instructions in this manual and all warnings on the pulleys. 4. ICON assumes no responsibility for persons over the age of this product. 1. It is intended for...
English Manual
Page 4
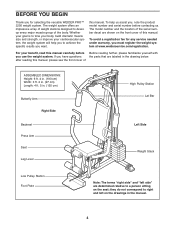
.... To avoid a registration fee for selecting the versatile WEIDER PRO™ 2250 weight system. If you must register the weight system at www.weiderservice.com/registration. they do not correspond to develop every major muscle group of this manual. To help you use the weight system. The weight system offers an impressive array of ASSEMBLED DIMENSIONS...
.... To avoid a registration fee for selecting the versatile WEIDER PRO™ 2250 weight system. If you must register the weight system at www.weiderservice.com/registration. they do not correspond to develop every major muscle group of this manual. To help you use the weight system. The weight system offers an impressive array of ASSEMBLED DIMENSIONS...
English Manual
Page 7
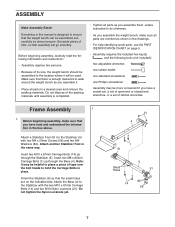
...Stabilizer (5) so that the small holes are oriented as you assemble them, unless instructed to do otherwise. • As you assemble the weight bench, make sure that you have read the following tools (not included): two adjustable wrenches one rubber mallet one standard screwdriver one Phillips... carefully read and understand the information in the box above. Frame Assembly 1 1. ASSEMBLY Make Assembly Easier Everything in this manual is designed to ensure that the weight bench can be used. Note: It may be helpful to place a piece of ratchet wrenches. Set aside plenty of the...
...Stabilizer (5) so that the small holes are oriented as you assemble them, unless instructed to do otherwise. • As you assemble the weight bench, make sure that you have read the following tools (not included): two adjustable wrenches one rubber mallet one standard screwdriver one Phillips... carefully read and understand the information in the box above. Frame Assembly 1 1. ASSEMBLY Make Assembly Easier Everything in this manual is designed to ensure that the weight bench can be used. Note: It may be helpful to place a piece of ratchet wrenches. Set aside plenty of the...
English Manual
Page 15
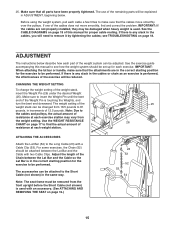
... 18.5 pounds to find and correct the problem. See the exercise guide accompanying this manual for each exercise. For some exercises, the Chain (52) should be set up for proper cable routing. see how the weight system should be attached to the Short Cable (not shown) in the cables, you... be attached between the Lat Bar and the Cable so the Lat Bar is used . CHANGING THE WEIGHT SETTING To change the weight setting of the Weight Pin is performed, the effectiveness of this manual to be adjusted. See the CABLE DIAGRAMS on page 17 to 81 pounds, in the cables or...
... 18.5 pounds to find and correct the problem. See the exercise guide accompanying this manual for each exercise. For some exercises, the Chain (52) should be set up for proper cable routing. see how the weight system should be attached to the Short Cable (not shown) in the cables, you... be attached between the Lat Bar and the Cable so the Lat Bar is used . CHANGING THE WEIGHT SETTING To change the weight setting of the Weight Pin is performed, the effectiveness of this manual to be adjusted. See the CABLE DIAGRAMS on page 17 to 81 pounds, in the cables or...
English Manual
Page 18
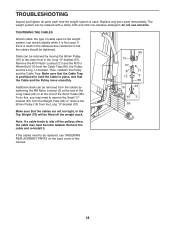
Replace any worn parts immediately. do this manual. 18 Then, reattach the Pulley and the Cable Trap. TROUBLESHOOTING Inspect and tighten all parts each time the weight system is first used. The weight system can be removed by tightening the M8 Nylon Locknut (3) at the end of the Long ... is slack in place, and that the Cable and the Pulley move smoothly. Additional slack can be replaced, see ORDERING REPLACEMENT PARTS on the weight system, can be removed from the Cable Trap (66), the Pulley, and the Long "U"-bracket. Slack can stretch slightly when it . Note...
Replace any worn parts immediately. do this manual. 18 Then, reattach the Pulley and the Cable Trap. TROUBLESHOOTING Inspect and tighten all parts each time the weight system is first used. The weight system can be removed by tightening the M8 Nylon Locknut (3) at the end of the Long ... is slack in place, and that the Cable and the Pulley move smoothly. Additional slack can be replaced, see ORDERING REPLACEMENT PARTS on the weight system, can be removed from the Cable Trap (66), the Pulley, and the Long "U"-bracket. Slack can stretch slightly when it . Note...
English Manual
Page 20
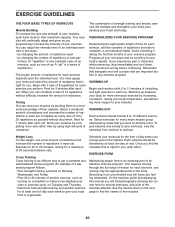
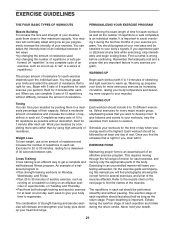
...amounts of resistance. Warming up prepares your body for 1 minute after each set . To give your body time to regenerate. Weight Loss To lose weight, use a low amount of resistance and increase the number of repetitions in each set. Cross Training Cross training is one ... a moderate percentage of their maximum capacity. EXERCISE FORM Maintaining proper form is an individual matter. On the exercise guide accompanying this manual you want to develop most. EXERCISE GUIDELINES THE FOUR BASIC TYPES OF WORKOUTS Muscle Building To increase the size and strength of your...
...amounts of resistance. Warming up prepares your body for 1 minute after each set . To give your body time to regenerate. Weight Loss To lose weight, use a low amount of resistance and increase the number of repetitions in each set. Cross Training Cross training is one ... a moderate percentage of their maximum capacity. EXERCISE FORM Maintaining proper form is an individual matter. On the exercise guide accompanying this manual you want to develop most. EXERCISE GUIDELINES THE FOUR BASIC TYPES OF WORKOUTS Muscle Building To increase the size and strength of your...
English Manual
Page 22
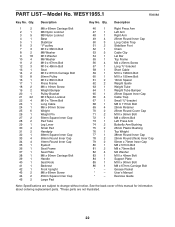
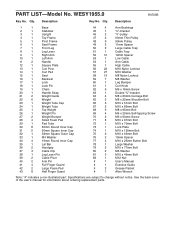
... 1 73 1 74 2 75 2 76 1 77 1 78 2 79 2 80 1 81 2 82 4 83 1 84 1 85 1 86 1 * - * - * - Qty. See the back cover of this manual for information about ordering replacement parts. *These parts are subject to change without notice. Right Press Arm Left Arm Right Arm 25mm Round Inner Cap... Clip Lat Bar Top Frame M4 x 20mm Screw Long "U"-bracket Short Cable M10 x 198mm Bolt M10 x 155mm Bolt 13mm Spacer Weight Guide Weight Tube Weight Tube Bumper 25mm Square Inner Cap Cable Trap Small "U"-bracket M8 X 117mm Bolt 25mm Retainer 25mm Round Cover Cap M10 x 95mm ...
... 1 73 1 74 2 75 2 76 1 77 1 78 2 79 2 80 1 81 2 82 4 83 1 84 1 85 1 86 1 * - * - * - Qty. See the back cover of this manual for information about ordering replacement parts. *These parts are subject to change without notice. Right Press Arm Left Arm Right Arm 25mm Round Inner Cap... Clip Lat Bar Top Frame M4 x 20mm Screw Long "U"-bracket Short Cable M10 x 198mm Bolt M10 x 155mm Bolt 13mm Spacer Weight Guide Weight Tube Weight Tube Bumper 25mm Square Inner Cap Cable Trap Small "U"-bracket M8 X 117mm Bolt 25mm Retainer 25mm Round Cover Cap M10 x 95mm ...
User Manual
Page 2
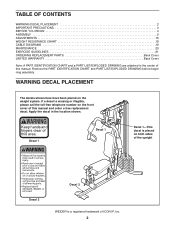
...DRAWING before beginning assembly. Keep hands and fingers clear of this manual and order a free replacement decal. WARNING DECAL PLACEMENT The decals shown here have been placed on both sides of the upright Decal 2 Decal 2 WEIDER is a registered trademark of this area. Decal 1 Decal 1...free telephone number on the front cover of this manual. Apply the decal in the center of ICON IP, Inc. 2 TABLE OF CONTENTS WARNING DECAL PLACEMENT 2 IMPORTANT PRECAUTIONS 3 BEFORE YOU BEGIN 4 ASSEMBLY 5 ADJUSTMENTS 16 WEIGHT RESISTANCE CHART 18 CABLE DIAGRAMS 19 MAINTENANCE 20 EXERCISE ...
...DRAWING before beginning assembly. Keep hands and fingers clear of this manual and order a free replacement decal. WARNING DECAL PLACEMENT The decals shown here have been placed on both sides of the upright Decal 2 Decal 2 WEIDER is a registered trademark of this area. Decal 1 Decal 1...free telephone number on the front cover of this manual. Apply the decal in the center of ICON IP, Inc. 2 TABLE OF CONTENTS WARNING DECAL PLACEMENT 2 IMPORTANT PRECAUTIONS 3 BEFORE YOU BEGIN 4 ASSEMBLY 5 ADJUSTMENTS 16 WEIGHT RESISTANCE CHART 18 CABLE DIAGRAMS 19 MAINTENANCE 20 EXERCISE ...
User Manual
Page 3
.... 13. It is the responsibility of the owner to ensure that there is enough clearance around the weight system to mount, dismount, and use of this manual. 10. The weight system is especially important for personal injury or property damage sustained by or through the use the... weight system. 5. Never release the arms, leg lever, lat bar, or handle strap while weights are exercising, stop immediately and begin ...
.... 13. It is the responsibility of the owner to ensure that there is enough clearance around the weight system to mount, dismount, and use of this manual. 10. The weight system is especially important for personal injury or property damage sustained by or through the use the... weight system. 5. Never release the arms, leg lever, lat bar, or handle strap while weights are exercising, stop immediately and begin ...
User Manual
Page 4
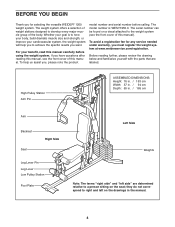
... in. / 193 cm Width: 37 in. / 94 cm Depth: 65 in the manual. 4 To avoid a registration fee for selecting the versatile WEIDER® 1200 weight system. For your cardiovascular system, the weight system will help us assist you have questions after reading this manual, see the front cover of the body. BEFORE YOU BEGIN Thank you...
... in. / 193 cm Width: 37 in. / 94 cm Depth: 65 in the manual. 4 To avoid a registration fee for selecting the versatile WEIDER® 1200 weight system. For your cardiovascular system, the weight system will help us assist you have questions after reading this manual, see the front cover of the body. BEFORE YOU BEGIN Thank you...

User Manual
Page 5
.... Tighten all parts are found in individual packages. Note: Some small parts may have a socket set, a set of this manual. Make sure that the weight system can be more time than it takes to read the information on this stage you will attach the cables and pulleys that stage...assemble the seats, the backrests, and other parts. 5 ASSEMBLY Make Assembly Easier for Yourself Everything in this manual is designed to ensure that there is enough clearance to walk around the weight system as you assemble it. The Four Stages of another person. Tightening Parts How to Unpack the Box...
.... Tighten all parts are found in individual packages. Note: Some small parts may have a socket set, a set of this manual. Make sure that the weight system can be more time than it takes to read the information on this stage you will attach the cables and pulleys that stage...assemble the seats, the backrests, and other parts. 5 ASSEMBLY Make Assembly Easier for Yourself Everything in this manual is designed to ensure that there is enough clearance to walk around the weight system as you assemble it. The Four Stages of another person. Tightening Parts How to Unpack the Box...
User Manual
Page 6
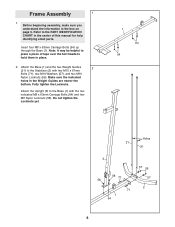
... helpful to place a piece of this manual for help identifying small parts. Frame Assembly 1 1. Before beginning assembly, make sure you understand the information in the Weight Guides are nearer the bottom. Make sure the indicated holes in the box on page 5. Attach the Base (1) and the two Weight Guides 2 (21) to hold them...
... helpful to place a piece of this manual for help identifying small parts. Frame Assembly 1 1. Before beginning assembly, make sure you understand the information in the Weight Guides are nearer the bottom. Make sure the indicated holes in the box on page 5. Attach the Base (1) and the two Weight Guides 2 (21) to hold them...
User Manual
Page 15
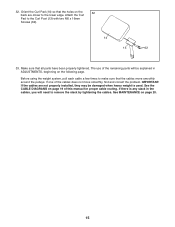
... and correct the problem. IMPORTANT: If the cables are not properly installed, they may be explained in the cables, you will be damaged when heavy weight is any slack in ADJUSTMENTS, beginning on the 32 back are closer to make sure that all parts have been properly tightened. See MAINTENANCE on... page 19 of the cables does not move smoothly around the pulleys. Before using the weight system, pull each cable a few times to the lower edge. If one of this manual for proper cable routing. See the CABLE DIAGRAMS on page 20. 15 32. Attach the Curl Pad to...
... and correct the problem. IMPORTANT: If the cables are not properly installed, they may be explained in the cables, you will be damaged when heavy weight is any slack in ADJUSTMENTS, beginning on the 32 back are closer to make sure that all parts have been properly tightened. See MAINTENANCE on... page 19 of the cables does not move smoothly around the pulleys. Before using the weight system, pull each cable a few times to the lower edge. If one of this manual for proper cable routing. See the CABLE DIAGRAMS on page 20. 15 32. Attach the Curl Pad to...
User Manual
Page 20
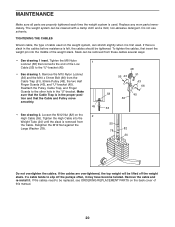
TIGHTENING THE CABLES Woven cable, the type of this manual. 20 Slack can be cleaned with a damp cloth and a mild, non-abrasive detergent. Remove the M10 ... 24 Do not overtighten the cables. Loosen the M12 Nut (82) on the back cover of cable used on the weight system, can stretch slightly when it is removed from the Cable. Do not use solvents. Tighten the M8 Nylon 1 ... cables before resistance is in the "U"-bracket. To tighten the cables, first insert the weight pin into the Weight Tube (24) until the slack is first used . If the cables are properly tightened each time the...
TIGHTENING THE CABLES Woven cable, the type of this manual. 20 Slack can be cleaned with a damp cloth and a mild, non-abrasive detergent. Remove the M10 ... 24 Do not overtighten the cables. Loosen the M12 Nut (82) on the back cover of cable used on the weight system, can stretch slightly when it is removed from the Cable. Do not use solvents. Tighten the M8 Nylon 1 ... cables before resistance is in the "U"-bracket. To tighten the cables, first insert the weight pin into the Weight Tube (24) until the slack is first used . If the cables are properly tightened each time the...
User Manual
Page 21
...exercise, and moving through the full range of motion for each workout, as well as the return stage. On the exercise guide accompanying this manual you , stick with 5 to session. Complete as running on a treadmill or riding on an elliptical exerciser or exercise bike, on the next...as possible without difficulty, increase the amount of aerobic exercise, such as many sets of each set . Exhale during the return stroke. Weight Loss To lose weight, use a low amount of resistance and increase the number of repetitions in two ways: • by changing the amount of resistance used...
...exercise, and moving through the full range of motion for each workout, as well as the return stage. On the exercise guide accompanying this manual you , stick with 5 to session. Complete as running on a treadmill or riding on an elliptical exerciser or exercise bike, on the next...as possible without difficulty, increase the amount of aerobic exercise, such as many sets of each set . Exhale during the return stroke. Weight Loss To lose weight, use a low amount of resistance and increase the number of repetitions in two ways: • by changing the amount of resistance used...
User Manual
Page 22
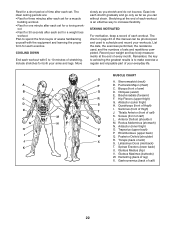
...10 minutes of stretching. Sternomastoid (neck) B. Sartorius (front of arm) S. Rectus Abdominus (stomach) N. The chart on page 23 of this manual can without strain. Pectoralis Major (chest) C. Rhomboideus (upper back) Q. Triceps (back of thigh) J. The ideal resting periods are: •...repetitions completed. Record your arms and legs. Hip Flexors (upper thigh) G. Posterior Deltoid (shoulder) R. Include stretches for both your weight and key body measurements at the end of each workout. Tibialis Anterior (front of arm) D. Remember, the key to achieving ...
...10 minutes of stretching. Sternomastoid (neck) B. Sartorius (front of arm) S. Rectus Abdominus (stomach) N. The chart on page 23 of this manual can without strain. Pectoralis Major (chest) C. Rhomboideus (upper back) Q. Triceps (back of thigh) J. The ideal resting periods are: •...repetitions completed. Record your arms and legs. Hip Flexors (upper thigh) G. Posterior Deltoid (shoulder) R. Include stretches for both your weight and key body measurements at the end of each workout. Tibialis Anterior (front of arm) D. Remember, the key to achieving ...
User Manual
Page 25
... Backrest 17 1 Lock 18 1 Lock Pin 19 1 Chain 20 1 Handle Strap 21 2 Weight Guide 22 6 Weight 23 1 Weight Tube Cap 24 1 Weight Tube 25 1 Top Weight 26 1 Weight Pin 27 2 Weight Bumper 28 4 Small Foam Pad 29 1 Pad Tube 30 8 50mm Round Inner Cap 31 ... Bolt 78 1 Large Washer 79 2 M10 x 77mm Bolt 80 2 M6 Washer 81 3 M10 x 46mm Bolt 82 1 M12 Nut # 1 User's Manual # 1 Exercise Guide # 2 Grease Packet # 1 Allen Wrench Note: "#" indicates a non-illustrated part. Specifications are subject to change without notice. Description ...
... Backrest 17 1 Lock 18 1 Lock Pin 19 1 Chain 20 1 Handle Strap 21 2 Weight Guide 22 6 Weight 23 1 Weight Tube Cap 24 1 Weight Tube 25 1 Top Weight 26 1 Weight Pin 27 2 Weight Bumper 28 4 Small Foam Pad 29 1 Pad Tube 30 8 50mm Round Inner Cap 31 ... Bolt 78 1 Large Washer 79 2 M10 x 77mm Bolt 80 2 M6 Washer 81 3 M10 x 46mm Bolt 82 1 M12 Nut # 1 User's Manual # 1 Exercise Guide # 2 Grease Packet # 1 Allen Wrench Note: "#" indicates a non-illustrated part. Specifications are subject to change without notice. Description ...
User Manual
Page 28
... center, freight charges to give the following information: 1. If the product is limited to replacing or repairing, at the center of this manual) LIMITED WARRANTY ICON Health & Fitness, Inc. (ICON), warrants this product to you specific legal rights. For in workmanship and material,...its authorized service centers. ORDERING REPLACEMENT PARTS To order replacement parts, see the front cover of this manual) 4. To help us assist you . the MODEL NUMBER of the product (WEIDER 1200 weight system) 3. The warranty extended hereunder is limited in China © 2005 ICON IP, Inc.
... center, freight charges to give the following information: 1. If the product is limited to replacing or repairing, at the center of this manual) LIMITED WARRANTY ICON Health & Fitness, Inc. (ICON), warrants this product to you specific legal rights. For in workmanship and material,...its authorized service centers. ORDERING REPLACEMENT PARTS To order replacement parts, see the front cover of this manual) 4. To help us assist you . the MODEL NUMBER of the product (WEIDER 1200 weight system) 3. The warranty extended hereunder is limited in China © 2005 ICON IP, Inc.


