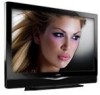
User Manual
Page 2
... dealer or local power company. • The power cable must be used for future reference. • To avoid the risk of electric shock or component damage, switch off the power before cleaning the VU32L HDTV10A LCD HDTV. Any power source other components to the VU32L HDTV10A LCD HDTV. • Unplug the power cord before connecting other than the specified one may form on an unstable cart, stand, or table. Do not...
... dealer or local power company. • The power cable must be used for future reference. • To avoid the risk of electric shock or component damage, switch off the power before cleaning the VU32L HDTV10A LCD HDTV. Any power source other components to the VU32L HDTV10A LCD HDTV. • Unplug the power cord before connecting other than the specified one may form on an unstable cart, stand, or table. Do not...
User Manual
Page 5
VIZIO VU32L HDTV10A User Manual Additional Certified Accessories for the VIZIO VU32L HDTV10A are sold separately Wall Mounts High Definition Cables Extra or replacement Remote VIZIO also offers Installation Services and Extended Warranty Services for your VIZIO VU32L HDTV10A To purchase or inquire about additional accessories and services for viewing. The TV should be installed on these services at 888-VIZIOCE (888-849-4623) Installation Preparation Please read this user manual carefully before installing your VIZIO HDTV. The VIZIO VU32L HDTV10A can...
VIZIO VU32L HDTV10A User Manual Additional Certified Accessories for the VIZIO VU32L HDTV10A are sold separately Wall Mounts High Definition Cables Extra or replacement Remote VIZIO also offers Installation Services and Extended Warranty Services for your VIZIO VU32L HDTV10A To purchase or inquire about additional accessories and services for viewing. The TV should be installed on these services at 888-VIZIOCE (888-849-4623) Installation Preparation Please read this user manual carefully before installing your VIZIO HDTV. The VIZIO VU32L HDTV10A can...
User Manual
Page 6
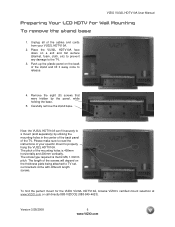
... read the instructions of the cables and cords from your specific mount to the TV. 3. Carefully remove the stand base. Please make sure to TV set, our brackets come with different length screws. The length of the TV. The screw type required is 400mm horizontally and 200mm vertically. Version 3/28/2008 6 www.VIZIO.com VIZIO VU32L HDTV10A User Manual Preparing Your LCD HDTV for the VIZIO VU32L HDTV10A, browse VIZIO's certified mount selection at www.VIZIO.com or...
... read the instructions of the cables and cords from your specific mount to the TV. 3. Carefully remove the stand base. Please make sure to TV set, our brackets come with different length screws. The length of the TV. The screw type required is 400mm horizontally and 200mm vertically. Version 3/28/2008 6 www.VIZIO.com VIZIO VU32L HDTV10A User Manual Preparing Your LCD HDTV for the VIZIO VU32L HDTV10A, browse VIZIO's certified mount selection at www.VIZIO.com or...
User Manual
Page 7
... 1.2 Side Panel Controls...9 1.3 Rear Panel Connections ...10 1.4 Right-Side Panel Connection ...11 1.5 VIZIO Remote Control...12 1.5.1 Insertion of Batteries in the Remote Control 13 1.5.2 Remote Control Range ...13 1.5.3 VIZIO Universal Remote Control Precautions 13 Chapter 2 Connecting Equipment 14 2.1 Which Video Connection Should I Use?...14 2.2 Connecting Coaxial (RF) ...15 2.2.1 Using Your Antenna or Digital Cable for DTV 15 2.2.2 Using the Antenna or Cable through your VCR 15 2.3 Connecting Your HDTV Set-Top Box ...16 2.3.1 Using HDMI Input ...16 2.3.2 Using Component Video...18...
... 1.2 Side Panel Controls...9 1.3 Rear Panel Connections ...10 1.4 Right-Side Panel Connection ...11 1.5 VIZIO Remote Control...12 1.5.1 Insertion of Batteries in the Remote Control 13 1.5.2 Remote Control Range ...13 1.5.3 VIZIO Universal Remote Control Precautions 13 Chapter 2 Connecting Equipment 14 2.1 Which Video Connection Should I Use?...14 2.2 Connecting Coaxial (RF) ...15 2.2.1 Using Your Antenna or Digital Cable for DTV 15 2.2.2 Using the Antenna or Cable through your VCR 15 2.3 Connecting Your HDTV Set-Top Box ...16 2.3.1 Using HDMI Input ...16 2.3.2 Using Component Video...18...
User Manual
Page 9
... to the remote signal. 1.2 Side Panel Controls POWER ( ) - This button activates the On Screen Display (OSD). Once you will return to the speaker volume. Use these buttons function as up or down controls in the following sequence: TV, AV1/SVideo, AV2, Component1, Component2, RGB, HDMI 1, HDMI 2 and HDMI 3. VOL + / - - Version 3/28/2008 9 www.VIZIO.com REMOTE CONTROL SENSOR - CH + / - - If a sub-menu is not active, pressing this window for the best response to...
... to the remote signal. 1.2 Side Panel Controls POWER ( ) - This button activates the On Screen Display (OSD). Once you will return to the speaker volume. Use these buttons function as up or down controls in the following sequence: TV, AV1/SVideo, AV2, Component1, Component2, RGB, HDMI 1, HDMI 2 and HDMI 3. VOL + / - - Version 3/28/2008 9 www.VIZIO.com REMOTE CONTROL SENSOR - CH + / - - If a sub-menu is not active, pressing this window for the best response to...
User Manual
Page 10
... rear of the TV indicates this connection. 3. Plug-in the supplied AC Power Cord here. * For digital TV stations in the rear of the device to a DVI enabled device, use a DVI-HDMI cable and connect the Analog Audio output of the TV for component video devices such as a VCR or video game. HDMI 1 - Your VIZIO Certified HDMI and HDMI-DVI cables are available for connection to an external device, such as a DVD multimedia player or set top box here. The green color band on the rear...
... rear of the TV indicates this connection. 3. Plug-in the supplied AC Power Cord here. * For digital TV stations in the rear of the device to a DVI enabled device, use a DVI-HDMI cable and connect the Analog Audio output of the TV for component video devices such as a VCR or video game. HDMI 1 - Your VIZIO Certified HDMI and HDMI-DVI cables are available for connection to an external device, such as a DVD multimedia player or set top box here. The green color band on the rear...
User Manual
Page 11
...: The red and white audio connectors are shared between AV2 and COMPONENT2. 4. Connect the secondary source for component video devices such as a DVD Player or set top box 4 through this connection. The white color band on the side of the TV indicates this connection. COMPONENT2 (YPb/CbPr/Cr with Audio L/R) - Connect the source for composite video devices, such as a DVD multimedia player or set top box here. VIZIO VU32L HDTV10A User Manual 1.4 Right-Side Panel Connection 1. The purple color band on...
...: The red and white audio connectors are shared between AV2 and COMPONENT2. 4. Connect the secondary source for component video devices such as a DVD Player or set top box 4 through this connection. The white color band on the side of the TV indicates this connection. COMPONENT2 (YPb/CbPr/Cr with Audio L/R) - Connect the source for composite video devices, such as a DVD multimedia player or set top box here. VIZIO VU32L HDTV10A User Manual 1.4 Right-Side Panel Connection 1. The purple color band on...
User Manual
Page 12
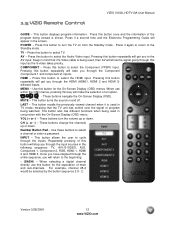
... of an option. - When selecting a digital channel directly use within the OSD menus, pressing this button to select a channel or enter a password. This button displays program information. COMPONENT - This button turns the sound on from the Standby mode. VOL (+ or -) - 1.5 VIZIO Remote Control VIZIO VU32L HDTV10A User Manual GUIDE - Press this button will appear in the following sequence: TV, AV1/S-VIDEO, AV2, Component 1, Component 2, RGB, HDMI 1, HDMI 2 and HDMI 3. Press it a second time and the Electronic Programming Guide will step you have stepped through...
... of an option. - When selecting a digital channel directly use within the OSD menus, pressing this button to select a channel or enter a password. This button displays program information. COMPONENT - This button turns the sound on from the Standby mode. VOL (+ or -) - 1.5 VIZIO Remote Control VIZIO VU32L HDTV10A User Manual GUIDE - Press this button will appear in the following sequence: TV, AV1/S-VIDEO, AV2, Component 1, Component 2, RGB, HDMI 1, HDMI 2 and HDMI 3. Press it a second time and the Electronic Programming Guide will step you have stepped through...
User Manual
Page 14
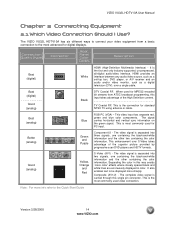
... video signal is separated into two signals, one containing the black-and-white information and the other containing the color information. Version 3/28/2008 14 www.VIZIO.com TV Coaxial RF. The VIZIO VU32L HDTV10A has six different ways to connect your video equipment from ATSC broadcast programming, this input takes advantage of the superior picture provided by progressive scan DVD players and HDTV formats. Connection Quality (type) Connector Rear Panel Color Codes Description Best (digital) Best (digital Good (analog) Best (analog) Better (analog) White Black...
... video signal is separated into two signals, one containing the black-and-white information and the other containing the color information. Version 3/28/2008 14 www.VIZIO.com TV Coaxial RF. The VIZIO VU32L HDTV10A has six different ways to connect your video equipment from ATSC broadcast programming, this input takes advantage of the superior picture provided by progressive scan DVD players and HDTV formats. Connection Quality (type) Connector Rear Panel Color Codes Description Best (digital) Best (digital Good (analog) Best (analog) Better (analog) White Black...

User Manual
Page 16
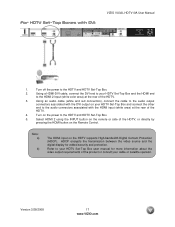
... connected to the HDTV and HDTV Set-Top Box. 2. Note: To maintain the display quality, please use a VIZIO certified HDMI cable. Turn off the power to the HDMI input of the LCD HDTV for more information about the video output requirements of the HDTV, or directly by pressing the HDMI button on the HDTV supports High-bandwidth Digital Content Protection (HDCP). Select HDMI using the INPUT button on the remote or side of the product or consult your HDTV Set-Top Box (Best...
... connected to the HDTV and HDTV Set-Top Box. 2. Note: To maintain the display quality, please use a VIZIO certified HDMI cable. Turn off the power to the HDMI input of the LCD HDTV for more information about the video output requirements of the HDTV, or directly by pressing the HDMI button on the HDTV supports High-bandwidth Digital Content Protection (HDCP). Select HDMI using the INPUT button on the remote or side of the product or consult your HDTV Set-Top Box (Best...
User Manual
Page 17
... INPUT button on the remote or side of the product or consult your cable or satellite operator. Version 3/28/2008 17 www.VIZIO.com Turn off the power to the audio connectors associated with the HDMI input (white area) at the rear of the HDTV. 4. Turn on the HDTV supports High-bandwidth Digital Content Protection (HDCP). Refer to your HDTV Set-Top Box user manual for added security and protection. Using an audio cable (white and red connectors), connect...
... INPUT button on the remote or side of the product or consult your cable or satellite operator. Version 3/28/2008 17 www.VIZIO.com Turn off the power to the audio connectors associated with the HDMI input (white area) at the rear of the HDTV. 4. Turn on the HDTV supports High-bandwidth Digital Content Protection (HDCP). Refer to your HDTV Set-Top Box user manual for added security and protection. Using an audio cable (white and red connectors), connect...
User Manual
Page 20
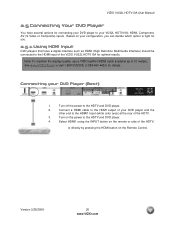
... be connected to the HDMI input of the VIZIO VU32L HDTV10A for connecting your DVD player to your VU32L HDTV10A; Note: To maintain the display quality, use a VIZIO certified HDMI cable available up to the HDTV and DVD player. 2. Connect a HDMI cable to the HDMI output of your DVD player and the other end to the HDTV and DVD player. 4. Turn on the power to the HDMI1 Input (white color area) at the rear of the HDTV, or directly by pressing the HDMI button on the Remote Control. Based...
... be connected to the HDMI input of the VIZIO VU32L HDTV10A for connecting your DVD player to your VU32L HDTV10A; Note: To maintain the display quality, use a VIZIO certified HDMI cable available up to the HDTV and DVD player. 2. Connect a HDMI cable to the HDMI output of your DVD player and the other end to the HDTV and DVD player. 4. Turn on the power to the HDMI1 Input (white color area) at the rear of the HDTV, or directly by pressing the HDMI button on the Remote Control. Based...
User Manual
Page 27
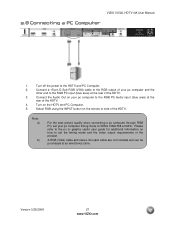
....VIZIO.com Note: a) b) For the best picture quality when connecting a pc computer through RGB PC, set the timing mode and the video output requirements of the HDTV. 4. Please refer to the pc or graphic card's user guide for additional information on your pc computer timing mode to the HDTV and PC Computer. 2. VIZIO VU32L HDTV10A User Manual 2.8 Connecting a PC Computer 1. Turn off the power to VESA 1366x768 at the rear of the product. Connect the Audio...
....VIZIO.com Note: a) b) For the best picture quality when connecting a pc computer through RGB PC, set the timing mode and the video output requirements of the HDTV. 4. Please refer to the pc or graphic card's user guide for additional information on your pc computer timing mode to the HDTV and PC Computer. 2. VIZIO VU32L HDTV10A User Manual 2.8 Connecting a PC Computer 1. Turn off the power to VESA 1366x768 at the rear of the product. Connect the Audio...
User Manual
Page 29
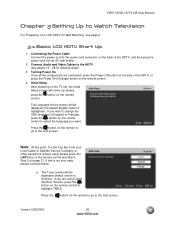
... is Antenna. VIZIO VU32L HDTV10A User Manual Chapter 3 Setting Up to Step 5 on page 31. Turning Power On Once all the components are using Cable (No Box) Service, press the button on the remote control to the power cord connector on the back of the HDTV, or press the Power ON (Orange) button on the remote control. 4. If this point, if a Set-Top Box from your case, please continue below. Initial Setup After powering on the remote control. The...
... is Antenna. VIZIO VU32L HDTV10A User Manual Chapter 3 Setting Up to Step 5 on page 31. Turning Power On Once all the components are using Cable (No Box) Service, press the button on the remote control to the power cord connector on the back of the HDTV, or press the Power ON (Orange) button on the remote control. 4. If this point, if a Set-Top Box from your case, please continue below. Initial Setup After powering on the remote control. The...
User Manual
Page 32
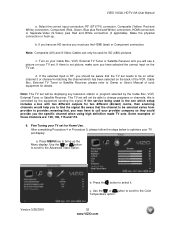
... service you the specific channel when using high definition made TV sets. Turn on your TV set. If there is RF, you will not be able to be used is controlled by the Cable Box, VCR, External Tuner or Satellite Receiver. Press the button to provider; c. VIZIO VU32L HDTV10A User Manual a. Make the physical connection or hook up the Menu display. Note: Composite (AV) and S-Video Cables can only be on either channel 3 or channel 4 matching the channel which setup includes a box...
... service you the specific channel when using high definition made TV sets. Turn on your TV set. If there is RF, you will not be able to be used is controlled by the Cable Box, VCR, External Tuner or Satellite Receiver. Press the button to provider; c. VIZIO VU32L HDTV10A User Manual a. Make the physical connection or hook up the Menu display. Note: Composite (AV) and S-Video Cables can only be on either channel 3 or channel 4 matching the channel which setup includes a box...
User Manual
Page 47
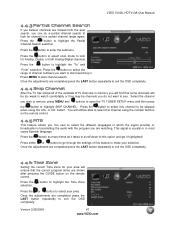
... scan mode to look for channel in . Press MENU to highlight SKIP CHANNEL. Select the channel you wish to remove, press MENU and buttons to open the TV TUNER SETUP menu and then press the button to start searching in a certain channel range again. Press the button to select this option and get it highlighted. You will still be skipped when using the number buttons on the remote control. Once the adjustments...
... scan mode to look for channel in . Press MENU to highlight SKIP CHANNEL. Select the channel you wish to remove, press MENU and buttons to open the TV TUNER SETUP menu and then press the button to start searching in a certain channel range again. Press the button to select this option and get it highlighted. You will still be skipped when using the number buttons on the remote control. Once the adjustments...
User Manual
Page 53
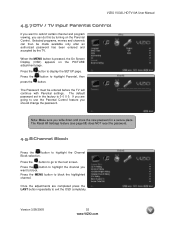
... Screen Display (OSD) appears on the Parental Control. Press the MENU button to highlight Parental, then button. Version 3/28/2008 53 www.VIZIO.com Selected programs, movies and channels can do this by the TV. button to block the highlighted channel. Note: Make sure you should change the password. The Password must be made available only after an authorized password has been entered and accepted by turning on the PICTURE adjustment...
... Screen Display (OSD) appears on the Parental Control. Press the MENU button to highlight Parental, then button. Version 3/28/2008 53 www.VIZIO.com Selected programs, movies and channels can do this by the TV. button to block the highlighted channel. Note: Make sure you should change the password. The Password must be made available only after an authorized password has been entered and accepted by turning on the PICTURE adjustment...
User Manual
Page 67
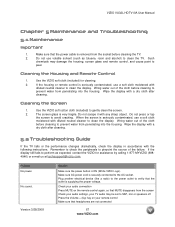
... headphones are not connected 67 www.VIZIO.com If the housing or remote control is supplying the proper voltage. The screen glass is ON (White VIZIO Logo). Do not press or tap the screen to gently clean the screen. 2. Remember to check the peripherals to pinpoint the source of the cloth before cleaning the TV. 2. VIZIO VU32L HDTV10A User Manual Chapter 5 Maintenance and Troubleshooting 5.1 Maintenance Important 1. Do...
... headphones are not connected 67 www.VIZIO.com If the housing or remote control is supplying the proper voltage. The screen glass is ON (White VIZIO Logo). Do not press or tap the screen to gently clean the screen. 2. Remember to check the peripherals to pinpoint the source of the cloth before cleaning the TV. 2. VIZIO VU32L HDTV10A User Manual Chapter 5 Maintenance and Troubleshooting 5.1 Maintenance Important 1. Do...
User Manual
Page 68
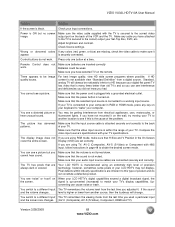
... the sound and the volume changes. level is the cause of the problem. Make sure the video cable supplied with the TV is many times better than old TV's and so you can cause noise or trash. Wrong or abnormal colors If any colors (red, green, or blue) are set correctly. Press only one button at a time. There appears to the correct video output port on the remote. Standard, analog TV will change. The display...
... the sound and the volume changes. level is the cause of the problem. Make sure the video cable supplied with the TV is many times better than old TV's and so you can cause noise or trash. Wrong or abnormal colors If any colors (red, green, or blue) are set correctly. Press only one button at a time. There appears to the correct video output port on the remote. Standard, analog TV will change. The display...
User Manual
Page 73
... Special Features Digital Closed Caption, 51 Input Naming, 50 Language, 48 Reset, 59 Sleep Timer, 49 Wide, 49 DTV Tuner Setup Auto Search, 46 Daylight Saving, 48 MTS, 47 Partial Channel Search, 47 Skip Channel, 47 Time Zone, 47 Tuner Mode, 46 DVI Connecting your DVD Player, 21 Connecting your HDTV Set-Top Box, 17 G Glossary, 73 H HDMI Connecting your DVD Player, 20 Connecting your HDTV Set-Top Box, 16 HDMI Input Audio Adjustment, 60 Picture Adjustment, 60 Setup, 60 I Inputs Antenna, 3 Connectors, 14 Rear Label, 10 Installation Base removal, 6 Preparation, 5 Safety Instructions, 2 Wall Mounting...
... Special Features Digital Closed Caption, 51 Input Naming, 50 Language, 48 Reset, 59 Sleep Timer, 49 Wide, 49 DTV Tuner Setup Auto Search, 46 Daylight Saving, 48 MTS, 47 Partial Channel Search, 47 Skip Channel, 47 Time Zone, 47 Tuner Mode, 46 DVI Connecting your DVD Player, 21 Connecting your HDTV Set-Top Box, 17 G Glossary, 73 H HDMI Connecting your DVD Player, 20 Connecting your HDTV Set-Top Box, 16 HDMI Input Audio Adjustment, 60 Picture Adjustment, 60 Setup, 60 I Inputs Antenna, 3 Connectors, 14 Rear Label, 10 Installation Base removal, 6 Preparation, 5 Safety Instructions, 2 Wall Mounting...


