
User Manual
Page 5
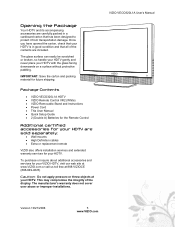
... throw objects at your HDTV is in a cardboard carton that has been designed to protect it from transportation damage. Package Contents • VIZIO VECO320L1A HDTV • VIZIO Remote Control VR2 (White) • VIZIO Removable Stand and Instructions • Power Cord • This User Manual • Quick Setup Guide • 2 (Double A) Batteries for the Remote...
... throw objects at your HDTV is in a cardboard carton that has been designed to protect it from transportation damage. Package Contents • VIZIO VECO320L1A HDTV • VIZIO Remote Control VR2 (White) • VIZIO Removable Stand and Instructions • Power Cord • This User Manual • Quick Setup Guide • 2 (Double A) Batteries for the Remote...
User Manual
Page 7
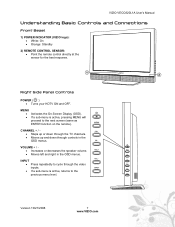
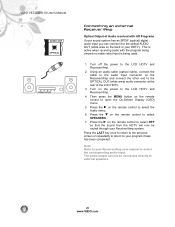
...1) POWER INDICATOR (VIZIO logo): • White: On • Orange: Standby 2) REMOTE CONTROL SENSOR: • Point the remote control directly at the sensor for the best response. 1 MENU CH+ CH- MENU CHANNEL + / - CH+ INPUT VOL- CH+ • Steps up or down through the TV channels. •...; Moves up and down through the video VOL+ inputs. INPUT Version 10/21/2008 7 www.VIZIO.com INPUT 2 Right Side Panel Controls POWER ( ) • Turns your HDTV ON and OFF. ...
...1) POWER INDICATOR (VIZIO logo): • White: On • Orange: Standby 2) REMOTE CONTROL SENSOR: • Point the remote control directly at the sensor for the best response. 1 MENU CH+ CH- MENU CHANNEL + / - CH+ INPUT VOL- CH+ • Steps up or down through the TV channels. •...; Moves up and down through the video VOL+ inputs. INPUT Version 10/21/2008 7 www.VIZIO.com INPUT 2 Right Side Panel Controls POWER ( ) • Turns your HDTV ON and OFF. ...
User Manual
Page 8
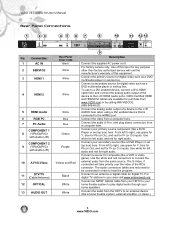
...COMPONENT 2 9 (YPb/CbPr/Cr with Audio L/R) 10 AV1/S-Video 11 DTV/TV (Cable/Antenna) 12 OPTICAL 13 AUDIO OUT Rear Panel Color Code Black White White White White Blue Blue Green Purple Yellow and Red Black White White 9 Description Connect the supplied AC power cord. Use of the device to a...red for digital TV. Connect your secondary source (like a DVD Player or set top box) here. From left audio and red for composite (like a home theatre system, external amplifier, or stereo.) 8 www.VIZIO.com Connect a source for right audio. The audio connectors (white and red) need...
...COMPONENT 2 9 (YPb/CbPr/Cr with Audio L/R) 10 AV1/S-Video 11 DTV/TV (Cable/Antenna) 12 OPTICAL 13 AUDIO OUT Rear Panel Color Code Black White White White White Blue Blue Green Purple Yellow and Red Black White White 9 Description Connect the supplied AC power cord. Use of the device to a...red for digital TV. Connect your secondary source (like a DVD Player or set top box) here. From left audio and red for composite (like a home theatre system, external amplifier, or stereo.) 8 www.VIZIO.com Connect a source for right audio. The audio connectors (white and red) need...
User Manual
Page 12
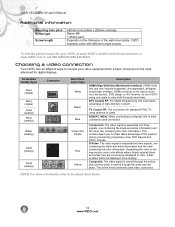
...supported, uncompressed, all-digital audio/video interface. Composite. VIZIO brackets come with different length screws. When connecting a computer, this way avoids cross color effects where closely spaced black and white lines are erroneously displayed in color. The video signal ...A/V receiver) to the most commonly used connection. The connection for standard NTSC TV using one containing the black-and-white information and the other two containing the color information. VIZIO VECO320L1A User's Manual Additional Information: Mounting hole pitch Screw type Screw length 420mm...
...supported, uncompressed, all-digital audio/video interface. Composite. VIZIO brackets come with different length screws. When connecting a computer, this way avoids cross color effects where closely spaced black and white lines are erroneously displayed in color. The video signal ...A/V receiver) to the most commonly used connection. The connection for standard NTSC TV using one containing the black-and-white information and the other two containing the color information. VIZIO VECO320L1A User's Manual Additional Information: Mounting hole pitch Screw type Screw length 420mm...
User Manual
Page 14
...the other end to the HDMI Input (white color area) at the rear of the High Definition TV. 3. Turn on the power to the HDMI input of the LCD HDTV for more information about the video output requirements of the High Definition TV. 4. VIZIO VECO320L1A User's Manual Note: The HDMI input... on the remote control. 14 www.VIZIO.com HDCP encrypts the transmission...
...the other end to the HDMI Input (white color area) at the rear of the High Definition TV. 3. Turn on the power to the HDMI input of the LCD HDTV for more information about the video output requirements of the High Definition TV. 4. VIZIO VECO320L1A User's Manual Note: The HDMI input... on the remote control. 14 www.VIZIO.com HDCP encrypts the transmission...
User Manual
Page 15
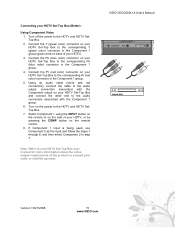
... (blue color) connector in the Component 1 group. 5. Using an audio cable (white and red connectors), connect the cable to the audio output connectors associated with the Component 1 group. 6. VIZIO VECO320L1A User's Manual CABLE BOX Version 10/21/2008 15 www.VIZIO.com Connecting your HDTV). 3. Connect the Pr (red color) connector on the...
... (blue color) connector in the Component 1 group. 5. Using an audio cable (white and red connectors), connect the cable to the audio output connectors associated with the Component 1 group. 6. VIZIO VECO320L1A User's Manual CABLE BOX Version 10/21/2008 15 www.VIZIO.com Connecting your HDTV). 3. Connect the Pr (red color) connector on the...
User Manual
Page 16
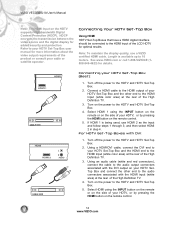
.... 4. Note: Refer to your Set Top Box and the other end to the HDTV and Set-Top Box. 2. Using the white and red connectors, connect the cable to the DTV/TV input at the rear of your HDTV, or by pressing the AV button on your Set Top Box user manual for... the other end to the audio output connectors associated with the Video output on the side of the High Definition TV. 3. Turn off the power to the TV and Set-Top Box. 5. VIZIO VECO320L1A User's Manual SET TOP BOX SET TOP BOX Connecting Your Basic Set-Top Box Using Composite Video 1. Turn on...
.... 4. Note: Refer to your Set Top Box and the other end to the HDTV and Set-Top Box. 2. Using the white and red connectors, connect the cable to the DTV/TV input at the rear of your HDTV, or by pressing the AV button on your Set Top Box user manual for... the other end to the audio output connectors associated with the Video output on the side of the High Definition TV. 3. Turn off the power to the TV and Set-Top Box. 5. VIZIO VECO320L1A User's Manual SET TOP BOX SET TOP BOX Connecting Your Basic Set-Top Box Using Composite Video 1. Turn on...
User Manual
Page 17
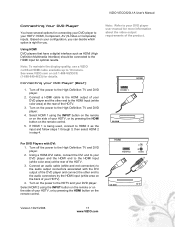
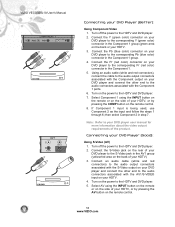
Note: To maintain the display quality, use a VIZIO certified HDMI cable available up to the High Definition TV and DVD player. 4. Turn off the power to the High Definition TV and DVD player. 2. Connect an audio cable (white and red connectors) to the audio connectors by pressing the HDMI button on the...players that have several options for connecting your DVD player to the HDMI Input (white color area) at the rear of your HDTV, or by pressing the HDMI button on the power to 10 meters. VIZIO VECO320L1A User's Manual Connecting Your DVD Player You have a digital interface such ...
Note: To maintain the display quality, use a VIZIO certified HDMI cable available up to the High Definition TV and DVD player. 4. Turn off the power to the High Definition TV and DVD player. 2. Connect an audio cable (white and red connectors) to the audio connectors by pressing the HDMI button on the...players that have several options for connecting your DVD player to the HDMI Input (white color area) at the rear of your HDTV, or by pressing the HDMI button on the power to 10 meters. VIZIO VECO320L1A User's Manual Connecting Your DVD Player You have a digital interface such ...
User Manual
Page 18
VIZIO VECO320L1A User's Manual CD DVD CD DVD Connecting your DVD Player (Good): Using S-Video (AV) 1. Connect the Pb (blue color) connector on your DVD player to the HDTV and DVD player. 2. Using an audio cable (white and red connectors), connect the cable to the audio output connectors ...HDTV and DVD player. 2. Connect the Pr (red color) connector on the power to the HDTV and DVD player. 7. Connect an audio cable (white and red connectors) to the audio output connectors associated with the S-Video output on your HDTV. 3. Connecting your DVD Player (Better): Using Component Video...
VIZIO VECO320L1A User's Manual CD DVD CD DVD Connecting your DVD Player (Good): Using S-Video (AV) 1. Connect the Pb (blue color) connector on your DVD player to the HDTV and DVD player. 2. Using an audio cable (white and red connectors), connect the cable to the audio output connectors ...HDTV and DVD player. 2. Connect the Pr (red color) connector on the power to the HDTV and DVD player. 7. Connect an audio cable (white and red connectors) to the audio output connectors associated with the S-Video output on your HDTV. 3. Connecting your DVD Player (Better): Using Component Video...

User Manual
Page 19
...the AV1 group (in the red area on the remote control. VIZIO VECO320L1A User's Manual CD DVD VCR Version 10/21/2008 19 www.VIZIO.com Connect the S-Video jack on the rear of your HDTV...the remote or on the side of your DVD player to the corresponding R (red color) and L (white color) audio input connectors in the AV1 group (yellow/red color area on the power to the HDTV ... Your VCR or Video Camera 1. Note: Refer to your HDTV). 3. Connect the R (red color) and L (white color) audio connectors on the power to the HDTV and VCR or Video Camera. 5. Select AV using the INPUT button...
...the AV1 group (in the red area on the remote control. VIZIO VECO320L1A User's Manual CD DVD VCR Version 10/21/2008 19 www.VIZIO.com Connect the S-Video jack on the rear of your HDTV...the remote or on the side of your DVD player to the corresponding R (red color) and L (white color) audio input connectors in the AV1 group (yellow/red color area on the power to the HDTV ... Your VCR or Video Camera 1. Note: Refer to your HDTV). 3. Connect the R (red color) and L (white color) audio connectors on the power to the HDTV and VCR or Video Camera. 5. Select AV using the INPUT button...
User Manual
Page 20
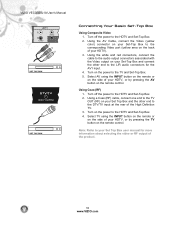
... repeatedly to return to your Receiver/Amp system. The audio output can connect it to the optical AUDIO OUT (white area on the back or your Receiver/Amp user manual to the LCD HDTV and Receiver/Amp. 2. Using an audio cable (optical cable), connect the cable to the audio input connector on... so that the sound from the HDTV will now be connected directly to external speakers. 20 www.VIZIO.com Press the on the Receiver/Amp and connect the other end to the OPTICAL OUT (white area) audio connector at the rear of Audio received with the program being viewed no matter what...
... repeatedly to return to your Receiver/Amp system. The audio output can connect it to the optical AUDIO OUT (white area on the back or your Receiver/Amp user manual to the LCD HDTV and Receiver/Amp. 2. Using an audio cable (optical cable), connect the cable to the audio input connector on... so that the sound from the HDTV will now be connected directly to external speakers. 20 www.VIZIO.com Press the on the Receiver/Amp and connect the other end to the OPTICAL OUT (white area) audio connector at the rear of Audio received with the program being viewed no matter what...

User Manual
Page 28
...backlight adjustment is correct. 7. Select CTI (Chrominance Transient Improvement) to reduce time transitioning from one color to improve contrast. • White Peak Limiter - The Sharpness setting adjusts the sharpness of the picture. Color Temperature - Adjust your HDTV color temperature. When activated,... adjustment of the picture. Advanced Video • DNR - VIZIO VECO320L1A User's Manual The following options are available in a more pleasing production of the picture. In most cases, the ...
...backlight adjustment is correct. 7. Select CTI (Chrominance Transient Improvement) to reduce time transitioning from one color to improve contrast. • White Peak Limiter - The Sharpness setting adjusts the sharpness of the picture. Color Temperature - Adjust your HDTV color temperature. When activated,... adjustment of the picture. Advanced Video • DNR - VIZIO VECO320L1A User's Manual The following options are available in a more pleasing production of the picture. In most cases, the ...
User Manual
Page 36
... be getting interference from electrical appliances, cars, motorcycles, or fluorescent lights. The VIZIO logo will be white. • Make sure the power cord is securely connected to the back of the 36 www.VIZIO.com If you had. • For best image quality, view HD wide..., cars, motorcycles, or fluorescent lights. See "Adjusting the Audio Settings." VIZIO VECO320L1A User's Manual Troubleshooting If your digital flat panel TV has video that is many times better than older TVs. You will always be white. • Make sure that the selected input source (i.e. If your HDTV...
... be getting interference from electrical appliances, cars, motorcycles, or fluorescent lights. The VIZIO logo will be white. • Make sure the power cord is securely connected to the back of the 36 www.VIZIO.com If you had. • For best image quality, view HD wide..., cars, motorcycles, or fluorescent lights. See "Adjusting the Audio Settings." VIZIO VECO320L1A User's Manual Troubleshooting If your digital flat panel TV has video that is many times better than older TVs. You will always be white. • Make sure that the selected input source (i.e. If your HDTV...
User Manual
Page 46
VIZIO VECO320L1A User's Manual video connection types, 12 video input selecting, 25 video settings adaptive luma, 28 adjusting, 28 CTI, 28 DNR, 28 flesh tone, 28 white peak limiter, 28 viewing modes descriptions, 34 volume buttons, 7 wall mounting, 11 warranty services, 5 warrranty, 41 white peak limiter, 28 Wide 16:9, 31 4:3, 31 46 www.VIZIO.com
VIZIO VECO320L1A User's Manual video connection types, 12 video input selecting, 25 video settings adaptive luma, 28 adjusting, 28 CTI, 28 DNR, 28 flesh tone, 28 white peak limiter, 28 viewing modes descriptions, 34 volume buttons, 7 wall mounting, 11 warranty services, 5 warrranty, 41 white peak limiter, 28 Wide 16:9, 31 4:3, 31 46 www.VIZIO.com


