

User Manual
Page 2
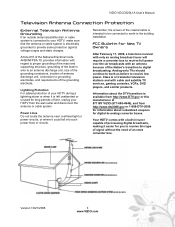
..., be replaced when using dropped or damaged appliances. If repair is dropped or damaged in the back and bottom of electric shock or component damage, switch off the power before connecting other components to your HDTV. • Unplug the power cord before moving your HDTV close to rain or other voltage than the voltage specified. Continuous use an adapter to qualified service personnel. • Keep your HDTV...
..., be replaced when using dropped or damaged appliances. If repair is dropped or damaged in the back and bottom of electric shock or component damage, switch off the power before connecting other components to your HDTV. • Unplug the power cord before moving your HDTV close to rain or other voltage than the voltage specified. Continuous use an adapter to qualified service personnel. • Keep your HDTV...
User Manual
Page 3
... New TV Owners After February 17, 2009, a television receiver with only an analog broadcast tuner will require a converter box to receive full power over-the-air broadcasts with cable and satellite TV services, gaming consoles, VCRs, DVD players, and similar products. FCC Bulletin for digital-to-analog converter boxes. Your HDTV comes with regard to proper grounding of the mast and supporting structure, grounding of the lead-in the building installation...
... New TV Owners After February 17, 2009, a television receiver with only an analog broadcast tuner will require a converter box to receive full power over-the-air broadcasts with cable and satellite TV services, gaming consoles, VCRs, DVD players, and similar products. FCC Bulletin for digital-to-analog converter boxes. Your HDTV comes with regard to proper grounding of the mast and supporting structure, grounding of the lead-in the building installation...
User Manual
Page 4
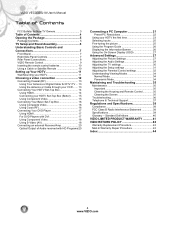
VIZIO VECO320L1A User's Manual Table of Contents FCC Bulletin for New TV Owners 3 Table of Contents 4 Opening the Package 5 Package Contents 5 TV Setup and Stand Assembly 6 Understanding Basic Controls and Connections 7 Front Bezel 7 Right Side Panel Controls 7 Rear Panel Connections 8 VIZIO Remote Control 9 Inserting the remote control batteries 10 Using a Cable or Satellite Remote 10 Setting up Your HDTV 11 Wall Mounting your HDTV 11 Choosing a video connection 12 Connecting Coaxial (RF 13 Using Your Antenna or Digital Cable for DTV /TV ... 13 Using the Antenna or Cable ...
VIZIO VECO320L1A User's Manual Table of Contents FCC Bulletin for New TV Owners 3 Table of Contents 4 Opening the Package 5 Package Contents 5 TV Setup and Stand Assembly 6 Understanding Basic Controls and Connections 7 Front Bezel 7 Right Side Panel Controls 7 Rear Panel Connections 8 VIZIO Remote Control 9 Inserting the remote control batteries 10 Using a Cable or Satellite Remote 10 Setting up Your HDTV 11 Wall Mounting your HDTV 11 Choosing a video connection 12 Connecting Coaxial (RF 13 Using Your Antenna or Digital Cable for DTV /TV ... 13 Using the Antenna or Cable ...
User Manual
Page 8
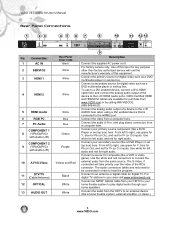
... Connect to right, use green for Y, blue for Pb (or Cb), and red for digital video such as a DVD multimedia player or set -top box. For factory service only. Connect the analog audio output of the device to connect the external audio from the HDTV to hear the program. Connect the video from a computer here. mini plug stereo connector) from a computer here. Connect a secondary source for Pr (or Cr) inputs. Use white for left to the HDMI2 port. Connect an SPDIF Optical cable...
... Connect to right, use green for Y, blue for Pb (or Cb), and red for digital video such as a DVD multimedia player or set -top box. For factory service only. Connect the analog audio output of the device to connect the external audio from the HDTV to hear the program. Connect the video from a computer here. mini plug stereo connector) from a computer here. Connect a secondary source for Pr (or Cr) inputs. Use white for left to the HDMI2 port. Connect an SPDIF Optical cable...
User Manual
Page 9
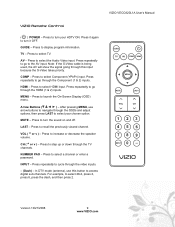
... the Audio Video input. CH ( ^ or v ) - INPUT - Press to increase or decrease the speaker volume. Press to step up or down through the video inputs. - (Dash) - Arrow Buttons ( ) - Press to select Component (YPbPr) input. NUMBER PAD - In DTV mode (antenna), use arrow buttons to navigate through the Component (1 & 2) inputs. AV - Press to access digital sub-channels. Press to turn your chosen option. Press to select a channel or enter a password. VOL ( ^ or v ) - GUIDE TV AV COMP HDMI MENU MUTE...
... the Audio Video input. CH ( ^ or v ) - INPUT - Press to increase or decrease the speaker volume. Press to step up or down through the video inputs. - (Dash) - Arrow Buttons ( ) - Press to select Component (YPbPr) input. NUMBER PAD - In DTV mode (antenna), use arrow buttons to navigate through the Component (1 & 2) inputs. AV - Press to access digital sub-channels. Press to turn your chosen option. Press to select a channel or enter a password. VOL ( ^ or v ) - GUIDE TV AV COMP HDMI MENU MUTE...
User Manual
Page 10
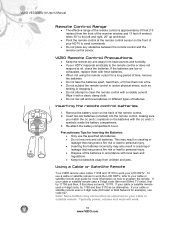
... mix old and new batteries or different types of batteries. To use a cable or satellite remote to work the LCD HDTV, refer to your cable or satellite remote uses a 3-digit code (Echostar or Dish Network for more information on how to program the remote. If your LCD HDTV. Using a Cable or Satellite Remote Your VIZIO remote uses codes 11758 and 10178 to work your cable or satellite remote uses a 5-digit code (like most Direct TV units), first try 1758 and then...
... mix old and new batteries or different types of batteries. To use a cable or satellite remote to work the LCD HDTV, refer to your cable or satellite remote uses a 3-digit code (Echostar or Dish Network for more information on how to program the remote. If your LCD HDTV. Using a Cable or Satellite Remote Your VIZIO remote uses codes 11758 and 10178 to work your cable or satellite remote uses a 5-digit code (like most Direct TV units), first try 1758 and then...
User Manual
Page 11
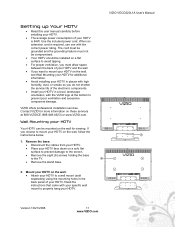
... (8) screws holding the base to a wall mount (sold separately) using the mounting holes in places with high humidity, dust, or smoke so you choose to prevent poor ventilation and excessive component damage. If you do not shorten the service life of your HDTV is required, use one with your specific wall mount to properly hang your HDTV to the TV. 2 • Remove the stand base. 2. Use the included power cord. When...
... (8) screws holding the base to a wall mount (sold separately) using the mounting holes in places with high humidity, dust, or smoke so you choose to prevent poor ventilation and excessive component damage. If you do not shorten the service life of your HDTV is required, use one with your specific wall mount to properly hang your HDTV to the TV. 2 • Remove the stand base. 2. Use the included power cord. When...
User Manual
Page 12
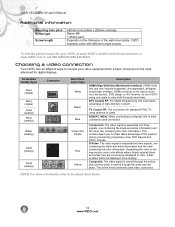
... more sharply. VIZIO VECO320L1A User's Manual Additional Information: Mounting hole pitch Screw type Screw length 420mm horizontally x 200mm vertically Metric M8 1.25mm pitch Depends on the thickness of the superior picture provided by progressive scan DVD players and HDTV formats. Component. Connection Quality (type) Best (digital) Best (digital Good (analog) Best (analog) Better (analog) Connector Good (analog) Good (analog) Rear Panel Color Code White Black Blue Green and Purple Red Yellow Description HDMI (High-Definition Multimedia Interface). The video signal is the first...
... more sharply. VIZIO VECO320L1A User's Manual Additional Information: Mounting hole pitch Screw type Screw length 420mm horizontally x 200mm vertically Metric M8 1.25mm pitch Depends on the thickness of the superior picture provided by progressive scan DVD players and HDTV formats. Component. Connection Quality (type) Best (digital) Best (digital Good (analog) Best (analog) Better (analog) Connector Good (analog) Good (analog) Rear Panel Color Code White Black Blue Green and Purple Red Yellow Description HDMI (High-Definition Multimedia Interface). The video signal is the first...
User Manual
Page 14
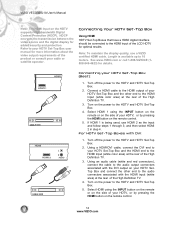
... the HDMI Input (white color area) at the rear of the High Definition TV. 3. VIZIO VECO320L1A User's Manual Note: The HDMI input on the remote control. 5. Select HDMI using the INPUT button on the remote or on the side of the product or consult your HDTV Set-Top Box (Best): 1. HDCP encrypts the transmission between the video source and the digital display for more information about the video output requirements of your HDTV, or by pressing the HDMI button on the HDTV supports...
... the HDMI Input (white color area) at the rear of the High Definition TV. 3. VIZIO VECO320L1A User's Manual Note: The HDMI input on the remote control. 5. Select HDMI using the INPUT button on the remote or on the side of the product or consult your HDTV Set-Top Box (Best): 1. HDCP encrypts the transmission between the video source and the digital display for more information about the video output requirements of your HDTV, or by pressing the HDMI button on the HDTV supports...
User Manual
Page 18
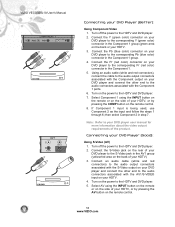
... Component 1 input is being used, use Component 2 as the input and follow the steps 1 through 6; Connect the Pr (red color) connector on your DVD player to the HDTV and DVD player. 2. Using an audio cable (white and red connectors), connect the cable to the HDTV and DVD player. 7. Connect the S-Video jack on the rear of your HDTV, or by pressing the AV button on the remote control. 8. Turn on the power to the audio output connectors associated with the Component 1 ports. 6. VIZIO VECO320L1A User's Manual CD DVD CD DVD Connecting your DVD Player (Good): Using S-Video...
... Component 1 input is being used, use Component 2 as the input and follow the steps 1 through 6; Connect the Pr (red color) connector on your DVD player to the HDTV and DVD player. 2. Using an audio cable (white and red connectors), connect the cable to the HDTV and DVD player. 7. Connect the S-Video jack on the rear of your HDTV, or by pressing the AV button on the remote control. 8. Turn on the power to the audio output connectors associated with the Component 1 ports. 6. VIZIO VECO320L1A User's Manual CD DVD CD DVD Connecting your DVD Player (Good): Using S-Video...

User Manual
Page 24
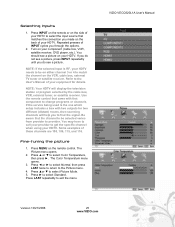
... ►. NOTE: DTV digital broadcast is not available in Clear QAM. The channel availability through cable depends on which direction to get information about availability in your area, antenna types, and in which channels your antenna. Consult your input source (Antenna or Cable), then press ►. Press ▲ or ▼ to exit. NOTE: Select Cable only if you selected Scan. The Channel Scan screen opens. VIZIO VECO320L1A User's Manual 8.
... ►. NOTE: DTV digital broadcast is not available in Clear QAM. The channel availability through cable depends on which direction to get information about availability in your area, antenna types, and in which channels your antenna. Consult your input source (Antenna or Cable), then press ►. Press ▲ or ▼ to exit. NOTE: Select Cable only if you selected Scan. The Channel Scan screen opens. VIZIO VECO320L1A User's Manual 8.
User Manual
Page 25
... see a picture on your HDTV. If you do not see a picture. NOTE: Your HDTV will help you made on the back of your component (cable box, VCR, satellite receiver, DVD player, etc.). The Color Temperature menu opens. 3. Press ► to the Picture menu. 4. NOTE: If the selected input is the one which setup includes a box with that came with two outputs for details. Use the remote control that component to change programs or channels. The Picture menu opens...
... see a picture on your HDTV. If you do not see a picture. NOTE: Your HDTV will help you made on the back of your component (cable box, VCR, satellite receiver, DVD player, etc.). The Color Temperature menu opens. 3. Press ► to the Picture menu. 4. NOTE: If the selected input is the one which setup includes a box with that came with two outputs for details. Use the remote control that component to change programs or channels. The Picture menu opens...

User Manual
Page 29
... to an external audio system. • Off - Version 10/21/2008 29 www.VIZIO.com Adjust the sound to output audio in the bottom left or right. 5. Treble - Volume - VIZIO VECO320L1A User's Manual Adjusting the Audio Settings When viewing a DTV / TV or an HDMI, Component, AV, or PC source, the following options are available in the Audio Settings menu: 1. SRS TSXT -- Select to the left -hand corner of someone talking on the remote control.
... to an external audio system. • Off - Version 10/21/2008 29 www.VIZIO.com Adjust the sound to output audio in the bottom left or right. 5. Treble - Volume - VIZIO VECO320L1A User's Manual Adjusting the Audio Settings When viewing a DTV / TV or an HDMI, Component, AV, or PC source, the following options are available in the Audio Settings menu: 1. SRS TSXT -- Select to the left -hand corner of someone talking on the remote control.
User Manual
Page 30
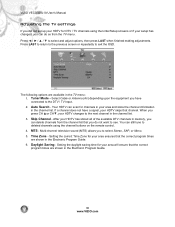
... program times are shown in the channel list. 3. When you press CH ▲or CH▼, your HDTV changes to the next channel in the Electronic Program Guide. 30 www.VIZIO.com Select Cable or Antenna (Air) depending upon the equipment you have a signal, your HDTV skips that you do so from the channel list that channel. If a channel does not have connected to the DTV / TV Input. 2. Tuner Mode - Your HDTV can scan for channels...
... program times are shown in the channel list. 3. When you press CH ▲or CH▼, your HDTV changes to the next channel in the Electronic Program Guide. 30 www.VIZIO.com Select Cable or Antenna (Air) depending upon the equipment you have a signal, your HDTV skips that you do so from the channel list that channel. If a channel does not have connected to the DTV / TV Input. 2. Tuner Mode - Your HDTV can scan for channels...
User Manual
Page 36
... component. • Adjust brightness and contrast. • Press INPUT to select a different source. • If any colors (red, green, or blue) are missing, check the video cable to make sure it on the wall, try moving your digital flat panel TV has video that is the cause of the 36 www.VIZIO.com DVD player) is working properly. • If your HDTV is connected to your computer in the troubleshooting table below. VIZIO VECO320L1A User's Manual Troubleshooting...
... component. • Adjust brightness and contrast. • Press INPUT to select a different source. • If any colors (red, green, or blue) are missing, check the video cable to make sure it on the wall, try moving your digital flat panel TV has video that is the cause of the 36 www.VIZIO.com DVD player) is working properly. • If your HDTV is connected to your computer in the troubleshooting table below. VIZIO VECO320L1A User's Manual Troubleshooting...

User Manual
Page 37
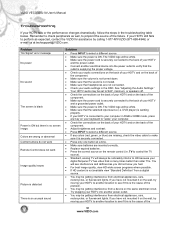
... volume changes when you switch inputs The screen size changes when you switch inputs Backlight setting doesn't respond Solution problem. • Check the connections on the back of your HDTV and on the back of the component. • Make sure that H-Size and V.Position in the OSD are set correctly. Customer support and quality service are integral parts of VIZIO's commitment to you. See "Adjusting the Setup Settings" • Press WIDE on the remote control...
... volume changes when you switch inputs The screen size changes when you switch inputs Backlight setting doesn't respond Solution problem. • Check the connections on the back of your HDTV and on the back of the component. • Make sure that H-Size and V.Position in the OSD are set correctly. Customer support and quality service are integral parts of VIZIO's commitment to you. See "Adjusting the Setup Settings" • Press WIDE on the remote control...
User Manual
Page 39
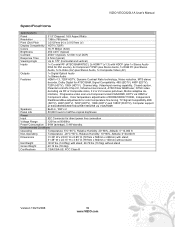
...) Outputs 1x Digital Optical Audio 1x Stereo Audio Features HDMI v1.3, 720P HDTV, Dynamic Contrast Ratio technology, Noise reduction, MTS stereo decoder, Dolby Digital for ATSC/QAM, Signal Compatibility: 480i (SDTV), 480P (EDTV), 720P (HDTV), 1080i (HDTV), Channel skip, Video/input naming capability, Closed caption, Parental control/V-Chip 2.0, Virtual surround sound, ATSC/Clear QAM tuner, NTSC video decoding via VGA/HDMI Speakers Built-in, 10W x 2 Panel Life 50,000 hours to half the original brightness Power Input...
...) Outputs 1x Digital Optical Audio 1x Stereo Audio Features HDMI v1.3, 720P HDTV, Dynamic Contrast Ratio technology, Noise reduction, MTS stereo decoder, Dolby Digital for ATSC/QAM, Signal Compatibility: 480i (SDTV), 480P (EDTV), 720P (HDTV), 1080i (HDTV), Channel skip, Video/input naming capability, Closed caption, Parental control/V-Chip 2.0, Virtual surround sound, ATSC/Clear QAM tuner, NTSC video decoding via VGA/HDMI Speakers Built-in, 10W x 2 Panel Life 50,000 hours to half the original brightness Power Input...
User Manual
Page 40
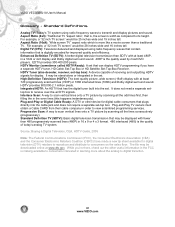
... set-top box. Plug-and-Play or Digital Cable Ready: A DTV or other useful information in the set . The file may be 28 inches wide and 16 inches tall. For example, a "32 inch TV screen" would be stand-alone or integrated in the FCC is digitally encoded for digital television (DTV) retailers to reproduce and distribute to view scrambled programming services. Integrated HDTV: An HDTV that plugs directly into the set . For example, a "32 inch TV screen" would be downloaded online...
... set-top box. Plug-and-Play or Digital Cable Ready: A DTV or other useful information in the set . The file may be 28 inches wide and 16 inches tall. For example, a "32 inch TV screen" would be stand-alone or integrated in the FCC is digitally encoded for digital television (DTV) retailers to reproduce and distribute to view scrambled programming services. Integrated HDTV: An HDTV that plugs directly into the set . For example, a "32 inch TV screen" would be downloaded online...
User Manual
Page 44
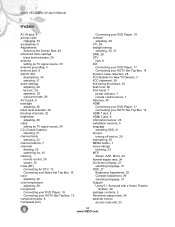
... User's Manual Index AC IN jack, 8 access code changing, 33 accessories, 5 Adjustments Selecting the Screen Size, 40 advanced video settings black level extender, 28 antenna setting as TV signal source, 30 antenna grounding, 3 antenna jack, 8 aspect ratio descriptions, 34 selecting, 31 audio settings adjusting, 29 lip sync, 29 speakers, 29 surround mode, 29 AV In jack, 8 backlight adjusting, 28 black level extender, 28 blocking channels, 32 brightness adjusting, 28 cable setting as TV signal source, 30 CC (Closed Caption) selecting, 31 channel block selecting, 32 channel buttons, 7 channels...
... User's Manual Index AC IN jack, 8 access code changing, 33 accessories, 5 Adjustments Selecting the Screen Size, 40 advanced video settings black level extender, 28 antenna setting as TV signal source, 30 antenna grounding, 3 antenna jack, 8 aspect ratio descriptions, 34 selecting, 31 audio settings adjusting, 29 lip sync, 29 speakers, 29 surround mode, 29 AV In jack, 8 backlight adjusting, 28 black level extender, 28 blocking channels, 32 brightness adjusting, 28 cable setting as TV signal source, 30 CC (Closed Caption) selecting, 31 channel block selecting, 32 channel buttons, 7 channels...
User Manual
Page 45
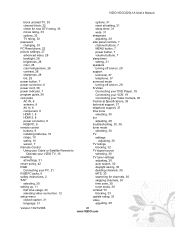
..., 32 password changing, 33 PC Resolutions, 22 picture settings, 27 advanced video, 28 backlight, 28 brightness, 28 color, 28 color temperature, 28 contrast, 28 sharpness, 28 tint, 28 power button, 7 power connector, 8 power cord, 38 power indicator, 7 program guide, 26 rear jacks AC IN, 8 antenna, 8 AV In, 8 component, 8 HDMI 1, 8 HDMI 2, 8 power connector, 8 RGB PC, 8 remote control buttons, 9 installing batteries, 10 range, 10 safety, 10 sensor, 7 Remote Control Using your Cable or Satellite Remote to Operate your VIZIO TV, 10 resetting all settings, 31 return policy, 42 RGB Connecting your...
..., 32 password changing, 33 PC Resolutions, 22 picture settings, 27 advanced video, 28 backlight, 28 brightness, 28 color, 28 color temperature, 28 contrast, 28 sharpness, 28 tint, 28 power button, 7 power connector, 8 power cord, 38 power indicator, 7 program guide, 26 rear jacks AC IN, 8 antenna, 8 AV In, 8 component, 8 HDMI 1, 8 HDMI 2, 8 power connector, 8 RGB PC, 8 remote control buttons, 9 installing batteries, 10 range, 10 safety, 10 sensor, 7 Remote Control Using your Cable or Satellite Remote to Operate your VIZIO TV, 10 resetting all settings, 31 return policy, 42 RGB Connecting your...


