
Quickstart Guide
Page 4
TABLE OF CONTENTS Package Contents 5 Controls & Connections 6 FIrst-Time Setup 8 Using the Remote 13 Settings and LED Behavior 14 Programming the Sound Bar 16 Resetting to Factory Default Settings 17 Bluetooth Pairing 18 Using Bluetooth Mode 19 Advanced Setup 20 Connecting a Subwoofer 22 Wall Mounting the Sound Bar 23 Help & Troubleshooting 25 One-Year Limited Warranty 26 Specifications 26 Legal & Compliance 27
TABLE OF CONTENTS Package Contents 5 Controls & Connections 6 FIrst-Time Setup 8 Using the Remote 13 Settings and LED Behavior 14 Programming the Sound Bar 16 Resetting to Factory Default Settings 17 Bluetooth Pairing 18 Using Bluetooth Mode 19 Advanced Setup 20 Connecting a Subwoofer 22 Wall Mounting the Sound Bar 23 Help & Troubleshooting 25 One-Year Limited Warranty 26 Specifications 26 Legal & Compliance 27
Quickstart Guide
Page 8
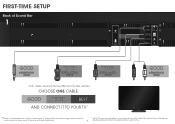
... supplied. CHOOSE ONE CABLE: GOOD BETTER BEST AND CONNECT IT TO YOUR TV* † When using the Digital Inputs, if there is no audio: (A) try setting the TV output to PCM or (B) Connect directly to your other devices 8 (Blu-ray player, game system, etc) see your Blu-ray/other source, some...
... supplied. CHOOSE ONE CABLE: GOOD BETTER BEST AND CONNECT IT TO YOUR TV* † When using the Digital Inputs, if there is no audio: (A) try setting the TV output to PCM or (B) Connect directly to your other devices 8 (Blu-ray player, game system, etc) see your Blu-ray/other source, some...
Quickstart Guide
Page 9
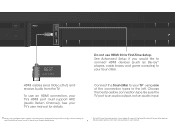
Do not use an HDMI connection, your TV's user manual for First-Time Setup. Be sure the TV port is no audio: (A) try setting the TV output to PCM or (B) Connect directly to your device's user manual. See your TV's HDMI port must support ARC (Audio Return Channel). Choose ...
Do not use an HDMI connection, your TV's user manual for First-Time Setup. Be sure the TV port is no audio: (A) try setting the TV output to PCM or (B) Connect directly to your device's user manual. See your TV's HDMI port must support ARC (Audio Return Channel). Choose ...
Quickstart Guide
Page 12
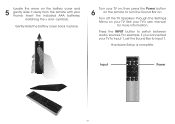
... Sound Bar to turn the Sound Bar on. Turn off the TV Speakers through the Settings Menu on the battery cover and 5 gently slide it away from the remote with your thumb. Locate the arrow on your TV. See your TV ... slide the battery cover back in place. Turn your TV's user manual for more information. Press the INPUT button to switch between audio sources. Input VIZIO INPUT MENU Power 12
... Sound Bar to turn the Sound Bar on. Turn off the TV Speakers through the Settings Menu on the battery cover and 5 gently slide it away from the remote with your thumb. Locate the arrow on your TV. See your TV ... slide the battery cover back in place. Turn your TV's user manual for more information. Press the INPUT button to switch between audio sources. Input VIZIO INPUT MENU Power 12
Quickstart Guide
Page 13
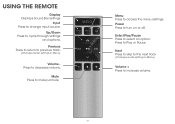
VIZIO INPUT MENU Menu Press to Play or Pause. Press to access the menu settings. Next Press to skip to the next track. (Changes audio settings in Menu) Volume Press to increase volume. 13 Previous Press to return to previous track. (Changes audio settings in Menu) Volume + Press to decrease volume. Mute Press to select an option. Enter/Play/Pause Press to mute/unmute. Power Press to cycle through settings and options. Up/Down Press to turn on or off. USING THE REMOTE Display Displays Sound Bar settings Input Press to change input source.
VIZIO INPUT MENU Menu Press to Play or Pause. Press to access the menu settings. Next Press to skip to the next track. (Changes audio settings in Menu) Volume Press to increase volume. 13 Previous Press to return to previous track. (Changes audio settings in Menu) Volume + Press to decrease volume. Mute Press to select an option. Enter/Play/Pause Press to mute/unmute. Power Press to cycle through settings and options. Up/Down Press to turn on or off. USING THE REMOTE Display Displays Sound Bar settings Input Press to change input source.

Quickstart Guide
Page 14
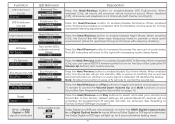
...level. Press the Next/Previous button to Right and back continuously. Note: DTS TruSurround must be discoverable for the Sound Bar (VIZIO S5430w) using your Bluetooth device into pairing mode prior to the left when the dialog presence is decreased. The LED indicators will ...increased and to increase/decrease the virtual surround sound level. Description Press the Play button on the remote control's LCD display. Note: Set your Bluetooth Device. Two center LEDs indicate Subwoofer level 0. Note: Subwoofer not included. 14 Bass Levels Bass Two center LEDs indicate ...
...level. Press the Next/Previous button to Right and back continuously. Note: DTS TruSurround must be discoverable for the Sound Bar (VIZIO S5430w) using your Bluetooth device into pairing mode prior to the left when the dialog presence is decreased. The LED indicators will ...increased and to increase/decrease the virtual surround sound level. Description Press the Play button on the remote control's LCD display. Note: Set your Bluetooth Device. Two center LEDs indicate Subwoofer level 0. Note: Subwoofer not included. 14 Bass Levels Bass Two center LEDs indicate ...
Quickstart Guide
Page 15
... provides a consistent and comfortable volume level for 5 seconds before fading away. 15 Press the Next/Previous and Play buttons to the factory default settings. When enabled (On), the Sound Bar will move to turn off when no audio signal is detected TV Remote On: TV Remote Off: ...standby after a period of audio delay. Dolby Digital Logo DTS Logo Press the Next/Previous button to enable/disable VIZIO TV Remotes.When enabled (On), you can use a VIZIO TV remote control to the right with sleeping children). When enabled (On), all sources will lower bass frequency levels...
... provides a consistent and comfortable volume level for 5 seconds before fading away. 15 Press the Next/Previous and Play buttons to the factory default settings. When enabled (On), the Sound Bar will move to turn off when no audio signal is detected TV Remote On: TV Remote Off: ...standby after a period of audio delay. Dolby Digital Logo DTS Logo Press the Next/Previous button to enable/disable VIZIO TV Remotes.When enabled (On), you can use a VIZIO TV remote control to the right with sleeping children). When enabled (On), all sources will lower bass frequency levels...
Quickstart Guide
Page 17
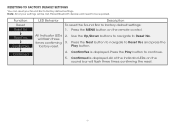
... bar will need to Reset No. Function Reset Reset No Reset Yes ConfirmYes Confirmed LED Behavior Description To reset the Sound Bar to factory default settings. will be re-paired. Press the Next button to navigate to continue. 5. Confirmed is displayed. Note: All of the Indicator LEDs on the remote control... press the factory reset. Paired Bluetooth devices will flash three times confirming the reset. 17 Play button. 4. All of your Sound Bar to factory default settings: 1. Use the Up/Down buttons to navigate to be lost.
... bar will need to Reset No. Function Reset Reset No Reset Yes ConfirmYes Confirmed LED Behavior Description To reset the Sound Bar to factory default settings. will be re-paired. Press the Next button to navigate to continue. 5. Confirmed is displayed. Note: All of the Indicator LEDs on the remote control... press the factory reset. Paired Bluetooth devices will flash three times confirming the reset. 17 Play button. 4. All of your Sound Bar to factory default settings: 1. Use the Up/Down buttons to navigate to be lost.
Quickstart Guide
Page 21
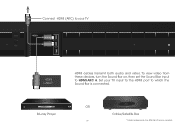
Blu-ray Player OR 21 Cable/Satellite Box *Cables appearance may differ from these devices, turn the Sound Bar on, then set the Sound Bar input to HDMI-ARC 6. Set your TV input to the HDMI port to your TV HDMI CABLE* HDMI cables transmit both audio and video. Connect HDMI (ARC) to which the Sound Bar is connected. To view video from the ones supplied.
Blu-ray Player OR 21 Cable/Satellite Box *Cables appearance may differ from these devices, turn the Sound Bar on, then set the Sound Bar input to HDMI-ARC 6. Set your TV input to the HDMI port to your TV HDMI CABLE* HDMI cables transmit both audio and video. Connect HDMI (ARC) to which the Sound Bar is connected. To view video from the ones supplied.

Quickstart Guide
Page 22
... (Volume) and phase to cycle through the menu options until Bass. CONNECTING A SUBWOOFER Back of Sound Bar RCA Subwoofer Cable* For best results setting up an optional subwoofer,VIZIO suggests the following procedure: 1. Connect an RCA cable from the Sound Bar to the center position. 3. Power Off the Sound Bar and Subwoofer...
... (Volume) and phase to cycle through the menu options until Bass. CONNECTING A SUBWOOFER Back of Sound Bar RCA Subwoofer Cable* For best results setting up an optional subwoofer,VIZIO suggests the following procedure: 1. Connect an RCA cable from the Sound Bar to the center position. 3. Power Off the Sound Bar and Subwoofer...
Quickstart Guide
Page 25
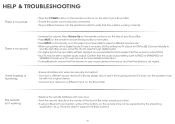
...audio. • On digital inputs, the input LEDs will flash rapidly if an unsupported format is present. The remote isn't working correctly. Set the source to output PCM. • Your TV may be supported by the streaming application. (e.g., Pandora doesn't support the Back button.) 25...8226; Ensure the power cord is securely connected. • Plug a different device into the electrical outlet to verify that the audio output setting is set to variable audio output. Consult your TV's user manual for more detailed information. • If using either of the Digital Inputs, if...
...audio. • On digital inputs, the input LEDs will flash rapidly if an unsupported format is present. The remote isn't working correctly. Set the source to output PCM. • Your TV may be supported by the streaming application. (e.g., Pandora doesn't support the Back button.) 25...8226; Ensure the power cord is securely connected. • Plug a different device into the electrical outlet to verify that the audio output setting is set to variable audio output. Consult your TV's user manual for more detailed information. • If using either of the Digital Inputs, if...
Quickstart Guide
Page 26
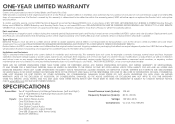
...INCLUDING ANY IMPLIED WARRANTY OF MERCHANTABILITY AND FITNESS FOR A PARTICULAR PURPOSE, SHALL BE LIMITED IN DURATION TO THE PERIOD OF TIME SET FORTH ABOVE. VIZIO SHALL NOT BE RESPONSIBLE FOR LOSS OF USE, LOSS OF INFORMATION OR DATA, COMMERCIAL LOSS, LOST REVENUE OR LOST PROFITS, OR...of customer misuse, modifications or adjustments, as well as installation and set-up issues or any type of commercial use. VIZIO'S TOTAL LIABILITY FOR ANY AND ALL LOSSES AND DAMAGES RESULTING FROM ANY CAUSE WHATSOEVER INCLUDING VIZIO'S NEGLIGENCE, ALLEGED DAMAGE, OR DEFECTIVE GOODS, WHETHER SUCH DEFECTS ...
...INCLUDING ANY IMPLIED WARRANTY OF MERCHANTABILITY AND FITNESS FOR A PARTICULAR PURPOSE, SHALL BE LIMITED IN DURATION TO THE PERIOD OF TIME SET FORTH ABOVE. VIZIO SHALL NOT BE RESPONSIBLE FOR LOSS OF USE, LOSS OF INFORMATION OR DATA, COMMERCIAL LOSS, LOST REVENUE OR LOST PROFITS, OR...of customer misuse, modifications or adjustments, as well as installation and set-up issues or any type of commercial use. VIZIO'S TOTAL LIABILITY FOR ANY AND ALL LOSSES AND DAMAGES RESULTING FROM ANY CAUSE WHATSOEVER INCLUDING VIZIO'S NEGLIGENCE, ALLEGED DAMAGE, OR DEFECTIVE GOODS, WHETHER SUCH DEFECTS ...

Quickstart Guide
Page 27
...subject to the following two conditions: 1. IC Radiation Exposure Statement This equipment complies with IC RSS-102 radiation exposure limits set by turning the equipment off and on a circuit different from DTS Licensing Limited. This device may cause undesired operation.... This equipment generates, uses and can be used in the "factory default" setting and this product properly, according to local laws and regulations. Reorient or relocate the receiving antenna. 2. This product qualifies for ...
...subject to the following two conditions: 1. IC Radiation Exposure Statement This equipment complies with IC RSS-102 radiation exposure limits set by turning the equipment off and on a circuit different from DTS Licensing Limited. This device may cause undesired operation.... This equipment generates, uses and can be used in the "factory default" setting and this product properly, according to local laws and regulations. Reorient or relocate the receiving antenna. 2. This product qualifies for ...


