Quickstart Guide
Page 2
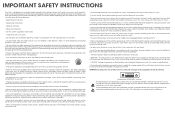
... lighting flash with instructions. Install in the literature accompanying the appliance. If your Unit, hold the power plug, not the cord. Operating your Unit in the housing. Incorrect polarity may damage the wires inside the cord and cause fire or electric shock. Doing so could short circuit parts causing a fire or electric shock. A damp cloth is intended to alert the user...
... lighting flash with instructions. Install in the literature accompanying the appliance. If your Unit, hold the power plug, not the cord. Operating your Unit in the housing. Incorrect polarity may damage the wires inside the cord and cause fire or electric shock. Doing so could short circuit parts causing a fire or electric shock. A damp cloth is intended to alert the user...

Quickstart Guide
Page 3
Friday: 5 am to 8 pm (PST) Saturday - Sunday: 7 am to 4 pm (PST) We speak English • Se habla Español • Nous parlons Français We can help with: • New Product Setup • Connecting Your Devices • Technical Problems • And More Phone: (877) 878-4946 (TOLL-FREE) Email: techsupport@VIZIO.com Web: http://store.VIZIO.com/support Hours of operation: Monday - YOUR PRODUCT INCLUDES FREE LIFETIME TECH SUPPORT The VIZIO support team is highly trained and is based in the United States. LET US HELP! DO YOU HAVE QUESTIONS?
Friday: 5 am to 8 pm (PST) Saturday - Sunday: 7 am to 4 pm (PST) We speak English • Se habla Español • Nous parlons Français We can help with: • New Product Setup • Connecting Your Devices • Technical Problems • And More Phone: (877) 878-4946 (TOLL-FREE) Email: techsupport@VIZIO.com Web: http://store.VIZIO.com/support Hours of operation: Monday - YOUR PRODUCT INCLUDES FREE LIFETIME TECH SUPPORT The VIZIO support team is highly trained and is based in the United States. LET US HELP! DO YOU HAVE QUESTIONS?

Quickstart Guide
Page 4
TABLE OF CONTENTS Package Contents 5 Controls & Connections 6 FIrst-Time Setup 8 Using the Remote 13 Settings and LED Behavior 14 Programming the Sound Bar 16 Resetting to Factory Default Settings 17 Bluetooth Pairing 18 Using Bluetooth Mode 19 Advanced Setup 20 Connecting a Subwoofer 22 Wall Mounting the Sound Bar 23 Help & Troubleshooting 25 One-Year Limited Warranty 26 Specifications 26 Legal & Compliance 27
TABLE OF CONTENTS Package Contents 5 Controls & Connections 6 FIrst-Time Setup 8 Using the Remote 13 Settings and LED Behavior 14 Programming the Sound Bar 16 Resetting to Factory Default Settings 17 Bluetooth Pairing 18 Using Bluetooth Mode 19 Advanced Setup 20 Connecting a Subwoofer 22 Wall Mounting the Sound Bar 23 Help & Troubleshooting 25 One-Year Limited Warranty 26 Specifications 26 Legal & Compliance 27
Quickstart Guide
Page 5
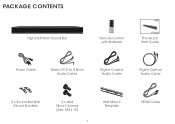
PACKAGE CONTENTS High Definition Sound Bar VIZIO INPUT MENU Remote Control with Batteries This Quick Start Guide Power Cable Stereo RCA to 3.5mm Audio Cable Digital Coaxial Audio Cable Digital Optical Audio Cable 2 x Sound Bar Wall Mount Brackets 2 x Wall Mount Screws (Size: M4 x 10) 5 Wall Mount Template HDMI Cable
PACKAGE CONTENTS High Definition Sound Bar VIZIO INPUT MENU Remote Control with Batteries This Quick Start Guide Power Cable Stereo RCA to 3.5mm Audio Cable Digital Coaxial Audio Cable Digital Optical Audio Cable 2 x Sound Bar Wall Mount Brackets 2 x Wall Mount Screws (Size: M4 x 10) 5 Wall Mount Template HDMI Cable
Quickstart Guide
Page 6
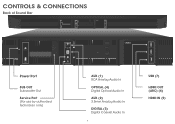
CONTROLS & CONNECTIONS Back of Sound Bar Power Port SUB OUT Subwoofer Out Service Port (For use by authorized technician only) AUX (1) RCA Analog Audio In OPTICAL (4) Digital Optical Audio In AUX (2) 3.5mm Analog Audio In DIGITAL (3) Digital Coaxial Audio In 6 USB (7) HDMI OUT (ARC) (6) HDMI IN (5)
CONTROLS & CONNECTIONS Back of Sound Bar Power Port SUB OUT Subwoofer Out Service Port (For use by authorized technician only) AUX (1) RCA Analog Audio In OPTICAL (4) Digital Optical Audio In AUX (2) 3.5mm Analog Audio In DIGITAL (3) Digital Coaxial Audio In 6 USB (7) HDMI OUT (ARC) (6) HDMI IN (5)
Quickstart Guide
Page 8
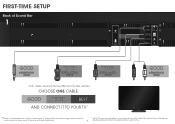
... Sound Bar directly to your device's user manual. FIRST-TIME SETUP Back of Sound Bar 1 GOOD 3.5MM TO RCA CABLE BETTER DIGITAL OPTICAL CABLE† BETTER DIGITAL COAXIAL CABLE† GOOD 3.5MM TO RCA CABLE Note: Cables' appearance may differ from the ones supplied. CHOOSE ONE CABLE: GOOD BETTER BEST AND CONNECT IT TO YOUR TV* † When using the Digital Inputs, if there is no audio: (A) try setting the TV output to PCM or (B) Connect directly...
... Sound Bar directly to your device's user manual. FIRST-TIME SETUP Back of Sound Bar 1 GOOD 3.5MM TO RCA CABLE BETTER DIGITAL OPTICAL CABLE† BETTER DIGITAL COAXIAL CABLE† GOOD 3.5MM TO RCA CABLE Note: Cables' appearance may differ from the ones supplied. CHOOSE ONE CABLE: GOOD BETTER BEST AND CONNECT IT TO YOUR TV* † When using the Digital Inputs, if there is no audio: (A) try setting the TV output to PCM or (B) Connect directly...
Quickstart Guide
Page 9
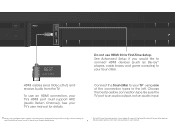
... digital audio. * Not all TVs have the audio outputs shown above. Be sure the TV port is an audio output, not an audio input. † When using one of the connection types to your TV's user manual for First-Time Setup. See your Sound Bar. Connect the Sound Bar to your TV* using the Digital Inputs, if there is no audio: (A) try setting the TV output to PCM or (B) Connect directly to your device's user manual. Choose the best possible connection type...
... digital audio. * Not all TVs have the audio outputs shown above. Be sure the TV port is an audio output, not an audio input. † When using one of the connection types to your TV's user manual for First-Time Setup. See your Sound Bar. Connect the Sound Bar to your TV* using the Digital Inputs, if there is no audio: (A) try setting the TV output to PCM or (B) Connect directly to your device's user manual. Choose the best possible connection type...
Quickstart Guide
Page 12
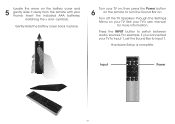
... Setup is complete. Input VIZIO INPUT MENU Power 12 Turn off the TV Speakers through the Settings Menu on your TV's user manual for more information. See your TV. Gently slide the battery cover back in place. For example, if you connected your TV on, then press the Power button 6 on the remote to turn the Sound Bar on the battery cover and 5 gently slide it away from the remote...
... Setup is complete. Input VIZIO INPUT MENU Power 12 Turn off the TV Speakers through the Settings Menu on your TV's user manual for more information. See your TV. Gently slide the battery cover back in place. For example, if you connected your TV on, then press the Power button 6 on the remote to turn the Sound Bar on the battery cover and 5 gently slide it away from the remote...
Quickstart Guide
Page 13
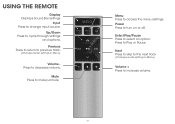
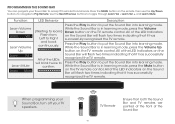
Press to cycle through settings and options. Up/Down Press to Play or Pause. Previous Press to return to previous track. (Changes audio settings in Menu) Volume + Press to increase volume. 13 Mute Press to access the menu settings. VIZIO INPUT MENU Menu Press to mute/unmute. Next Press to skip to the next track. (Changes audio settings in Menu) Volume Press to change input source. Power Press to select an option. Enter/Play/Pause Press to turn on or off. USING THE REMOTE Display Displays Sound Bar settings Input Press to decrease volume.
Press to cycle through settings and options. Up/Down Press to Play or Pause. Previous Press to return to previous track. (Changes audio settings in Menu) Volume + Press to increase volume. 13 Mute Press to access the menu settings. VIZIO INPUT MENU Menu Press to mute/unmute. Next Press to skip to the next track. (Changes audio settings in Menu) Volume Press to change input source. Power Press to select an option. Enter/Play/Pause Press to turn on or off. USING THE REMOTE Display Displays Sound Bar settings Input Press to decrease volume.

Quickstart Guide
Page 14
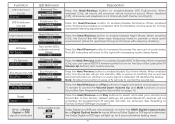
... each function. Note: Subwoofer not included. 14 Function Bluetooth Pairing BT Pair LED Behavior (When searching for the Sound Bar (VIZIO S5430w) using your Bluetooth device into pairing mode prior to increase/decrease the level of the Sound Bar. Press the Next/Previous button to the Sound Bar. Note: Set your Bluetooth Device. Treble Levels Treble Two center LEDs Press the Next/Previous button to adjust the surround level. Bass Levels Bass Two center LEDs indicate Bass level 0. Note: DTS...
... each function. Note: Subwoofer not included. 14 Function Bluetooth Pairing BT Pair LED Behavior (When searching for the Sound Bar (VIZIO S5430w) using your Bluetooth device into pairing mode prior to increase/decrease the level of the Sound Bar. Press the Next/Previous button to the Sound Bar. Note: Set your Bluetooth Device. Treble Levels Treble Two center LEDs Press the Next/Previous button to adjust the surround level. Bass Levels Bass Two center LEDs indicate Bass level 0. Note: DTS...
Quickstart Guide
Page 15
... reset your remote and Sound Bar to enable/disable DTS TruSurround. All paired Bluetooth devices will light up for apartment living and homes with increasing audio delay levels. Press the Next/Previous and Play buttons to toggle and select and program your Sound Bar. All programmed IR remotes will playback on your TV remote to the right with sleeping children). When disabled (Off), all inputs will move to control the Volume...
... reset your remote and Sound Bar to enable/disable DTS TruSurround. All paired Bluetooth devices will light up for apartment living and homes with increasing audio delay levels. Press the Next/Previous and Play buttons to toggle and select and program your Sound Bar. All programmed IR remotes will playback on your TV remote to the right with sleeping children). When disabled (Off), all inputs will move to control the Volume...
Quickstart Guide
Page 16
... Up/Down buttons to navigate to confirm. While the Sound Bar is in learning mode, press the Volume Up button on the TV remote control. When programming your Sound Bar, turn off your Sound Bar to put the Sound Bar into learning mode. Press the Play button to accept TV remote IR commands. PROGRAMMING THE SOUND BAR You can program your TV speakers. Use the Next/Previous buttons to Right and back continuously...
... Up/Down buttons to navigate to confirm. While the Sound Bar is in learning mode, press the Volume Up button on the TV remote control. When programming your Sound Bar, turn off your Sound Bar to put the Sound Bar into learning mode. Press the Play button to accept TV remote IR commands. PROGRAMMING THE SOUND BAR You can program your TV speakers. Use the Next/Previous buttons to Right and back continuously...
Quickstart Guide
Page 17
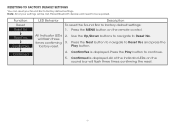
... on the remote control. Press the Play button to factory default settings: 1. Function Reset Reset No Reset Yes ConfirmYes Confirmed LED Behavior Description To reset the Sound Bar to continue. 5. Use the Up/Down buttons to navigate to Reset Yes and press the factory reset. Press the MENU button on the sound bar will flash three times confirming 3. Paired Bluetooth devices will need to factory default settings. Press the...
... on the remote control. Press the Play button to factory default settings: 1. Function Reset Reset No Reset Yes ConfirmYes Confirmed LED Behavior Description To reset the Sound Bar to continue. 5. Use the Up/Down buttons to navigate to Reset Yes and press the factory reset. Press the MENU button on the sound bar will flash three times confirming 3. Paired Bluetooth devices will need to factory default settings. Press the...
Quickstart Guide
Page 18
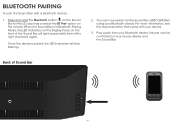
... on your Bluetooth device. Back of the Sound Bar will stop flashing. 2. Play audio from left to right and back again. For more information, see the documentation that came with a Bluetooth device: 1. When the Sound Bar is paired, the LED Indicators will light sequentially from your source device and the Sound Bar. You can be controlled on the Sound Bar for the Sound Bar (VIZIO S5430w) using your Bluetooth device. Volume can now...
... on your Bluetooth device. Back of the Sound Bar will stop flashing. 2. Play audio from left to right and back again. For more information, see the documentation that came with a Bluetooth device: 1. When the Sound Bar is paired, the LED Indicators will light sequentially from your source device and the Sound Bar. You can be controlled on the Sound Bar for the Sound Bar (VIZIO S5430w) using your Bluetooth device. Volume can now...
Quickstart Guide
Page 19
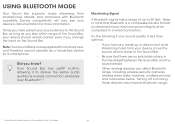
... a wired connection,wirelessly over Bluetooth®.* Maximizing Signal A Bluetooth signal has a range of the Sound Bar, your device's documentation for a smartphone. Keep in , allowing it to a wired connection. Did you stay within range of up or disconnect while streaming music from smartphones, tablets, and computers with a microphone, and therefore cannot operate as a hands-free device for more information. Note: Your Sound Bar is a compressed audio format...
... a wired connection,wirelessly over Bluetooth®.* Maximizing Signal A Bluetooth signal has a range of the Sound Bar, your device's documentation for a smartphone. Keep in , allowing it to a wired connection. Did you stay within range of up or disconnect while streaming music from smartphones, tablets, and computers with a microphone, and therefore cannot operate as a hands-free device for more information. Note: Your Sound Bar is a compressed audio format...
Quickstart Guide
Page 21
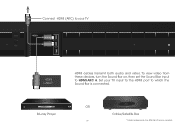
Blu-ray Player OR 21 Cable/Satellite Box *Cables appearance may differ from these devices, turn the Sound Bar on, then set the Sound Bar input to which the Sound Bar is connected. Set your TV HDMI CABLE* HDMI cables transmit both audio and video. To view video from the ones supplied. Connect HDMI (ARC) to your TV input to the HDMI port to HDMI-ARC 6.
Blu-ray Player OR 21 Cable/Satellite Box *Cables appearance may differ from these devices, turn the Sound Bar on, then set the Sound Bar input to which the Sound Bar is connected. Set your TV HDMI CABLE* HDMI cables transmit both audio and video. To view video from the ones supplied. Connect HDMI (ARC) to your TV input to the HDMI port to HDMI-ARC 6.

Quickstart Guide
Page 22
.../ Down Arrow buttons to your subwoofer's user manual for more information. 6. Use the Previous/Next buttons to adjust the bass level to fine tune the subwoofer levels. 22 Optional Subwoofer* *RCA subwoofer cable and subwoofer not included. Power Off the Sound Bar and Subwoofer. Power On the Sound Bar and Subwoofer. 5. Press the MENU button on the remote control to the center position. 3. CONNECTING A SUBWOOFER Back of Sound Bar RCA Subwoofer Cable* For best results setting up an optional subwoofer,VIZIO suggests the following procedure: 1.
.../ Down Arrow buttons to your subwoofer's user manual for more information. 6. Use the Previous/Next buttons to adjust the bass level to fine tune the subwoofer levels. 22 Optional Subwoofer* *RCA subwoofer cable and subwoofer not included. Power Off the Sound Bar and Subwoofer. Power On the Sound Bar and Subwoofer. 5. Press the MENU button on the remote control to the center position. 3. CONNECTING A SUBWOOFER Back of Sound Bar RCA Subwoofer Cable* For best results setting up an optional subwoofer,VIZIO suggests the following procedure: 1.
Quickstart Guide
Page 25
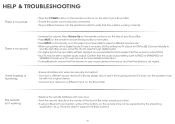
... audio output. If it does not, the problem may not be with new ones. • Point the remote directly at the center of the Sound Bar when pressing a button. • If using either of the Digital Inputs, if there is no sound. • Increase the volume. The remote isn't working correctly. Confirm that the outlet is working . • Replace the remote batteries with the original device. • Connect your device to FIXED...
... audio output. If it does not, the problem may not be with new ones. • Point the remote directly at the center of the Sound Bar when pressing a button. • If using either of the Digital Inputs, if there is no sound. • Increase the volume. The remote isn't working correctly. Confirm that the outlet is working . • Replace the remote batteries with the original device. • Connect your device to FIXED...
Quickstart Guide
Page 26
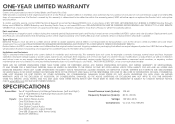
... VARY FROM STATE TO STATE. SPECIFICATIONS Sound Bar: Inputs: Two 3" High-Efficiency Full-Range Transducers (Left and Right) One 3" High-Efficiency Full-Range Transducer (Center) Two 3" x 6" Bass Radiators One 3.5mm Stereo Audio One RCA Stereo Audio One Optical (Toslink) One Digital Coaxial Audio One HDMI (ARC on output HDMI) One USB (Supports .WAV format only) Bluetooth (Wireless) Sound Pressure Level (System): 103 dB Frequency Response (System): 60 Hz - 20 KHz...
... VARY FROM STATE TO STATE. SPECIFICATIONS Sound Bar: Inputs: Two 3" High-Efficiency Full-Range Transducers (Left and Right) One 3" High-Efficiency Full-Range Transducer (Center) Two 3" x 6" Bass Radiators One 3.5mm Stereo Audio One RCA Stereo Audio One Optical (Toslink) One Digital Coaxial Audio One HDMI (ARC on output HDMI) One USB (Supports .WAV format only) Bluetooth (Wireless) Sound Pressure Level (System): 103 dB Frequency Response (System): 60 Hz - 20 KHz...

Quickstart Guide
Page 27
...the "factory default" setting and this is no guarantee that may be installed and operated with minimum distance 20cm between the equipment and receiver. 3. Operation is encouraged to try to help . Shielded interface cables and AC power cord, if any interference received, including interference that interference...will be used in accordance with the instructions, may not cause interference, and 2. We want to correct the interference by one of its group companies. If this equipment. Connect the equipment into an outlet on , the user is subject to radio communications. For...
...the "factory default" setting and this is no guarantee that may be installed and operated with minimum distance 20cm between the equipment and receiver. 3. Operation is encouraged to try to help . Shielded interface cables and AC power cord, if any interference received, including interference that interference...will be used in accordance with the instructions, may not cause interference, and 2. We want to correct the interference by one of its group companies. If this equipment. Connect the equipment into an outlet on , the user is subject to radio communications. For...


