User Manual
Page 2
...for future reference. • To reduce the risk of power supplied to your home, consult your investment beyond the standard warranty, VIZIO offers on-site extended warranty service plans. to your TV. • Read these instructions. • Keep these instructions before using...8226; Unplug the power cord before connecting other with the apparatus. Safety & Certification THANK YOU FOR CHOOSING VIZIO IMPORTANT SAFETY INSTRUCTIONS • Use only with the cart, stand, tripod, bracket, or table specified by the manufacturer. To get the most out of important operating ...
...for future reference. • To reduce the risk of power supplied to your home, consult your investment beyond the standard warranty, VIZIO offers on-site extended warranty service plans. to your TV. • Read these instructions. • Keep these instructions before using...8226; Unplug the power cord before connecting other with the apparatus. Safety & Certification THANK YOU FOR CHOOSING VIZIO IMPORTANT SAFETY INSTRUCTIONS • Use only with the cart, stand, tripod, bracket, or table specified by the manufacturer. To get the most out of important operating ...
User Manual
Page 6
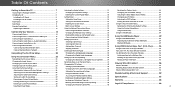
... Changing the View Mode Settings 45 Installing the TV 8 Deleting the Custom Audio Mode 32 Adjusting the Wide Mode (Aspect Ratio 45 Installing the TV Stand 8 Setting Timers 33 Changing your TV Name 45 Installing the TV on the Input Menu 41 Changing the TV Settings 42 Viewing System Information 42... the USB Media Player 49 Using the USB Media Player 49 Preparing Your USB Drive to Play USB Media 49 Playing USB Media 49 Using VIZIO Internet Apps Plus® (V.I .A.
... Changing the View Mode Settings 45 Installing the TV 8 Deleting the Custom Audio Mode 32 Adjusting the Wide Mode (Aspect Ratio 45 Installing the TV Stand 8 Setting Timers 33 Changing your TV Name 45 Installing the TV on the Input Menu 41 Changing the TV Settings 42 Viewing System Information 42... the USB Media Player 49 Using the USB Media Player 49 Preparing Your USB Drive to Play USB Media 49 Playing USB Media 49 Using VIZIO Internet Apps Plus® (V.I .A.
User Manual
Page 7
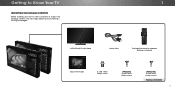
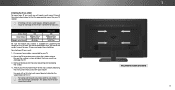
Getting to Know Your TV INSPECTING THE PACKAGE CONTENTS Before installing your new TV, take a moment to ensure nothing is missing or damaged. VIZIO LED UHDTV with Stand 1 Power Cord INPUT LIST EXIT MENU INFO BACK VOL GUIDE CH 3D 1 2 3 4 5 6 7 8 9 ENTER 0 Two-Sided Remote with Keyboard (Batteries Included) Quick Start Guide 4 x M5 14mm Phillips Screws (P552ui-B2) 4 x M6 18mm Phillips Screws (P652ui-B2) 4 x M6 16mm Phillips Screws PACKAGE CONTENTS 7 Use the images below to inspect the package contents.
Getting to Know Your TV INSPECTING THE PACKAGE CONTENTS Before installing your new TV, take a moment to ensure nothing is missing or damaged. VIZIO LED UHDTV with Stand 1 Power Cord INPUT LIST EXIT MENU INFO BACK VOL GUIDE CH 3D 1 2 3 4 5 6 7 8 9 ENTER 0 Two-Sided Remote with Keyboard (Batteries Included) Quick Start Guide 4 x M5 14mm Phillips Screws (P552ui-B2) 4 x M6 18mm Phillips Screws (P652ui-B2) 4 x M6 16mm Phillips Screws PACKAGE CONTENTS 7 Use the images below to inspect the package contents.
User Manual
Page 8
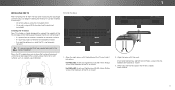
...screws into the bottom of the TV as shown. 2. Your TV can begin installing the TV. Align the neck piece with the neck. For P652ui-B2: Insert and tighten four (4) M6 16mm Phillips screws into place. When you can be installed in the base installation. 1 INSTALLING THE TV ...: • It is recommended that two people take part in two ways: • On a flat surface, using the included stand • On a wall, using a VESA-standard wall mount (not included) Installing the TV Stand Your TV includes a stand designed to the screen, place the TV on a stable, level surface. 8
...screws into the bottom of the TV as shown. 2. Your TV can begin installing the TV. Align the neck piece with the neck. For P652ui-B2: Insert and tighten four (4) M6 16mm Phillips screws into place. When you can be installed in the base installation. 1 INSTALLING THE TV ...: • It is recommended that two people take part in two ways: • On a flat surface, using the included stand • On a wall, using a VESA-standard wall mount (not included) Installing the TV Stand Your TV includes a stand designed to the screen, place the TV on a stable, level surface. 8
User Manual
Page 9
... that came with right-angle connectors. Remove the base and neck by loosening and removing the screws. 4. Screw Size: Hole Pattern: Weight w/o Stand: P552ui-B2 M6 300mm (V) x 300mm (H) 40.65 lbs P652ui-B2 M6 400mm (V) x 400mm (H) 59.97 lbs Be sure the mount you . This allows the TV to rest closer to use cables...
... that came with right-angle connectors. Remove the base and neck by loosening and removing the screws. 4. Screw Size: Hole Pattern: Weight w/o Stand: P552ui-B2 M6 300mm (V) x 300mm (H) 40.65 lbs P652ui-B2 M6 400mm (V) x 400mm (H) 59.97 lbs Be sure the mount you . This allows the TV to rest closer to use cables...
User Manual
Page 64
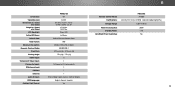
...: Dimensions w/ Stand: w/o Stand: Weight w/ Stand: w/o Stand: LCD Backlight: Active LED Zones: Refresh Rate: Clear Action: Maximum Resolution: Dynamic Contrast Ratio: Pixel Pitch: Viewing Angle: HDMI Inputs: Component Video Inputs: Composite Inputs: RF Antenna Input: USB Port: Ethernet: Audio Outputs: OSD Language: Ambient Light Sensor: P652ui-B2 65" 64.... English, French, Spanish Yes B Remote Control Model: Certifications: Voltage Range: Power Consumption: Standby Power: Zero Bright Pixel Guarantee: P652ui-B2 XRT500 UL/CUL, FCC Class B, HDMI 1.4b/2.0, Dolby Digital Plus 120V @ 60 Hz 360W
...: Dimensions w/ Stand: w/o Stand: Weight w/ Stand: w/o Stand: LCD Backlight: Active LED Zones: Refresh Rate: Clear Action: Maximum Resolution: Dynamic Contrast Ratio: Pixel Pitch: Viewing Angle: HDMI Inputs: Component Video Inputs: Composite Inputs: RF Antenna Input: USB Port: Ethernet: Audio Outputs: OSD Language: Ambient Light Sensor: P652ui-B2 65" 64.... English, French, Spanish Yes B Remote Control Model: Certifications: Voltage Range: Power Consumption: Standby Power: Zero Bright Pixel Guarantee: P652ui-B2 XRT500 UL/CUL, FCC Class B, HDMI 1.4b/2.0, Dolby Digital Plus 120V @ 60 Hz 360W
Quickstart Guide (English)
Page 2
... the power cord before turning on the top of your TV. Continued use attachments/accessories specified by the manufacturer. • Use only with the cart, stand, tripod, bracket, or table specified by qualified service personnel only. h If the provided plug does not fit into the apparatus, the apparatus has been exposed...
... the power cord before turning on the top of your TV. Continued use attachments/accessories specified by the manufacturer. • Use only with the cart, stand, tripod, bracket, or table specified by qualified service personnel only. h If the provided plug does not fit into the apparatus, the apparatus has been exposed...
Quickstart Guide (English)
Page 5
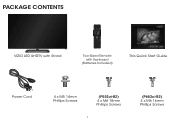
PACKAGE CONTENTS VIZIO LED UHDTV with Stand Two-Sided Remote with Keyboard (Batteries Included) This Quick Start Guide Power Cord 4 x M5 14mm Phillips Screws (P552ui-B2) 4 x M6 18mm Phillips Screws 5 (P652ui-B2) 4 x M6 16mm Phillips Screws
PACKAGE CONTENTS VIZIO LED UHDTV with Stand Two-Sided Remote with Keyboard (Batteries Included) This Quick Start Guide Power Cord 4 x M5 14mm Phillips Screws (P552ui-B2) 4 x M6 18mm Phillips Screws 5 (P652ui-B2) 4 x M6 16mm Phillips Screws


