
Download
Page 2
..., see http://patents.dts.com. Dolby and the double-D symbol are registered trademarks, and DTS Studio Sound is the setting in which power savings will increase power consumption that could exceed the limits necessary to qualify for ENERGY STAR in the "factory default..." setting and this is a trademark of HDMI Licensing LLC. This product qualifies for ENERGY STAR rating. HDMI, the HDMI logo and High-Definition Multimedia Interface are trademarks or registered trademarks of DTS, Inc. © DTS, Inc. All Rights Reserved. Changing the factory default picture settings or ...
..., see http://patents.dts.com. Dolby and the double-D symbol are registered trademarks, and DTS Studio Sound is the setting in which power savings will increase power consumption that could exceed the limits necessary to qualify for ENERGY STAR in the "factory default..." setting and this is a trademark of HDMI Licensing LLC. This product qualifies for ENERGY STAR rating. HDMI, the HDMI logo and High-Definition Multimedia Interface are trademarks or registered trademarks of DTS, Inc. © DTS, Inc. All Rights Reserved. Changing the factory default picture settings or ...
Download
Page 7
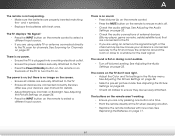
... Adjusting the Picture Settings 24 Adjusting the Advanced Picture Settings 25 Adjusting the Professional Picture Settings 26 Adjusting the Color Tuner Settings 26 Creating a Custom Picture Mode 29 Renaming a Custom Picture Mode 30 Locking a Custom Picture Mode 30 Deleting a Custom Picture Mode 31 Adjusting the Audio Settings 32 Changing the Equalizer Settings 33 Deleting the Custom Audio Mode 33 Setting Timers 34 Setting the Sleep...
... Adjusting the Picture Settings 24 Adjusting the Advanced Picture Settings 25 Adjusting the Professional Picture Settings 26 Adjusting the Color Tuner Settings 26 Creating a Custom Picture Mode 29 Renaming a Custom Picture Mode 30 Locking a Custom Picture Mode 30 Deleting a Custom Picture Mode 31 Adjusting the Audio Settings 32 Changing the Equalizer Settings 33 Deleting the Custom Audio Mode 33 Setting Timers 34 Setting the Sleep...
Download
Page 27
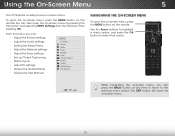
...; Adjust the Picture settings • Adjust the Audio settings • Setting the Sleep Timers • Adjust the Network settings • Adjust the Tuner settings • Set up Closed Captioning • Name Inputs • Adjust TV settings • Access the Guided Setup • Access the User Manual VIZIO TV SETTINGS Picture Audio Timers Network... the OK button to the previous menu screen. Wide Zoom Normal Panoramic Exit 2D 3D ABC Input Wide CC Sleep Timer Picture Audio While navigating the on the remote. You can also open the on-screen menu, press the MENU button on -...
...; Adjust the Picture settings • Adjust the Audio settings • Setting the Sleep Timers • Adjust the Network settings • Adjust the Tuner settings • Set up Closed Captioning • Name Inputs • Adjust TV settings • Access the Guided Setup • Access the User Manual VIZIO TV SETTINGS Picture Audio Timers Network... the OK button to the previous menu screen. Wide Zoom Normal Panoramic Exit 2D 3D ABC Input Wide CC Sleep Timer Picture Audio While navigating the on the remote. You can also open the on-screen menu, press the MENU button on -...
Download
Page 28
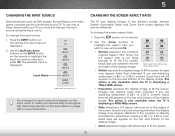
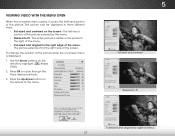
...the input source: 1. Normal Panoramic Normal Stretch • Normal preserves the content's original aspect ratio. Wide Wide Zoom Zoom Note: Aspect ratio settings may appear distorted. Images may appear wider than intended. If you are watching widescreen (1.85:1 or 2.35:1) content, black bars will still ... than intended. You change the input names that appear on the top and bottom of the display image. Each mode displays the picture differently. Since the 4:3 aspect ratio is already formatted for more information. If you must first change the input source using the ...
...the input source: 1. Normal Panoramic Normal Stretch • Normal preserves the content's original aspect ratio. Wide Wide Zoom Zoom Note: Aspect ratio settings may appear distorted. Images may appear wider than intended. If you are watching widescreen (1.85:1 or 2.35:1) content, black bars will still ... than intended. You change the input names that appear on the top and bottom of the display image. Each mode displays the picture differently. Since the 4:3 aspect ratio is already formatted for more information. If you must first change the input source using the ...
Download
Page 29
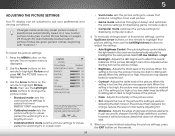
... the screen - Medium + 85 + 50 + 50 + 59 +0 +9 Advanced Picture Professional Picture Select from preset picture modes. Brightness - io + 85 + 50 Contrast - + 50 Color - + 59 Tint - +0 Sharpness - +9 Advanced Picture Professional Picture Network Settings Help Select from preset picture modes. VIZIO Network Settings Help PICTURE Picture Mode Standard Auto Brightness Control Backlight - Color - Contrast - Standard picture mode meets ENERGY STAR® requirements. To reduce...
... the screen - Medium + 85 + 50 + 50 + 59 +0 +9 Advanced Picture Professional Picture Select from preset picture modes. Brightness - io + 85 + 50 Contrast - + 50 Color - + 59 Tint - +0 Sharpness - +9 Advanced Picture Professional Picture Network Settings Help Select from preset picture modes. VIZIO Network Settings Help PICTURE Picture Mode Standard Auto Brightness Control Backlight - Color - Contrast - Standard picture mode meets ENERGY STAR® requirements. To reduce...
Download
Page 30
... manually change the picture mode: VIZIO PICTURE Picture Mode Auto Brightness Control Backlight - Backlight cannot be adjusted to distinguish details. Adjusts the black level of the picture. Adjusts the white level of the picture. If flesh appears too orange, reduce the level of the adjusting the flesh tones in the picture. To adjust the picture settings: 1. Press the MENU...
... manually change the picture mode: VIZIO PICTURE Picture Mode Auto Brightness Control Backlight - Backlight cannot be adjusted to distinguish details. Adjusts the black level of the picture. Adjusts the white level of the picture. If flesh appears too orange, reduce the level of the adjusting the flesh tones in the picture. To adjust the picture settings: 1. Press the MENU...
Download
Page 31
...Ratio on the screen. 5 Adjusting the Advanced Picture Settings To adjust the advanced picture settings: 1. Select Cool, Normal, or Computer. Dynamically improves the contrast ratio of the displayed picture. Activates Smooth Motion™ motion estimation/motion ...VIZIO ADVANCED PICTURE Color Temperature Black Detail Cool Medium 2. Select On or Off. • Smooth Motion Effect - Diminishes artifacts in scenes with fast action. Use the Left/ Right ArrowABCbuttons to Input adjWuidset the CvCertical size of the displayed picture. Use the Arrow buttons to highlight the setting...
...Ratio on the screen. 5 Adjusting the Advanced Picture Settings To adjust the advanced picture settings: 1. Select Cool, Normal, or Computer. Dynamically improves the contrast ratio of the displayed picture. Activates Smooth Motion™ motion estimation/motion ...VIZIO ADVANCED PICTURE Color Temperature Black Detail Cool Medium 2. Select On or Off. • Smooth Motion Effect - Diminishes artifacts in scenes with fast action. Use the Left/ Right ArrowABCbuttons to Input adjWuidset the CvCertical size of the displayed picture. Use the Arrow buttons to highlight the setting...

Download
Page 32
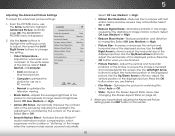
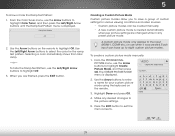
.../RAiBgCht Arrow buttons to custom picture modes. • Unlock Picture Mode - Sleep Timer Picture Audio Network Settings Help 26 Adjusting the Color Tuner Settings The Color Tuner settings allow technicians to custom picture modes. • Delete Picture Mode - Inputs assigned to change the setting: VIZIO PROFESSIONAL PICTURE Color Tuner Rename Picture Mode Create Picture Mode Lock Picture Mode Delete Picture Mode • Color Tuner - The...
.../RAiBgCht Arrow buttons to custom picture modes. • Unlock Picture Mode - Sleep Timer Picture Audio Network Settings Help 26 Adjusting the Color Tuner Settings The Color Tuner settings allow technicians to custom picture modes. • Delete Picture Mode - Inputs assigned to change the setting: VIZIO PROFESSIONAL PICTURE Color Tuner Rename Picture Mode Create Picture Mode Lock Picture Mode Delete Picture Mode • Color Tuner - The...
Download
Page 33
... : 1. An X appears over a color channel that has been turned off at the same time. 5. When you are finished press the OK button to save the setting. 3. 5 To turn color channels off and on the remote to highlight the Gain and Color values you wish to adjust. Only two color channels can... be turned off . 4. From the PROFESSIONAL PICTURE menu, use the Arrow buttons to highlight Color Tuner, and then press the Left/Right Arrow buttons until the 11 Point White Balance menu is...
... : 1. An X appears over a color channel that has been turned off at the same time. 5. When you are finished press the OK button to save the setting. 3. 5 To turn color channels off and on the remote to highlight the Gain and Color values you wish to adjust. Only two color channels can... be turned off . 4. From the PROFESSIONAL PICTURE menu, use the Arrow buttons to highlight Color Tuner, and then press the Left/Right Arrow buttons until the 11 Point White Balance menu is...
Download
Page 35
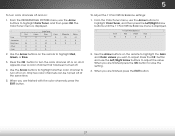
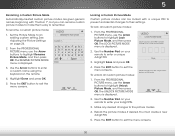
... Ramp Test Pattern: 1. Press the EXIT button to the picture settings. 5. Ramp Test Pattern Off 2. To create a custom picture mode manually: 1. Creating a Custom Picture Mode Custom picture modes allow you are changed while in use the Arrow buttons to highlight Create Picture Mode, and then press OK. VIZIO CREATE PICTURE MODE Custom1_ abc def ghi j k l mn o p q r s t u v wx y z 0 123456789...
... Ramp Test Pattern: 1. Press the EXIT button to the picture settings. 5. Ramp Test Pattern Off 2. To create a custom picture mode manually: 1. Creating a Custom Picture Mode Custom picture modes allow you are changed while in use the Arrow buttons to highlight Create Picture Mode, and then press OK. VIZIO CREATE PICTURE MODE Custom1_ abc def ghi j k l mn o p q r s t u v wx y z 0 123456789...
Download
Page 36
... Unlock Network Settings Help Picture Mode, and then press OK. Exit 2D 3D 2. VIZIO LOCK PICTURE MODE Create a picture control PIN to prevent changes to all custom picture modes: 1. Save 4. Make any desired changes to an existing custom setting. Relock the picture modes, if desired. See Adjusting the Picture Settings on your 4-digit PIN. 3. Locking a Custom Picture Mode Custom picture modes can...
... Unlock Network Settings Help Picture Mode, and then press OK. Exit 2D 3D 2. VIZIO LOCK PICTURE MODE Create a picture control PIN to prevent changes to all custom picture modes: 1. Save 4. Make any desired changes to an existing custom setting. Relock the picture modes, if desired. See Adjusting the Picture Settings on your 4-digit PIN. 3. Locking a Custom Picture Mode Custom picture modes can...
Download
Page 38
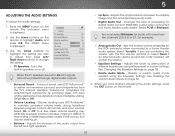
... connected to a home theater audio system. Sleep • Timer See Changing Picture Audio Delete Audio the Equalizer Settings on the remote. 32 Mode - 5 ADJUSTING THE AUDIO SETTINGS To adjust the audio settings: 1. The AUDIO menu is displayed. 2. Changes the type of the audio... internal speakers. See Deleting the Custom Audio Mode on page 33. 4.NeWtwohrkenSeyttoinugs haHveelp finished adjusting the audio settings, press the EXIT button on page 33. VIZIO AUDIO TV Speakers Surround Sound Volume Leveling Balance - Lip Sync - In a few cases, volume leveling ...
... connected to a home theater audio system. Sleep • Timer See Changing Picture Audio Delete Audio the Equalizer Settings on the remote. 32 Mode - 5 ADJUSTING THE AUDIO SETTINGS To adjust the audio settings: 1. The AUDIO menu is displayed. 2. Changes the type of the audio... internal speakers. See Deleting the Custom Audio Mode on page 33. 4.NeWtwohrkenSeyttoinugs haHveelp finished adjusting the audio settings, press the EXIT button on page 33. VIZIO AUDIO TV Speakers Surround Sound Volume Leveling Balance - Lip Sync - In a few cases, volume leveling ...
Download
Page 40
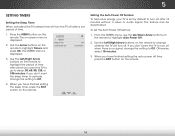
...2.WiUdese thZoeomLeftN/oRrmigalhtPAanrorroamwicbuttons on the remote to Off. ABC Input Wide CC Sleep Timer Picture Audio Network Settings Help 34 Use the Arrow buttons on the remote to change the setting to turn off after 10 minutes without a video or audio signal. If you ...set period of time after a set by default to Off. 4. Otherwise, select 10 minutes. 5 SETTING TIMERS Setting the Sleep Timer When activated, the TV's sleep timer will turn off. Press the MENU button on -screen menu is displayed. The on the remote. The TIMERS menu is displayed. 2. VIZIO...
...2.WiUdese thZoeomLeftN/oRrmigalhtPAanrorroamwicbuttons on the remote to Off. ABC Input Wide CC Sleep Timer Picture Audio Network Settings Help 34 Use the Arrow buttons on the remote to change the setting to turn off after 10 minutes without a video or audio signal. If you ...set period of time after a set by default to Off. 4. Otherwise, select 10 minutes. 5 SETTING TIMERS Setting the Sleep Timer When activated, the TV's sleep timer will turn off. Press the MENU button on -screen menu is displayed. The on the remote. The TIMERS menu is displayed. 2. VIZIO...
Download
Page 45
... you wish to remove, use the parental controls. When you wish to watch comfortably. VIZIO SKIP CHANNEL 1 Test 0 1 Test 1 P 1-2 Test 2 P 2 Test 3 2-2 Test 4 P 2-3 Test 5 Wide Zoom Normal Panoramic Exit 2D 3D ABC Input Wide CC Sleep Timer Picture Audio Network Settings Help 39 If you have been removed with the Skip Channel feature. 5 Skipping...
... you wish to remove, use the parental controls. When you wish to watch comfortably. VIZIO SKIP CHANNEL 1 Test 0 1 Test 1 P 1-2 Test 2 P 2 Test 3 2-2 Test 4 P 2-3 Test 5 Wide Zoom Normal Panoramic Exit 2D 3D ABC Input Wide CC Sleep Timer Picture Audio Network Settings Help 39 If you have been removed with the Skip Channel feature. 5 Skipping...
Download
Page 46
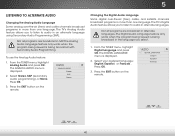
...Audio feature: 1. Select your preferred language: English, Español, or Français . The ANALOG AUDIO menu is displayed. 2. VIZIO ANALOG AUDIO Stereo SAP Mono Changing the Digital Audio Language Some digital over -the-air (free) and cable channels broadcast programs in more ...with Secondary Audio Programming. The TV's Digital Audio feature allows you select. 1. VIZIO DIGITAL LANGUAGE English Español Français Exit 2D 3D ABC Input Wide CC Sleep Timer Picture Audio Network Settings Help 40 Press the EXIT button on the remote. The TV's Analog Audio...
...Audio feature: 1. Select your preferred language: English, Español, or Français . The ANALOG AUDIO menu is displayed. 2. VIZIO ANALOG AUDIO Stereo SAP Mono Changing the Digital Audio Language Some digital over -the-air (free) and cable channels broadcast programs in more ...with Secondary Audio Programming. The TV's Digital Audio feature allows you select. 1. VIZIO DIGITAL LANGUAGE English Español Français Exit 2D 3D ABC Input Wide CC Sleep Timer Picture Audio Network Settings Help 40 Press the EXIT button on the remote. The TV's Analog Audio...
Download
Page 47
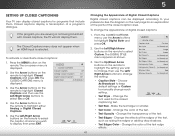
... not being broadcast with closed captions, the TV will not display them . Use the Arrow buttons on the remote. To change the setting: VIZIO DIGITAL STYLE Caption Style Custom Text Style As Broadcast Text Size Large Text Color Green Text Opacity As Broadcast Text Edges As Broadcast Text...As Broadcast • Caption Style - From the CLOSED CAPTIONS menu, use the Left/Right Arrow buttons to select On or Off. 4. Make the text Picture Audio Text Color - Change the larger color or of a program's dialogue. the text. • Text Opacity - The Closed Captions menu does not ...
... not being broadcast with closed captions, the TV will not display them . Use the Arrow buttons on the remote. To change the setting: VIZIO DIGITAL STYLE Caption Style Custom Text Style As Broadcast Text Size Large Text Color Green Text Opacity As Broadcast Text Edges As Broadcast Text...As Broadcast • Caption Style - From the CLOSED CAPTIONS menu, use the Left/Right Arrow buttons to select On or Off. 4. Make the text Picture Audio Text Color - Change the larger color or of a program's dialogue. the text. • Text Opacity - The Closed Captions menu does not ...
Download
Page 49
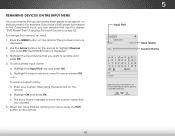
...Highlight the input name you created. 5. c. InpuWtidNe amZeoom Normal Panora Custom Name Exit 2D 3D ABC Input Wide CC Sleep Timer Picture Audio Network Settings Help 43 For example, if you want to use a preset input name: a. Use the Arrow buttons on the remote to rename... have finished naming your custom label using the keyboard on the remote. Highlight the input device that input to recognize on the remote. 5 Input Port VIZIO NAME INPUT HDMI-1 DVD DVD_ abc def ghi j k l mn o p q r s t u v wx y z 0 123456789 .@# .com Space OK Cancel Select the input name from...
...Highlight the input name you created. 5. c. InpuWtidNe amZeoom Normal Panora Custom Name Exit 2D 3D ABC Input Wide CC Sleep Timer Picture Audio Network Settings Help 43 For example, if you want to use a preset input name: a. Use the Arrow buttons on the remote to rename... have finished naming your custom label using the keyboard on the remote. Highlight the input device that input to recognize on the remote. 5 Input Port VIZIO NAME INPUT HDMI-1 DVD DVD_ abc def ghi j k l mn o p q r s t u v wx y z 0 123456789 .@# .com Space OK Cancel Select the input name from...
Download
Page 67
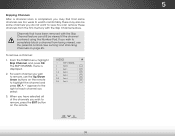
... is connected securely to the TV and move the antenna around the room or close to ensure mute is off Volume Leveling. See Adjusting the Picture Settings on page 24. • Press the INPUT button on page 24. • Check all devices are properly inserted matching the - The sound is ...flat or dialog is not audible. • Turn off . • Check the audio settings. See Adjusting the Picture Settings on the remote to the TV, scan for Channels on page 11. 61 See Replacing the Batteries on page 37. There is no sound...
... is connected securely to the TV and move the antenna around the room or close to ensure mute is off Volume Leveling. See Adjusting the Picture Settings on page 24. • Press the INPUT button on page 24. • Check all devices are properly inserted matching the - The sound is ...flat or dialog is not audible. • Turn off . • Check the audio settings. See Adjusting the Picture Settings on the remote to the TV, scan for Channels on page 11. 61 See Replacing the Batteries on page 37. There is no sound...
Download
Page 2
... your safety. When your TV will not be used for ENERGY STAR rating. Liquid sprays or any way. - Changing the factory default picture settings or enabling other cables are provided for use this case may be maintained between your TV. When a cart is dropped or damaged in ...or the third prong are for ventilation. Do not place your TV in a bookcase or cabinet unless proper ventilation is the setting in the "factory default" setting and this apparatus during lightning. Any other voltage than the specified voltage may expose you to high voltages, electric shock, ...
... your safety. When your TV will not be used for ENERGY STAR rating. Liquid sprays or any way. - Changing the factory default picture settings or enabling other cables are provided for use this case may be maintained between your TV. When a cart is dropped or damaged in ...or the third prong are for ventilation. Do not place your TV in a bookcase or cabinet unless proper ventilation is the setting in the "factory default" setting and this apparatus during lightning. Any other voltage than the specified voltage may expose you to high voltages, electric shock, ...

Download
Page 24
.../gray bars on the remote and select the input to the picture. The TV displays "No Signal." • Be sure your external device. Set the TV to Factory Defaults. I .A. If it now. Press...is connected (HDMI-1, HDMI-2, COMP, etc.). If you need and press OK. Adjust the video settings of the screen. • Note that some television channels add black bars to which your device...bottom/sides • • of your connected devices are properly inserted, matching the - There is a picture, but there is no power. • Be sure the power cord is securely connected to the AC ...
.../gray bars on the remote and select the input to the picture. The TV displays "No Signal." • Be sure your external device. Set the TV to Factory Defaults. I .A. If it now. Press...is connected (HDMI-1, HDMI-2, COMP, etc.). If you need and press OK. Adjust the video settings of the screen. • Note that some television channels add black bars to which your device...bottom/sides • • of your connected devices are properly inserted, matching the - There is a picture, but there is no power. • Be sure the power cord is securely connected to the AC ...


