Download
Page 4
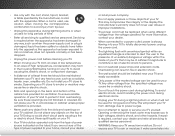
... normally or has been dropped. • Unplug the power cord before turning on the top of the display. • Use only with the cart, stand, tripod, bracket, or table specified by the manufacturer, or sold with arrowhead symbol within the inside of your TV that may be of sufficient magnitude...
... normally or has been dropped. • Unplug the power cord before turning on the top of the display. • Use only with the cart, stand, tripod, bracket, or table specified by the manufacturer, or sold with arrowhead symbol within the inside of your TV that may be of sufficient magnitude...
Download
Page 7
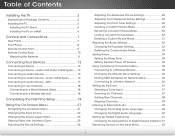
... Language 40 Setting Up Closed Captioning 41 Changing the Appearance of Contents Installing the TV 3 Inspecting the Package Contents 3 Installing the TV 4 Installing the TV Stand 4 Installing the TV on the Input Menu 43 1 Audio Cable Types 16 Connecting an Audio Device - Audio and Video Cable Types....... 13 Connecting an Audio...
... Language 40 Setting Up Closed Captioning 41 Changing the Appearance of Contents Installing the TV 3 Inspecting the Package Contents 3 Installing the TV 4 Installing the TV Stand 4 Installing the TV on the Input Menu 43 1 Audio Cable Types 16 Connecting an Audio Device - Audio and Video Cable Types....... 13 Connecting an Audio...
Download
Page 9
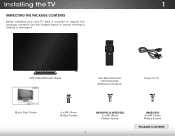
Installing the TV 1 INSPECTING THE PACKAGE CONTENTS Before installing your new TV, take a moment to ensure nothing is missing or damaged. VIZIO LED HDTV with Stand Two-Sided Remote with Keyboard (Batteries Included) Power Cord Quick Start Guide 4 x M5 14mm Phillips Screws (M492i-B2 & M552i-B2) 4 x M6 18mm Phillips Screws 3 (M652i-B2) 4 x M6 16mm Phillips Screws PACKAGE CONTENTS Use the images below to inspect the package contents.
Installing the TV 1 INSPECTING THE PACKAGE CONTENTS Before installing your new TV, take a moment to ensure nothing is missing or damaged. VIZIO LED HDTV with Stand Two-Sided Remote with Keyboard (Batteries Included) Power Cord Quick Start Guide 4 x M5 14mm Phillips Screws (M492i-B2 & M552i-B2) 4 x M6 18mm Phillips Screws 3 (M652i-B2) 4 x M6 16mm Phillips Screws PACKAGE CONTENTS Use the images below to inspect the package contents.
Download
Page 10
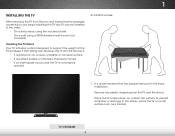
...is pushed, pulled, or otherwise improperly moved • If an earthquake occurs and the TV is not properly secured To install the base: 1. TV ON STAND 4 However, the TV can be installed in the base installation. 1 INSTALLING THE TV After removing the TV from the TV and the... stand. It is recommended that two people take part in two ways: • On a flat surface, using the included stand • On a wall, using a VESA-standard wall mount (not included) Installing the TV...
...is pushed, pulled, or otherwise improperly moved • If an earthquake occurs and the TV is not properly secured To install the base: 1. TV ON STAND 4 However, the TV can be installed in the base installation. 1 INSTALLING THE TV After removing the TV from the TV and the... stand. It is recommended that two people take part in two ways: • On a flat surface, using the included stand • On a wall, using a VESA-standard wall mount (not included) Installing the TV...
Download
Page 11
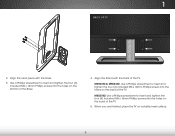
... TV. Align the Stand with the base. 3. M652i-B2: Use a Phillips screwdriver to insert and tighten the four (4) included M6 x 18mm Phillips screws into the holes on the bottom of the TV. 1 BACK OF TV 2. When you are finished, place the TV on the back of the TV. 5. M492i-B2 & M552i-B2: Use a Phillips screwdriver...
... TV. Align the Stand with the base. 3. M652i-B2: Use a Phillips screwdriver to insert and tighten the four (4) included M6 x 18mm Phillips screws into the holes on the bottom of the TV. 1 BACK OF TV 2. When you are finished, place the TV on the back of the TV. 5. M492i-B2 & M552i-B2: Use a Phillips screwdriver...
Download
Page 12
... that came with right-angle connectors. This allows the TV to rest closer to help you choose is clear of the TV. 6 1 M492i-B2 M552i-B2 M652i-B2 WALL-MOUNT SCREW LOCATIONS Remove the base by loosening and removing the screws. 4. Remove these before attaching the wall mount bracket to use cables...Installing the TV Installing the TV on a Wall To mount your TV on a wall, you can scratch or damage the TV. 3. M492i-B2 M552i-B2 M652i-B2 Screw Size: Hole Pattern: Weight w/o Stand: M6 300mm x 300mm 31.24 lbs M6 400mm x 400mm 38.56 lbs M6 400mm x 400mm 59.97 lbs Be sure the ...
... that came with right-angle connectors. This allows the TV to rest closer to help you choose is clear of the TV. 6 1 M492i-B2 M552i-B2 M652i-B2 WALL-MOUNT SCREW LOCATIONS Remove the base by loosening and removing the screws. 4. Remove these before attaching the wall mount bracket to use cables...Installing the TV Installing the TV on a Wall To mount your TV on a wall, you can scratch or damage the TV. 3. M492i-B2 M552i-B2 M652i-B2 Screw Size: Hole Pattern: Weight w/o Stand: M6 300mm x 300mm 31.24 lbs M6 400mm x 400mm 38.56 lbs M6 400mm x 400mm 59.97 lbs Be sure the ...
Download
Page 69
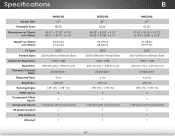
Specifications Screen Size: Viewable Area: Dimensions w/ Stand: w/o Stand: Weight w/ Stand: w/o Stand: TV Type: Refresh Rate: Maximum Resolution: Pixel Pitch: Dynamic Contrast Ratio: Response Time: Brightness: Viewing Angle: HDMI Inputs: Component Video Inputs: Composite Inputs: RF Antenna Input: USB 2.0 Ports: Ethernet: M492i-B2 49" 48.50" 43.07" x 27.20" x 9.76" 43.07" x 24.91" x 2.12" 36.65...
Specifications Screen Size: Viewable Area: Dimensions w/ Stand: w/o Stand: Weight w/ Stand: w/o Stand: TV Type: Refresh Rate: Maximum Resolution: Pixel Pitch: Dynamic Contrast Ratio: Response Time: Brightness: Viewing Angle: HDMI Inputs: Component Video Inputs: Composite Inputs: RF Antenna Input: USB 2.0 Ports: Ethernet: M492i-B2 49" 48.50" 43.07" x 27.20" x 9.76" 43.07" x 24.91" x 2.12" 36.65...
Download
Page 2
... or appliance coupler is exposed to smoke or moisture may cause fire or electric shock. • Slots and openings in an area with the cart, stand, tripod, bracket, or table specified by qualified service personnel only. Wait before moving your TV close to rain or other hazards. To ensure reliable operation...
... or appliance coupler is exposed to smoke or moisture may cause fire or electric shock. • Slots and openings in an area with the cart, stand, tripod, bracket, or table specified by qualified service personnel only. Wait before moving your TV close to rain or other hazards. To ensure reliable operation...
Download
Page 5
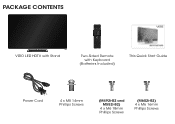
PACKAGE CONTENTS VIZIO LED HDTV with Stand Two-Sided Remote with Keyboard (Batteries Included) This Quick Start Guide Power Cord 4 x M5 14mm Phillips Screws (M492i-B2 and M552i-B2) 4 x M6 18mm Phillips Screws (M652i-B2) 4 x M6 16mm Phillips Screws
PACKAGE CONTENTS VIZIO LED HDTV with Stand Two-Sided Remote with Keyboard (Batteries Included) This Quick Start Guide Power Cord 4 x M5 14mm Phillips Screws (M492i-B2 and M552i-B2) 4 x M6 18mm Phillips Screws (M652i-B2) 4 x M6 16mm Phillips Screws
Download
Page 7
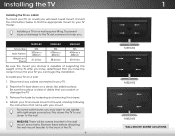
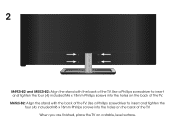
2 M492i-B2 and M552i-B2: Align the stand with the back of the TV. M652i-B2: Align the stand with the back of the TV. When you are finished, place the TV on the back of the TV. Use a Phillips screwdriver to insert and tighten the four (4) included M6 x 16mm Phillips screws into the holes on the back of the TV. Use a Phillips screwdriver to insert and tighten the four (4) included M6 x 18mm Phillips screws into the holes on a stable, level surface.
2 M492i-B2 and M552i-B2: Align the stand with the back of the TV. M652i-B2: Align the stand with the back of the TV. When you are finished, place the TV on the back of the TV. Use a Phillips screwdriver to insert and tighten the four (4) included M6 x 16mm Phillips screws into the holes on the back of the TV. Use a Phillips screwdriver to insert and tighten the four (4) included M6 x 18mm Phillips screws into the holes on a stable, level surface.


