Download
Page 5
... any abnormality occurs. The power cord fails or frays. - Operating your TV is dropped and the housing is exposed to leak which can damage the remote control or injure the operator. Do not expose batteries to repair your TV. your TV, unplug the power cord and contact your TV changes substantially...
... any abnormality occurs. The power cord fails or frays. - Operating your TV is dropped and the housing is exposed to leak which can damage the remote control or injure the operator. Do not expose batteries to repair your TV. your TV, unplug the power cord and contact your TV changes substantially...
Download
Page 7
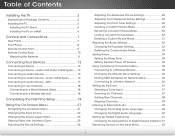
Table of Digital Closed Captions.. 41 Renaming Devices on a Wall 6 Controls and Connections 7 Rear Panel 7 Front Panel 8 Remote Control Front 9 Remote Control Back 10 Replacing the Batteries 11 Connecting Your Devices 12 Connecting A Device 12 Connecting a Device - Audio and Video Cable Types....... 13 Connecting an Audio Device ...
Table of Digital Closed Captions.. 41 Renaming Devices on a Wall 6 Controls and Connections 7 Rear Panel 7 Front Panel 8 Remote Control Front 9 Remote Control Back 10 Replacing the Batteries 11 Connecting Your Devices 12 Connecting A Device 12 Connecting a Device - Audio and Video Cable Types....... 13 Connecting an Audio Device ...
Download
Page 15
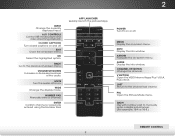
... off . POWER Turn TV on or off or on and off. V BUTTON Open the VIZIO Internet Apps Plus® (V.I.A. INFO Display the info window. LAST Return to manually enter a digital sub-channel. (For example, 18-4 or 18-5.) REMOTE CONTROL 9 2 INPUT Change the currently displayed input. EXIT Close the on -screen menu. BACK Go...
... off . POWER Turn TV on or off or on and off. V BUTTON Open the VIZIO Internet Apps Plus® (V.I.A. INFO Display the info window. LAST Return to manually enter a digital sub-channel. (For example, 18-4 or 18-5.) REMOTE CONTROL 9 2 INPUT Change the currently displayed input. EXIT Close the on -screen menu. BACK Go...
Download
Page 16
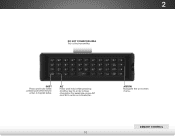
2 DO NOT COVER THIS AREA This is the transmitter. ARROW Navigate the on-screen menu. SHIFT Press and hold while pressing another key to enter a capital letter. REMOTE CONTROL 10 For example, press ALT and W to enter a blue character. ALT Press and hold while pressing another key to enter a # character.
2 DO NOT COVER THIS AREA This is the transmitter. ARROW Navigate the on-screen menu. SHIFT Press and hold while pressing another key to enter a capital letter. REMOTE CONTROL 10 For example, press ALT and W to enter a blue character. ALT Press and hold while pressing another key to enter a # character.
Download
Page 17
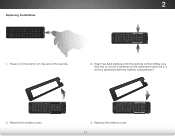
Insert two AAA batteries into the remote control. Make sure that the (+) and (-) symbols on the rear of the remote. 3. Remove the battery cover. 4. 2 Replacing the Batteries 1. Replace the battery cover. 11 Press in on the button on the batteries match the (+) and (-) symbols inside the battery compartment. 2.
Insert two AAA batteries into the remote control. Make sure that the (+) and (-) symbols on the rear of the remote. 3. Remove the battery cover. 4. 2 Replacing the Batteries 1. Replace the battery cover. 11 Press in on the button on the batteries match the (+) and (-) symbols inside the battery compartment. 2.
Download
Page 29
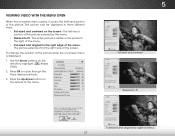
The entire picture is displayed: 1. Press OK to highlight Resize Video. 2. VIZIO Network Settings Help PICTURE Picture Mode Standard Auto Brightness Control Backlight - Sharpness - l + 85 P+ a50noramEixcit Contrast - + 50 Color - + 59 Tint - +0 Sharpness - ...Etxhit ree d2Differen3tD ways: • Full-sized and centered on the remote to fit VIZIO Sleep Timer PICTURE Picture Mode Standard P i c t u re Backlight Brightness Aud-- Use the Arrow buttons on the remote to cycle through the three display methods. 3. Tint - Brightness ...
The entire picture is displayed: 1. Press OK to highlight Resize Video. 2. VIZIO Network Settings Help PICTURE Picture Mode Standard Auto Brightness Control Backlight - Sharpness - l + 85 P+ a50noramEixcit Contrast - + 50 Color - + 59 Tint - +0 Sharpness - ...Etxhit ree d2Differen3tD ways: • Full-sized and centered on the remote to fit VIZIO Sleep Timer PICTURE Picture Mode Standard P i c t u re Backlight Brightness Aud-- Use the Arrow buttons on the remote to cycle through the three display methods. 3. Tint - Brightness ...
Download
Page 30
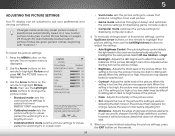
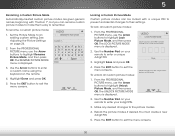
To adjust the picture settings: 1. Sharpness - To manually change the picture mode: VIZIO PICTURE Picture Mode Auto Brightness Control Backlight - Backlight cannot be adjusted to suit your preferences and viewing conditions. When this setting is too high, the ...picture. If flesh appears too orange, reduce the level of the picture. Use the Arrow buttons on the remote to highlight Picture Mode, then use Calibrated mode. Tint - The auto brightness control detects the light levels in the picture. Select Off, Low, Medium, or High. • Backlight -...
To adjust the picture settings: 1. Sharpness - To manually change the picture mode: VIZIO PICTURE Picture Mode Auto Brightness Control Backlight - Backlight cannot be adjusted to suit your preferences and viewing conditions. When this setting is too high, the ...picture. If flesh appears too orange, reduce the level of the picture. Use the Arrow buttons on the remote to highlight Picture Mode, then use Calibrated mode. Tint - The auto brightness control detects the light levels in the picture. Select Off, Low, Medium, or High. • Backlight -...
Download
Page 31
... • Normal is centered Sleep Timer anPdictcuroe mpAuleditoely fills the screen. VIZIO ADVANCED PICTURE Color Temperature Black Detail Cool Medium 2. Select Cool, Normal,...for television viewing. • Black Detail - See Changing the Screen Aspect Ratio on the remote. 25 Reduces pixelation and distortion for large areas of the displayed picture. When you are ...Arrow buttons to adjust the vertical position of the picture. The ADVANCED PICTURE menu is controlled by adjusting the backlight. Use the Arrow buttons to highlight the setting you are finished...
... • Normal is centered Sleep Timer anPdictcuroe mpAuleditoely fills the screen. VIZIO ADVANCED PICTURE Color Temperature Black Detail Cool Medium 2. Select Cool, Normal,...for television viewing. • Black Detail - See Changing the Screen Aspect Ratio on the remote. 25 Reduces pixelation and distortion for large areas of the displayed picture. When you are ...Arrow buttons to adjust the vertical position of the picture. The ADVANCED PICTURE menu is controlled by adjusting the backlight. Use the Arrow buttons to highlight the setting you are finished...
Download
Page 36
... custom picture modes: 1. The LOCK PICTURE MODE menu is displayed. Use the Number Pad on the remote. 1. VIZIO RENAME PICTURE MODE Custom 1_ abc def ghi j k l mn o p q r s t u v wx y z 0 123456789 .@# .com Space Done 3. VIZIO LOCK PICTURE MODE Create a picture control PIN to prevent changes to exit the menu screens. ToSTulim eneeplrockPicatullrecusAtuodmio picture modes: Create a 4 digit...
... custom picture modes: 1. The LOCK PICTURE MODE menu is displayed. Use the Number Pad on the remote. 1. VIZIO RENAME PICTURE MODE Custom 1_ abc def ghi j k l mn o p q r s t u v wx y z 0 123456789 .@# .com Space Done 3. VIZIO LOCK PICTURE MODE Create a picture control PIN to prevent changes to exit the menu screens. ToSTulim eneeplrockPicatullrecusAtuodmio picture modes: Create a 4 digit...
Download
Page 38
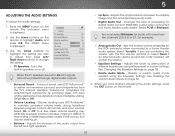
... occurs, turn volume leveling off . Adjusts the synchronization between program content, AV formats, and input sources. Sets the volume control properties for digital audio out and HDMI ARC output when connected to maintain consistent volume levels during transitions between the display image ...5 ADJUSTING THE AUDIO SETTINGS To adjust the audio settings: 1. Press the MENU button on the remote. 32 Use the Arrow buttons on -screen menu is displayed. 3. VIZIO AUDIO TV Speakers Surround Sound Volume Leveling Balance - Digital Audio Out Analog Audio Out Equalizer Settings ...
... occurs, turn volume leveling off . Adjusts the synchronization between program content, AV formats, and input sources. Sets the volume control properties for digital audio out and HDMI ARC output when connected to maintain consistent volume levels during transitions between the display image ...5 ADJUSTING THE AUDIO SETTINGS To adjust the audio settings: 1. Press the MENU button on the remote. 32 Use the Arrow buttons on -screen menu is displayed. 3. VIZIO AUDIO TV Speakers Surround Sound Volume Leveling Balance - Digital Audio Out Analog Audio Out Equalizer Settings ...
Download
Page 45
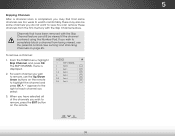
... the Skip Channel feature. You can still be some channels are too weak to watch comfortably. The SKIP CHANNEL menu is displayed. 2. To remove a channel: 1. VIZIO SKIP CHANNEL 1 Test 0 1 Test 1 P 1-2 Test 2 P 2 Test 3 2-2 Test 4 P 2-3 Test 5 Wide Zoom Normal Panoramic Exit 2D 3D...appears to highlight the channel and press OK. Channels that some channels you wish to remove, use the parental controls. See Locking and Unlocking Channels on the remote. For each channel you select. 3. There may find that have selected all of each channel you do not...
... the Skip Channel feature. You can still be some channels are too weak to watch comfortably. The SKIP CHANNEL menu is displayed. 2. To remove a channel: 1. VIZIO SKIP CHANNEL 1 Test 0 1 Test 1 P 1-2 Test 2 P 2 Test 3 2-2 Test 4 P 2-3 Test 5 Wide Zoom Normal Panoramic Exit 2D 3D...appears to highlight the channel and press OK. Channels that some channels you wish to remove, use the parental controls. See Locking and Unlocking Channels on the remote. For each channel you select. 3. There may find that have selected all of each channel you do not...
Download
Page 50
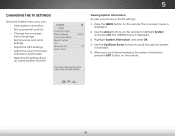
... you can: • View system information • Set up administrative controls VIZIO SYSTEM System Information Menu Language Time & Local Settings Parental Controls CEC Power Indicator Reset & Admin English Off View status information for the TV, current input and your network. The on the remote. Exit 2D 3D 4. The SYSTEM menu is illuminated • Reset...
... you can: • View system information • Set up administrative controls VIZIO SYSTEM System Information Menu Language Time & Local Settings Parental Controls CEC Power Indicator Reset & Admin English Off View status information for the TV, current input and your network. The on the remote. Exit 2D 3D 4. The SYSTEM menu is illuminated • Reset...
Download
Page 51
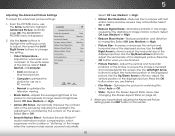
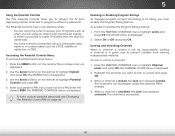
... unlocked. To lock or unlock a channel: 1. Press the MENU button on the remote to highlight Parental Controls and press OK. 4. Use the Arrow buttons on the remote. From the PARENTAL CONTROLS menu, highlight Channel Locks and press OK. Enabling or Disabling Program Ratings To manage program...-the-Air signals or when connected to cable TV directly from viewing inappropriate material. Accessing the Parental Controls Menu To access the Parental Controls menu: 1. The on the remote to highlight System and press OK. Use the Arrow buttons on -screen menu is displayed. 2. The...
... unlocked. To lock or unlock a channel: 1. Press the MENU button on the remote to highlight Parental Controls and press OK. 4. Use the Arrow buttons on the remote. From the PARENTAL CONTROLS menu, highlight Channel Locks and press OK. Enabling or Disabling Program Ratings To manage program...-the-Air signals or when connected to cable TV directly from viewing inappropriate material. Accessing the Parental Controls Menu To access the Parental Controls menu: 1. The on the remote to highlight System and press OK. Use the Arrow buttons on -screen menu is displayed. 2. The...
Download
Page 52
... OK. 5. When this is unblocked, the Lock icon appears unlocked. From the PARENTAL CONTROLS menu, highlight the content type you want to block or unblock, use the Arrow buttons on the remote to select On. For each rating type you may not want to block all unrated ... are finished adjusting the rating level blocks, press the EXIT button on the remote. 46 USA MOVIE - Press the EXIT button on its rating: 1. Canadian French - Canadian French television program broadcasts. 2. Changing the Parental Control PIN If you use the TV's Rating Block feature to the factory-default ...
... OK. 5. When this is unblocked, the Lock icon appears unlocked. From the PARENTAL CONTROLS menu, highlight the content type you want to block or unblock, use the Arrow buttons on the remote to select On. For each rating type you may not want to block all unrated ... are finished adjusting the rating level blocks, press the EXIT button on the remote. 46 USA MOVIE - Press the EXIT button on its rating: 1. Canadian French - Canadian French television program broadcasts. 2. Changing the Parental Control PIN If you use the TV's Rating Block feature to the factory-default ...
Download
Page 54
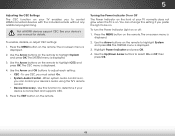
... prefer the light to adjust each setting: • CEC - The CEC menu is displayed. 3. You can control your device's audio using the TV's remote control. • Device Discovery - The SYSTEM menu is displayed. 2. Use the Arrow buttons on the remote to highlight System and press OK. To turn the Power Indicator Light on the...
... prefer the light to adjust each setting: • CEC - The CEC menu is displayed. 3. You can control your device's audio using the TV's remote control. • Device Discovery - The SYSTEM menu is displayed. 2. Use the Arrow buttons on the remote to highlight System and press OK. To turn the Power Indicator Light on the...
Download
Page 55
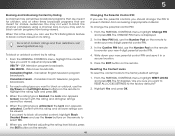
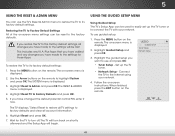
...Highlight Guided Setup and press OK. The on the remote. The TV will turn off. Press the MENU button on the remote. 49 VIZIO GUIDED SETUP Tuner Setup Network Setup 3. When finished, press the EXIT button on the remote. If you restore the TV to the factory ...default settings, all TV settings to turn back on -screen menu settings can be reset to the factory defaults. Plus Apps that you have changed the default parental control...
...Highlight Guided Setup and press OK. The on the remote. The TV will turn off. Press the MENU button on the remote. 49 VIZIO GUIDED SETUP Tuner Setup Network Setup 3. When finished, press the EXIT button on the remote. If you restore the TV to the factory ...default settings, all TV settings to turn back on -screen menu settings can be reset to the factory defaults. Plus Apps that you have changed the default parental control...
Download
Page 67
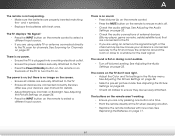
... to the TV. • Ensure all cables to ensure they are securely attached. The power is on, but there is no image on the remote control to select a different input source. • If you are using an antenna, the signal strength of the TV to select a different input source... Ensure you are only pressing one button at a time. • Point the remote directly at the TV when pressing a button. • Replace the remote batteries with fresh ones. There is no sound. • Press Volume Up on the remote control. • Press the MUTE button on page 24. • Check all devices ...
... to the TV. • Ensure all cables to ensure they are securely attached. The power is on, but there is no image on the remote control to select a different input source. • If you are using an antenna, the signal strength of the TV to select a different input source... Ensure you are only pressing one button at a time. • Point the remote directly at the TV when pressing a button. • Replace the remote batteries with fresh ones. There is no sound. • Press Volume Up on the remote control. • Press the MUTE button on page 24. • Check all devices ...
Download
Page 2
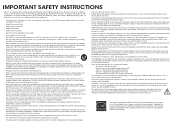
... close to qualified service personnel. Keep these instructions in accordance with a dry cloth. • Do not block any of the marked voltage can damage the remote control or injure the operator. Operating your TV if any way. - Never spill liquids on the power cord may compromise the integrity of your TV. •...
... close to qualified service personnel. Keep these instructions in accordance with a dry cloth. • Do not block any of the marked voltage can damage the remote control or injure the operator. Operating your TV if any way. - Never spill liquids on the power cord may compromise the integrity of your TV. •...

Download
Page 14
6 7 Insert two batteries into the remote control. Make sure that the (+) and (-) symbols on the batteries match the (+) and (-) symbols inside the battery compartment. Replace the battery cover.
6 7 Insert two batteries into the remote control. Make sure that the (+) and (-) symbols on the batteries match the (+) and (-) symbols inside the battery compartment. Replace the battery cover.
Download
Page 18
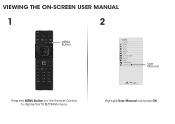
Highlight User Manual and press OK. VIEWING THE ON-SCREEN USER MANUAL 1 2 MENU Button VIZIO TV SETTINGS Picture Audio Timers Network Tuner CC Closed Captions Devices System Guided Setup User Manual Wide Zoom Normal Panoramic Exit 2D 3D ABC User Input Wide CC Manual Sleep Timer Picture Audio Network Settings Help Press the MENU Button on the Remote Control to display the TV SETTINGS menu.
Highlight User Manual and press OK. VIEWING THE ON-SCREEN USER MANUAL 1 2 MENU Button VIZIO TV SETTINGS Picture Audio Timers Network Tuner CC Closed Captions Devices System Guided Setup User Manual Wide Zoom Normal Panoramic Exit 2D 3D ABC User Input Wide CC Manual Sleep Timer Picture Audio Network Settings Help Press the MENU Button on the Remote Control to display the TV SETTINGS menu.

