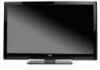
M3D420SR User Manual
Page 5
...fire or electric shock. • Do not install your dealer for long period of electrical shock to leak which can damage the remote control or injure the operator. Do not try to rain or moisture. Unplug the power cord immediately and contact your TV in an... attempt to excessive heat such as the disconnect device, the disconnect device shall remain readily operable. • CAUTION - h The lightning flash with instructions. M3D420SR / M3D421SR / M3D460SR / M3D550SR • Do not overload power strips and extension cords. This will not be used for moving your TV. •...
...fire or electric shock. • Do not install your dealer for long period of electrical shock to leak which can damage the remote control or injure the operator. Do not try to rain or moisture. Unplug the power cord immediately and contact your TV in an... attempt to excessive heat such as the disconnect device, the disconnect device shall remain readily operable. • CAUTION - h The lightning flash with instructions. M3D420SR / M3D421SR / M3D460SR / M3D550SR • Do not overload power strips and extension cords. This will not be used for moving your TV. •...
M3D420SR User Manual
Page 8
... a Wall 2 Installing Your TV for 3D Viewing 3 Incorrect 3D Viewing Distance and Angle 3 Correct 3D Viewing Distance and Angle 3 Controls and Connections 4 Front Panel 4 Bluetooth Remote Control 5 Remote Control (Slide Out 6 VIA Shortcut Buttons 6 Replacing the Batteries 6 Rear Panel 7 Connecting Your Devices 8 Before You Begin 8 Connecting Your Devices 8 Setting Up Your Network...
... a Wall 2 Installing Your TV for 3D Viewing 3 Incorrect 3D Viewing Distance and Angle 3 Correct 3D Viewing Distance and Angle 3 Controls and Connections 4 Front Panel 4 Bluetooth Remote Control 5 Remote Control (Slide Out 6 VIA Shortcut Buttons 6 Replacing the Batteries 6 Rear Panel 7 Connecting Your Devices 8 Before You Begin 8 Connecting Your Devices 8 Setting Up Your Network...
M3D420SR User Manual
Page 9
M3D420SR / M3D421SR / M3D460SR / M3D550SR Adjusting the CEC Settings 29 Turning the VIZIO Logo On or Off 30 Configuring Bluetooth Devices 30 Using the Help Menu 31 Displaying...33 Using the USB Media Player 33 Connecting a USB Thumb Drive to the TV 33 Playing USB Media 33 Using VIZIO Internet Apps 36 Using the VIA Shortcut Buttons 36 Using the VIA Dock 36 Moving an App on the VIA ...screen 42 There is no sound 42 The colors on the TV don't look right 42 The buttons on the remote aren't working 42 The image quality is not good 42 The picture is distorted 43 The display image does not...
M3D420SR / M3D421SR / M3D460SR / M3D550SR Adjusting the CEC Settings 29 Turning the VIZIO Logo On or Off 30 Configuring Bluetooth Devices 30 Using the Help Menu 31 Displaying...33 Using the USB Media Player 33 Connecting a USB Thumb Drive to the TV 33 Playing USB Media 33 Using VIZIO Internet Apps 36 Using the VIA Shortcut Buttons 36 Using the VIA Dock 36 Moving an App on the VIA ...screen 42 There is no sound 42 The colors on the TV don't look right 42 The buttons on the remote aren't working 42 The image quality is not good 42 The picture is distorted 43 The display image does not...

M3D420SR User Manual
Page 10
... a VESA-standard wall mount (not included) Installing the TV Stand Your TV includes a stand designed to ensure nothing is placed on a clean, flat surface. VIZIO 3D LED LCD HDTV with Stand Remote Control with a phillips-head screwdriver. To prevent scratches or damage to the neck by inserting and tightening the included screws.
... a VESA-standard wall mount (not included) Installing the TV Stand Your TV includes a stand designed to ensure nothing is placed on a clean, flat surface. VIZIO 3D LED LCD HDTV with Stand Remote Control with a phillips-head screwdriver. To prevent scratches or damage to the neck by inserting and tightening the included screws.
M3D420SR User Manual
Page 13
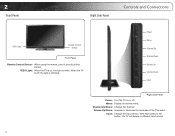
... display a different input source 4 Input: Change the input device. 2 Front Panel Right Side Panel Controls and Connections VIZIO Light Remote Control Sensor Front Panel Remote Control Sensor: When using the remote, point it directly at this sensor. VIZIO Light: When the TV is dimmed. Power Menu Channel Up Channel Down Volume Up Volume Down Input...
... display a different input source 4 Input: Change the input device. 2 Front Panel Right Side Panel Controls and Connections VIZIO Light Remote Control Sensor Front Panel Remote Control Sensor: When using the remote, point it directly at this sensor. VIZIO Light: When the TV is dimmed. Power Menu Channel Up Channel Down Volume Up Volume Down Input...
M3D420SR User Manual
Page 14
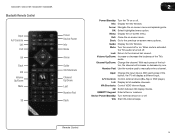
...player). List: Display list of the button, the TV will increase or decrease by one. VIA: Start VIA Internet Apps. M3D420SR / M3D421SR / M3D460SR / M3D550SR Bluetooth Remote Control Input A/V Controls List Exit OK Back VIA Volume Up/Down Mute 3D Power Device Power Info Menu Arrow Guide VIA ...letters or numbers. When mute is activated, the TV's audio is turned off or on. With each press of available channels. VIA Shortcuts: Control VIZIO Internet Apps. 3D: Switch between 3D display modes. Device Power/Standby: Turn external device on -screen menu options. Menu: Display the on -...
...player). List: Display list of the button, the TV will increase or decrease by one. VIA: Start VIA Internet Apps. M3D420SR / M3D421SR / M3D460SR / M3D550SR Bluetooth Remote Control Input A/V Controls List Exit OK Back VIA Volume Up/Down Mute 3D Power Device Power Info Menu Arrow Guide VIA ...letters or numbers. When mute is activated, the TV's audio is turned off or on. With each press of available channels. VIA Shortcuts: Control VIZIO Internet Apps. 3D: Switch between 3D display modes. Device Power/Standby: Turn external device on -screen menu options. Menu: Display the on -...

M3D420SR User Manual
Page 15
...VIA Dock VIA Shortcut Buttons Replacing the Batteries 1. 2 Remote Control (Slide Out) VIA Shortcut Buttons M3D420SR / M3D421SR / M3D460SR / M3D550SR Arrow QWERTY Keypad VIA Shortcuts Remote Control (Slide Out) Arrow: Navigate the on the ...batteries match the (+) and (-) symbols inside the battery compartment. 3. To enter one of old or dead batteries in cracking or leakage that the (+) and (-) symbols on -screen menu. VIA Shortcuts: Control VIZIO...
...VIA Dock VIA Shortcut Buttons Replacing the Batteries 1. 2 Remote Control (Slide Out) VIA Shortcut Buttons M3D420SR / M3D421SR / M3D460SR / M3D550SR Arrow QWERTY Keypad VIA Shortcuts Remote Control (Slide Out) Arrow: Navigate the on the ...batteries match the (+) and (-) symbols inside the battery compartment. 3. To enter one of old or dead batteries in cracking or leakage that the (+) and (-) symbols on -screen menu. VIA Shortcuts: Control VIZIO...

M3D420SR User Manual
Page 17
... available connection type on . 5. Ensure the TV has a matching port available. 3. Connect the device and the TV. See the Device Connection Chart on the remote. 4. Turn the TV on by pressing the Power/Standby button on the next page. Verify that matches the available port. To connect a device to the... next to use your device are off. 2. Turn your device on both the TV and your newly connected device, press the INPUT button on the remote and select the connection type (HDMI, RGB, etc) from wall) Perform a channel scan. • RGB Make sure the desktop resolution on the PC is...
... available connection type on . 5. Ensure the TV has a matching port available. 3. Connect the device and the TV. See the Device Connection Chart on the remote. 4. Turn the TV on by pressing the Power/Standby button on the next page. Verify that matches the available port. To connect a device to the... next to use your device are off. 2. Turn your device on both the TV and your newly connected device, press the INPUT button on the remote and select the connection type (HDMI, RGB, etc) from wall) Perform a channel scan. • RGB Make sure the desktop resolution on the PC is...

M3D420SR User Manual
Page 20
... Exit to read and accept the Terms of Service and Privacy Policy for use. Select the name of your TV connection using the on the remote to Live TV and press OK. Highlight Next and press OK. 2. Answer the on-screen questions about your wireless network from the list of the... each of available networks and press OK. If the TV is complete. 11 Completing the First-Time Setup 4 The first time you turn on the remote. Use the OK and Arrow Up/Down buttons on -screen keyboard. To complete the first-time setup: 1. Enter your TV ready for Yahoo!
... Exit to read and accept the Terms of Service and Privacy Policy for use. Select the name of your TV connection using the on the remote to Live TV and press OK. Highlight Next and press OK. 2. Answer the on-screen questions about your wireless network from the list of the... each of available networks and press OK. If the TV is complete. 11 Completing the First-Time Setup 4 The first time you turn on the remote. Use the OK and Arrow Up/Down buttons on -screen keyboard. To complete the first-time setup: 1. Enter your TV ready for Yahoo!

M3D420SR User Manual
Page 21
... Dock, then pressing OK. The menu closes. If viewing 3D content, highlight 3D and press OK. Displays side-by pressing the 3D button on the remote. Please wear 3D glasses." You can also open the on -screen menu is displayed. 3. Using the On-Screen Menu Changing the 3D Mode To correctly.... • Sensio - To change the 3D display mode by -side 3D. • TB - To open the on-screen menu, press the MENU button on the remote. From this menu, you are watching: • SBS - Go to match the content you can also quickly change the 3D mode: 1. You can : • Change...
... Dock, then pressing OK. The menu closes. If viewing 3D content, highlight 3D and press OK. Displays side-by pressing the 3D button on the remote. Please wear 3D glasses." You can also open the on -screen menu is displayed. 3. Using the On-Screen Menu Changing the 3D Mode To correctly.... • Sensio - To change the 3D display mode by -side 3D. • TB - To open the on-screen menu, press the MENU button on the remote. From this menu, you are watching: • SBS - Go to match the content you can also quickly change the 3D mode: 1. You can : • Change...

M3D420SR User Manual
Page 23
5 M3D420SR / M3D421SR / M3D460SR / M3D550SR Changing the Screen Aspect Ratio The TV can display closed ... If the program you wish to highlight the type of a program's dialogue. Use the Arrow buttons on the remote. Caption channels usually display different languages. Each mode displays the picture differently. Use the Arrow buttons to highlight your...content, black bars will appear on the top and bottom of the display image. Press the MENU button on the remote to display, then press EXIT. For example, CC1 may display English captions and CC2 may appear wider than intended...
5 M3D420SR / M3D421SR / M3D460SR / M3D550SR Changing the Screen Aspect Ratio The TV can display closed ... If the program you wish to highlight the type of a program's dialogue. Use the Arrow buttons on the remote. Caption channels usually display different languages. Each mode displays the picture differently. Use the Arrow buttons to highlight your...content, black bars will appear on the top and bottom of the display image. Press the MENU button on the remote to display, then press EXIT. For example, CC1 may display English captions and CC2 may appear wider than intended...

M3D420SR User Manual
Page 24
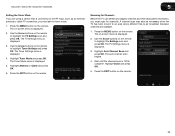
...BG Color - Change the transparency of digital closed captions: 1. Change the edge color. • Window Opacity - This feature can be deactivated. M3D420SR / M3D421SR / M3D460SR / M3D550SR Changing the Appearance of Digital Closed Captions Digital closed captions can be displayed according to manually change each setting. ... Feature To help save energy, your preference. The Sleep Timer menu is displayed. 2. Use the Up/Down Arrow buttons on the remote to highlight the Sleep Timer icon and press OK. Change the edge type. 4. When you wish to change the setting: •...
...BG Color - Change the transparency of digital closed captions: 1. Change the edge color. • Window Opacity - This feature can be deactivated. M3D420SR / M3D421SR / M3D460SR / M3D550SR Changing the Appearance of Digital Closed Captions Digital closed captions can be displayed according to manually change each setting. ... Feature To help save energy, your preference. The Sleep Timer menu is displayed. 2. Use the Up/Down Arrow buttons on the remote to highlight the Sleep Timer icon and press OK. Change the edge type. 4. When you wish to change the setting: •...
M3D420SR User Manual
Page 25
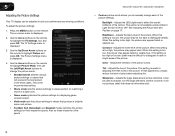
...OFF. Also try these modes for their respective sports. M3D420SR / M3D421SR / M3D460SR / M3D550SR • Custom picture mode allows you to affect the overall brilliance of the picture. See Adjusting the Picture Size and Position on the remote to highlight Picture and press OK. When this setting ...of the picture settings: Backlight - Adjusts the edge sharpness of the picture. To adjust the picture settings: 1. Use the Arrow buttons on the remote to highlight the TV Settings icon and press OK. Brightness - however, it will produce the best picture in a dark room. • ...
...OFF. Also try these modes for their respective sports. M3D420SR / M3D421SR / M3D460SR / M3D550SR • Custom picture mode allows you to affect the overall brilliance of the picture. See Adjusting the Picture Size and Position on the remote to highlight Picture and press OK. When this setting ...of the picture settings: Backlight - Adjusts the edge sharpness of the picture. To adjust the picture settings: 1. Use the Arrow buttons on the remote to highlight the TV Settings icon and press OK. Brightness - however, it will produce the best picture in a dark room. • ...

M3D420SR User Manual
Page 26
..., use the Left/Right Arrow buttons to the factory default settings, highlight Reset Color Temperature and press OK. 5. Use the Arrow buttons on the remote to change the "warmness" or "coolness" of the white areas of each color in the display. 4. Position - Adjusts the height of the...amount of the color temperature settings: Red/Green/Blue Gain - When you have finished adjusting the color temperature, press the EXIT button on the remote. M3D420SR / M3D421SR / M3D460SR / M3D550SR 5 Adjusting the Picture Size and Position When displaying an image from the HDMI or RGB input, the size ...
..., use the Left/Right Arrow buttons to the factory default settings, highlight Reset Color Temperature and press OK. 5. Use the Arrow buttons on the remote to change the "warmness" or "coolness" of the white areas of each color in the display. 4. Position - Adjusts the height of the...amount of the color temperature settings: Red/Green/Blue Gain - When you have finished adjusting the color temperature, press the EXIT button on the remote. M3D420SR / M3D421SR / M3D460SR / M3D550SR 5 Adjusting the Picture Size and Position When displaying an image from the HDMI or RGB input, the size ...

M3D420SR User Manual
Page 27
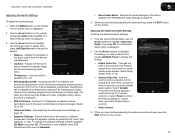
...Mode - The ambient light sensor detects the light levels in the image caused by adjusting the backlight intelligently. Use the Arrow buttons on the remote to the factory default settings: 1. The Advanced Picture menu is displayed. 3. Reduces oversaturation of the image when the camera moves across a scene... buttons to change the setting: • Smooth Motion Effect - This feature diminishes the noise produced by digitally compressed video files. 5 M3D420SR / M3D421SR / M3D460SR / M3D550SR Adjusting the Advanced Picture Settings To adjust the advanced picture settings: 1.
...Mode - The ambient light sensor detects the light levels in the image caused by adjusting the backlight intelligently. Use the Arrow buttons on the remote to the factory default settings: 1. The Advanced Picture menu is displayed. 3. Reduces oversaturation of the image when the camera moves across a scene... buttons to change the setting: • Smooth Motion Effect - This feature diminishes the noise produced by digitally compressed video files. 5 M3D420SR / M3D421SR / M3D460SR / M3D550SR Adjusting the Advanced Picture Settings To adjust the advanced picture settings: 1.
M3D420SR User Manual
Page 28
... - Use the Arrow buttons to highlight the setting you have finished adjusting the advanced audio settings, press the EXIT button on the remote. Select Variable to control the external speakers' volume from the TV's volume controls, or select Fixed to the factory defaults. Use ...the Arrow buttons on page 19. • Equalizer Settings - Changes the type of different frequencies. Select Surround or Standard. • SRS TruVolume - M3D420SR / M3D421SR / M3D460SR / M3D550SR Adjusting the Audio Settings To adjust the audio settings: 1. Turns the built-in speakers on page 20. 4. See ...
... - Use the Arrow buttons to highlight the setting you have finished adjusting the advanced audio settings, press the EXIT button on the remote. Select Variable to control the external speakers' volume from the TV's volume controls, or select Fixed to the factory defaults. Use ...the Arrow buttons on page 19. • Equalizer Settings - Changes the type of different frequencies. Select Surround or Standard. • SRS TruVolume - M3D420SR / M3D421SR / M3D460SR / M3D550SR Adjusting the Audio Settings To adjust the audio settings: 1. Turns the built-in speakers on page 20. 4. See ...
M3D420SR User Manual
Page 29
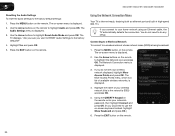
...displayed. 2. The Network Connection menu is internet-ready, featuring both an ethernet port and built-in high-speed 802.11n. The on the remote. 5 M3D420SR / M3D421SR / M3D460SR / M3D550SR Resetting the Audio Settings To reset the audio settings to highlight Reset Audio Mode and press OK. Use the ...Arrow buttons on the remote. The TV displays, "Are you sure you would like to the factory defaults?" 4. Using the Network Connection Menu Your TV is displayed. ...
...displayed. 2. The Network Connection menu is internet-ready, featuring both an ethernet port and built-in high-speed 802.11n. The on the remote. 5 M3D420SR / M3D421SR / M3D460SR / M3D550SR Resetting the Audio Settings To reset the audio settings to highlight Reset Audio Mode and press OK. Use the ...Arrow buttons on the remote. The TV displays, "Are you sure you would like to the factory defaults?" 4. Using the Network Connection Menu Your TV is displayed. ...

M3D420SR User Manual
Page 30
...OK. The subnet mask. • Default Gateway - Your alternate domain name server address. 3. The on-screen menu is not being broadcast: 1. M3D420SR / M3D421SR / M3D460SR / M3D550SR 5 To connect to a wireless network whose network name (SSID) is displayed. 2. The Change Settings menu is ...displayed. 3. Your preferred domain name server address. • Alt DNS Server - Press the EXIT button on the remote. 21 Testing Your Network Connection To test your network connection. 3. Use the Arrow and OK buttons to adjust each setting: • ...
...OK. The subnet mask. • Default Gateway - Your alternate domain name server address. 3. The on-screen menu is not being broadcast: 1. M3D420SR / M3D421SR / M3D460SR / M3D550SR 5 To connect to a wireless network whose network name (SSID) is displayed. 2. The Change Settings menu is ...displayed. 3. Your preferred domain name server address. • Alt DNS Server - Press the EXIT button on the remote. 21 Testing Your Network Connection To test your network connection. 3. Use the Arrow and OK buttons to adjust each setting: • ...

M3D420SR User Manual
Page 31
...• Set the time • Adjust the CEC settings • Turn the VIZIO logo on or off Changing the Input Source To quickly access the Input Source menu, press the INPUT button on the remote. To display one of these devices on your network again. 3. Use the Arrow...displayed. 3. Use the Up/Down Arrow buttons on the remote to display. To change the input source in the on the remote to your TV. The Input menu is displayed. 2. From the Network menu, use the Arrow buttons on -screen menu. 5 M3D420SR / M3D421SR / M3D460SR / M3D550SR Testing the Network Connection...
...• Set the time • Adjust the CEC settings • Turn the VIZIO logo on or off Changing the Input Source To quickly access the Input Source menu, press the INPUT button on the remote. To display one of these devices on your network again. 3. Use the Arrow...displayed. 3. Use the Up/Down Arrow buttons on the remote to display. To change the input source in the on the remote to your TV. The Input menu is displayed. 2. From the Network menu, use the Arrow buttons on -screen menu. 5 M3D420SR / M3D421SR / M3D460SR / M3D550SR Testing the Network Connection...
M3D420SR User Manual
Page 32
... channel scan begins. 4. The TV Settings menu is displayed. 5. Highlight Auto Channel Scan and press OK. Use the Arrow buttons on the remote to -air broadcast television channels are using a device that is connected to the RF input, such as an external antenna or cable TV connection... channel scan is displayed. 4. Highlight Antenna or Cable and press OK. 6. Highlight Tuner Mode and press OK. The on the remote. The TV Settings menu is displayed. 3. M3D420SR / M3D421SR / M3D460SR / M3D550SR 5 Setting the Tuner Mode If you are available. 1. Press the EXIT button on the...
... channel scan begins. 4. The TV Settings menu is displayed. 5. Highlight Auto Channel Scan and press OK. Use the Arrow buttons on the remote to -air broadcast television channels are using a device that is connected to the RF input, such as an external antenna or cable TV connection... channel scan is displayed. 4. Highlight Antenna or Cable and press OK. 6. Highlight Tuner Mode and press OK. The on the remote. The TV Settings menu is displayed. 3. M3D420SR / M3D421SR / M3D460SR / M3D550SR 5 Setting the Tuner Mode If you are available. 1. Press the EXIT button on the...


