Download
Page 4
... the apparatus, the apparatus has been exposed to rain or moisture, does not operate normally or has been dropped. • Unplug the power cord before turning on the top of power source indicated on your TV that may cause fire or electric shock. • Do not touch the power cord during...
... the apparatus, the apparatus has been exposed to rain or moisture, does not operate normally or has been dropped. • Unplug the power cord before turning on the top of power source indicated on your TV that may cause fire or electric shock. • Do not touch the power cord during...
Download
Page 8
... Control Passcode 36 Resetting the Content Locks 36 Changing the On-Screen Menu Language 36 Setting the Time Zone 37 Adjusting the CEC Settings 37 Turning the Power Indicator On or Off 38 Using the Reset & Admin Menu 38 Resetting the TV Settings 39 Restoring the TV to Factory Default ... Using the USB Media Player 42 Using the USB Media Player 42 Connecting a USB Thumb Drive to the TV 42 Playing USB Media 42 Using VIZIO Internet Apps 46 Using the VIA Dock 46 Using the Hot Keys 46 Troubleshooting & Technical Support 47 Specifications 50 Limited Warranty 52 Legal & Compliance 53...
... Control Passcode 36 Resetting the Content Locks 36 Changing the On-Screen Menu Language 36 Setting the Time Zone 37 Adjusting the CEC Settings 37 Turning the Power Indicator On or Off 38 Using the Reset & Admin Menu 38 Resetting the TV Settings 39 Restoring the TV to Factory Default ... Using the USB Media Player 42 Using the USB Media Player 42 Connecting a USB Thumb Drive to the TV 42 Playing USB Media 42 Using VIZIO Internet Apps 46 Using the VIA Dock 46 Using the Hot Keys 46 Troubleshooting & Technical Support 47 Specifications 50 Limited Warranty 52 Legal & Compliance 53...
Download
Page 13
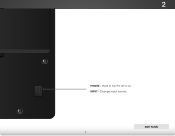
Hold to turn TV off or on. Side Panel 7 2 Side Panel POWER - INPUT - Change input source.
Hold to turn TV off or on. Side Panel 7 2 Side Panel POWER - INPUT - Change input source.
Download
Page 15
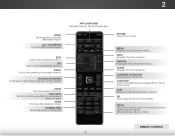
...model) Dash Use with number pad to manually enter a digital sub-channel. (For example, 18-4 or 18-5.) Remote Control 9 V Button Open the VIZIO Internet Apps Plus™ (V.I.A. Remote Control Input Change the currently displayed input. A/V Controls Control USB media player. wide Change the display mode. Channel ...Up/Down Change the channel. Last Return to the previous on -screen menu or app. Exit Close the on . Mute Turn the audio off . App launcher Quickly launch the pictured app. Back Go to the channel last viewed. 3D (Not supported on -screen menu...
...model) Dash Use with number pad to manually enter a digital sub-channel. (For example, 18-4 or 18-5.) Remote Control 9 V Button Open the VIZIO Internet Apps Plus™ (V.I.A. Remote Control Input Change the currently displayed input. A/V Controls Control USB media player. wide Change the display mode. Channel ...Up/Down Change the channel. Last Return to the previous on -screen menu or app. Exit Close the on . Mute Turn the audio off . App launcher Quickly launch the pictured app. Back Go to the channel last viewed. 3D (Not supported on -screen menu...
Download
Page 17
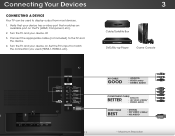
Verify that matches an available port on . Turn the TV and your device has a video port that your device off. 3. Set the TV's input to display output from most devices. 1. Connecting Your Devices ... BEST • DIGITAL • HD VIDEO (1080p)* • HD AUDIO 11 * Maximum Resolution Connect the appropriate cable (not included) to the TV and the device. 4. Turn the TV and your device on the TV (HDMI, Component, etc). 2.
Verify that matches an available port on . Turn the TV and your device has a video port that your device off. 3. Set the TV's input to display output from most devices. 1. Connecting Your Devices ... BEST • DIGITAL • HD VIDEO (1080p)* • HD AUDIO 11 * Maximum Resolution Connect the appropriate cable (not included) to the TV and the device. 4. Turn the TV and your device on the TV (HDMI, Component, etc). 2.
Download
Page 19
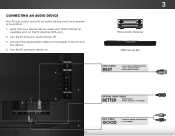
Connect the appropriate cable (not included) to an audio device, such as a receiver or sound bar. 1. Turn the TV and your audio device off. 3. Turn the TV and your device on the TV (Optical, RCA, etc). 2. Verify that your device has an audio port that matches an available port ...on . 3 Home Audio Receiver VIZIO Sound Bar HDMI CABLE BEST • ARC 2-WAY COMMUNICATION • 2.0-5.1 DIGITAL AUDIO • ...
Connect the appropriate cable (not included) to an audio device, such as a receiver or sound bar. 1. Turn the TV and your audio device off. 3. Turn the TV and your device on the TV (Optical, RCA, etc). 2. Verify that your device has an audio port that matches an available port ...on . 3 Home Audio Receiver VIZIO Sound Bar HDMI CABLE BEST • ARC 2-WAY COMMUNICATION • 2.0-5.1 DIGITAL AUDIO • ...

Download
Page 23
... OK and Up/Down Arrow buttons on the remote to highlight Home Use and press OK. 3. Completing the First-Time Setup 4 The first time you turn on the TV, the Setup App will guide you are connecting to your network with an Ethernet cable, connect it to highlight Home Mode Setup...
... OK and Up/Down Arrow buttons on the remote to highlight Home Use and press OK. 3. Completing the First-Time Setup 4 The first time you turn on the TV, the Setup App will guide you are connecting to your network with an Ethernet cable, connect it to highlight Home Mode Setup...
Download
Page 30
... system. Lip Sync - Adjusts the synchronization between program content, AV formats and input sources. • Digital Audio Out - Turns the built-in speakers on the remote to the factory defaults. TV Speakers Surround Sound Volume Leveling 3. 5 Adjusting the Audio ...Settings To adjust the audio settings: 1. The Audio menu is displayed. 2. VIZIO Audio Balance - Adjusts the loudness of the audio output from your home theater system controls. DTS TruVolume™ maintains consistent volume...
... system. Lip Sync - Adjusts the synchronization between program content, AV formats and input sources. • Digital Audio Out - Turns the built-in speakers on the remote to the factory defaults. TV Speakers Surround Sound Volume Leveling 3. 5 Adjusting the Audio ...Settings To adjust the audio settings: 1. The Audio menu is displayed. 2. VIZIO Audio Balance - Adjusts the loudness of the audio output from your home theater system controls. DTS TruVolume™ maintains consistent volume...
Download
Page 31
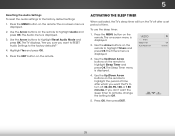
... MENU button on the remote. Activating the Sleep Timer When activated, the TV's sleep timer will turn off after which you don't want to RESET Audio Settings to Off. 5. Press the MENU button on the remote. VIZIO Timers Sleep Timer Auto Power Off Off 10 mins 3. The Sleep Timer menu is displayed... buttons on the remote to highlight the period of time after a set period of time. Use the Up/Down Arrow buttons on the remote to turn the TV off : 30, 60, 90, 120, or 180 minutes. To use the sleep timer: 1. 5 Resetting the Audio Settings To reset the audio settings to...
... MENU button on the remote. Activating the Sleep Timer When activated, the TV's sleep timer will turn off after which you don't want to RESET Audio Settings to Off. 5. Press the MENU button on the remote. VIZIO Timers Sleep Timer Auto Power Off Off 10 mins 3. The Sleep Timer menu is displayed... buttons on the remote to highlight the period of time after a set period of time. Use the Up/Down Arrow buttons on the remote to turn the TV off : 30, 60, 90, 120, or 180 minutes. To use the sleep timer: 1. 5 Resetting the Audio Settings To reset the audio settings to...
Download
Page 32
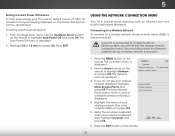
VIZIO Network Wired Connection Disconnected Wireless Access Points Manual Setup Hidden Network Test Connection 6. The Auto Power Off menu is displayed. 3. Highlight Off or 10 min ... on the screen. The More Access Points menu, which is a list of your wireless network (this is displayed. 4. You must disconnect the Ethernet cable to turn off after 10 minutes if no signal is being broadcast: If your TV is connected to a network with an Ethernet cable, you do not see...
VIZIO Network Wired Connection Disconnected Wireless Access Points Manual Setup Hidden Network Test Connection 6. The Auto Power Off menu is displayed. 3. Highlight Off or 10 min ... on the screen. The More Access Points menu, which is a list of your wireless network (this is displayed. 4. You must disconnect the Ethernet cable to turn off after 10 minutes if no signal is being broadcast: If your TV is connected to a network with an Ethernet cable, you do not see...
Download
Page 33
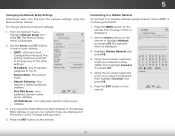
...Alt. DNS Server - Using the on the WirdeemoZtoeomto hiNgorhmlaigl hPtaNnoeratmwicork and press OK. From the Network menu, highlight Manual Setup and VIZIO press OK. Use the Arrow buttons on -screen keyboard, STlietm ehenepertenrhPyiicogtuuhrerlignheAttuwCdoioorkn'ns epcatsaswnodrd, press OK. This is displayed. 2. Use ...the Arrow and OK buttons to adjust each setting: • DHCP - (Dynamic Host Configuration Protocol) This setting must be turned Off to set up your access point name. 5 Changing the Manual Setup Settings Advanced users can fine-tune the network settings using...
...Alt. DNS Server - Using the on the WirdeemoZtoeomto hiNgorhmlaigl hPtaNnoeratmwicork and press OK. From the Network menu, highlight Manual Setup and VIZIO press OK. Use the Arrow buttons on -screen keyboard, STlietm ehenepertenrhPyiicogtuuhrerlignheAttuwCdoioorkn'ns epcatsaswnodrd, press OK. This is displayed. 2. Use ...the Arrow and OK buttons to adjust each setting: • DHCP - (Dynamic Host Configuration Protocol) This setting must be turned Off to set up your access point name. 5 Changing the Manual Setup Settings Advanced users can fine-tune the network settings using...
Download
Page 44
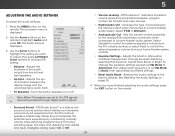
... Power Indicator and press OK. 4. Use the Up/Down Arrow buttons to highlight System and press OK. 5 Turning the Power Indicator On or Off The Power Indicator on the front of your TV is set to Factory Defaults VIZIO Privacy Policy • Start the Store Demo Service Check Store Demo 38 To... turn the Power Indicator Light on or off . Using the Reset & Admin Menu You can change this setting if...
... Power Indicator and press OK. 4. Use the Up/Down Arrow buttons to highlight System and press OK. 5 Turning the Power Indicator On or Off The Power Indicator on the front of your TV is set to Factory Defaults VIZIO Privacy Policy • Start the Store Demo Service Check Store Demo 38 To... turn the Power Indicator Light on or off . Using the Reset & Admin Menu You can change this setting if...

Download
Page 45
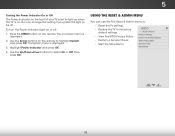
... press OK. 7. Wait for the TV to the factory defaults. Press the MENU button on the remote. The System menu is displayed. 4. The TV will turn off. The Reset & Admin menu is displayed. 3. Press the EXIT button on the remote to its factory default settings: 1. The System menu is displayed. 2. If... and press OK. The on -screen menu settings can be lost! Use the Arrow buttons on the remote to the settings will be reset to turn back on -screen menu is displayed. 4. The Reset & Admin menu is displayed. 2. To restore the TV to highlight System and press OK. The on ...
... press OK. 7. Wait for the TV to the factory defaults. Press the MENU button on the remote. The System menu is displayed. 4. The TV will turn off. The Reset & Admin menu is displayed. 3. Press the EXIT button on the remote to its factory default settings: 1. The System menu is displayed. 2. If... and press OK. The on -screen menu settings can be lost! Use the Arrow buttons on the remote to the settings will be reset to turn back on -screen menu is displayed. 4. The Reset & Admin menu is displayed. 2. To restore the TV to highlight System and press OK. The on ...
Download
Page 48
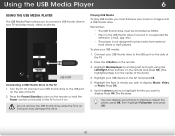
... and right using the Left/Right Arrow buttons on the remote and press OK. (The highlighted App is on the side of the TV to turn it on the remote. 3. Highlight the type of the TV. 2. The file plays. Highlight your TV and play media from external hard drives or mp3... device in the list and press OK. 5. Press OK. Use the Arrow buttons to highlight the file you wish to play music, video, or photos. Turn the TV off. Select the photo, press OK, then highlight Fullscreen and press OK. 42 Press the Power/Standby button on the remote or hold...
... and right using the Left/Right Arrow buttons on the remote and press OK. (The highlighted App is on the side of the TV to turn it on the remote. 3. Highlight the type of the TV. 2. The file plays. Highlight your TV and play media from external hard drives or mp3... device in the list and press OK. 5. Press OK. Use the Arrow buttons to highlight the file you wish to play music, video, or photos. Turn the TV off. Select the photo, press OK, then highlight Fullscreen and press OK. 42 Press the Power/Standby button on the remote or hold...

Download
Page 54
... your antenna is securely attached to the TV. • Press the Power/Standby button on the remote or on the side of the TV to turn the TV on. See Adjusting the Audio Settings on page 24. • Check the audio connections of external devices (Blu-ray player, game console, cable...
... your antenna is securely attached to the TV. • Press the Power/Standby button on the remote or on the side of the TV to turn the TV on. See Adjusting the Audio Settings on page 24. • Check the audio connections of external devices (Blu-ray player, game console, cable...

Download
Page 59
...by one or more of media, shipping and handling upon request made to the PL2.0/LGPL2.1 License Agreements. These limits are subject to VIZIO at www.VIZIO.com. This device complies with the emission limits. 3. The manufacturer is valid for a period of three (3) years from that are...television reception, which the receiver is encouraged to try to correct the interference by unauthorized modification to this device must be determined by turning the equipment off and on a circuit different from the date of the distribution of this equipment does cause harmful interference to any ...
...by one or more of media, shipping and handling upon request made to the PL2.0/LGPL2.1 License Agreements. These limits are subject to VIZIO at www.VIZIO.com. This device complies with the emission limits. 3. The manufacturer is valid for a period of three (3) years from that are...television reception, which the receiver is encouraged to try to correct the interference by unauthorized modification to this device must be determined by turning the equipment off and on a circuit different from the date of the distribution of this equipment does cause harmful interference to any ...

Download
Page 2
... the like. • If any objects on your TV to an area of high temperature, condensation may form in electric shock or fire. Wait before turning on the top of electrical shock to constitute a risk of your TV. Operating your TV close to ground your TV safely. For more information, contact...
... the like. • If any objects on your TV to an area of high temperature, condensation may form in electric shock or fire. Wait before turning on the top of electrical shock to constitute a risk of your TV. Operating your TV close to ground your TV safely. For more information, contact...

Download
Page 6
... option. INFO Display the info window. CHANNEL UP/DOWN Change the channel. 3D (Not supported on -screen menu. BACK VOL GUIDE CH 3D 1 2 3 4 5 6 7 8 9 ENTER 0 POWER Turn TV on or off or on. V BUTTON Open the Smart TV dock. VOLUME UP/DOWN Increase or decrease loudness of the audio. GUIDE Display the... -screen menu or app. APP LAUNCHER Quickly launch the pictured app. BACK Go to manually enter a digital sub-channel. (For example, 18-4 or 18-5.) MUTE Turn the audio off . WIDE Change the display mode. ARROW Navigate the on -screen menu.
... option. INFO Display the info window. CHANNEL UP/DOWN Change the channel. 3D (Not supported on -screen menu. BACK VOL GUIDE CH 3D 1 2 3 4 5 6 7 8 9 ENTER 0 POWER Turn TV on or off or on. V BUTTON Open the Smart TV dock. VOLUME UP/DOWN Increase or decrease loudness of the audio. GUIDE Display the... -screen menu or app. APP LAUNCHER Quickly launch the pictured app. BACK Go to manually enter a digital sub-channel. (For example, 18-4 or 18-5.) MUTE Turn the audio off . WIDE Change the display mode. ARROW Navigate the on -screen menu.
Download
Page 9
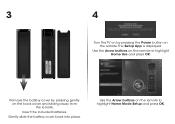
3 4 Turn the TV on by pressing gently on the back cover and sliding away from the remote. The Setup App is displayed. Gently slide the battery cover back into place. Remove the battery cover by pressing the Power button on the remote. Insert the included batteries. Use the Arrow buttons on the remote to highlight Home Mode Setup and press OK. Use the Arrow buttons on the remote to highlight Home Use and press OK.
3 4 Turn the TV on by pressing gently on the back cover and sliding away from the remote. The Setup App is displayed. Gently slide the battery cover back into place. Remove the battery cover by pressing the Power button on the remote. Insert the included batteries. Use the Arrow buttons on the remote to highlight Home Mode Setup and press OK. Use the Arrow buttons on the remote to highlight Home Use and press OK.

Download
Page 17
It comes with a three channel sound bar, wireless subwoofer and rear satellite speakers packed with Wireless Sub & Satellites For the pinnacle of surround sound immersion and convenience, the VIZIO 5.1 Sound Bar sets the bar exceptionally high. Bluetooth connectivity lets you stream your music wirelessly letting you turn any room into the ultimate home theater. Available at www.VIZIO.com This Product Sold Separately VIZIO RECOMMENDS 5.1 Home Theater Sound Bar with the latest in Dolby and DTS audio technology.
It comes with a three channel sound bar, wireless subwoofer and rear satellite speakers packed with Wireless Sub & Satellites For the pinnacle of surround sound immersion and convenience, the VIZIO 5.1 Sound Bar sets the bar exceptionally high. Bluetooth connectivity lets you stream your music wirelessly letting you turn any room into the ultimate home theater. Available at www.VIZIO.com This Product Sold Separately VIZIO RECOMMENDS 5.1 Home Theater Sound Bar with the latest in Dolby and DTS audio technology.


