
User Manual
Page 2
...function abnormally. If water penetrates into the VO47L FHDTV10A. Do not use and maintenance of the batteries, operator injury and contamination the remote controller. • If any heat source, i.e. radiator, heater, oven, amplifier etc. Overloading can be used for cleaning the VO47L... of the following safety instructions before cleaning the VO47L FHDTV10A LCD. Temperature: 40˚F ~ 95˚F, Humidity: 20% ~ 80% non-condensing, Altitude: 0 ~ 6500ft (0 ~ 2000m) Version 11/7/2007 2 www.VIZIO.com VIZIO VO47L FHDTV10A User Manual THIS PRODUCT HAS BEEN DESIGNED AND TESTED...
...function abnormally. If water penetrates into the VO47L FHDTV10A. Do not use and maintenance of the batteries, operator injury and contamination the remote controller. • If any heat source, i.e. radiator, heater, oven, amplifier etc. Overloading can be used for cleaning the VO47L... of the following safety instructions before cleaning the VO47L FHDTV10A LCD. Temperature: 40˚F ~ 95˚F, Humidity: 20% ~ 80% non-condensing, Altitude: 0 ~ 6500ft (0 ~ 2000m) Version 11/7/2007 2 www.VIZIO.com VIZIO VO47L FHDTV10A User Manual THIS PRODUCT HAS BEEN DESIGNED AND TESTED...
User Manual
Page 4
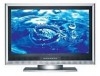
...wide x 30" tall we strongly advise that has been designed to unpack and install the HDTV. The glass surface can easily be scratched or broken so please handle the product gently and never place the HDTV with the glass facing downwards on a surface without protective padding. VIZIO...you have at least 2 people to protect it accompanying accessories are included. Package Contents VIZIO VO47L FHDTV10A VIZIO Remote Control by Universal Electronics HDMI Cable Power Cord Safety Strap VIZIO Bezel and Screen Cleaning Cloth This User Manual Quick Setup Guide Registration Card VIP Services ...
...wide x 30" tall we strongly advise that has been designed to unpack and install the HDTV. The glass surface can easily be scratched or broken so please handle the product gently and never place the HDTV with the glass facing downwards on a surface without protective padding. VIZIO...you have at least 2 people to protect it accompanying accessories are included. Package Contents VIZIO VO47L FHDTV10A VIZIO Remote Control by Universal Electronics HDMI Cable Power Cord Safety Strap VIZIO Bezel and Screen Cleaning Cloth This User Manual Quick Setup Guide Registration Card VIP Services ...
User Manual
Page 7
...Remote Control 15 1.4.2 Remote Control Range ...15 1.4.3 VIZIO Universal Remote Control Precautions 15 Chapter 2 Connecting Equipment 16 2.1 Which Video Connection Should I Use?...16 2.2 Connecting Your Cable or Satellite Box ...17 2.2.1 Using HDMI ...17 2.2.2 Using Component Video...19 2.3 Connecting Coaxial (RF) ...20 2.3.1 Using Your Antenna or Digital Cable for DTV 20 2.3.2 Using Your Antenna or Cable for TV...Setting Up to Watch Television 31 3.1 Basic LCD HDTV Start Up ...31 3.2 Watching a TV Program ...34 3.3 Adjusting Basic LCD HDTV Settings ...34 3.4 Program Information...35 Chapter...
...Remote Control 15 1.4.2 Remote Control Range ...15 1.4.3 VIZIO Universal Remote Control Precautions 15 Chapter 2 Connecting Equipment 16 2.1 Which Video Connection Should I Use?...16 2.2 Connecting Your Cable or Satellite Box ...17 2.2.1 Using HDMI ...17 2.2.2 Using Component Video...19 2.3 Connecting Coaxial (RF) ...20 2.3.1 Using Your Antenna or Digital Cable for DTV 20 2.3.2 Using Your Antenna or Cable for TV...Setting Up to Watch Television 31 3.1 Basic LCD HDTV Start Up ...31 3.2 Watching a TV Program ...34 3.3 Adjusting Basic LCD HDTV Settings ...34 3.4 Program Information...35 Chapter...
User Manual
Page 8
... 4.18 Understanding Viewing Modes...56 4.18.1 Picture-In-Picture (PIP) Mode ...57 4.18.2 Adjusting Basic PIP Settings ...58 4.19 Programming the VIZIO Universal Remote Control 59 4.19...Picture Adjustment ...51 4.12 Video Input Audio Adjustment ...51 4.13 Video Input Setup...51 4.14 Video Input Parental Control ...52 4.15 PC Input Picture Adjustment ...52 4.15.1... Settings ...45 4.7 DTV / TV Input Parental Control...46 4.7.1 Channel Block ...46 4.7.2 TV Rating...47 4.7.3 Movie Rating...48 4.7.4 Check for Component Codes ...60 4.20 Using a Cable or Satellite Remote ...60 Chapter 5 Maintenance and ...
... 4.18 Understanding Viewing Modes...56 4.18.1 Picture-In-Picture (PIP) Mode ...57 4.18.2 Adjusting Basic PIP Settings ...58 4.19 Programming the VIZIO Universal Remote Control 59 4.19...Picture Adjustment ...51 4.12 Video Input Audio Adjustment ...51 4.13 Video Input Setup...51 4.14 Video Input Parental Control ...52 4.15 PC Input Picture Adjustment ...52 4.15.1... Settings ...45 4.7 DTV / TV Input Parental Control...46 4.7.1 Channel Block ...46 4.7.2 TV Rating...47 4.7.3 Movie Rating...48 4.7.4 Check for Component Codes ...60 4.20 Using a Cable or Satellite Remote ...60 Chapter 5 Maintenance and ...
User Manual
Page 9
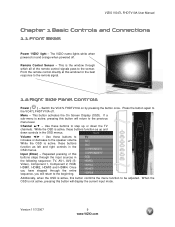
... - When the OSD is active, these buttons function as left and right controls in the following sequence: TV, AV1, AV2 (SVideo), Component 1, Component 2, RGB, HDMI1, HDMI2, HDMI3 and HDMI4. Point the remote control directly at this button will return to be adjusted. Channel ▲/▼ ... On Screen Display (OSD). Repeated pressing of the remote control signals pass to the speaker volume. Press the button again to the remote signal. 1.2 Right Side Panel Controls Power ( ) - Version 11/7/2007 9 www.VIZIO.com The VIZIO name lights white when powered on by pressing the ...
... - When the OSD is active, these buttons function as left and right controls in the following sequence: TV, AV1, AV2 (SVideo), Component 1, Component 2, RGB, HDMI1, HDMI2, HDMI3 and HDMI4. Point the remote control directly at this button will return to be adjusted. Channel ▲/▼ ... On Screen Display (OSD). Repeated pressing of the remote control signals pass to the speaker volume. Press the button again to the remote signal. 1.2 Right Side Panel Controls Power ( ) - Version 11/7/2007 9 www.VIZIO.com The VIZIO name lights white when powered on by pressing the ...
User Manual
Page 12
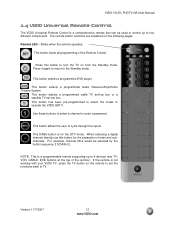
... mode. For example, channel 28-2 would be used to control up to 4 devices (see TV, VCR, CABLE, DVD buttons at the top of the remote). NOTE: This is a programmable remote supporting up to four different components. VIZIO VO47L FHDTV10A User Manual 1.4 VIZIO Universal Remote Control The VIZIO Universal Remote Control is a comprehensive remote that can be selected by the button sequence 2 8 DASH...
... mode. For example, channel 28-2 would be used to control up to 4 devices (see TV, VCR, CABLE, DVD buttons at the top of the remote). NOTE: This is a programmable remote supporting up to four different components. VIZIO VO47L FHDTV10A User Manual 1.4 VIZIO Universal Remote Control The VIZIO Universal Remote Control is a comprehensive remote that can be selected by the button sequence 2 8 DASH...
User Manual
Page 15
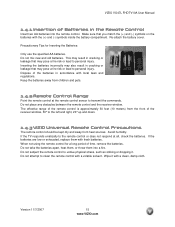
...www.VIZIO.com Do not mix new and old batteries. Make sure that may pose a fire risk or lead to personal injury. The effective range of the remote control is approximately 30 feet (10 meters) from heat sources. If the TV ...responds erratically to undue physical stress, such as striking or dropping it with fresh batteries. Precautionary Tips for a long period of time, remove the batteries. Do not subject the remote control to the remote control or does not respond at the remote control sensor to the left and right, 20°up and down. 1.4.3 VIZIO Universal Remote Control...
...www.VIZIO.com Do not mix new and old batteries. Make sure that may pose a fire risk or lead to personal injury. The effective range of the remote control is approximately 30 feet (10 meters) from heat sources. If the TV ...responds erratically to undue physical stress, such as striking or dropping it with fresh batteries. Precautionary Tips for a long period of time, remove the batteries. Do not subject the remote control to the remote control or does not respond at the remote control sensor to the left and right, 20°up and down. 1.4.3 VIZIO Universal Remote Control...
User Manual
Page 17
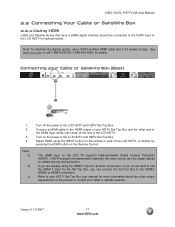
...the power to the HDMI2, HDMI3 or HDMI4 connection. If you are already using the INPUT button on the Remote Control. The HDMI input on the power to the HDMI input of the LCD HDTV. HDCP encrypts the transmission between the video source and the digital display for the Set-Top Box, ...not want to use a VIZIO certified HDMI cable that have a HDMI digital interface should be connected to the LCD HDTV and HDTV Set-Top Box. Connect a HDMI cable to the HDMI Input (white color area) at the rear of the LCD HDTV for optimal results. Turn on the LCD TV supports High-bandwidth Digital ...
...the power to the HDMI2, HDMI3 or HDMI4 connection. If you are already using the INPUT button on the Remote Control. The HDMI input on the power to the HDMI input of the LCD HDTV. HDCP encrypts the transmission between the video source and the digital display for the Set-Top Box, ...not want to use a VIZIO certified HDMI cable that have a HDMI digital interface should be connected to the LCD HDTV and HDTV Set-Top Box. Connect a HDMI cable to the HDMI Input (white color area) at the rear of the LCD HDTV for optimal results. Turn on the LCD TV supports High-bandwidth Digital ...
User Manual
Page 18
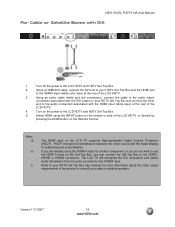
... to your cable or satellite operator. If you are already using the INPUT button on the remote or side of the LCD HDTV, or directly by pressing the HDMI button on the LCD TV supports High-bandwidth Digital Content Protection (HDCP). Turn on your HDTV Set-Top Box and connect...(white area) at the rear of the LCD HDTV. 4. Version 11/7/2007 18 www.VIZIO.com Using an audio cable (white and red connectors), connect the cable to the audio output connectors associated with DVI: 1. Note: d) e) f) The HDMI input on the Remote Control. HDCP encrypts the transmission between the video ...
... to your cable or satellite operator. If you are already using the INPUT button on the remote or side of the LCD HDTV, or directly by pressing the HDMI button on the LCD TV supports High-bandwidth Digital Content Protection (HDCP). Turn on your HDTV Set-Top Box and connect...(white area) at the rear of the LCD HDTV. 4. Version 11/7/2007 18 www.VIZIO.com Using an audio cable (white and red connectors), connect the cable to the audio output connectors associated with DVI: 1. Note: d) e) f) The HDMI input on the Remote Control. HDCP encrypts the transmission between the video ...

User Manual
Page 19
... Y (green color) connector on the Remote Control. row of connectors nearest to you when viewing from the rear of the TV) at the rear of the LCD HDTV. 4. Version 11/7/2007 19 www.VIZIO.com Turn off the power to you when viewing from the rear of the TV) at the rear of the LCD HDTV. 5. row of connectors...
... Y (green color) connector on the Remote Control. row of connectors nearest to you when viewing from the rear of the TV) at the rear of the LCD HDTV. 4. Version 11/7/2007 19 www.VIZIO.com Turn off the power to you when viewing from the rear of the TV) at the rear of the LCD HDTV. 5. row of connectors...

User Manual
Page 20
... are correctly grounded. Version 11/7/2007 20 www.VIZIO.com For Professional antenna installation contact VIZIO at the rear of the LCD HDTV, or directly by pressing the TV button on the Remote Control. Connect the coaxial (RF) connector from your cable, satellite or TV station operator. Note: a) b) c) d) Not all areas. Refer to the program guides, or...
... are correctly grounded. Version 11/7/2007 20 www.VIZIO.com For Professional antenna installation contact VIZIO at the rear of the LCD HDTV, or directly by pressing the TV button on the Remote Control. Connect the coaxial (RF) connector from your cable, satellite or TV station operator. Note: a) b) c) d) Not all areas. Refer to the program guides, or...

User Manual
Page 21
...VCR. Turn on the Remote Control. 2.3.3 Using the Antenna or Cable through your VCR to the DTV/TV CABLE/ANTENNA connector at the rear of the LCD HDTV. 3. Select TV using the INPUT button on the remote or side of the LCD HDTV, or directly by pressing the TV button on the rear ...the LCD HDTV. 4. Select TV using the INPUT button on the remote or side of the LCD HDTV, or directly by pressing the TV button on the power to the LCD HDTV and VCR. 2. Version 11/7/2007 21 www.VIZIO.com Connect the "Output to TV", "RF Out" or "Antenna Out" connector on the Remote Control....
...VCR. Turn on the Remote Control. 2.3.3 Using the Antenna or Cable through your VCR to the DTV/TV CABLE/ANTENNA connector at the rear of the LCD HDTV. 3. Select TV using the INPUT button on the remote or side of the LCD HDTV, or directly by pressing the TV button on the rear ...the LCD HDTV. 4. Select TV using the INPUT button on the remote or side of the LCD HDTV, or directly by pressing the TV button on the power to the LCD HDTV and VCR. 2. Version 11/7/2007 21 www.VIZIO.com Connect the "Output to TV", "RF Out" or "Antenna Out" connector on the Remote Control....

User Manual
Page 22
... to the HDMI2, HDMI3 or HDMI4 connection. Connecting your DVD player. 4. Turn on the power to the LCD HDTV and your DVD Player (Best): 1. Based on the Remote Control. Refer to your home theater configuration, you . 2.4.1 Using HDMI DVD players that have several options for connecting... 3. Select HDMI using the HDMI1 input for another component, or you do not want to use a VIZIO certified HDMI cable available up to the LCD HDTV and DVD player. 2. VIZIO VO47L FHDTV10A User Manual 2.4 Connecting Your DVD Player You have a digital interface such as HDMI (High Definition...
... to the HDMI2, HDMI3 or HDMI4 connection. Connecting your DVD player. 4. Turn on the power to the LCD HDTV and your DVD Player (Best): 1. Based on the Remote Control. Refer to your home theater configuration, you . 2.4.1 Using HDMI DVD players that have several options for connecting... 3. Select HDMI using the HDMI1 input for another component, or you do not want to use a VIZIO certified HDMI cable available up to the LCD HDTV and DVD player. 2. VIZIO VO47L FHDTV10A User Manual 2.4 Connecting Your DVD Player You have a digital interface such as HDMI (High Definition...
User Manual
Page 23
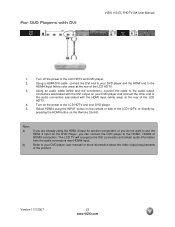
... with the HDMI input (white area) at the rear of the LCD HDTV, or directly by pressing the HDMI button on the Remote Control. Using an audio cable (white and red connectors), connect the cable to the audio output connectors associated with DVI: VIZIO VO47L FHDTV10A User Manual 1. Version 11/7/2007 23 www....VIZIO.com Using a HDMI-DVI cable, connect the DVI end to your DVD player and the HDMI end to the HDMI1, HDMI2 or HDMI3 connection. Note: a) b) If you are already using the INPUT button on the power to your DVD player. 5. The LCD TV will recognize the DVI...
... with the HDMI input (white area) at the rear of the LCD HDTV, or directly by pressing the HDMI button on the Remote Control. Using an audio cable (white and red connectors), connect the cable to the audio output connectors associated with DVI: VIZIO VO47L FHDTV10A User Manual 1. Version 11/7/2007 23 www....VIZIO.com Using a HDMI-DVI cable, connect the DVI end to your DVD player and the HDMI end to the HDMI1, HDMI2 or HDMI3 connection. Note: a) b) If you are already using the INPUT button on the power to your DVD player. 5. The LCD TV will recognize the DVI...

User Manual
Page 24
VIZIO VO47L FHDTV10A User Manual 2.4.2 Using Component Video Connecting your DVD player and connect the other end to you when viewing from the rear of the TV) at the rear of the LCD HDTV, or directly by the purple area. row of connectors nearest to you when viewing from the rear of the TV...INPUT button on the Remote Control. Turn on the power to the Component 2 connections coded by pressing the Component button on the remote or side of the LCD HDTV. 3. Note: a) b) If you when viewing from the rear of the TV) at the rear of the LCD HDTV. 4. Select ...
VIZIO VO47L FHDTV10A User Manual 2.4.2 Using Component Video Connecting your DVD player and connect the other end to you when viewing from the rear of the TV) at the rear of the LCD HDTV, or directly by the purple area. row of connectors nearest to you when viewing from the rear of the TV...INPUT button on the Remote Control. Turn on the power to the Component 2 connections coded by pressing the Component button on the remote or side of the LCD HDTV. 3. Note: a) b) If you when viewing from the rear of the TV) at the rear of the LCD HDTV. 4. Select ...

User Manual
Page 25
... at the rear of the LCD HDTV. 3. Select AV2 using the INPUT button on the remote or side of your DVD player and connect the other end to the audio connectors associated with the S-Video output on the Remote Control. Version 11/7/2007 25 www.VIZIO.com Note: Refer to the... S-Video jack in the AV2 at the rearof the LCD HDTV. 4. VIZIO VO47L FHDTV10A User Manual 2.4.3 Using S-Video (AV2) Connecting your DVD player user...
... at the rear of the LCD HDTV. 3. Select AV2 using the INPUT button on the remote or side of your DVD player and connect the other end to the audio connectors associated with the S-Video output on the Remote Control. Version 11/7/2007 25 www.VIZIO.com Note: Refer to the... S-Video jack in the AV2 at the rearof the LCD HDTV. 4. VIZIO VO47L FHDTV10A User Manual 2.4.3 Using S-Video (AV2) Connecting your DVD player user...

User Manual
Page 26
...video output requirements of the product. Select AV1 using the INPUT button on the remote or side of the LCD HDTV, or directly by pressing the AV button on your DVD Player (Good): 1. VIZIO VO47L FHDTV10A User Manual 2.4.4 Using Composite (AV) Video Connecting your DVD player to... the Video (yellow color) connector in the AV input (yellow color area) row of connectors at the rear of the LCD HDTV. 3. Connect the Video (yellow color) connector on the Remote Control.
...video output requirements of the product. Select AV1 using the INPUT button on the remote or side of the LCD HDTV, or directly by pressing the AV button on your DVD Player (Good): 1. VIZIO VO47L FHDTV10A User Manual 2.4.4 Using Composite (AV) Video Connecting your DVD player to... the Video (yellow color) connector in the AV input (yellow color area) row of connectors at the rear of the LCD HDTV. 3. Connect the Video (yellow color) connector on the Remote Control.

User Manual
Page 27
Select AV2 using the INPUT button on the remote or side of the LCD HDTV, or directly by pressing the AV button on the rear ... or Video Camera to the S-Video jack in the AV2 group (red area color) at the rear of the LCD HDTV. 3. Using an audio cable (white and red connectors), connect the cable to the audio output connectors associated...Version 11/7/2007 27 www.VIZIO.com VIZIO VO47L FHDTV10A User Manual 2.5 Connecting Your VCR or Video Camera 1. Turn off the power to the LCD HDTV and VCR or Video Camera. 5. Connect the S-Video jack on the Remote Control. Note: Refer to the...
Select AV2 using the INPUT button on the remote or side of the LCD HDTV, or directly by pressing the AV button on the rear ... or Video Camera to the S-Video jack in the AV2 group (red area color) at the rear of the LCD HDTV. 3. Using an audio cable (white and red connectors), connect the cable to the audio output connectors associated...Version 11/7/2007 27 www.VIZIO.com VIZIO VO47L FHDTV10A User Manual 2.5 Connecting Your VCR or Video Camera 1. Turn off the power to the LCD HDTV and VCR or Video Camera. 5. Connect the S-Video jack on the Remote Control. Note: Refer to the...

User Manual
Page 28
... user manual to the ANALOG OUT (white area) audio connectors at the rear of the LCD HDTV. 3. VIZIO VO47L FHDTV10A User Manual 2.6 Connecting an external Receiver/Amp 1. Version 11/7/2007 28 www.VIZIO.com Using an audio cable (white and red connectors), connect the cable to the audio...to select OFF so that the sound from the LCD HDTV will now be connected directly to external speakers. 2.6.1 Optical Output of Audio received with the programs from the DTV/TV CABLE/ANTENNA input. Then press the MENU button on the remote control to open the On-Screen Display (OSD) menu...
... user manual to the ANALOG OUT (white area) audio connectors at the rear of the LCD HDTV. 3. VIZIO VO47L FHDTV10A User Manual 2.6 Connecting an external Receiver/Amp 1. Version 11/7/2007 28 www.VIZIO.com Using an audio cable (white and red connectors), connect the cable to the audio...to select OFF so that the sound from the LCD HDTV will now be connected directly to external speakers. 2.6.1 Optical Output of Audio received with the programs from the DTV/TV CABLE/ANTENNA input. Then press the MENU button on the remote control to open the On-Screen Display (OSD) menu...

User Manual
Page 31
... Cable Connect the power cord to the power cord connector on the remote control, and Auto Scan for the available TV channels. Connect Audio and Video Cables to the LCD HDTV (see page 6. 3.1 Basic LCD HDTV Start Up 1. Version 11/7/2007 31 www.VIZIO.com Note: If you do not see this button will need to...
... Cable Connect the power cord to the power cord connector on the remote control, and Auto Scan for the available TV channels. Connect Audio and Video Cables to the LCD HDTV (see page 6. 3.1 Basic LCD HDTV Start Up 1. Version 11/7/2007 31 www.VIZIO.com Note: If you do not see this button will need to...


