
User Manual
Page 2
...VIZIO.com Keep these openings are not sure of the type of the VO47L FHDTV10A and to protect it can be used for an extended period of time, unplug the power connector. • To avoid risk of the grounded plug. • Do not overload power strips and extension cords. Do not install the product close...or component damage, switch off the power before connecting other components to the VO47L FHDTV10A. • Unplug the power cord before operating the display. To prevent the product from moisture. Use only a cart or stand recommended by the manufacturer to insure compatibility....
...VIZIO.com Keep these openings are not sure of the type of the VO47L FHDTV10A and to protect it can be used for an extended period of time, unplug the power connector. • To avoid risk of the grounded plug. • Do not overload power strips and extension cords. Do not install the product close...or component damage, switch off the power before connecting other components to the VO47L FHDTV10A. • Unplug the power cord before operating the display. To prevent the product from moisture. Use only a cart or stand recommended by the manufacturer to insure compatibility....

User Manual
Page 5
... common sense practice such as not to reduce the chance of the electronic components. VIZIO VO47L FHDTV10A User Manual Additional Certified Accessories for the VIZIO VO47L FHDTV10A are sold separately Wall Mounts High Definition Cables Extra or replacement Remote VIZIO also offers Installation Services and Extended Warranty Services for your VIZIO VO47L FHDTV10A To purchase or inquire about 400W; The Safety Strap should be grounded and...
... common sense practice such as not to reduce the chance of the electronic components. VIZIO VO47L FHDTV10A User Manual Additional Certified Accessories for the VIZIO VO47L FHDTV10A are sold separately Wall Mounts High Definition Cables Extra or replacement Remote VIZIO also offers Installation Services and Extended Warranty Services for your VIZIO VO47L FHDTV10A To purchase or inquire about 400W; The Safety Strap should be grounded and...
User Manual
Page 6
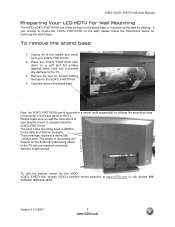
... the TV set; Please make sure to read the instructions of your VO47L FHDTV10A. 2. To remove the stand base 1. The length of the cables and cords from your specific mount to properly hang the VO47L FHDTV10A. our brackets come with different length screws. Unplug all of the screws will depend on the wall for viewing. To find the perfect mount for the VIZIO VO47L FHDTV10A, browse VIZIO's certified mount...
... the TV set; Please make sure to read the instructions of your VO47L FHDTV10A. 2. To remove the stand base 1. The length of the cables and cords from your specific mount to properly hang the VO47L FHDTV10A. our brackets come with different length screws. Unplug all of the screws will depend on the wall for viewing. To find the perfect mount for the VIZIO VO47L FHDTV10A, browse VIZIO's certified mount...
User Manual
Page 7
...VCR or Video Camera ...27 2.6 Connecting an external Receiver/Amp ...28 2.6.1 Optical Output of Audio received with HD Program 28 2.7 Connecting a PC Computer ...29 2.7.1 Preset PC Resolutions...30 2.7.2 Resolution (1920x1080) through RGB (15-Pin VGA) Input 30 Chapter 3 Setting Up to Watch Television 31 3.1 Basic LCD HDTV Start Up ...31 3.2 Watching a TV Program ...34 3.3 Adjusting Basic LCD HDTV Settings ...34 3.4 Program Information...35 Chapter 4 Advanced Adjustment of HDTV 36 4.1 Using the On Screen Display (OSD) ...36 4.2 DTV / TV Input Picture Adjustment...37 4.2.1 Picture Mode ...37...
...VCR or Video Camera ...27 2.6 Connecting an external Receiver/Amp ...28 2.6.1 Optical Output of Audio received with HD Program 28 2.7 Connecting a PC Computer ...29 2.7.1 Preset PC Resolutions...30 2.7.2 Resolution (1920x1080) through RGB (15-Pin VGA) Input 30 Chapter 3 Setting Up to Watch Television 31 3.1 Basic LCD HDTV Start Up ...31 3.2 Watching a TV Program ...34 3.3 Adjusting Basic LCD HDTV Settings ...34 3.4 Program Information...35 Chapter 4 Advanced Adjustment of HDTV 36 4.1 Using the On Screen Display (OSD) ...36 4.2 DTV / TV Input Picture Adjustment...37 4.2.1 Picture Mode ...37...
User Manual
Page 8
...42 4.5.4 Digital Audio Out...43 4.5.5 Time Zone ...43 4.5.6 Daylight Saving...43 4.6 DTV / TV Input Setup ...44 4.6.1 Language...44 4.6.2 Sleep Timer ...44 4.6.3 Analog Closed Caption ...44 4.6.4 Digital Closed Caption ...44 4.6.5 Digital Closed Caption Style ...44 4.6.6 PIP (Picture-in-Picture) ...45 4.6.7 H/V Position...45 4.6.8 Reset All Settings ...45 4.7 DTV / TV Input Parental Control...46 4.7.1 Channel Block ...46 4.7.2 TV Rating...47 4.7.3 Movie Rating...48 4.7.4 Check for Component Codes ...60 4.20 Using a Cable or Satellite Remote ...60 Chapter 5 Maintenance and Troubleshooting 61...
...42 4.5.4 Digital Audio Out...43 4.5.5 Time Zone ...43 4.5.6 Daylight Saving...43 4.6 DTV / TV Input Setup ...44 4.6.1 Language...44 4.6.2 Sleep Timer ...44 4.6.3 Analog Closed Caption ...44 4.6.4 Digital Closed Caption ...44 4.6.5 Digital Closed Caption Style ...44 4.6.6 PIP (Picture-in-Picture) ...45 4.6.7 H/V Position...45 4.6.8 Reset All Settings ...45 4.7 DTV / TV Input Parental Control...46 4.7.1 Channel Block ...46 4.7.2 TV Rating...47 4.7.3 Movie Rating...48 4.7.4 Check for Component Codes ...60 4.20 Using a Cable or Satellite Remote ...60 Chapter 5 Maintenance and Troubleshooting 61...

User Manual
Page 10
...). 7. The green color band on the rear of the TV indicates this equipment. 3. VIZIO VO47L FHDTV10A User Manual 1.3 Rear Panel Connections 1 2 4 5 8 10 13 14 3 6 7 9 11 12 1. Use of this connection. HDMI 3 - RGB PC - Connect the primary source for digital video such as a DVD multimedia player or set top box through this input for factory service only. AC IN - SERVICE - This custom communication port is also transmitted with Audio L/R) - HDMI 1 - Connect the primary source for component video devices such as a VCR or video game. The white color band...
...). 7. The green color band on the rear of the TV indicates this equipment. 3. VIZIO VO47L FHDTV10A User Manual 1.3 Rear Panel Connections 1 2 4 5 8 10 13 14 3 6 7 9 11 12 1. Use of this connection. HDMI 3 - RGB PC - Connect the primary source for digital video such as a DVD multimedia player or set top box through this input for factory service only. AC IN - SERVICE - This custom communication port is also transmitted with Audio L/R) - HDMI 1 - Connect the primary source for component video devices such as a VCR or video game. The white color band...
User Manual
Page 12
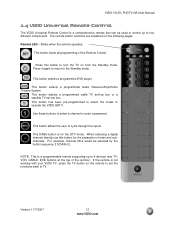
... Control. This button starts all programming of the remote). This button has been pre-programmed to select the codes to select a channel or enter a password. Blinks when the remote operates. This button selects a programmed DVD player. The remote button functions are explained on the following pages. This button selects a programmed Audio Receiver/Amp/Home Theatre System. VIZIO VO47L FHDTV10A User Manual 1.4 VIZIO Universal Remote Control The VIZIO Universal Remote Control is not working with your VIZIO TV, press the TV button on the remote to set -top box. Remote LED...
... Control. This button starts all programming of the remote). This button has been pre-programmed to select the codes to select a channel or enter a password. Blinks when the remote operates. This button selects a programmed DVD player. The remote button functions are explained on the following pages. This button selects a programmed Audio Receiver/Amp/Home Theatre System. VIZIO VO47L FHDTV10A User Manual 1.4 VIZIO Universal Remote Control The VIZIO Universal Remote Control is not working with your VIZIO TV, press the TV button on the remote to set -top box. Remote LED...
User Manual
Page 13
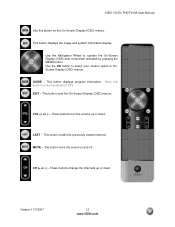
... display. This button displays program information. GUIDE - EXIT - This button exits the On-Screen Display (OSD) menus. VOL (+ or -) - This button turns the sound on and off. These buttons turn the volume up or down . Use the OK button to operate the On-Screen Display (OSD) after it has been activated by pressing the MENU button. LAST - These buttons change the channels up or down . This button recalls the previously viewed channel. CH (+ or -) - Version 11/7/2007 13 www.VIZIO...
... display. This button displays program information. GUIDE - EXIT - This button exits the On-Screen Display (OSD) menus. VOL (+ or -) - This button turns the sound on and off. These buttons turn the volume up or down . Use the OK button to operate the On-Screen Display (OSD) after it has been activated by pressing the MENU button. LAST - These buttons change the channels up or down . This button recalls the previously viewed channel. CH (+ or -) - Version 11/7/2007 13 www.VIZIO...

User Manual
Page 16
... takes advantage of the superior picture provided by progressive scan DVD players and HDTV formats. Note: For more sharply. This enhancement over a single cable. VIZIO VO47L FHDTV10A User Manual Chapter 2 Connecting Equipment 2.1 Which Video Connection Should I Use? Connection Quality (type) Connector Rear Panel Color Codes Description Best (digital) White HDMI (High-Definition Multimedia Interface) - It is the connection for standard NTSC TV using antenna or cable. TV Coaxial RF. This video input has separate red, green and blue color components. It also enables text...
... takes advantage of the superior picture provided by progressive scan DVD players and HDTV formats. Note: For more sharply. This enhancement over a single cable. VIZIO VO47L FHDTV10A User Manual Chapter 2 Connecting Equipment 2.1 Which Video Connection Should I Use? Connection Quality (type) Connector Rear Panel Color Codes Description Best (digital) White HDMI (High-Definition Multimedia Interface) - It is the connection for standard NTSC TV using antenna or cable. TV Coaxial RF. This video input has separate red, green and blue color components. It also enables text...
User Manual
Page 17
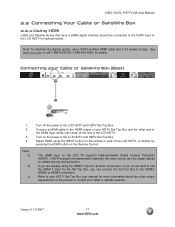
Note: a) b) c) Turn off the power to the LCD HDTV and HDTV Set-Top Box. Select HDMI using the HDMI 1 input for another component, or you do not want to use a VIZIO certified HDMI cable that have a HDMI digital interface should be connected to the HDMI input of the LCD HDTV. Turn on the power to the LCD HDTV and HDTV Set-Top Box. If you can connect the Set-Top Box to the HDMI Input (white color area) at the rear of the LCD HDTV for details. The HDMI input on the Remote Control. Version...
Note: a) b) c) Turn off the power to the LCD HDTV and HDTV Set-Top Box. Select HDMI using the HDMI 1 input for another component, or you do not want to use a VIZIO certified HDMI cable that have a HDMI digital interface should be connected to the HDMI input of the LCD HDTV. Turn on the power to the LCD HDTV and HDTV Set-Top Box. If you can connect the Set-Top Box to the HDMI Input (white color area) at the rear of the LCD HDTV for details. The HDMI input on the Remote Control. Version...
User Manual
Page 18
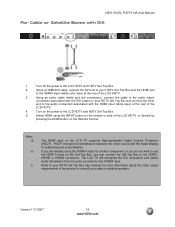
... the video output requirements of the product or consult your HDTV Set-Top Box and the HDMI end to use the HDMI 4 input for added security and protection. VIZIO VO47L FHDTV10A User Manual For Cable or Satellite Boxes with the HDMI input (white area) at the rear of the LCD HDTV. 3. Turn on the LCD TV supports High-bandwidth Digital Content Protection (HDCP). Select HDMI using the HDMI 4 input for another component, or you do not want to the HDMI4 Input (white color...
... the video output requirements of the product or consult your HDTV Set-Top Box and the HDMI end to use the HDMI 4 input for added security and protection. VIZIO VO47L FHDTV10A User Manual For Cable or Satellite Boxes with the HDMI input (white area) at the rear of the LCD HDTV. 3. Turn on the LCD TV supports High-bandwidth Digital Content Protection (HDCP). Select HDMI using the HDMI 4 input for another component, or you do not want to the HDMI4 Input (white color...

User Manual
Page 19
... the audio output connectors associated with the Component 1 input (green color area) at the rear of the LCD HDTV, or directly by the purple area. Version 11/7/2007 19 www.VIZIO.com Connect the PbCb (blue color) connector on the Remote Control. Turn off the power to the LCD HDTV and HDTV Set-Top Box. 7. Note: a) b) If you are already using the INPUT button on your cable or satellite operator. Using an audio cable (white and red connectors), connect the cable to use the Component 1 input...
... the audio output connectors associated with the Component 1 input (green color area) at the rear of the LCD HDTV, or directly by the purple area. Version 11/7/2007 19 www.VIZIO.com Connect the PbCb (blue color) connector on the Remote Control. Turn off the power to the LCD HDTV and HDTV Set-Top Box. 7. Note: a) b) If you are already using the INPUT button on your cable or satellite operator. Using an audio cable (white and red connectors), connect the cable to use the Component 1 input...
User Manual
Page 23
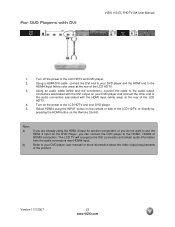
... already using the INPUT button on the remote or side of the product. Version 11/7/2007 23 www.VIZIO.com Turn on the Remote Control. The LCD TV will recognize the DVI connection and obtain audio information from the audio connectors near HDMI4 input. Using a HDMI-DVI cable, connect the DVI end to your DVD player user manual for the DVD Player, you can connect the DVD player to the HDMI4 Input (white color area) at the rear of the LCD HDTV. 3. For DVD Players...
... already using the INPUT button on the remote or side of the product. Version 11/7/2007 23 www.VIZIO.com Turn on the Remote Control. The LCD TV will recognize the DVI connection and obtain audio information from the audio connectors near HDMI4 input. Using a HDMI-DVI cable, connect the DVI end to your DVD player user manual for the DVD Player, you can connect the DVD player to the HDMI4 Input (white color area) at the rear of the LCD HDTV. 3. For DVD Players...
User Manual
Page 42
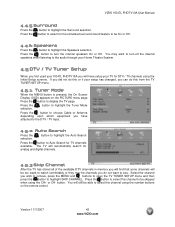
... TV channels available. The TV will still be channels you wish to remove, press the MENU and buttons to open the TV TUNER SETUP menu and then press the button to turn the internal speakers On or Off. If you did not do this from the TV TUNER SETUP menu. 4.5.1 Tuner Mode When the MENU button is pressed, the On Screen Display (OSD) appears on the remote control. button to highlight the Tuner Mode Press the button to choose Cable or Antenna...
... TV channels available. The TV will still be channels you wish to remove, press the MENU and buttons to open the TV TUNER SETUP menu and then press the button to turn the internal speakers On or Off. If you did not do this from the TV TUNER SETUP menu. 4.5.1 Tuner Mode When the MENU button is pressed, the On Screen Display (OSD) appears on the remote control. button to highlight the Tuner Mode Press the button to choose Cable or Antenna...

User Manual
Page 59
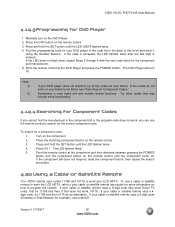
... the POWER button. Listed below are the steps for programming your VIZIO VO47L FHDTV10A. Press and hold the SET button until the LED LIGHT flashes twice. 4. VIZIO VO47L FHDTV10A User Manual 4.19 Programming the VIZIO Universal Remote Control You can program the remote control to work with up to four different pieces of equipment including your VCR, Cable Box and DVD Player. 4.19.1 Programming for VCR 1. Manually turn on the VCR. 2. Find the programming code for the component and manufacturer. Sometimes a code listed will...
... the POWER button. Listed below are the steps for programming your VIZIO VO47L FHDTV10A. Press and hold the SET button until the LED LIGHT flashes twice. 4. VIZIO VO47L FHDTV10A User Manual 4.19 Programming the VIZIO Universal Remote Control You can program the remote control to work with up to four different pieces of equipment including your VCR, Cable Box and DVD Player. 4.19.1 Programming for VCR 1. Manually turn on the VCR. 2. Find the programming code for the component and manufacturer. Sometimes a code listed will...
User Manual
Page 60
... Using a Cable or Satellite Remote Your VIZIO remote uses codes 11758 and 10178 to work the LCD HDTV, refer to program the remote. If the codes do not work , you can use code 627. Press and hold the SET button until the component turns off . To search for the component and manufacturer. 5. If the LED does not flash twice, repeat Steps 2 through 4 with the next code listed for a component code: 1. Sometimes a code listed will turn on the remote control until the LED LIGHT flashes twice. 4. VIZIO...
... Using a Cable or Satellite Remote Your VIZIO remote uses codes 11758 and 10178 to work the LCD HDTV, refer to program the remote. If the codes do not work , you can use code 627. Press and hold the SET button until the component turns off . To search for the component and manufacturer. 5. If the LED does not flash twice, repeat Steps 2 through 4 with the next code listed for a component code: 1. Sometimes a code listed will turn on the remote control until the LED LIGHT flashes twice. 4. VIZIO...
User Manual
Page 61
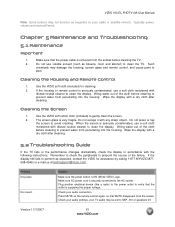
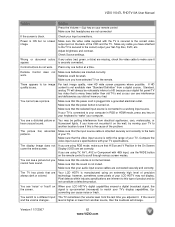
... source of the cloth before cleaning the TV. 2. Problem No power. Check your audio connection Press MUTE on your TV audio may be set to SAP, min or speakers off. Chapter 5 Maintenance and Troubleshooting 5.1 Maintenance Important 1. No sound. Do not scrape it with a dry cloth after cleaning. 5.2 Troubleshooting Guide If the TV fails or the performance changes dramatically, check the display in accordance with the following instructions. Typically power, volume...
... source of the cloth before cleaning the TV. 2. Problem No power. Check your audio connection Press MUTE on your TV audio may be set to SAP, min or speakers off. Chapter 5 Maintenance and Troubleshooting 5.1 Maintenance Important 1. No sound. Do not scrape it with a dry cloth after cleaning. 5.2 Troubleshooting Guide If the TV fails or the performance changes dramatically, check the display in accordance with the following instructions. Typically power, volume...
User Manual
Page 62
... had. For best image quality, view HD wide screen programs where possible. Make sure the video cable supplied with 480i input, use the WIDE button on the remote control to scroll through various screen modes. You see a picture. Make sure that the power cord is plugged into a grounded electrical outlet. Your LCD HDTV is manufactured using RGB mode, make sure it appear. VIZIO VO47L FHDTV10A User Manual Problem Solution Press the Volume + (Up) key on your remote control Make sure that...
... had. For best image quality, view HD wide screen programs where possible. Make sure the video cable supplied with 480i input, use the WIDE button on the remote control to scroll through various screen modes. You see a picture. Make sure that the power cord is plugged into a grounded electrical outlet. Your LCD HDTV is manufactured using RGB mode, make sure it appear. VIZIO VO47L FHDTV10A User Manual Problem Solution Press the Volume + (Up) key on your remote control Make sure that...

User Manual
Page 63
... a different input The TV remembers the viewing mode from the last time you used a particular input and the screen size changes. (AV1, AV2, Component 1, Component 2, HDMI 1, HDMI 2, HDMI 3, HDMI 4 and TV). Letterboxed (or "Widescreen") versions of DVD movies are integral parts of expanding this function, press the "ZOOM" key on warranty service or repair, after the warranty period, please contact our Support Department at the expense of image accuracy. Sunday Please have your VIZIO model number, serial number and...
... a different input The TV remembers the viewing mode from the last time you used a particular input and the screen size changes. (AV1, AV2, Component 1, Component 2, HDMI 1, HDMI 2, HDMI 3, HDMI 4 and TV). Letterboxed (or "Widescreen") versions of DVD movies are integral parts of expanding this function, press the "ZOOM" key on warranty service or repair, after the warranty period, please contact our Support Department at the expense of image accuracy. Sunday Please have your VIZIO model number, serial number and...

User Manual
Page 67
...VIZIO VO47L FHDTV10A User Manual Tint, 38 DTV Special Features Closed Caption, 43, 44 Closed Caption Style, 43, 44 Language, 42 Reset, 45 Sleep Timer, 44 DTV Tuner Setup Auto Search, 44 DVI Connecting your Cable Box, 18 Connecting your DVD Player, 23 Connecting your Satellite Box, 18 G Glossary, 66 H HDMI Connecting your Cable Box, 17 Connecting your DVD Player, 22 Connecting your Satellite Box, 17 HDMI Input Audio Adjustment, 50 Picture Adjustment, 50 Setup, 50 I Inputs Antenna, 3 Connectors, 16 Installation Base removal, 6 Preparation, 5 Safetey Strap, 5 Safety Instructions, 2 Wall Mounting...
...VIZIO VO47L FHDTV10A User Manual Tint, 38 DTV Special Features Closed Caption, 43, 44 Closed Caption Style, 43, 44 Language, 42 Reset, 45 Sleep Timer, 44 DTV Tuner Setup Auto Search, 44 DVI Connecting your Cable Box, 18 Connecting your DVD Player, 23 Connecting your Satellite Box, 18 G Glossary, 66 H HDMI Connecting your Cable Box, 17 Connecting your DVD Player, 22 Connecting your Satellite Box, 17 HDMI Input Audio Adjustment, 50 Picture Adjustment, 50 Setup, 50 I Inputs Antenna, 3 Connectors, 16 Installation Base removal, 6 Preparation, 5 Safetey Strap, 5 Safety Instructions, 2 Wall Mounting...


