
Download
Page 6
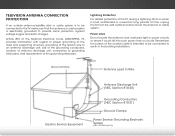
Remember, the screen of the coaxial cable is intended to be connected to the TV, make sure that the antenna or cable system is electrically grounded to provide ...
Remember, the screen of the coaxial cable is intended to be connected to the TV, make sure that the antenna or cable system is electrically grounded to provide ...
Download
Page 7
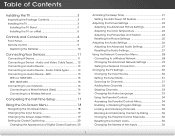
... a Wired Network (Best 16 Connecting to a Wireless Network 16 Completing the First-Time Setup 17 Using the On-Screen Menu 18 Navigating the On-Screen Menu 18 Changing the Input Source 19 Changing the Screen Aspect Ratio 19 Setting Up Closed Captioning 20 Changing the Appearance of Digital Closed Captions.. 20 Activating the...
... a Wired Network (Best 16 Connecting to a Wireless Network 16 Completing the First-Time Setup 17 Using the On-Screen Menu 18 Navigating the On-Screen Menu 18 Changing the Input Source 19 Changing the Screen Aspect Ratio 19 Setting Up Closed Captioning 20 Changing the Appearance of Digital Closed Captions.. 20 Activating the...
Download
Page 8
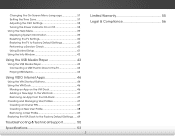
Changing the On-Screen Menu Language 37 Setting the Time Zone 37 Adjusting the CEC Settings 38 Turning the Power Indicator On or Off 38 Using the Help Menu ... Using the USB Media Player 43 Using the USB Media Player 43 Connecting a USB Thumb Drive to the TV 43 Playing USB Media 43 Using VIZIO Internet Apps 46 Using the VIA Shortcut Buttons 46 Using the VIA Dock 46 Moving an App on the VIA Dock 46 Adding a New App...
Changing the On-Screen Menu Language 37 Setting the Time Zone 37 Adjusting the CEC Settings 38 Turning the Power Indicator On or Off 38 Using the Help Menu ... Using the USB Media Player 43 Using the USB Media Player 43 Connecting a USB Thumb Drive to the TV 43 Playing USB Media 43 Using VIZIO Internet Apps 46 Using the VIA Shortcut Buttons 46 Using the VIA Dock 46 Moving an App on the VIA Dock 46 Adding a New App...
Download
Page 10
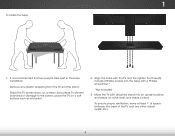
Place the TV screen-down on a soft surface such as a blanket. 2. To ensure proper ventilation, leave at least 1" of space between the back of the TV and any plastic ... from the TV and the stand. It is recommended that two people take part in the base installation. To prevent scratches or damage to the screen, place the TV on a clean, flat surface. Remove any other object (walls, etc). 4 Move the TV with a Phillips screwdriver.* *Not included 3. Align the base with...
Place the TV screen-down on a soft surface such as a blanket. 2. To ensure proper ventilation, leave at least 1" of space between the back of the TV and any plastic ... from the TV and the stand. It is recommended that two people take part in the base installation. To prevent scratches or damage to the screen, place the TV on a clean, flat surface. Remove any other object (walls, etc). 4 Move the TV with a Phillips screwdriver.* *Not included 3. Align the base with...

Download
Page 13
Increase or decrease volume level. INPUT - MENU - Change input source. INPUT MENU CH ^ CH VOL ^ VOL ^ ^ 2 POWER - VOLUME UP/DOWN - Side Panel 7 Change the channel. Open the on . CHANNEL UP/DOWN - Turn TV off or on -screen menu.
Increase or decrease volume level. INPUT - MENU - Change input source. INPUT MENU CH ^ CH VOL ^ VOL ^ ^ 2 POWER - VOLUME UP/DOWN - Side Panel 7 Change the channel. Open the on . CHANNEL UP/DOWN - Turn TV off or on -screen menu.
Download
Page 15
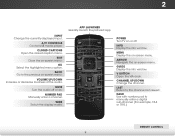
.... Guide Display the info window. Channel Up/Down Change the channel. App launcher Quickly launch the pictured app. Last Return to the previous on -screen menu. Volume Up/Down Increase or decrease loudness of the audio. Number Pad Manually enter a channel. Power Turn TV on . Mute Turn the ...audio off or on or off. Arrow Navigate the on -screen menu. Exit Close the on -screen menu. Back Go to the channel last viewed. 2 Remote Control Input Change the currently-displayed input. Dash Use with number pad to ...
.... Guide Display the info window. Channel Up/Down Change the channel. App launcher Quickly launch the pictured app. Last Return to the previous on -screen menu. Volume Up/Down Increase or decrease loudness of the audio. Number Pad Manually enter a channel. Power Turn TV on . Mute Turn the ...audio off or on or off. Arrow Navigate the on -screen menu. Exit Close the on -screen menu. Back Go to the channel last viewed. 2 Remote Control Input Change the currently-displayed input. Dash Use with number pad to ...
Download
Page 23
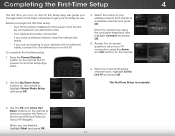
... ready. • If you are finished, highlight Next and press OK. 17 The TV powers on the remote. Answer the on-screen questions about your TV connection using the on-screen keyboard, then highlight Connect and press OK. 5. When you have a wireless network, have finished the channel scan, highlight Exit to highlight...
... ready. • If you are finished, highlight Next and press OK. 17 The TV powers on the remote. Answer the on-screen questions about your TV connection using the on-screen keyboard, then highlight Connect and press OK. 5. When you have a wireless network, have finished the channel scan, highlight Exit to highlight...
Download
Page 24
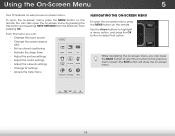
... • Change the screen aspect ratio • Set up closed captioning • Activate the sleep timer • Adjust the picture settings • Adjust the audio settings • Adjust the network settings • Change TV settings • Access the help menu VIZIO ABC Input Wide CC ...Sleep Timer Picture Audio Network Settings Help Navigating the On-Screen Menu To open the on-screen menu, press the MENU button on the remote.
... • Change the screen aspect ratio • Set up closed captioning • Activate the sleep timer • Adjust the picture settings • Adjust the audio settings • Adjust the network settings • Change TV settings • Access the help menu VIZIO ABC Input Wide CC ...Sleep Timer Picture Audio Network Settings Help Navigating the On-Screen Menu To open the on-screen menu, press the MENU button on the remote.
Download
Page 25
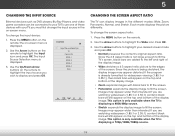
...press OK. Use the Arrow buttons to fill the screen. This option is only available when the TV is not large enough to fill the Exit TV's2Dscreen3D, black bars are added to the left and right of the display image. VIZIO Input Source Selection TV Comp/AV HDMI-1 HDMI-2 ...HDMI-3 HDMI-4 RGB Changing the Screen Aspect Ratio The TV can be connected to your desired screen mode and press OK: • Normal preserves the content's original aspect ratio....
...press OK. Use the Arrow buttons to fill the screen. This option is only available when the TV is not large enough to fill the Exit TV's2Dscreen3D, black bars are added to the left and right of the display image. VIZIO Input Source Selection TV Comp/AV HDMI-1 HDMI-2 ...HDMI-3 HDMI-4 RGB Changing the Screen Aspect Ratio The TV can be connected to your desired screen mode and press OK: • Normal preserves the content's original aspect ratio....
Download
Page 26
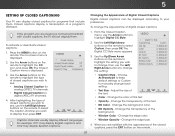
...To change each Input settWinidge . ChAaudnioge the color of the text. • Sleep Timer CoPlicotur re- Change the edge type. 4. VIZIO Digital CC Style Caption Style Custom Text Size As Broadcast Color As Broadcast Opacity As Broadcast 3. Adjust the size of the text. •.... Change the transparency of a program's dialogue. Closed captions display a transcription of the background. • Window Color - The on-screen menu is displayed. 3. When you wish to see , use the Left/Right Arrow buttons on the remote to select the caption channel ...
...To change each Input settWinidge . ChAaudnioge the color of the text. • Sleep Timer CoPlicotur re- Change the edge type. 4. VIZIO Digital CC Style Caption Style Custom Text Size As Broadcast Color As Broadcast Opacity As Broadcast 3. Adjust the size of the text. •.... Change the transparency of a program's dialogue. Closed captions display a transcription of the background. • Window Color - The on-screen menu is displayed. 3. When you wish to see , use the Left/Right Arrow buttons on the remote to select the caption channel ...
Download
Page 27
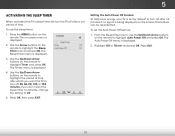
The on-screen menu is displayed. 3. Use the Up/Down Arrow buttons on the Timer Off remote to highlight Timer and press OK. Press OK, then press EXIT. Press Exit. The Sleep Timer menu is VIZIO displayed. If you want the sleep timer to activate, change the setting to Off. 5. Setting the ... buttons on the remote to highlight the Sleep Auto Power Off Off Timer icon and press OK. Use the Up/Down Arrow buttons on the screen. From the Sleep Timer menu, use the sleep timer: 1. Exit 2D 3D ABC Input Wide CC Sleep Timer Picture Audio Network Settings Help 21 ...
The on-screen menu is displayed. 3. Use the Up/Down Arrow buttons on the Timer Off remote to highlight Timer and press OK. Press OK, then press EXIT. Press Exit. The Sleep Timer menu is VIZIO displayed. If you want the sleep timer to activate, change the setting to Off. 5. Setting the ... buttons on the remote to highlight the Sleep Auto Power Off Off Timer icon and press OK. Use the Up/Down Arrow buttons on the screen. From the Sleep Timer menu, use the sleep timer: 1. Exit 2D 3D ABC Input Wide CC Sleep Timer Picture Audio Network Settings Help 21 ...
Download
Page 28
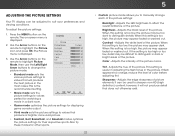
... the edge sharpness of the picture. Also try these modes for other sports. • Custom picture mode allows you to manually change the picture mode: VIZIO Picture Picture Mode Backlight Brightness Contrast Color Tint Sharpness Custom - + 50 - + 50 - + 50 - + 50 - +0 - +0 More • Standard mode...Picture Mode, then use the Left/Right Arrow buttons to change each of the picture settings: Backlight - Use the Arrow buttons on -screen menu is useful in adjusting the flesh tones in the most cases. When this setting is the recommended setting. • Movie mode...
... the edge sharpness of the picture. Also try these modes for other sports. • Custom picture mode allows you to manually change the picture mode: VIZIO Picture Picture Mode Backlight Brightness Contrast Color Tint Sharpness Custom - + 50 - + 50 - + 50 - + 50 - +0 - +0 More • Standard mode...Picture Mode, then use the Left/Right Arrow buttons to change each of the picture settings: Backlight - Use the Arrow buttons on -screen menu is useful in adjusting the flesh tones in the most cases. When this setting is the recommended setting. • Movie mode...
Download
Page 32
... track. • TV Speakers - Select On or Off. • Advanced Audio - mAicdjust the boost or attenuation of the audio output from the TV's internal speakers. VIZIO Audio Settings Audio Mode Balance - TV Speakers Flat +0 +0 Off 3. Use the Arrow buttons to On) • Reset Audio Mode - 5 Adjusting the Audio Settings To adjust... that delivers an immersive surround sound experience from the left and right speakers. • Lip Sync - Select On or Off. • Volume Leveling - The on-screen menu is displayed.
... track. • TV Speakers - Select On or Off. • Advanced Audio - mAicdjust the boost or attenuation of the audio output from the TV's internal speakers. VIZIO Audio Settings Audio Mode Balance - TV Speakers Flat +0 +0 Off 3. Use the Arrow buttons to On) • Reset Audio Mode - 5 Adjusting the Audio Settings To adjust... that delivers an immersive surround sound experience from the left and right speakers. • Lip Sync - Select On or Off. • Volume Leveling - The on-screen menu is displayed.
Download
Page 33
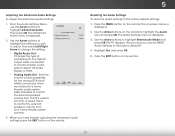
... from your home theater system controls. 5 Adjusting the Advanced Audio Settings To adjust the advanced audio settings: 1. VIZIO Advanced Audio Digital Audio Out Analog Audio Out PCM Fixed 3. InPpruet ss thWeideEXIT CbCutton on -screen menu is displayed. 2. Use the Arrow buttons to highlight the setting you wish to adjust, then press Left...
... from your home theater system controls. 5 Adjusting the Advanced Audio Settings To adjust the advanced audio settings: 1. VIZIO Advanced Audio Digital Audio Out Analog Audio Out PCM Fixed 3. InPpruet ss thWeideEXIT CbCutton on -screen menu is displayed. 2. Use the Arrow buttons to highlight the setting you wish to adjust, then press Left...
Download
Page 34
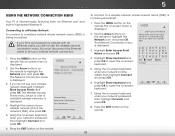
...this is displayed. 2. The on the remote. Highlight the name of available wireless networks, is displayed. 3. Using the on -screen keyboard, enter your network's password, then highlight Connect and Slpeerpess Timer OK. Picture Audio 8. Press the EXIT button on the ...on the remote. Connecting to a Wireless Network To connect to a wireless network whose network name (SSID) is displayed. 2. VIZIO Network connection Wired Connection Disconnected Wireless Access Points Manual Setup Enter Access Point Name Test Connection Advanced network settings 6. 5 Using ...
...this is displayed. 2. The on the remote. Highlight the name of available wireless networks, is displayed. 3. Using the on -screen keyboard, enter your network's password, then highlight Connect and Slpeerpess Timer OK. Picture Audio 8. Press the EXIT button on the ...on the remote. Connecting to a Wireless Network To connect to a wireless network whose network name (SSID) is displayed. 2. VIZIO Network connection Wired Connection Disconnected Wireless Access Points Manual Setup Enter Access Point Name Test Connection Advanced network settings 6. 5 Using ...
Download
Page 35
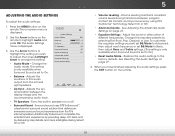
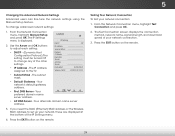
VIZIO IP Setting DHCP Off IP Address Subnet Mask Default Gateway Pref. If you need the RJ45 (Ethernet) MAC address or the Wireless MAC address to ... Panoramic 3. DNS Server - Testing Your Network Connection To test your network connection. Your preferred domain name server address. • Alt DNS Server - The Test Connection screen displays the connection method, network name, signal strength, and download speed of the IP Settings menu. 4. Press the EXIT button on the remote. To change...
VIZIO IP Setting DHCP Off IP Address Subnet Mask Default Gateway Pref. If you need the RJ45 (Ethernet) MAC address or the Wireless MAC address to ... Panoramic 3. DNS Server - Testing Your Network Connection To test your network connection. Your preferred domain name server address. • Alt DNS Server - The Test Connection screen displays the connection method, network name, signal strength, and download speed of the IP Settings menu. 4. Press the EXIT button on the remote. To change...
Download
Page 36
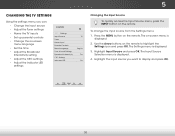
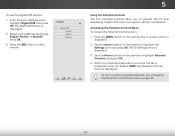
...; Set the time • Adjust the Broadcast Interactivity setting • Adjust the CEC settings • Adjust the Indicator LED settings VIZIO Settings Input Source Tuner Name Input Parental Controls Menu Language Time & Local Settings Broadcast Interactivity CEC Settings Indicator LED TV English On On... Changing the Input Source To quickly access the Input Source menu, press the INPUT button on -screen menu is displayed. 3. The on the remote. Highlight InpuAtBCSource and press OK. Use the Arrow buttons on the remote. 5 Changing the...
...; Set the time • Adjust the Broadcast Interactivity setting • Adjust the CEC settings • Adjust the Indicator LED settings VIZIO Settings Input Source Tuner Name Input Parental Controls Menu Language Time & Local Settings Broadcast Interactivity CEC Settings Indicator LED TV English On On... Changing the Input Source To quickly access the Input Source menu, press the INPUT button on -screen menu is displayed. 3. The on the remote. Highlight InpuAtBCSource and press OK. Use the Arrow buttons on the remote. 5 Changing the...
Download
Page 37
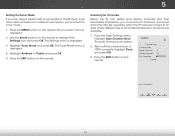
...is connected to highlight the Settings icon and press OK. 5 Setting the Tuner Mode If you are available. 1. Use the Arrow buttons on -screen menu is displayed. 2. The Tuner Mode menu is displayed. 3. Highlight Done and press OK. 3. Highlight Tuner Mode and press OK. From ...the Tuner Settings menu, highlight Auto Channel Scan. Highlight Antenna or Cable and press OK. 5. Scanning for channels. VIZIO Channel Scan Channel Scan Digital Channels: 0 Analog Channels: 19 18% Complete Cancel Press OK to -air broadcast television channels are using a device ...
...is connected to highlight the Settings icon and press OK. 5 Setting the Tuner Mode If you are available. 1. Use the Arrow buttons on -screen menu is displayed. 2. The Tuner Mode menu is displayed. 3. Highlight Done and press OK. 3. Highlight Tuner Mode and press OK. From ...the Tuner Settings menu, highlight Auto Channel Scan. Highlight Antenna or Cable and press OK. 5. Scanning for channels. VIZIO Channel Scan Channel Scan Digital Channels: 0 Analog Channels: 19 18% Complete Cancel Press OK to -air broadcast television channels are using a device ...
Download
Page 40
...press OK. The on the remote. Use the Arrow buttons on the remote to highlight the Settings icon AaBCnd press OK. VIZIO Digital MTS English French Spanish 5 Using the Parental Controls The TV's parental controls allow you to highlight Parental Controls and ...4. The TV Settings menu is displayed. 2. Select your preferred language: English, French, or Spanish. Press the EXIT button on -screen menu is displayed. Press the MENU button on page 36. 34 STliEpm eeneaprtsesrcPyoiocdtuuerre,peanArtueednriottahlepdaesfsacuoldt,e0.0If0y0o. To set a custom parental passcode, ...
...press OK. The on the remote. Use the Arrow buttons on the remote to highlight the Settings icon AaBCnd press OK. VIZIO Digital MTS English French Spanish 5 Using the Parental Controls The TV's parental controls allow you to highlight Parental Controls and ...4. The TV Settings menu is displayed. 2. Select your preferred language: English, French, or Spanish. Press the EXIT button on -screen menu is displayed. Press the MENU button on page 36. 34 STliEpm eeneaprtsesrcPyoiocdtuuerre,peanArtueednriottahlepdaesfsacuoldt,e0.0If0y0o. To set a custom parental passcode, ...

Download
Page 42
... yourself, highlight the field below Input Labels and press OK. Changing the Names of an input: 1. Press the MENU button on the remote. VIZIO 2. The Settings Input Labels TV menu is displayed. Show Keyboard 4. Highlight Input Source and press OK. Highlight OK and press OK. (You ...on the remote to the factory defaults?" 2. The Change PIN menu is displayed. In the Confirm Pin field, use the Number Pad on -screen keyboard by highlighting Show keyboard and press OK) 6. Write down your new parental control passcode and save it easier to recognize the different devices ...
... yourself, highlight the field below Input Labels and press OK. Changing the Names of an input: 1. Press the MENU button on the remote. VIZIO 2. The Settings Input Labels TV menu is displayed. Show Keyboard 4. Highlight Input Source and press OK. Highlight OK and press OK. (You ...on the remote to the factory defaults?" 2. The Change PIN menu is displayed. In the Confirm Pin field, use the Number Pad on -screen keyboard by highlighting Show keyboard and press OK) 6. Write down your new parental control passcode and save it easier to recognize the different devices ...


