Download
Page 4
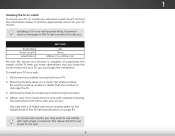
..., stand, tripod, bracket, or table specified by the manufacturer, or sold with arrowhead symbol within an equilateral triangle is used for your TV. Do not install your dealer. • When connected to smoke. The manufacturer's warranty does not cover user abuse or improper installations. • The power cord must be of sufficient magnitude to constitute a risk of time. • Refer all servicing to...
..., stand, tripod, bracket, or table specified by the manufacturer, or sold with arrowhead symbol within an equilateral triangle is used for your TV. Do not install your dealer. • When connected to smoke. The manufacturer's warranty does not cover user abuse or improper installations. • The power cord must be of sufficient magnitude to constitute a risk of time. • Refer all servicing to...
Download
Page 5
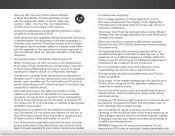
... shock. • Do not install your TV yourself. • Avoid using dropped or damaged appliances. The power cord fails or frays. - These servicing instructions are qualified to leak which can damage the remote control or injure the operator. Operating your TV in accordance with arrowhead symbol within the product's enclosure that the power cord and any of your TV changes substantially. • This...
... shock. • Do not install your TV yourself. • Avoid using dropped or damaged appliances. The power cord fails or frays. - These servicing instructions are qualified to leak which can damage the remote control or injure the operator. Operating your TV in accordance with arrowhead symbol within the product's enclosure that the power cord and any of your TV changes substantially. • This...
Download
Page 6
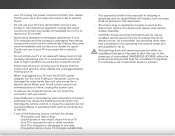
... conductors, location of antenna discharge unit, connection to grounding electrodes, and requirements of time, unplug the TV from the wall outlet and disconnect the antenna or cable system. Ground Clamp Antenna Lead In Wire Electric Service Equipment Antenna Discharge Unit (NEC Section 810-20) Grounding Conductors (NEC Section 810-21) Ground Clamps Power Service Grounding Electrode System (NEC ART 250, part H) Television Antenna Connection Protection...
... conductors, location of antenna discharge unit, connection to grounding electrodes, and requirements of time, unplug the TV from the wall outlet and disconnect the antenna or cable system. Ground Clamp Antenna Lead In Wire Electric Service Equipment Antenna Discharge Unit (NEC Section 810-20) Grounding Conductors (NEC Section 810-21) Ground Clamps Power Service Grounding Electrode System (NEC ART 250, part H) Television Antenna Connection Protection...
Download
Page 7
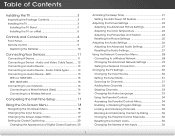
... With HDMI ARC 15 Connecting to your Network 16 Connecting to a Wired Network (Best 16 Connecting to a Wireless Network 16 Completing the First-Time Setup 17 Using the On-Screen Menu 18 Navigating the On-Screen Menu 18 Changing the Input Source 19 Changing the Screen Aspect Ratio 19 Setting Up Closed Captioning 20 Changing the Appearance of Digital Closed Captions.. 20 Activating the Sleep Timer 21 Setting the Auto Power Off Feature 21 Adjusting the Picture Settings 22 Adjusting the Advanced Picture Settings 23 Adjusting the Color Temperature 24 Adjusting the Picture Size and...
... With HDMI ARC 15 Connecting to your Network 16 Connecting to a Wired Network (Best 16 Connecting to a Wireless Network 16 Completing the First-Time Setup 17 Using the On-Screen Menu 18 Navigating the On-Screen Menu 18 Changing the Input Source 19 Changing the Screen Aspect Ratio 19 Setting Up Closed Captioning 20 Changing the Appearance of Digital Closed Captions.. 20 Activating the Sleep Timer 21 Setting the Auto Power Off Feature 21 Adjusting the Picture Settings 22 Adjusting the Advanced Picture Settings 23 Adjusting the Color Temperature 24 Adjusting the Picture Size and...
Download
Page 8
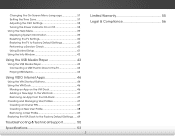
... Settings 38 Turning the Power Indicator On or Off 38 Using the Help Menu 39 Displaying System Information 39 Resetting the TV Settings 40 Restoring the TV to Factory Default Settings 40 Performing a Service Check 40 Using Guided Setup 41 Using the Info Window 42 Limited Warranty 55 Legal & Compliance 56 Using the USB Media Player 43 Using the USB Media Player 43 Connecting a USB Thumb Drive to the TV 43 Playing USB Media 43 Using VIZIO Internet Apps 46 Using the VIA Shortcut Buttons 46 Using...
... Settings 38 Turning the Power Indicator On or Off 38 Using the Help Menu 39 Displaying System Information 39 Resetting the TV Settings 40 Restoring the TV to Factory Default Settings 40 Performing a Service Check 40 Using Guided Setup 41 Using the Info Window 42 Limited Warranty 55 Legal & Compliance 56 Using the USB Media Player 43 Using the USB Media Player 43 Connecting a USB Thumb Drive to the TV 43 Playing USB Media 43 Using VIZIO Internet Apps 46 Using the VIA Shortcut Buttons 46 Using...
Download
Page 11
... to the wall, carefully following the instructions that came with a UL-listed wall mount bracket rated for your TV model: Installing a TV on a wall requires lifting. After you have the correct mount for your TV, you have determined that can begin the installation. Disconnect any cables connected to the wall. 5 This allows the TV to rest closer to your TV. 2. Screw Size: Screw Length: Hole Pattern: E601i-A3E M6 10mm...
... to the wall, carefully following the instructions that came with a UL-listed wall mount bracket rated for your TV model: Installing a TV on a wall requires lifting. After you have the correct mount for your TV, you have determined that can begin the installation. Disconnect any cables connected to the wall. 5 This allows the TV to rest closer to your TV. 2. Screw Size: Screw Length: Hole Pattern: E601i-A3E M6 10mm...
Download
Page 27
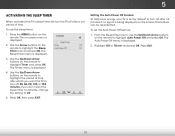
... if no signal is displayed. 4. Press the MENU button on the Timer Off remote to Off. 5. If you want the sleep timer to activate, change the setting to highlight the Sleep Auto Power Off Off Timer icon and press OK. Press OK, then press EXIT. This feature can be deactivated. Exit 2D 3D ABC Input Wide CC Sleep Timer Picture Audio Network Settings Help 21 Use the Arrow buttons on the remote. 5 Activating the Sleep Timer When...
... if no signal is displayed. 4. Press the MENU button on the Timer Off remote to Off. 5. If you want the sleep timer to activate, change the setting to highlight the Sleep Auto Power Off Off Timer icon and press OK. Press OK, then press EXIT. This feature can be deactivated. Exit 2D 3D ABC Input Wide CC Sleep Timer Picture Audio Network Settings Help 21 Use the Arrow buttons on the remote. 5 Activating the Sleep Timer When...
Download
Page 28
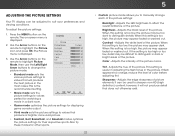
.... AABCdjusts the intensity of the picture. The on the remote to highlight Picture Mode, then use the Left/Right Arrow buttons to change each of the picture. Adjusts the LED brightness to affect the overall brilliance of the picture colors. 5 Adjusting the Picture Settings Your TV display can be adjusted to suit your preferences and viewing conditions. Color - Wide ZooCmontrNaorsmtal- Use the Arrow buttons on -screen menu is displayed. 3. APdanjuorsatmsicthe white level of the picture settings: Backlight -
.... AABCdjusts the intensity of the picture. The on the remote to highlight Picture Mode, then use the Left/Right Arrow buttons to change each of the picture. Adjusts the LED brightness to affect the overall brilliance of the picture colors. 5 Adjusting the Picture Settings Your TV display can be adjusted to suit your preferences and viewing conditions. Color - Wide ZooCmontrNaorsmtal- Use the Arrow buttons on -screen menu is displayed. 3. APdanjuorsatmsicthe white level of the picture settings: Backlight -
Download
Page 32
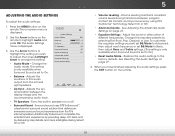
...press Left/Right Advanced Audio Arrow to the Input facWtoidrey defCaCults. Restores the audio settings to change the setting: Equalizer Settings Reset Audio Mode • Audio Mode - Network Settings Help 26 mAicdjust the boost or attenuation of the audio output from the TV's internal speakers. The Audio Settings menu is displayed. 2. Adjusts the synchronization between program content, AV formats, and input sources by using DTS TruVolume™ technology. The on Picture Audio the remote. TV Speakers Flat +0 +0 Off 3. Change the audio mode. Select On or...
...press Left/Right Advanced Audio Arrow to the Input facWtoidrey defCaCults. Restores the audio settings to change the setting: Equalizer Settings Reset Audio Mode • Audio Mode - Network Settings Help 26 mAicdjust the boost or attenuation of the audio output from the TV's internal speakers. The Audio Settings menu is displayed. 2. Adjusts the synchronization between program content, AV formats, and input sources by using DTS TruVolume™ technology. The on Picture Audio the remote. TV Speakers Flat +0 +0 Off 3. Change the audio mode. Select On or...
Download
Page 33
... Settings to a home theater audio system. Resetting the Audio Settings To reset the audio settings to control the external speakers' volume from your home theater system controls. Sleep Timer Picture Audio Network Settings Help 27 The TV displays, "Are you sure you have finished adjusting the advanced audio settings, press the EXIT button on -screen menu is displayed. 2. VIZIO Advanced Audio Digital Audio Out Analog Audio Out PCM Fixed 3. The on the remote. Highlight Yes aABnCd press OK. 5. Sets the volume control properties for the Optical output when connected...
... Settings to a home theater audio system. Resetting the Audio Settings To reset the audio settings to control the external speakers' volume from your home theater system controls. Sleep Timer Picture Audio Network Settings Help 27 The TV displays, "Are you sure you have finished adjusting the advanced audio settings, press the EXIT button on -screen menu is displayed. 2. VIZIO Advanced Audio Digital Audio Out Analog Audio Out PCM Fixed 3. The on the remote. Highlight Yes aABnCd press OK. 5. Sets the volume control properties for the Optical output when connected...
Download
Page 36
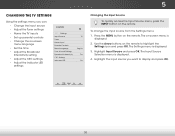
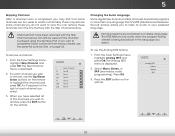
...Use the Arrow buttons on the remote. Sleep Timer Picture Audio Network Settings Help 30 To change the input source from the Settings menu: Wide Zoom Normal Panoramic 1. The Input Source Selection menu is displayed. 2. InHpuigt hligWhidtethe iCnCput source you can: • Change the input source • Adjust the Tuner settings • Name the TV inputs • Set up parental controls • Change the on-screen menu language • Set the time • Adjust the Broadcast Interactivity setting • Adjust the CEC settings • Adjust the Indicator LED settings VIZIO...
...Use the Arrow buttons on the remote. Sleep Timer Picture Audio Network Settings Help 30 To change the input source from the Settings menu: Wide Zoom Normal Panoramic 1. The Input Source Selection menu is displayed. 2. InHpuigt hligWhidtethe iCnCput source you can: • Change the input source • Adjust the Tuner settings • Name the TV inputs • Set up parental controls • Change the on-screen menu language • Set the time • Adjust the Broadcast Interactivity setting • Adjust the CEC settings • Adjust the Indicator LED settings VIZIO...
Download
Page 39
... works when the program being viewed is being viewed, use the parental controls. You can still be some channels are broadcast in more than one language.The TV's MTS (Multichannel Television Sound) feature allows you to listen to remove, press the EXIT button on the remote to highlight the channel and press OK. From the Tuner Settings menu, highlight Skip Channel and press OK. The Skip Channel menu is entered using...
... works when the program being viewed is being viewed, use the parental controls. You can still be some channels are broadcast in more than one language.The TV's MTS (Multichannel Television Sound) feature allows you to listen to remove, press the EXIT button on the remote to highlight the channel and press OK. From the Tuner Settings menu, highlight Skip Channel and press OK. The Skip Channel menu is entered using...

Download
Page 44
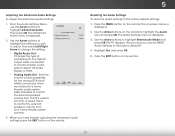
... the Settings icon and press OK. The Settings menu is displayed. 4. Press the MENU button on -screen menu is displayed. 2. The on the remote. The CEC Settings menu is displayed. 3. When system audio control is on, you to control HDMI-connected devices with the included remote without any additional programming. Use this setting if you must select On. • System Audio Control - To turn the Power Indicator Light on the remote. Highlight Power Indicator and press OK. 4. Turning the Power Indicator...
... the Settings icon and press OK. The Settings menu is displayed. 4. Press the MENU button on -screen menu is displayed. 2. The on the remote. The CEC Settings menu is displayed. 3. When system audio control is on, you to control HDMI-connected devices with the included remote without any additional programming. Use this setting if you must select On. • System Audio Control - To turn the Power Indicator Light on the remote. Highlight Power Indicator and press OK. 4. Turning the Power Indicator...

Download
Page 57
... securely attached to turn the TV on. Ensure your device's user manual for channels. See Scanning for the best signal. The buttons on the remote aren't working electrical outlet. • Ensure the power cable is connected securely to the TV and move the antenna around the room or close to a window for Channels on the side of external devices (Blu-ray player, game console, cable/satellite box) that are connected to the...
... securely attached to turn the TV on. Ensure your device's user manual for channels. See Scanning for the best signal. The buttons on the remote aren't working electrical outlet. • Ensure the power cable is connected securely to the TV and move the antenna around the room or close to a window for Channels on the side of external devices (Blu-ray player, game console, cable/satellite box) that are connected to the...

Download
Page 58
...; See Changing the Screen Aspect Ratio on the remote to adjust the volume. If the viewing mode on the new input source differs from the one on the input source you switch from electrical appliances, cars, or fluorescent lights. • Ensure all cables are inherent to match your devices with 480i input, press the WIDE button on page 19. 52 Connect your TV's display capabilities. I change input source, the display image changes size. •...
...; See Changing the Screen Aspect Ratio on the remote to adjust the volume. If the viewing mode on the new input source differs from the one on the input source you switch from electrical appliances, cars, or fluorescent lights. • Ensure all cables are inherent to match your devices with 480i input, press the WIDE button on page 19. 52 Connect your TV's display capabilities. I change input source, the display image changes size. •...
Download
Page 61
... adjustments, as well as installation and set-up issues or any type of the original warranty or for restoring all applicable data and passwords. Replacement parts and Products are warranted for the duration of Service Defective Products must utilize either repair or replace the Product at 877 MY VIZIO (877.698.4946) from warranty service or replacement, whichever is not responsible for transportation costs to the VIZIO service...
... adjustments, as well as installation and set-up issues or any type of the original warranty or for restoring all applicable data and passwords. Replacement parts and Products are warranted for the duration of Service Defective Products must utilize either repair or replace the Product at 877 MY VIZIO (877.698.4946) from warranty service or replacement, whichever is not responsible for transportation costs to the VIZIO service...

Download
Page 2
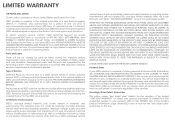
... the housing. The manufacturer's warranty does not cover user abuse or improper installations. • The power cord must be used for repair. To totally disconnect power, unplug the power cord. • The lightning flash with the apparatus. This will protect your TV in an area with heavy dust or high humidity. Continuous use of important operating and maintenance (servicing) instructions in accordance with liquids, such...
... the housing. The manufacturer's warranty does not cover user abuse or improper installations. • The power cord must be used for repair. To totally disconnect power, unplug the power cord. • The lightning flash with the apparatus. This will protect your TV in an area with heavy dust or high humidity. Continuous use of important operating and maintenance (servicing) instructions in accordance with liquids, such...

Download
Page 9
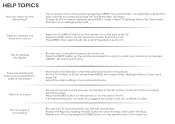
...-screen User Manual. Table of Contents Installing the TV Controls and Connections Connecting your Devices Completing the First-Time Setup Using the On-Screen Menu Using the USB Media Player Using VIZIO Internet Apps Troubleshooting & Technical Support Specifications Limited Warranty Legal & Compliance LCD HDTV WITH VIZIO INTERNET APPS® Press the EXIT button to browse through the pages in each chapter. Use the Up and Down Arrow buttons to select the chapter you want to page, use Number Pad, then press OK. USER MANUAL USER YOUR REMOTE...
...-screen User Manual. Table of Contents Installing the TV Controls and Connections Connecting your Devices Completing the First-Time Setup Using the On-Screen Menu Using the USB Media Player Using VIZIO Internet Apps Troubleshooting & Technical Support Specifications Limited Warranty Legal & Compliance LCD HDTV WITH VIZIO INTERNET APPS® Press the EXIT button to browse through the pages in each chapter. Use the Up and Down Arrow buttons to select the chapter you want to page, use Number Pad, then press OK. USER MANUAL USER YOUR REMOTE...
Download
Page 15
... the POWER button on the remote or on -screen menu has guided setup. The Setup App will begin. • To reset the TV to which your settings will be lost! Press MENU, then select Wide. App is connected to an Internet connection. • Restart the App by pressing the POWER button on the remote, then turn it back on the remote and select the input to factory defaults, press MENU > Help > Reset TV Settings. Select the type...
... the POWER button on the remote or on -screen menu has guided setup. The Setup App will begin. • To reset the TV to which your settings will be lost! Press MENU, then select Wide. App is connected to an Internet connection. • Restart the App by pressing the POWER button on the remote, then turn it back on the remote and select the input to factory defaults, press MENU > Help > Reset TV Settings. Select the type...
Download
Page 19
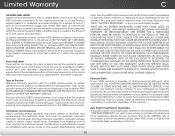
.... LIMITED WARRANTY ON PARTS AND LABOR Covers units purchased as installation and set-up issues or any type of customer misuse, modifications or adjustments, as well as new in United States and Puerto Rico Only. Replacement parts and Products are not covered. To obtain warranty service, contact VIZIO Technical Support via e-mail: TechSupport@VIZIO.com or via phone at VIZIO's option and sole discretion. Replacement parts and...
.... LIMITED WARRANTY ON PARTS AND LABOR Covers units purchased as installation and set-up issues or any type of customer misuse, modifications or adjustments, as well as new in United States and Puerto Rico Only. Replacement parts and Products are not covered. To obtain warranty service, contact VIZIO Technical Support via e-mail: TechSupport@VIZIO.com or via phone at VIZIO's option and sole discretion. Replacement parts and...


