

User Manual English
Page 2
... into your outlet, consult an electrician for future reference. • To reduce the risk of electric shock or component damage, switch off the power before turning on your HDTV to the presence of power source indicated on the apparatus. • The mains plug or appliance coupler is used for long period...
... into your outlet, consult an electrician for future reference. • To reduce the risk of electric shock or component damage, switch off the power before turning on your HDTV to the presence of power source indicated on the apparatus. • The mains plug or appliance coupler is used for long period...

User Manual English
Page 3
... doctor. For additional information from the FCC about exposure to learn about using headphones, or earpieces. • Do not turn down the volume. RF ENERGY INTERFERENCE/COMPATIBILITY RF transmitting electronic equipment such as your implantable medical device. For additional information, ... this glass. RADIO FREQUENCY (RF) EXPOSURE Your Tablet Remote contains radio transmitters and receivers. For more information, visit www.vizio.com/environment. XR6 TABLET REMOTE Read all the safety information below before using your Tablet Remote could break this product contains...
... doctor. For additional information from the FCC about exposure to learn about using headphones, or earpieces. • Do not turn down the volume. RF ENERGY INTERFERENCE/COMPATIBILITY RF transmitting electronic equipment such as your implantable medical device. For additional information, ... this glass. RADIO FREQUENCY (RF) EXPOSURE Your Tablet Remote contains radio transmitters and receivers. For more information, visit www.vizio.com/environment. XR6 TABLET REMOTE Read all the safety information below before using your Tablet Remote could break this product contains...
User Manual English
Page 4
...™ App 8 First-Time Setup 9 Pairing your mobile device with E-Series TV 10 VIZIO SmartCast™ App 13 Register for a MyVIZIO account 13 Navigating the SmartCast™ App 14 User Profile Settings 16 Picking something to Watch 18 Picking ... Settings 56 Viewing System Information 57 Changing the On-Screen Menu Language 57 Setting the Time and Local Settings 58 Adjusting the CEC Settings 58 Turning the Power Indicator On or Off 59 Adjusting the Reset & Admin Settings 60 Manage mobile devices 62 Paired Mobile Devices 63 Troubleshooting 64 Specifications 65...
...™ App 8 First-Time Setup 9 Pairing your mobile device with E-Series TV 10 VIZIO SmartCast™ App 13 Register for a MyVIZIO account 13 Navigating the SmartCast™ App 14 User Profile Settings 16 Picking something to Watch 18 Picking ... Settings 56 Viewing System Information 57 Changing the On-Screen Menu Language 57 Setting the Time and Local Settings 58 Adjusting the CEC Settings 58 Turning the Power Indicator On or Off 59 Adjusting the Reset & Admin Settings 60 Manage mobile devices 62 Paired Mobile Devices 63 Troubleshooting 64 Specifications 65...

User Manual English
Page 5
Getting Started 1 E-SERIES TV Overview - To keep the power indicator LED on as long as the TV is on, see Turning the Power Indicator On or Off on , then goes out after severral seconds. Front Remote Sensor & Power Indicator When using the Basic Remote, aim it directly at this sensor. The power indicator lights up when the TV turns on page 59. 5
Getting Started 1 E-SERIES TV Overview - To keep the power indicator LED on as long as the TV is on, see Turning the Power Indicator On or Off on , then goes out after severral seconds. Front Remote Sensor & Power Indicator When using the Basic Remote, aim it directly at this sensor. The power indicator lights up when the TV turns on page 59. 5
User Manual English
Page 7
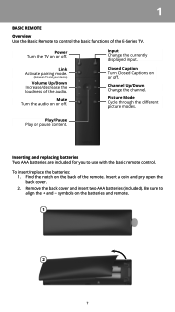
Power Turn the TV on or off . Channel Up/Down Change the channel. Picture Mode Cycle through the different picture modes. Play/Pause Play or pause content. 1 ... basic functions of the E-Series TV. Remove the back cover and insert two AAA batteries (included). To insert/replace the batteries: 1. Mute Turn the audio on the batteries and remote. 1 2 7 Closed Caption Turn Closed Captions on the back of the audio. Be sure to align the + and − symbols on or off .
Power Turn the TV on or off . Channel Up/Down Change the channel. Picture Mode Cycle through the different picture modes. Play/Pause Play or pause content. 1 ... basic functions of the E-Series TV. Remove the back cover and insert two AAA batteries (included). To insert/replace the batteries: 1. Mute Turn the audio on the batteries and remote. 1 2 7 Closed Caption Turn Closed Captions on the back of the audio. Be sure to align the + and − symbols on or off .

User Manual English
Page 10
Launch the VIZIO SmartCast app on support.vizio.com. 1. Note: The images shown here are for detailed instructions on the model. 10 You can also find a digital copy on your ... may be subject to begin the First-Time Setup. Tap Get Started to change. Refer to pair it with the E-Series TV. Turn on the E-Series TV by pressing the Power button on the back of the TV or by pressing the Power button on the bottom... E-SERIES TV Need help installing the TV? Select your device close to continue. 3. Hold your language and tap Next to the VIZIO logo on the Basic Remote Control.
Launch the VIZIO SmartCast app on support.vizio.com. 1. Note: The images shown here are for detailed instructions on the model. 10 You can also find a digital copy on your ... may be subject to begin the First-Time Setup. Tap Get Started to change. Refer to pair it with the E-Series TV. Turn on the E-Series TV by pressing the Power button on the back of the TV or by pressing the Power button on the bottom... E-SERIES TV Need help installing the TV? Select your device close to continue. 3. Hold your language and tap Next to the VIZIO logo on the Basic Remote Control.
User Manual English
Page 23
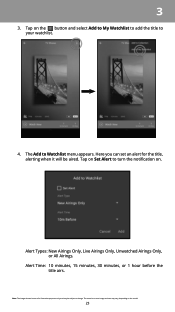
..., 15 minutes, 30 minutes, or 1 hour before the title airs. Tap on the button and select Add to My Watchlist to add the title to turn the notification on -screen image and text may be aired. Alert Types: New Airings Only, Live Airings Only, Unwatched Airings Only, or All Airings. 3 3. The...
..., 15 minutes, 30 minutes, or 1 hour before the title airs. Tap on the button and select Add to My Watchlist to add the title to turn the notification on -screen image and text may be aired. Alert Types: New Airings Only, Live Airings Only, Unwatched Airings Only, or All Airings. 3 3. The...
User Manual English
Page 42
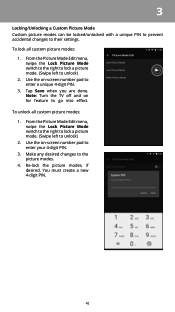
.... 42 3 Locking/Unlocking a Custom Picture Mode Custom picture modes can be locked/unlocked with a unique PIN to prevent accidental changes to the picture modes. 4. Note: Turn the TV off and on for feature to enter your 4-digit PIN. 3.
.... 42 3 Locking/Unlocking a Custom Picture Mode Custom picture modes can be locked/unlocked with a unique PIN to prevent accidental changes to the picture modes. 4. Note: Turn the TV off and on for feature to enter your 4-digit PIN. 3.
User Manual English
Page 44
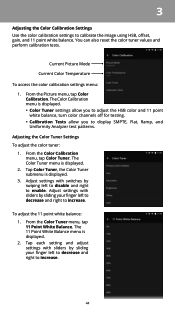
... increase. The 11 Point White Balance menu is displayed. • Color Tuner settings allow you to adjust the HSB color and 11 point white balance, turn color channels off for testing. • Calibration Tests allow you to calibrate the image using HSB, offset, gain, and 11 point white balance.
... increase. The 11 Point White Balance menu is displayed. • Color Tuner settings allow you to adjust the HSB color and 11 point white balance, turn color channels off for testing. • Calibration Tests allow you to calibrate the image using HSB, offset, gain, and 11 point white balance.

User Manual English
Page 47
...few cases, volume leveling may artificially suppress volume increases, making it difficult to enable. Changes the type of the audio output from the TV. * Turning Surround Sound off . • Balance - Mute all audio from the left to disable and right to hear dialog or flattening sudden noises. Volume...uses DTS TruVolume™ to the Audio Out output ports. • Surround Sound - Select PCM or Bitstream. • Analog Audio Out - Turns the built-in speakers on or off. Adjusts the loudness of processing for the RCA connector when connected to a home theater audio system. Sets...
...few cases, volume leveling may artificially suppress volume increases, making it difficult to enable. Changes the type of the audio output from the TV. * Turning Surround Sound off . • Balance - Mute all audio from the left to disable and right to hear dialog or flattening sudden noises. Volume...uses DTS TruVolume™ to the Audio Out output ports. • Surround Sound - Select PCM or Bitstream. • Analog Audio Out - Turns the built-in speakers on or off. Adjusts the loudness of processing for the RCA connector when connected to a home theater audio system. Sets...

User Manual English
Page 49
... after a set by default to sleep: 30, 60, 90, 120, or 180 minutes. 3 Activating the Sleep Timer When activated, the TV's sleep timer will turn the TV off after 10 minutes without a video or audio signal. Setting the Auto Power Off Feature To help save energy, your TV is no ... Timer. 2. To enable/disable the Auto Power Off feature: 1. From the Timers menu, tap Auto Power Off. 2. If you do not want the TV to turn off when there is set period of time after which you want the sleep timer to Off.
... after a set by default to sleep: 30, 60, 90, 120, or 180 minutes. 3 Activating the Sleep Timer When activated, the TV's sleep timer will turn the TV off after 10 minutes without a video or audio signal. Setting the Auto Power Off Feature To help save energy, your TV is no ... Timer. 2. To enable/disable the Auto Power Off feature: 1. From the Timers menu, tap Auto Power Off. 2. If you do not want the TV to turn off when there is set period of time after which you want the sleep timer to Off.

User Manual English
Page 58
... manual for details. Adjusting the CEC Settings The CEC function on CEC, select Enable to use the Tablet Remote to control CEC devices connected to turn daylight savings time on, off . 58 To ensure the correct time is displayed, set the TV's time zone: 1. See your TV enables you to ...time format to the HDMI ARC input. Select Disable to HDMI. Set the date and time. • Time Zone - Select ARC Only for these devices). turn CEC off , or auto. • Time Format - The ARC setting does not support video devices connected to the audio device (Select Enable to have the...
... manual for details. Adjusting the CEC Settings The CEC function on CEC, select Enable to use the Tablet Remote to control CEC devices connected to turn daylight savings time on, off . 58 To ensure the correct time is displayed, set the TV's time zone: 1. See your TV enables you to ...time format to the HDMI ARC input. Select Disable to HDMI. Set the date and time. • Time Zone - Select ARC Only for these devices). turn CEC off , or auto. • Time Format - The ARC setting does not support video devices connected to the audio device (Select Enable to have the...

User Manual English
Page 59
3 Turning the Power Indicator On or Off The power indicator on the front of your TV normally does not glow when the TV is on . Swipe the switch left to be on. You can change this setting if you prefer the indicator to turn the power indicator off : • From the System menu, swipe the Power Indicator switch to the right to turn the power indicator light on or off . 59 To turn the power indicator on .
3 Turning the Power Indicator On or Off The power indicator on the front of your TV normally does not glow when the TV is on . Swipe the switch left to be on. You can change this setting if you prefer the indicator to turn the power indicator off : • From the System menu, swipe the Power Indicator switch to the right to turn the power indicator light on or off . 59 To turn the power indicator on .

User Manual English
Page 61
3 To turn Smart Interactivity on or off: • From the Reset & Admin menu, tap Smart Interactivity. To enable/disable the Store Demo: • From the Reset & Admin menu, tap Store Demo. Tap Off or On. Tap Disable or Enable. 61
3 To turn Smart Interactivity on or off: • From the Reset & Admin menu, tap Smart Interactivity. To enable/disable the Store Demo: • From the Reset & Admin menu, tap Store Demo. Tap Off or On. Tap Disable or Enable. 61

User Manual English
Page 75
... in a particular installation. Operation is subject to the following two conditions: (1) this device may not cause harmful interference, and (2) this device must be determined by turning the equipment off and on, the user is encouraged to try to correct the interference by the party responsible for License-Exempt Radio Apparatus This...
... in a particular installation. Operation is subject to the following two conditions: (1) this device may not cause harmful interference, and (2) this device must be determined by turning the equipment off and on, the user is encouraged to try to correct the interference by the party responsible for License-Exempt Radio Apparatus This...
Quickstart Guide English
Page 2
.... Keep these instructions in a safe place for future reference. • To reduce the risk of electric shock or component damage, switch off the power before turning on the top of your TV and any heat sources such as a radiator, heater, oven, amplifier etc. To ensure reliable operation of your TV. •...
.... Keep these instructions in a safe place for future reference. • To reduce the risk of electric shock or component damage, switch off the power before turning on the top of your TV and any heat sources such as a radiator, heater, oven, amplifier etc. To ensure reliable operation of your TV. •...
Quickstart Guide English
Page 6
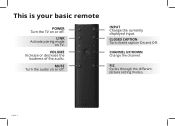
PIC Cycles through the different picture setting modes. CHANNEL UP/DOWN Change the channel. INPUT Change the currently displayed input. CLOSED CAPTION Turn closed caption On and Off. VOLUME Increase or decrease the loudness of the audio. English - 6 MUTE Turn the audio on or off . LINK Activate pairing mode on TV. This is your basic remote POWER Turn the TV on or off .
PIC Cycles through the different picture setting modes. CHANNEL UP/DOWN Change the channel. INPUT Change the currently displayed input. CLOSED CAPTION Turn closed caption On and Off. VOLUME Increase or decrease the loudness of the audio. English - 6 MUTE Turn the audio on or off . LINK Activate pairing mode on TV. This is your basic remote POWER Turn the TV on or off .

Quickstart Guide English
Page 19
Make sure the other device is a cast-enabled device and turned on. 2 English - 19 Tap the device you are. To select a different cast device: 1. On the Home category page, tap This Device. The device selection screen TVs. 2. Selecting a Cast device 1 Your Tablet Remote can be paired with multiple cast-enabled devices, allowing you to seamlessly access your content where ever you want to begin casting to.
Make sure the other device is a cast-enabled device and turned on. 2 English - 19 Tap the device you are. To select a different cast device: 1. On the Home category page, tap This Device. The device selection screen TVs. 2. Selecting a Cast device 1 Your Tablet Remote can be paired with multiple cast-enabled devices, allowing you to seamlessly access your content where ever you want to begin casting to.

Quickstart Guide English
Page 20
Aspect Ratio Cycle through the different aspect ratio modes. Volume Increase or decrease the loudness of TV. You can turn on or off. To access the basic functions, make sure your TV right from the VIZIO SmartCast app. If it is selected. Picture Mode Adjust the picture mode. Power Turn TV on /off English - 20 Input Change the currently Displayed input. Mute Turn the TV audio on or off , change the input, mute, and adjust the volume of your SmartCast HDTV is not, see Selecting a Cast device. Settings Change settings of the TV audio. Basic TV functions.
Aspect Ratio Cycle through the different aspect ratio modes. Volume Increase or decrease the loudness of TV. You can turn on or off. To access the basic functions, make sure your TV right from the VIZIO SmartCast app. If it is selected. Picture Mode Adjust the picture mode. Power Turn TV on /off English - 20 Input Change the currently Displayed input. Mute Turn the TV audio on or off , change the input, mute, and adjust the volume of your SmartCast HDTV is not, see Selecting a Cast device. Settings Change settings of the TV audio. Basic TV functions.

Quickstart Guide English
Page 27
Turn the TV and your TV to the TV and the device. 4. Connect the appropriate cable (not included) to an audio device: 1. Verify that matches an ... CABLE • ANALOG STEREO CONNECTION • 2.0 CHANNEL DIGITAL OPTICAL CABLE • 2.0 - 5.1 DIGITAL AUDIO • PCM, DTS, DOLBY DIGITAL Sound bar system Audio Receiver English - 27 Turn the TV and your device has a port that your device on the TV (HDMI, 3.5mm, etc.) 2. To connect your audio device off. 3.
Turn the TV and your TV to the TV and the device. 4. Connect the appropriate cable (not included) to an audio device: 1. Verify that matches an ... CABLE • ANALOG STEREO CONNECTION • 2.0 CHANNEL DIGITAL OPTICAL CABLE • 2.0 - 5.1 DIGITAL AUDIO • PCM, DTS, DOLBY DIGITAL Sound bar system Audio Receiver English - 27 Turn the TV and your device has a port that your device on the TV (HDMI, 3.5mm, etc.) 2. To connect your audio device off. 3.


