
User Manual English
Page 2
... readily operable. • CAUTION - When your HDTV. Safety Information IMPORTANT SAFETY INSTRUCTIONS - The wide blade or the third prong are for use this case may cause fire or electric shock. • Follow instructions for the installation, use attachments/accessories specified by the manufacturer. • Use only with the cart, stand, tripod, bracket, or table specified by a UL Listed Wall Mount Bracket or the equivalent. Servicing is...
... readily operable. • CAUTION - When your HDTV. Safety Information IMPORTANT SAFETY INSTRUCTIONS - The wide blade or the third prong are for use this case may cause fire or electric shock. • Follow instructions for the installation, use attachments/accessories specified by the manufacturer. • Use only with the cart, stand, tripod, bracket, or table specified by a UL Listed Wall Mount Bracket or the equivalent. Servicing is...

User Manual English
Page 3
... keys or typing, may have your Tablet Remote is taking place. Immediately turn off your Tablet Remote at www.who.int/emf. Persons with the Specific Absorption Rates (SAR) limits set forth in some places. Read and follow these instructions and precautions: place your VIZIO XR6 Tablet Remote. IMPORTANT SAFETY INSTRUCTIONS - POTENTIALLY EXPLOSIVE ATMOSPHERE When you have any other parts of...
... keys or typing, may have your Tablet Remote is taking place. Immediately turn off your Tablet Remote at www.who.int/emf. Persons with the Specific Absorption Rates (SAR) limits set forth in some places. Read and follow these instructions and precautions: place your VIZIO XR6 Tablet Remote. IMPORTANT SAFETY INSTRUCTIONS - POTENTIALLY EXPLOSIVE ATMOSPHERE When you have any other parts of...
User Manual English
Page 4
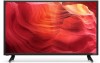
... 34 Adjusting Picture Settings 37 Adjusting the Picture Mode Edit Settings 41 Adjusting the Color Calibration Settings 44 Adjusting Audio Settings 46 Adjusting Timer Settings 48 Activating the Sleep Timer 49 Setting the Auto Power Off Feature 49 Adjusting Network Settings 50 Using the Network Connection menu 51 Renaming Devices on the Input Menu 54 Renaming Devices on the Input Menu 55 Enabling HDMI Color Subsampling 55 Changing the TV System Settings 56 Viewing System Information 57 Changing the On-Screen Menu Language 57 Setting the Time and Local Settings 58 Adjusting the...
... 34 Adjusting Picture Settings 37 Adjusting the Picture Mode Edit Settings 41 Adjusting the Color Calibration Settings 44 Adjusting Audio Settings 46 Adjusting Timer Settings 48 Activating the Sleep Timer 49 Setting the Auto Power Off Feature 49 Adjusting Network Settings 50 Using the Network Connection menu 51 Renaming Devices on the Input Menu 54 Renaming Devices on the Input Menu 55 Enabling HDMI Color Subsampling 55 Changing the TV System Settings 56 Viewing System Information 57 Changing the On-Screen Menu Language 57 Setting the Time and Local Settings 58 Adjusting the...
User Manual English
Page 7
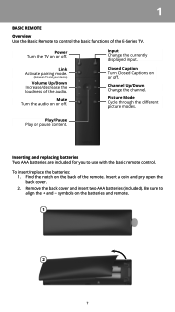
Channel Up/Down Change the channel. Be sure to control the basic functions of the E-Series TV. Play/Pause Play or pause content. Input Change the currently displayed input. Mute Turn the audio on or off . Insert a coin and pry open the back cover. 2. Link Activate pairing mode. (Between TV and your device) Volume Up/Down Increase/decrease the loudness of the remote. Find the notch on...
Channel Up/Down Change the channel. Be sure to control the basic functions of the E-Series TV. Play/Pause Play or pause content. Input Change the currently displayed input. Mute Turn the audio on or off . Insert a coin and pry open the back cover. 2. Link Activate pairing mode. (Between TV and your device) Volume Up/Down Increase/decrease the loudness of the remote. Find the notch on...
User Manual English
Page 14
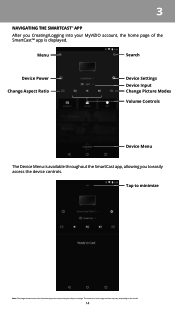
The actual on the model. 14 Menu Search Device Power Change Aspect Ratio Device Settings Device Input Change Picture Modes Volume Controls Device Menu The Device Menu is available throughout the SmartCast app, allowing you Creating/Logging into your MyVIZIO account, the home page of the SmartCast™ app is displayed. Tap to easily access the device controls. 3 NAVIGATING THE SMARTCAST™ APP After you to minimize Note: The images shown here are for illustrative purposes only and may vary, depending on -screen image and text may be subject to change.
The actual on the model. 14 Menu Search Device Power Change Aspect Ratio Device Settings Device Input Change Picture Modes Volume Controls Device Menu The Device Menu is available throughout the SmartCast app, allowing you Creating/Logging into your MyVIZIO account, the home page of the SmartCast™ app is displayed. Tap to easily access the device controls. 3 NAVIGATING THE SMARTCAST™ APP After you to minimize Note: The images shown here are for illustrative purposes only and may vary, depending on -screen image and text may be subject to change.
User Manual English
Page 19
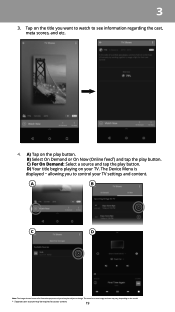
... On Now (Online feed*) and tap the play button. The Device Menu is displayed − allowing you want to watch to change. C) For On Demand: Select a source and tap the play button. The actual on-screen image and text may vary, depending on your TV settings and content. D) Your title begins playing on the model. * Separate user account may be required to control your TV...
... On Now (Online feed*) and tap the play button. The Device Menu is displayed − allowing you want to watch to change. C) For On Demand: Select a source and tap the play button. The actual on-screen image and text may vary, depending on your TV settings and content. D) Your title begins playing on the model. * Separate user account may be required to control your TV...
User Manual English
Page 21
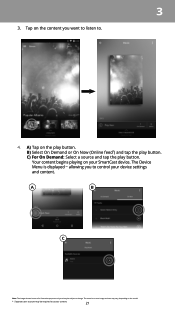
... On Demand: Select a source and tap the play button. Tap on the model. * Separate user account may be required to . 4. A) Tap on your device settings and content. Your content begins playing on the play button. A B C Note: The images shown here are for illustrative purposes only and may be subject to control your SmartCast device. The Device Menu is displayed − allowing you...
... On Demand: Select a source and tap the play button. Tap on the model. * Separate user account may be required to . 4. A) Tap on your device settings and content. Your content begins playing on the play button. A B C Note: The images shown here are for illustrative purposes only and may be subject to control your SmartCast device. The Device Menu is displayed − allowing you...
User Manual English
Page 29
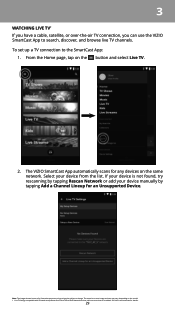
..., depending on -screen image and text may be added. To set -top boxes from the list. The actual on the model. * Live TV listings compatible with more services to be subject to change. The VIZIO SmartCast App automatically scans for an Unsupported Device. 3 WATCHING LIVE TV* If you have a cable, satellite, or over-the-air TV connection, you can use the VIZIO SmartCast App to...
..., depending on -screen image and text may be added. To set -top boxes from the list. The actual on the model. * Live TV listings compatible with more services to be subject to change. The VIZIO SmartCast App automatically scans for an Unsupported Device. 3 WATCHING LIVE TV* If you have a cable, satellite, or over-the-air TV connection, you can use the VIZIO SmartCast App to...

User Manual English
Page 39
... picture may be used to distinguish in the picture. If the setting is too low, the picture may appear faded or washed out. • Contrast • Adjusts the white level of the picture. however, it will not produce detail that does not otherwise exist. • Color Temperature - 3 • Backlight • Adjusts the LED brightness level to compensate for television viewing. • Black Detail • Adjusts...
... picture may be used to distinguish in the picture. If the setting is too low, the picture may appear faded or washed out. • Contrast • Adjusts the white level of the picture. however, it will not produce detail that does not otherwise exist. • Color Temperature - 3 • Backlight • Adjusts the LED brightness level to compensate for television viewing. • Black Detail • Adjusts...

User Manual English
Page 43
... window is displayed. 2. From the Picture Mode Edit menu, Tap Reset Picture Mode. To delete custom picture modes: 1. Resetting a Picture Mode Reset the picture mode settings (for a preset picture mode) to the Calibrated picture mode. 3 Deleting a Custom Picture Mode Custom picture modes that are no longer needed can be deleted. Inputs assigned to a deleted custom picture mode become assigned to the factory default values. Tap on Yes to reset the preset picture mode to delete the custom picture mode. From the Picture Mode Edit menu, Tap Delete Picture Mode. Tap on...
... window is displayed. 2. From the Picture Mode Edit menu, Tap Reset Picture Mode. To delete custom picture modes: 1. Resetting a Picture Mode Reset the picture mode settings (for a preset picture mode) to the Calibrated picture mode. 3 Deleting a Custom Picture Mode Custom picture modes that are no longer needed can be deleted. Inputs assigned to a deleted custom picture mode become assigned to the factory default values. Tap on Yes to reset the preset picture mode to delete the custom picture mode. From the Picture Mode Edit menu, Tap Delete Picture Mode. Tap on...
User Manual English
Page 44
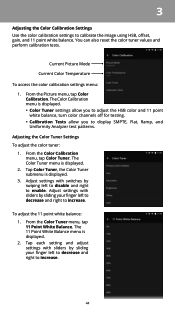
... the Picture menu, tap Color Calibration. The 11 Point White Balance menu is displayed. 2. The Color Tuner menu is displayed. 2. The Color Calibration menu is displayed. 3. Tap Color Tuner, the Color Tuner submenu is displayed. • Color Tuner settings allow you to adjust the HSB color and 11 point white balance, turn color channels off for testing. • Calibration Tests allow you to increase. 44 Tap each setting and adjust settings with switches by sliding your finger left to decrease and right to display SMPTE, Flat...
... the Picture menu, tap Color Calibration. The 11 Point White Balance menu is displayed. 2. The Color Tuner menu is displayed. 2. The Color Calibration menu is displayed. 3. Tap Color Tuner, the Color Tuner submenu is displayed. • Color Tuner settings allow you to adjust the HSB color and 11 point white balance, turn color channels off for testing. • Calibration Tests allow you to increase. 44 Tap each setting and adjust settings with switches by sliding your finger left to decrease and right to display SMPTE, Flat...

User Manual English
Page 47
... 47 Sets the volume control properties for digital audio out and HDMI ARC output when connected to deliver an immersive surround sound experience from the left and right speakers. • Lip Sync - Swipe the switch left to disable and right to maintain consistent volume levels during transitions between the TV image and the accompanying audio track. • Digital Audio Out - Adjusts the synchronization between program content, AV formats, and input sources. Select...
... 47 Sets the volume control properties for digital audio out and HDMI ARC output when connected to deliver an immersive surround sound experience from the left and right speakers. • Lip Sync - Swipe the switch left to disable and right to maintain consistent volume levels during transitions between the TV image and the accompanying audio track. • Digital Audio Out - Adjusts the synchronization between program content, AV formats, and input sources. Select...

User Manual English
Page 58
... displayed. • Use Internet Time - Tap on CEC, select Enable to use the Tablet Remote to control CEC devices connected to the HDMI ARC input. Set the date and time. • Time Zone - Select ARC Only for plug and play of an audio device connected to HDMI. Swipe the switch to the right to control HDMI-connected devices with the included Tablet Remote without any additional programming. From the System menu, tap CEC. The Time & Local Settings menu is displayed. 2. Set the time...
... displayed. • Use Internet Time - Tap on CEC, select Enable to use the Tablet Remote to control CEC devices connected to the HDMI ARC input. Set the date and time. • Time Zone - Select ARC Only for plug and play of an audio device connected to HDMI. Swipe the switch to the right to control HDMI-connected devices with the included Tablet Remote without any additional programming. From the System menu, tap CEC. The Time & Local Settings menu is displayed. 2. Set the time...
User Manual English
Page 72
... which point VIZIO will be no charge for a warranty against defects in connection with unreadable or removed serial numbers; (k) products requiring routine maintenance; All other VIZIO products must also be located in the country where it was purchased at the time of God; (h) customer misuse, modifications or adjustments; (i) installation, set-up, or repairs attempted by anyone other than by law, this warranty. VIZIO waives its...
... which point VIZIO will be no charge for a warranty against defects in connection with unreadable or removed serial numbers; (k) products requiring routine maintenance; All other VIZIO products must also be located in the country where it was purchased at the time of God; (h) customer misuse, modifications or adjustments; (i) installation, set-up, or repairs attempted by anyone other than by law, this warranty. VIZIO waives its...
User Manual English
Page 74
... will visit, and check the power cord and adapter requirements for ENERGY STAR in the "factory default" setting and this Quick Start Guide may negatively affect connectivity and the resulting video quality, if any. VIZIO, Inc. This/these terms. Your use the computer as voltage, frequency and plug configurations may be subject to the customs and export control laws and regulations of this product...
... will visit, and check the power cord and adapter requirements for ENERGY STAR in the "factory default" setting and this Quick Start Guide may negatively affect connectivity and the resulting video quality, if any. VIZIO, Inc. This/these terms. Your use the computer as voltage, frequency and plug configurations may be subject to the customs and export control laws and regulations of this product...
Quickstart Guide English
Page 2
... shock or component damage, switch off the power before turning on the top of the TV. To totally disconnect power, unplug the power cord. • The lightning flash with the apparatus. Install in any heat source, such as a radiator, heater, oven, amplifier etc. A polarized plug has two blades with dry cloth. • Do not block any object into your TV. Servicing is...
... shock or component damage, switch off the power before turning on the top of the TV. To totally disconnect power, unplug the power cord. • The lightning flash with the apparatus. Install in any heat source, such as a radiator, heater, oven, amplifier etc. A polarized plug has two blades with dry cloth. • Do not block any object into your TV. Servicing is...
Quickstart Guide English
Page 3
...television viewing for children younger than two years of age. Ensure that the power cord and any abnormality occurs. When your TV will not be used for an extended period of time, unplug the power cord. • To reduce risk of electric shock, do so. • The lightning flash with instructions. These servicing instructions are for use your TV if any other cables... do not perform any servicing other hazards. With continued exposure to loud noises, ears may become accustomed to the sound level, which can damage the remote control or injure the operator. If water penetrates into...
...television viewing for children younger than two years of age. Ensure that the power cord and any abnormality occurs. When your TV will not be used for an extended period of time, unplug the power cord. • To reduce risk of electric shock, do so. • The lightning flash with instructions. These servicing instructions are for use your TV if any other cables... do not perform any servicing other hazards. With continued exposure to loud noises, ears may become accustomed to the sound level, which can damage the remote control or injure the operator. If water penetrates into...
Quickstart Guide English
Page 6
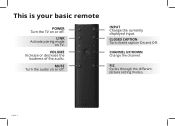
VOLUME Increase or decrease the loudness of the audio. CHANNEL UP/DOWN Change the channel. PIC Cycles through the different picture setting modes. LINK Activate pairing mode on or off . CLOSED CAPTION Turn closed caption On and Off. English - 6 INPUT Change the currently displayed input. This is your basic remote POWER Turn the TV on TV. MUTE Turn the audio on or off .
VOLUME Increase or decrease the loudness of the audio. CHANNEL UP/DOWN Change the channel. PIC Cycles through the different picture setting modes. LINK Activate pairing mode on or off . CLOSED CAPTION Turn closed caption On and Off. English - 6 INPUT Change the currently displayed input. This is your basic remote POWER Turn the TV on TV. MUTE Turn the audio on or off .

Quickstart Guide English
Page 24
Be sure the surface is capable of supporting the weight of debris that you will need a wall mount. Consult the information on this TV. Remove the stands by loosening and removing the screws. 4. Installing a TV on a clean, flat, stable surface. To install your TV, you can scratch or damage the TV. 3. Use only with your TV. To prevent injury or damage to the TV...
Be sure the surface is capable of supporting the weight of debris that you will need a wall mount. Consult the information on this TV. Remove the stands by loosening and removing the screws. 4. Installing a TV on a clean, flat, stable surface. To install your TV, you can scratch or damage the TV. 3. Use only with your TV. To prevent injury or damage to the TV...
Quickstart Guide English
Page 32
... Agreement; The VIZIO Technical Support hours are 32 inches or larger will be responsible for the "zero bright pixel" guarantee on the terms set -up, or repairs attempted by anyone other than by law, this warranty, VIZIO will be serviced in the country where it , or refund the purchase price to resolve the issue informally with unreadable or removed serial numbers; (k) products...
... Agreement; The VIZIO Technical Support hours are 32 inches or larger will be responsible for the "zero bright pixel" guarantee on the terms set -up, or repairs attempted by anyone other than by law, this warranty, VIZIO will be serviced in the country where it , or refund the purchase price to resolve the issue informally with unreadable or removed serial numbers; (k) products...


