User Manual
Page 6
... parties listed below, as before to digital television broadcasting was complete on June 12, 2009. Watch your local stations to find out when they will turn off their analog signal and switch to receive over-the-air TV. No extra converter box is needed. DTV TRANSITION ADVISORY The nationwide switch...
... parties listed below, as before to digital television broadcasting was complete on June 12, 2009. Watch your local stations to find out when they will turn off their analog signal and switch to receive over-the-air TV. No extra converter box is needed. DTV TRANSITION ADVISORY The nationwide switch...
User Manual
Page 9
Adjusting the CEC Settings...33 Turning the VIZIO Logo On or Off...33 Using the Help Menu...34 Displaying System Information...34 Resetting the TV Settings...34 Restoring the TV to Factory Default ......37 Playing USB Media...37 Using the VIA Shortcut Buttons...40 Using the VIA Dock...40 Moving an App on the VIA Dock...40 Using VIZIO Internet Apps...40 Adding a New App to the VIA Dock...41 Removing an App from the VIA Dock...41 Creating and Managing User Profiles...41...
Adjusting the CEC Settings...33 Turning the VIZIO Logo On or Off...33 Using the Help Menu...34 Displaying System Information...34 Resetting the TV Settings...34 Restoring the TV to Factory Default ......37 Playing USB Media...37 Using the VIA Shortcut Buttons...40 Using the VIA Dock...40 Moving an App on the VIA Dock...40 Using VIZIO Internet Apps...40 Adding a New App to the VIA Dock...41 Removing an App from the VIA Dock...41 Creating and Managing User Profiles...41...

User Manual
Page 13
Connect USB thumb drive for photo or music playback. Side Panel 6 Turn TV off or on -screen menu. Open the on . Increase or decrease volume level INPUT - Change input source. Connect HDMI device. VOLUME UP/DOWN - USB - HDMI Side - CHANNEL UP/DOWN - MENU - 2 SIDE PANEL POWER - Change the channel.
Connect USB thumb drive for photo or music playback. Side Panel 6 Turn TV off or on -screen menu. Open the on . Increase or decrease volume level INPUT - Change input source. Connect HDMI device. VOLUME UP/DOWN - USB - HDMI Side - CHANNEL UP/DOWN - MENU - 2 SIDE PANEL POWER - Change the channel.
User Manual
Page 15
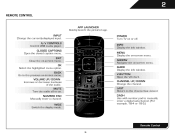
... the audio. MENU Display the on -screen menu. DASH Use with number pad to the channel last viewed. OK Select the highlighted menu option. POWER Turn TV on -screen menu. CHANNEL UP/DOWN Change the channel. CLOSED CAPTIONS Open the closed caption menu. WIDE Switch the display mode. ARROW Navigate the... manually enter a digital sub-channel. (For example, 18-4 or 18-5.) Remote Control 8 INPUT Change the currently-displayed input. BACK Go to the previous on . MUTE Turn the audio off . INFO Display the info window.
... the audio. MENU Display the on -screen menu. DASH Use with number pad to the channel last viewed. OK Select the highlighted menu option. POWER Turn TV on -screen menu. CHANNEL UP/DOWN Change the channel. CLOSED CAPTIONS Open the closed caption menu. WIDE Switch the display mode. ARROW Navigate the... manually enter a digital sub-channel. (For example, 18-4 or 18-5.) Remote Control 8 INPUT Change the currently-displayed input. BACK Go to the previous on . MUTE Turn the audio off . INFO Display the info window.
User Manual
Page 17
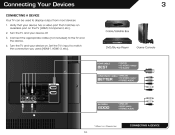
Turn the TV and your device has a video port that your device off. 3. DVD/Blu-ray Player Game Console Cable/Satellite Box 3 HDMI CABLE BEST BETTER &#... AUDIO * Maximum Resolution CONNECTING A DEVICE 10 Connecting Your Devices CONNECTING A DEVICE Your TV can be used to match the connection you used (HDMI-1, HDM1-2, etc). Turn the TV and your device on the TV (HDMI, Component, etc). 2. Set the TV's input to display output from most devices. 1. Verify that matches an...
Turn the TV and your device has a video port that your device off. 3. DVD/Blu-ray Player Game Console Cable/Satellite Box 3 HDMI CABLE BEST BETTER &#... AUDIO * Maximum Resolution CONNECTING A DEVICE 10 Connecting Your Devices CONNECTING A DEVICE Your TV can be used to match the connection you used (HDMI-1, HDM1-2, etc). Turn the TV and your device on the TV (HDMI, Component, etc). 2. Set the TV's input to display output from most devices. 1. Verify that matches an...
User Manual
Page 19
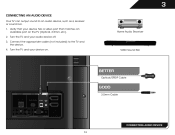
Turn the TV and your audio device off. 3. Turn the TV and your device on the TV (Optical, 3.5mm, etc). 2. VIZIO Sound Bar Home Audio Receiver BETTER Optical/SPDIF Cable GOOD 3.5mm Cable CONNECTING AUDIO DEVICE 12 Connect the appropriate cable (not included) to an audio device, such as a receiver or sound bar. 1. 3 CONNECTING AN AUDIO DEVICE Your TV can output sound to the TV and the device. 4. Verify that your device has a video port that matches an available port on .
Turn the TV and your audio device off. 3. Turn the TV and your device on the TV (Optical, 3.5mm, etc). 2. VIZIO Sound Bar Home Audio Receiver BETTER Optical/SPDIF Cable GOOD 3.5mm Cable CONNECTING AUDIO DEVICE 12 Connect the appropriate cable (not included) to an audio device, such as a receiver or sound bar. 1. 3 CONNECTING AN AUDIO DEVICE Your TV can output sound to the TV and the device. 4. Verify that your device has a video port that matches an available port on .
User Manual
Page 21
... Arrow and OK buttons on the remote. 3. Enter the network key using the on-screen keyboard. Completing the First-Time Setup The first time you turn on the TV, the Setup App will guide you through each of the steps necessary to get your TV ready for Yahoo! Press the Power...
... Arrow and OK buttons on the remote. 3. Enter the network key using the on-screen keyboard. Completing the First-Time Setup The first time you turn on the TV, the Setup App will guide you through each of the steps necessary to get your TV ready for Yahoo! Press the Power...
User Manual
Page 25
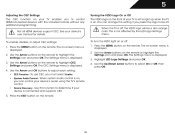
... and press OK. Use the Arrow buttons on the remote. The Auto Power-Off menu is displayed. 3. Press the MENU button on the remote to turn off after 10 minutes if no signal is the recommended setting. To set by default to highlight the Picture icon and press OK. Use the... Mode, then use the Left/Right Arrow buttons to change the picture mode: • Standard mode sets the various picture settings to values that will turn the TV off after which you are satisfied with the appearance of time. Press the MENU button on the remote to...
... and press OK. Use the Arrow buttons on the remote. The Auto Power-Off menu is displayed. 3. Press the MENU button on the remote to turn off after 10 minutes if no signal is the recommended setting. To set by default to highlight the Picture icon and press OK. Use the... Mode, then use the Left/Right Arrow buttons to change the picture mode: • Standard mode sets the various picture settings to values that will turn the TV off after which you are satisfied with the appearance of time. Press the MENU button on the remote to...
User Manual
Page 29
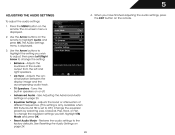
... image and the accompanying audio track. • TV Speakers - To change the setting: • Balance - Press the MENU button on or off. • Advanced Audio - Turns the built-in speakers on the remote. When you wish to adjust, then press Left/Right Arrow to change the equalizer settings yourself, highlight EQ...
... image and the accompanying audio track. • TV Speakers - To change the setting: • Balance - Press the MENU button on or off. • Advanced Audio - Turns the built-in speakers on the remote. When you wish to adjust, then press Left/Right Arrow to change the equalizer settings yourself, highlight EQ...
User Manual
Page 32
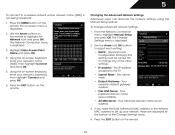
...'s default gateway address. • Pref. Use the Arrow and OK buttons to adjust each setting: • DHCP - (Dynamic Host Configuration Protocol) This setting must be turned Off to the TV. • Subnet Mask - The IP address assigned to change advanced network settings: 1. DNS Server - Highlight Enter Access Point Name and press...
...'s default gateway address. • Pref. Use the Arrow and OK buttons to adjust each setting: • DHCP - (Dynamic Host Configuration Protocol) This setting must be turned Off to the TV. • Subnet Mask - The IP address assigned to change advanced network settings: 1. DNS Server - Highlight Enter Access Point Name and press...
User Manual
Page 40
Use this setting if you to control HDMI-connected devices with the included remote without any additional programming. Turning the VIZIO Logo On or Off The VIZIO logo on the front of your TV is set to select On or Off, then press OK. • 5. Highlight LED Logo Settings and press OK. 4. .... To use CEC, you can change this function to determine if your device is on, you must select Enable. The on or off . To turn the VIZIO light on -screen menu is displayed. 2. Use the Arrow and OK buttons to highlight the Settings icon and press OK. Use the Arrow buttons on...
Use this setting if you to control HDMI-connected devices with the included remote without any additional programming. Turning the VIZIO Logo On or Off The VIZIO logo on the front of your TV is set to select On or Off, then press OK. • 5. Highlight LED Logo Settings and press OK. 4. .... To use CEC, you can change this function to determine if your device is on, you must select Enable. The on or off . To turn the VIZIO light on -screen menu is displayed. 2. Use the Arrow and OK buttons to highlight the Settings icon and press OK. Use the Arrow buttons on...
User Manual
Page 42
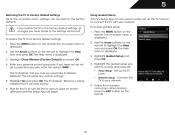
...default, 0000. Follow the on -screen menu is displayed. 2. To restore the TV to connect the TV with your parental control passcode. The TV will turn off. Using Guided Setup The TV's Setup App can be reset to highlight the Help icon and press OK. To access guided setup: 1. The on... -screen instructions. Highlight the guided setup you have made to turn back on the remote to Restore Defaults? Connect the TV to access and press OK: • • Tuner Setup - The Help menu is being ...
...default, 0000. Follow the on -screen menu is displayed. 2. To restore the TV to connect the TV with your parental control passcode. The TV will turn off. Using Guided Setup The TV's Setup App can be reset to highlight the Help icon and press OK. To access guided setup: 1. The on... -screen instructions. Highlight the guided setup you have made to turn back on the remote to Restore Defaults? Connect the TV to access and press OK: • • Tuner Setup - The Help menu is being ...
User Manual
Page 44
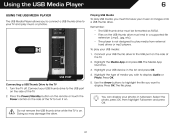
Press the Power/Standby button on the remote or touch the Power control on the side of the TV to turn it on the side of the TV. 2. Press OK. You can display your USB media: 1. Remember: • The USB thumb drive must be formatted as ...FAT32. • Files on the USB thumb drive must first save your music or images onto a USB thumb drive. Turn the TV off. The file plays. To play your photos in fullscreen. Highlight your TV and play media from external hard drives or mp3 players...
Press the Power/Standby button on the remote or touch the Power control on the side of the TV to turn it on the side of the TV. 2. Press OK. You can display your USB media: 1. Remember: • The USB thumb drive must be formatted as ...FAT32. • Files on the USB thumb drive must first save your music or images onto a USB thumb drive. Turn the TV off. The file plays. To play your photos in fullscreen. Highlight your TV and play media from external hard drives or mp3 players...
User Manual
Page 49
Highlight Done and press OK. Select the App by scrolling left corner of this new profile from installing new Apps, turn Limit Profile to On. (You need an Owner PIN. Highlight Create Profile and press OK. Highlight Avatar and press OK. The Avatar menu is displayed. ... or the on -screen keyboard, then press OK. The Create Profile menu is displayed. 11. Press OK. 14. Enter your passcode and save it after turning Limit Profile to prevent the user of the screen.) 3. Highlight Done and press OK. 7 Answer menu is displayed. 10. The Create Profile menu is in...
Highlight Done and press OK. Select the App by scrolling left corner of this new profile from installing new Apps, turn Limit Profile to On. (You need an Owner PIN. Highlight Create Profile and press OK. Highlight Avatar and press OK. The Avatar menu is displayed. ... or the on -screen keyboard, then press OK. The Create Profile menu is displayed. 11. Press OK. 14. Enter your passcode and save it after turning Limit Profile to prevent the user of the screen.) 3. Highlight Done and press OK. 7 Answer menu is displayed. 10. The Create Profile menu is in...
User Manual
Page 52
... aren't working electrical outlet. • Ensure the power cable is connected securely to the TV and move the antenna around the room or close to turn the TV on page 18 • Reset the picture settings.
... aren't working electrical outlet. • Ensure the power cable is connected securely to the TV and move the antenna around the room or close to turn the TV on page 18 • Reset the picture settings.
User Manual
Page 57
...such interference. Notice 1. Shielded interface cables and AC power cord, if any interference received, including interference that are designed to VIZIO at www.VIZIO.com. However, there is valid for a processing fee covering the cost of performing such distribution, such as the cost ...particular installation. Operation is encouraged to try to correct the interference by turning the equipment off and on a circuit different from : http://www.cs.fsu.edu/~engelen/license.html Please visit www.VIZIO.com for compliance with the instructions, may cause undesired operation. Use the...
...such interference. Notice 1. Shielded interface cables and AC power cord, if any interference received, including interference that are designed to VIZIO at www.VIZIO.com. However, there is valid for a processing fee covering the cost of performing such distribution, such as the cost ...particular installation. Operation is encouraged to try to correct the interference by turning the equipment off and on a circuit different from : http://www.cs.fsu.edu/~engelen/license.html Please visit www.VIZIO.com for compliance with the instructions, may cause undesired operation. Use the...

E422VLE Quick Start Guide
Page 2
... penetrates into a grounded power outlet. Wait before connecting other hazards. Do not place any of electric shock or component damage, switch off the power before turning on the top of the polarized or grounding-type plug. Overloading can damage the remote control or injure the operator. To avoid electric shock, avoid...
... penetrates into a grounded power outlet. Wait before connecting other hazards. Do not place any of electric shock or component damage, switch off the power before turning on the top of the polarized or grounding-type plug. Overloading can damage the remote control or injure the operator. To avoid electric shock, avoid...
E422VLE Quick Start Guide
Page 5
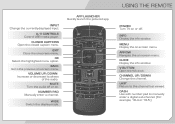
...Open the VIA dock. OK Select the highlighted menu option. VOLUME UP/DOWN Increase or decrease loudness of the audio. USING THE REMOTE POWER Turn TV on -screen menu. CLOSED CAPTIONS Open the closed caption menu. APP LAUNCHER Quickly launch the pictured app. INFO Display the info window. ...MUTE Turn the audio off . GUIDE Display the info window. LAST Return to manually enter a digital sub-channel. (For example, 18-4 or 18-5.) ...
...Open the VIA dock. OK Select the highlighted menu option. VOLUME UP/DOWN Increase or decrease loudness of the audio. USING THE REMOTE POWER Turn TV on -screen menu. CLOSED CAPTIONS Open the closed caption menu. APP LAUNCHER Quickly launch the pictured app. INFO Display the info window. ...MUTE Turn the audio off . GUIDE Display the info window. LAST Return to manually enter a digital sub-channel. (For example, 18-4 or 18-5.) ...

E422VLE Quick Start Guide
Page 9
Use the Arrow buttons on the remote. 3 4 Ethernet Cable Coaxial Cable If you have an external antenna or a cable connection that extends from your router or modem. The Setup App is displayed. Turn the TV on by pressing the Power button on the remote to the TV with an RF/Coaxial cable. Connect an Ethernet cable from a wall outlet, connect it to highlight Home Mode Setup and press OK.
Use the Arrow buttons on the remote. 3 4 Ethernet Cable Coaxial Cable If you have an external antenna or a cable connection that extends from your router or modem. The Setup App is displayed. Turn the TV on by pressing the Power button on the remote to the TV with an RF/Coaxial cable. Connect an Ethernet cable from a wall outlet, connect it to highlight Home Mode Setup and press OK.
E422VLE Quick Start Guide
Page 16
The Setup App will be lost! Select Yes. There are turned on. • Press the INPUT button on the remote and select the input to which your device is connected (HDMI-1, Composite, Component, etc). Select the ...
The Setup App will be lost! Select Yes. There are turned on. • Press the INPUT button on the remote and select the input to which your device is connected (HDMI-1, Composite, Component, etc). Select the ...


