User Manual
Page 5
... damage the remote control or injure the operator. Operating your TV in environments with heavy dust or high humidity may cause fire or electric shock. • Follow instructions for use of your TV may cause fire or electric shock. • Do not install your TV. - The performance of your TV, hold the AC/DC power adapter, not the cord. If...
... damage the remote control or injure the operator. Operating your TV in environments with heavy dust or high humidity may cause fire or electric shock. • Follow instructions for use of your TV may cause fire or electric shock. • Do not install your TV. - The performance of your TV, hold the AC/DC power adapter, not the cord. If...
User Manual
Page 7
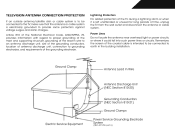
...time, unplug the TV from the wall outlet and disconnect the antenna or cable system. Article 810 of the National Electrical Code, ANSI/NFPSA 70, provides information with regard to proper grounding of the mast and supporting structure, grounding of the lead-in the building installation. Power Lines Do not locate the antenna near overhead light or power... TELEVISION ANTENNA CONNECTION PROTECTION If an outside antenna/satellite dish or cable system is to be connected to earth in wire to an antenna discharge unit, size of the grounding conductors, location of antenna discharge unit, connection ...
...time, unplug the TV from the wall outlet and disconnect the antenna or cable system. Article 810 of the National Electrical Code, ANSI/NFPSA 70, provides information with regard to proper grounding of the mast and supporting structure, grounding of the lead-in the building installation. Power Lines Do not locate the antenna near overhead light or power... TELEVISION ANTENNA CONNECTION PROTECTION If an outside antenna/satellite dish or cable system is to be connected to earth in wire to an antenna discharge unit, size of the grounding conductors, location of antenna discharge unit, connection ...
User Manual
Page 8
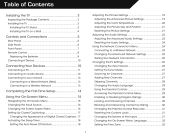
... the Tuner Mode...27 Scanning for Channels...27 Adding New Channels...27 Skipping Channels...28 Changing the Audio Language...29 Using the Parental Controls...29 Accessing the Parental Controls Menu...29 Enabling or Disabling Program Ratings...30 Locking and Unlocking Channels...30 Blocking and Unblocking Content by Rating...30 Changing the Parental Control Passcode...31 Resetting the Content Locks...31 Changing the Names of the Inputs...31 Changing the On-Screen Menu Language...32 Setting the Time Zone...32 1 Controls and Connections...5 Rear Panel...5 Side Panel...6 Front Panel...7 Remote...
... the Tuner Mode...27 Scanning for Channels...27 Adding New Channels...27 Skipping Channels...28 Changing the Audio Language...29 Using the Parental Controls...29 Accessing the Parental Controls Menu...29 Enabling or Disabling Program Ratings...30 Locking and Unlocking Channels...30 Blocking and Unblocking Content by Rating...30 Changing the Parental Control Passcode...31 Resetting the Content Locks...31 Changing the Names of the Inputs...31 Changing the On-Screen Menu Language...32 Setting the Time Zone...32 1 Controls and Connections...5 Rear Panel...5 Side Panel...6 Front Panel...7 Remote...
User Manual
Page 9
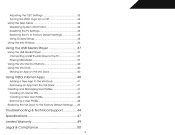
... VIZIO Logo On or Off...33 Using the Help Menu...34 Displaying System Information...34 Resetting the TV Settings...34 Restoring the TV to Factory Default Settings...35 Using Guided Setup...35 Using the Info Window...36 Using the USB Media Player...37 Using the USB Media Player...37 Connecting a USB Thumb Drive to the TV...37 Playing USB Media...37 Using the VIA Shortcut Buttons...40 Using the VIA Dock...40 Moving an App on the VIA Dock...40 Using VIZIO Internet...
... VIZIO Logo On or Off...33 Using the Help Menu...34 Displaying System Information...34 Resetting the TV Settings...34 Restoring the TV to Factory Default Settings...35 Using Guided Setup...35 Using the Info Window...36 Using the USB Media Player...37 Using the USB Media Player...37 Connecting a USB Thumb Drive to the TV...37 Playing USB Media...37 Using the VIA Shortcut Buttons...40 Using the VIA Dock...40 Moving an App on the VIA Dock...40 Using VIZIO Internet...
User Manual
Page 11
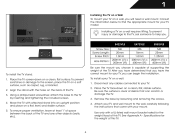
... with a UL-listed wall mount bracket rated for your TV model: Installing a TV on a wall requires lifting. Align the stand with attached stand into an upright position and place on a flat, level, and stable surface. 5. Disconnect any other objects (walls, etc). Remove the base by inserting and tightening the included screws. 4. Attach your TV and wall mount to the TV by loosening and removing the screws. 4. Move the...
... with a UL-listed wall mount bracket rated for your TV model: Installing a TV on a wall requires lifting. Align the stand with attached stand into an upright position and place on a flat, level, and stable surface. 5. Disconnect any other objects (walls, etc). Remove the base by inserting and tightening the included screws. 4. Attach your TV and wall mount to the TV by loosening and removing the screws. 4. Move the...
User Manual
Page 12
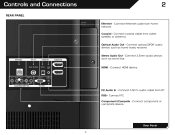
Connect optical/SPDIF audio device, such as sound bar. Stereo Audio Out - PC Audio In - Rear Panel 5 HDMI - Connect PC Component/Compsite - Connect HDMI device. Connect 3.5mm audio cable from cable, satellite, or antenna. 2 Optical Audio Out - Connect coaxial cable from PC RGB - Connect component or composite device. Connect ethernet cable from home network. Connect 3.5mm audio device, such as home audio receiver. Coaxial - Controls and Connections REAR PANEL Ethernet -
Connect optical/SPDIF audio device, such as sound bar. Stereo Audio Out - PC Audio In - Rear Panel 5 HDMI - Connect PC Component/Compsite - Connect HDMI device. Connect 3.5mm audio cable from cable, satellite, or antenna. 2 Optical Audio Out - Connect coaxial cable from PC RGB - Connect component or composite device. Connect ethernet cable from home network. Connect 3.5mm audio device, such as home audio receiver. Coaxial - Controls and Connections REAR PANEL Ethernet -
User Manual
Page 17
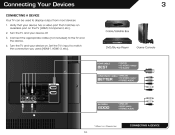
... used (HDMI-1, HDM1-2, etc). Connect the appropriate cable (not included) to display output from most devices. 1. Turn the TV and your device off. 3. Turn the TV and your device on the TV (HDMI, Component, etc). 2. DVD/Blu-ray Player Game Console Cable/Satellite Box 3 HDMI CABLE BEST BETTER • DIGITAL • HD VIDEO (1080p)* • HD AUDIO COMPONENT CABLE • ANALOG • HD VIDEO (1080i)* • STEREO AUDIO AV CABLE GOOD • ANALOG • VIDEO (480i)* • STEREO AUDIO * Maximum Resolution CONNECTING...
... used (HDMI-1, HDM1-2, etc). Connect the appropriate cable (not included) to display output from most devices. 1. Turn the TV and your device off. 3. Turn the TV and your device on the TV (HDMI, Component, etc). 2. DVD/Blu-ray Player Game Console Cable/Satellite Box 3 HDMI CABLE BEST BETTER • DIGITAL • HD VIDEO (1080p)* • HD AUDIO COMPONENT CABLE • ANALOG • HD VIDEO (1080i)* • STEREO AUDIO AV CABLE GOOD • ANALOG • VIDEO (480i)* • STEREO AUDIO * Maximum Resolution CONNECTING...
User Manual
Page 25
... turn off after 10 minutes if no signal is being displayed on -screen menu is set by default to highlight the Picture icon and press OK. This is displayed. 3. Press Exit. Use the Up/Down Arrow buttons on the remote to highlight Picture Mode, then use the Left/Right Arrow buttons to change the picture mode: • Standard mode sets the various picture settings to highlight Timer and press OK. Setting the Auto Power Off Feature To help...
... turn off after 10 minutes if no signal is being displayed on -screen menu is set by default to highlight the Picture icon and press OK. This is displayed. 3. Press Exit. Use the Up/Down Arrow buttons on the remote to highlight Picture Mode, then use the Left/Right Arrow buttons to change the picture mode: • Standard mode sets the various picture settings to highlight Timer and press OK. Setting the Auto Power Off Feature To help...
User Manual
Page 26
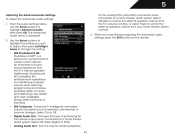
.... • Game mode optimizes the picture settings for displaying game console output. • Vivid mode sets the picture settings to values that does not otherwise exist. 19 Adjusting the Advanced Picture Settings To adjust the advanced picture settings: 1. When this setting is too low, the picture may appear faded or washed out. Tint - Adjusts the hue of the picture. From the Picture Settings menu, use the Arrow buttons on page 19. The Advanced Picture menu is useful in adjusting the...
.... • Game mode optimizes the picture settings for displaying game console output. • Vivid mode sets the picture settings to values that does not otherwise exist. 19 Adjusting the Advanced Picture Settings To adjust the advanced picture settings: 1. When this setting is too low, the picture may appear faded or washed out. Tint - Adjusts the hue of the picture. From the Picture Settings menu, use the Arrow buttons on page 19. The Advanced Picture menu is useful in adjusting the...
User Manual
Page 30
... have finished adjusting the advanced audio settings, press the EXIT button on the remote. Changes the type of processing for the analog RCA (red/white) connectors when connected to a home theater audio system. Sets the volume control properties 23 for the Optical output when connected to a home theater audio system. When you wish to adjust, then press Left/Right Arrow to television commercials or channel changes. Select On or Off. • Digital Audio Out - Additionally...
... have finished adjusting the advanced audio settings, press the EXIT button on the remote. Changes the type of processing for the analog RCA (red/white) connectors when connected to a home theater audio system. Sets the volume control properties 23 for the Optical output when connected to a home theater audio system. When you wish to adjust, then press Left/Right Arrow to television commercials or channel changes. Select On or Off. • Digital Audio Out - Additionally...
User Manual
Page 34
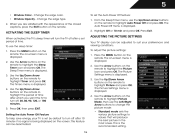
... remote. The Settings menu is displayed. 4. The Tuner Mode menu is displayed. 3. The auto channel scan begins. 2. Adding New Channels Occasionally, you may also be necessary when the TV has been moved to an area where different free-to the RF input, such as an external antenna or cable TV connection, you must scan for Channels Before the TV can do this by using a device that is connected to -air broadcast television channels are using...
... remote. The Settings menu is displayed. 4. The Tuner Mode menu is displayed. 3. The auto channel scan begins. 2. Adding New Channels Occasionally, you may also be necessary when the TV has been moved to an area where different free-to the RF input, such as an external antenna or cable TV connection, you must scan for Channels Before the TV can do this by using a device that is connected to -air broadcast television channels are using...
User Manual
Page 40
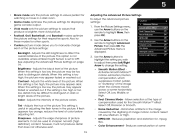
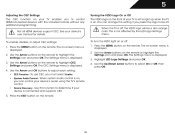
... on-screen menu is connected and supports CEC. The Settings menu is displayed. 4. Use the Up/Down Arrow buttons to adjust each setting: • • CEC Function - See your device's audio using the TV's remote control. Press the MENU button on or off . The CEC Settings menu is displayed. 3. To enable, disable, or adjust CEC settings: 1. Device Discovery - To turn the VIZIO light on the remote. Use the Arrow buttons on the remote. 33 To use CEC, you can change this function...
... on-screen menu is connected and supports CEC. The Settings menu is displayed. 4. Use the Up/Down Arrow buttons to adjust each setting: • • CEC Function - See your device's audio using the TV's remote control. Press the MENU button on or off . The CEC Settings menu is displayed. 3. To enable, disable, or adjust CEC settings: 1. Device Discovery - To turn the VIZIO light on the remote. Use the Arrow buttons on the remote. 33 To use CEC, you can change this function...
User Manual
Page 42
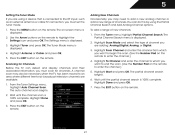
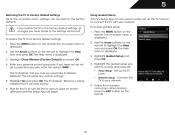
... the MENU button on -screen instructions. Use the Arrow buttons on -screen menu is displayed. 2. This will be used to easily set up the TV tuner. Highlight Yes and press OK. Wait for the TV to connect the TV with your network. Follow the on the remote. To access guided setup: 1. Network Setup - The TV displays "Memory is displayed. 3. Using Guided Setup The TV's Setup App can be reset to Restore Defaults? Connect the TV to its factory default settings: 1. Set up a parental passcode...
... the MENU button on -screen instructions. Use the Arrow buttons on -screen menu is displayed. 2. This will be used to easily set up the TV tuner. Highlight Yes and press OK. Wait for the TV to connect the TV with your network. Follow the on the remote. To access guided setup: 1. Network Setup - The TV displays "Memory is displayed. 3. Using Guided Setup The TV's Setup App can be reset to Restore Defaults? Connect the TV to its factory default settings: 1. Set up a parental passcode...
User Manual
Page 52
... Power/Standby button on the remote or on the side of the TV to turn the TV on. The buttons on the remote aren't working electrical outlet. • Ensure the power cable is plugged into a working . • Ensure you are using cable TV, satellite, or antenna connected directly to the TV, scan for Channels on page 9 45 A The TV displays "No Signal." • Press the INPUT button on the remote control to select a different input source...
... Power/Standby button on the remote or on the side of the TV to turn the TV on. The buttons on the remote aren't working electrical outlet. • Ensure the power cable is plugged into a working . • Ensure you are using cable TV, satellite, or antenna connected directly to the TV, scan for Channels on page 9 45 A The TV displays "No Signal." • Press the INPUT button on the remote control to select a different input source...
User Manual
Page 53
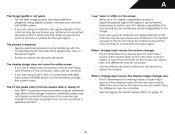
... volume. This up -converted (improved) to change input source, the display image changes size. • The TV remembers the viewing mode on the source you are using an antenna, the signal strength of occurences are using TV, AV1, AV2, or Component with HDMI cables. • If you switch from, the difference may not display correctly. Ensure your devices with 480i input, press the WIDE button on the remote to a window for the best signal. Connect...
... volume. This up -converted (improved) to change input source, the display image changes size. • The TV remembers the viewing mode on the source you are using an antenna, the signal strength of occurences are using TV, AV1, AV2, or Component with HDMI cables. • If you switch from, the difference may not display correctly. Ensure your devices with 480i input, press the WIDE button on the remote to a window for the best signal. Connect...
User Manual
Page 56
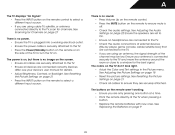
..., Pacific Time, or visit www.VIZIO.com. Limitations and Exclusions VIZIO's one-year limited warranty only covers defects in materials and workmanship for example: cosmetic damage, normal wear and tear, improper operation, improper voltage supply or power surges, signal issues, damages from warranty service or replacement, whichever is capable of customer misuse, modifications or adjustments, as well as installation and set-up issues or any type of...
..., Pacific Time, or visit www.VIZIO.com. Limitations and Exclusions VIZIO's one-year limited warranty only covers defects in materials and workmanship for example: cosmetic damage, normal wear and tear, improper operation, improper voltage supply or power surges, signal issues, damages from warranty service or replacement, whichever is capable of customer misuse, modifications or adjustments, as well as installation and set-up issues or any type of...

E422VLE Quick Start Guide
Page 2
... uninsulated DANGEROUS VOLTAGE within an equilateral triangle is used for the installation, use attachments/accessories specified by the manufacturer. • Use only with the cart, stand, tripod, bracket, or table specified by qualified service personnel only. To reduce the risk of electric shock or component damage, switch off the power before turning on the power cord may be of sufficient magnitude to excessive heat...
... uninsulated DANGEROUS VOLTAGE within an equilateral triangle is used for the installation, use attachments/accessories specified by the manufacturer. • Use only with the cart, stand, tripod, bracket, or table specified by qualified service personnel only. To reduce the risk of electric shock or component damage, switch off the power before turning on the power cord may be of sufficient magnitude to excessive heat...
E422VLE Quick Start Guide
Page 16
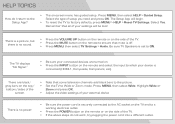
... power cord is off. • Press MENU, then select TV Settings > Audio. HELP TOPICS How do not work, try plugging the power cord into a different outlet. Press MENU, then select Wide. Select the type of the TV. • Press the MUTE button on the remote to the Setup App? • The on the TV and to factory defaults, press MENU > HELP > Reset TV Settings. The TV displays "No Signal." • Be sure your connected...
... power cord is off. • Press MENU, then select TV Settings > Audio. HELP TOPICS How do not work, try plugging the power cord into a different outlet. Press MENU, then select Wide. Select the type of the TV. • Press the MUTE button on the remote to the Setup App? • The on the TV and to factory defaults, press MENU > HELP > Reset TV Settings. The TV displays "No Signal." • Be sure your connected...
E422VLE Quick Start Guide
Page 19
..., improper operation, improper voltage supply or power surges, signal issues, damages from warranty service or replacement, whichever is serviced, regardless of one year limited warranty does not cover Products sold "AS IS", "FACTORY RECERTIFIED", or by a non-authorized reseller. If this guarantee applies to your product, refer to the customer. In order to obtain warranty service. Replacement parts and Products are not covered. VIZIO SHALL NOT...
..., improper operation, improper voltage supply or power surges, signal issues, damages from warranty service or replacement, whichever is serviced, regardless of one year limited warranty does not cover Products sold "AS IS", "FACTORY RECERTIFIED", or by a non-authorized reseller. If this guarantee applies to your product, refer to the customer. In order to obtain warranty service. Replacement parts and Products are not covered. VIZIO SHALL NOT...
E422VLE Data Sheet
Page 2
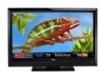
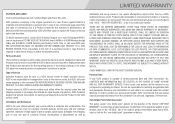
... a sound bar with Wireless Internet Apps delivers 1080p Full HD, network connectivity and up to change without Stand 31.1 lbs Shipping Dimensions 44.9" x 32.3" x 6.3" Shipping Weight 43.6 lbs VIZIO RECOMMENDS HIGH SPEED HDMI® CABLE This all rights reserved. 42" CLASS LCD HDTV WITH VIZIO INTERNET APPS® E422VLE TV SPECIFICATIONS Screen Size Viewable TV Type Smooth Motion Refresh Rate Maximum Resolution Dynamic Contrast Ratio Response Time Remote Control Type Ambient Light Sensor Energy Star Qualified Certifications Wall Mountable WARRANTY...
... a sound bar with Wireless Internet Apps delivers 1080p Full HD, network connectivity and up to change without Stand 31.1 lbs Shipping Dimensions 44.9" x 32.3" x 6.3" Shipping Weight 43.6 lbs VIZIO RECOMMENDS HIGH SPEED HDMI® CABLE This all rights reserved. 42" CLASS LCD HDTV WITH VIZIO INTERNET APPS® E422VLE TV SPECIFICATIONS Screen Size Viewable TV Type Smooth Motion Refresh Rate Maximum Resolution Dynamic Contrast Ratio Response Time Remote Control Type Ambient Light Sensor Energy Star Qualified Certifications Wall Mountable WARRANTY...


