User Manual
Page 8
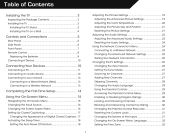
...the Parental Control Passcode...31 Resetting the Content Locks...31 Changing the Names of the Inputs...31 Changing the On-Screen Menu Language...32 Setting the Time Zone...32 1 Controls and Connections...5 Rear Panel...5 Side Panel...6 Front Panel...7 Remote Control...8 Replacing the Batteries...9 Connecting ...Connecting Your Devices...10 Connecting A PC...11 Connecting an audio device...12 Connecting to your network...13 Connecting to a Wired Network (Best)...13 Connecting to a Wireless Network...13 Completing the First-Time Setup...14 Using the On-Screen Menu...15 Navigating the On-Screen ...
...the Parental Control Passcode...31 Resetting the Content Locks...31 Changing the Names of the Inputs...31 Changing the On-Screen Menu Language...32 Setting the Time Zone...32 1 Controls and Connections...5 Rear Panel...5 Side Panel...6 Front Panel...7 Remote Control...8 Replacing the Batteries...9 Connecting ...Connecting Your Devices...10 Connecting A PC...11 Connecting an audio device...12 Connecting to your network...13 Connecting to a Wired Network (Best)...13 Connecting to a Wireless Network...13 Completing the First-Time Setup...14 Using the On-Screen Menu...15 Navigating the On-Screen ...
User Manual
Page 17
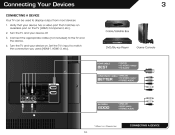
...HDM1-2, etc). Turn the TV and your device on the TV (HDMI, Component, etc). 2. DVD/Blu-ray Player Game Console Cable/Satellite Box 3 HDMI CABLE BEST BETTER • DIGITAL • HD VIDEO (1080p)* • HD AUDIO COMPONENT CABLE • ANALOG • HD VIDEO (1080i)* • STEREO AUDIO ... A DEVICE 10 Verify that your device has a video port that matches an available port on . Turn the TV and your device off. 3. Set the TV's input to match the connection you used to the TV and the device. 4. Connect the appropriate cable (not included) to display output...
...HDM1-2, etc). Turn the TV and your device on the TV (HDMI, Component, etc). 2. DVD/Blu-ray Player Game Console Cable/Satellite Box 3 HDMI CABLE BEST BETTER • DIGITAL • HD VIDEO (1080p)* • HD AUDIO COMPONENT CABLE • ANALOG • HD VIDEO (1080i)* • STEREO AUDIO ... A DEVICE 10 Verify that your device has a video port that matches an available port on . Turn the TV and your device off. 3. Set the TV's input to match the connection you used to the TV and the device. 4. Connect the appropriate cable (not included) to display output...
User Manual
Page 25
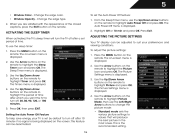
...menu, use the Up/Down Arrow buttons on -screen menu is set the Auto Power Off feature: 1. ACTIVATING THE SLEEP TIMER When activated, the TV's sleep timer will produce the best picture in the most cases. To adjust the picture settings: 1. The Timers menu is displayed. 3. Use the Up/...Down Arrow buttons on the remote. The Picture Settings menu is displayed. 4. Press the MENU button on the remote ...
...menu, use the Up/Down Arrow buttons on -screen menu is set the Auto Power Off feature: 1. ACTIVATING THE SLEEP TIMER When activated, the TV's sleep timer will produce the best picture in the most cases. To adjust the picture settings: 1. The Timers menu is displayed. 3. Use the Up/...Down Arrow buttons on the remote. The Picture Settings menu is displayed. 4. Press the MENU button on the remote ...
User Manual
Page 27
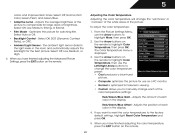
...on the remote to highlight More, then press OK. 2. Optimizes the picture for the best picture. Adjusts the average brightness of the picture. Adjusts the position of brightness. If you to the factory default settings, highlight Reset Color Temperature and press OK. 5. Select Off, Low, Medium, Strong,... or Extend. • Film Mode - When you have finished adjusting the Advanced Picture Settings, press the EXIT button on the remote to highlight Color Temperature, then use the Left/Right Arrow buttons to change the "warmness" or "...
...on the remote to highlight More, then press OK. 2. Optimizes the picture for the best picture. Adjusts the average brightness of the picture. Adjusts the position of brightness. If you to the factory default settings, highlight Reset Color Temperature and press OK. 5. Select Off, Low, Medium, Strong,... or Extend. • Film Mode - When you have finished adjusting the Advanced Picture Settings, press the EXIT button on the remote to highlight Color Temperature, then use the Left/Right Arrow buttons to change the "warmness" or "...
User Manual
Page 52
... device's user manual for details. • Adjust Brightness, Contrast, or Backlight. The buttons on page 18 • Reset the picture settings. See Adjusting the Picture Settings on the remote aren't working electrical outlet. • Ensure the power cable is connected securely to the TV and move the antenna around...on the side of external devices (Blu-ray player, game console, cable/satellite box) that are connected to the TV, scan for the best signal. The colors on the remote to ensure mute is no headphones are connected to the TV. • Check the audio connections of ...
... device's user manual for details. • Adjust Brightness, Contrast, or Backlight. The buttons on page 18 • Reset the picture settings. See Adjusting the Picture Settings on the remote aren't working electrical outlet. • Ensure the power cable is connected securely to the TV and move the antenna around...on the side of external devices (Blu-ray player, game console, cable/satellite box) that are connected to the TV, scan for the best signal. The colors on the remote to ensure mute is no headphones are connected to the TV. • Check the audio connections of ...
User Manual
Page 53
... the input source you are using digital sources. If the viewing mode on the new input source differs from the one on -screen menu are set correctly. • If you switch from electrical appliances, cars, or flourescent lights. • Ensure all cables are inherent to change input source, ..., press the WIDE button on page 16. 46 Ensure your devices with the TV. A The image quality is not good. • For the best image quality, view high-definition programs using an antenna, the signal strength of the channel may be low. Connect your antenna is distorted. • ...
... the input source you are using digital sources. If the viewing mode on the new input source differs from the one on -screen menu are set correctly. • If you switch from electrical appliances, cars, or flourescent lights. • Ensure all cables are inherent to change input source, ..., press the WIDE button on page 16. 46 Ensure your devices with the TV. A The image quality is not good. • For the best image quality, view high-definition programs using an antenna, the signal strength of the channel may be low. Connect your antenna is distorted. • ...

E422VLE Data Sheet
Page 1
... their respective owners. Vizio, the v logo, where vision meets value, razor led and other vizio trademarks are for you. E422VLE SMART TV AMAZING VALUE 42" CLASS LCD HDTV WITH VIZIO INTERNET APPS® VIZIO's 42" Class LCD HDTV with VIZIO Internet Apps® puts the best of the web right... on your wallet. Images used are the intellectual property of vizio inc. This energy saver also meets ENERGY STAR® Guidelines, making it 's all rights reserved. VIZIO INTERNET APPS® This TV has built-in WiFi for easy set...
... their respective owners. Vizio, the v logo, where vision meets value, razor led and other vizio trademarks are for you. E422VLE SMART TV AMAZING VALUE 42" CLASS LCD HDTV WITH VIZIO INTERNET APPS® VIZIO's 42" Class LCD HDTV with VIZIO Internet Apps® puts the best of the web right... on your wallet. Images used are the intellectual property of vizio inc. This energy saver also meets ENERGY STAR® Guidelines, making it 's all rights reserved. VIZIO INTERNET APPS® This TV has built-in WiFi for easy set...


