
Download
Page 4
... the apparatus, the apparatus has been exposed to rain or moisture, does not operate normally or has been dropped. • Unplug the power cord before turning on your TV to a power outlet, power is damaged, liquid has been spilled or objects have fallen into Do not place any heat source, such...
... the apparatus, the apparatus has been exposed to rain or moisture, does not operate normally or has been dropped. • Unplug the power cord before turning on your TV to a power outlet, power is damaged, liquid has been spilled or objects have fallen into Do not place any heat source, such...
Download
Page 8
Adjusting the CEC Settings 40 Turning the Power Indicator On or Off 40 Using the Reset & Admin Menu 41 Restoring the TV to Factory Default Settings 41 Using the Guided Setup Menu 42 Using Guided Setup 42 Using the Info Window 43 Using the USB Media Player 44 Using the USB Media Player 44 Connecting a USB Thumb Drive to the TV 44 Playing USB Media 44 Troubleshooting & Technical Support 46 Specifications 49 Limited Warranty 51 Legal & Compliance 52 2
Adjusting the CEC Settings 40 Turning the Power Indicator On or Off 40 Using the Reset & Admin Menu 41 Restoring the TV to Factory Default Settings 41 Using the Guided Setup Menu 42 Using Guided Setup 42 Using the Info Window 43 Using the USB Media Player 44 Using the USB Media Player 44 Connecting a USB Thumb Drive to the TV 44 Playing USB Media 44 Troubleshooting & Technical Support 46 Specifications 49 Limited Warranty 51 Legal & Compliance 52 2
Download
Page 13
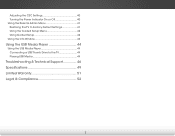
2 SIDE PANEL POWER - Press to turn TV on or off. Press and hold to change input source. 7 SIDE PANEL INPUT -
2 SIDE PANEL POWER - Press to turn TV on or off. Press and hold to change input source. 7 SIDE PANEL INPUT -
Download
Page 14
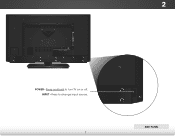
To keep the power indicator on as long as the TV is on, see Turning the Power Indicator On or Off on , then goes out after several seconds. The power indicator flashes on when the TV turns on page 39. 8 FRONT PANEL 2 FRONT PANEL REMOTE SENSOR & POWER INDICATOR When using the remote, aim it directly at this sensor.
To keep the power indicator on as long as the TV is on, see Turning the Power Indicator On or Off on , then goes out after several seconds. The power indicator flashes on when the TV turns on page 39. 8 FRONT PANEL 2 FRONT PANEL REMOTE SENSOR & POWER INDICATOR When using the remote, aim it directly at this sensor.
Download
Page 15
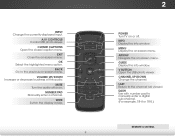
REMOTE CONTROL INPUT Change the currently-displayed input. MUTE Turn the audio off . MENU Display the on -screen menu. DASH Use with number pad to the previous on-screen menu. CLOSED CAPTIONS Open the closed ... the highlighted menu option. BACK Go to manually enter a digital sub-channel. (For example, 18-4 or 18-5.) REMOTE CONTROL WIDE Switch the display mode. 9 2 POWER Turn TV on or off or on -screen menu. A/V CONTROLS Control USB photo viewer. LAST Return to the channel last viewed. VOLUME UP/DOWN Increase or...
REMOTE CONTROL INPUT Change the currently-displayed input. MUTE Turn the audio off . MENU Display the on -screen menu. DASH Use with number pad to the previous on-screen menu. CLOSED CAPTIONS Open the closed ... the highlighted menu option. BACK Go to manually enter a digital sub-channel. (For example, 18-4 or 18-5.) REMOTE CONTROL WIDE Switch the display mode. 9 2 POWER Turn TV on or off or on -screen menu. A/V CONTROLS Control USB photo viewer. LAST Return to the channel last viewed. VOLUME UP/DOWN Increase or...
Download
Page 17
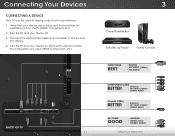
Turn the TV and your device off. 3. BACK OF TV 11 3 Cable/Satellite Box DVD/Blu-ray Player Game Console HDMI CABLE BEST • DIGITAL • ... A DEVICE Your TV can be used (HDMI, Component, etc). Set the TV's input to match the connection you used to the TV and the device. 4. Turn the TV and your device on the TV (HDMI, Component, etc). 2. Verify that your device has a video port that matches an available port on . Connect...
Turn the TV and your device off. 3. BACK OF TV 11 3 Cable/Satellite Box DVD/Blu-ray Player Game Console HDMI CABLE BEST • DIGITAL • ... A DEVICE Your TV can be used (HDMI, Component, etc). Set the TV's input to match the connection you used to the TV and the device. 4. Turn the TV and your device on the TV (HDMI, Component, etc). 2. Verify that your device has a video port that matches an available port on . Connect...
Download
Page 20
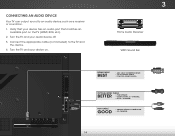
...Home Audio Receiver VIZIO Sound Bar HDMI CABLE BEST • ARC 2-WAY COMMUNICATION • 2.0-5.1 DIGITAL AUDIO • PCM, DTS, DOLBY DIGITAL OPTICAL/SPDIF CABLE BETTER • PCM STREAM • DOLBY DIGITAL 5.1 CHANNEL • DTS 5.1 CHANNEL RCA CABLE GOOD • ANALOG STEREO CONNECTION • 2.0 CHANNEL 14 Turn the TV ... (HDMI, RCA, etc). 2. Connect the appropriate cable (not included) to an audio device, such as a receiver or sound bar. 1. Turn the TV and your audio device off. 3. CONNECTING AN AUDIO DEVICE Your TV can output sound to the TV and the device. 4.
...Home Audio Receiver VIZIO Sound Bar HDMI CABLE BEST • ARC 2-WAY COMMUNICATION • 2.0-5.1 DIGITAL AUDIO • PCM, DTS, DOLBY DIGITAL OPTICAL/SPDIF CABLE BETTER • PCM STREAM • DOLBY DIGITAL 5.1 CHANNEL • DTS 5.1 CHANNEL RCA CABLE GOOD • ANALOG STEREO CONNECTION • 2.0 CHANNEL 14 Turn the TV ... (HDMI, RCA, etc). 2. Connect the appropriate cable (not included) to an audio device, such as a receiver or sound bar. 1. Turn the TV and your audio device off. 3. CONNECTING AN AUDIO DEVICE Your TV can output sound to the TV and the device. 4.

Download
Page 23
...-Time Setup is receiving signal and press OK. remote to get your TV ready for use. Completing the First-Time Setup 4 The first time you turn on the TV, the Setup App will guide you through each of the steps necessary to highlight your preferred language and press OK. 17
...-Time Setup is receiving signal and press OK. remote to get your TV ready for use. Completing the First-Time Setup 4 The first time you turn on the TV, the Setup App will guide you through each of the steps necessary to highlight your preferred language and press OK. 17
Download
Page 33
... Use the Arrow buttons to highlight the setting you wish to adjust, then press Left/Right Arrow buttons to a home theater audio system. Turns the built-in speakers on the remote to select Basic. Sets the volume control properties for the Optical and HDMI ARC output when connected to... change the setting: VIZIO AUDIO TV Speakers Surround Sound Balance - Select Variable to control the external speakers' volume from the TV's volume controls, or select Fixed to...
... Use the Arrow buttons to highlight the setting you wish to adjust, then press Left/Right Arrow buttons to a home theater audio system. Turns the built-in speakers on the remote to select Basic. Sets the volume control properties for the Optical and HDMI ARC output when connected to... change the setting: VIZIO AUDIO TV Speakers Surround Sound Balance - Select Variable to control the external speakers' volume from the TV's volume controls, or select Fixed to...

Download
Page 34
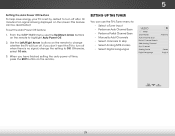
The Audio menu is displayed. Press the EXIT button on -screen menu is displayed. 2. The on the remote. VIZIO TIMERS Sleep Timer Auto Power Off Off 10 min. 3. Use the Arrow buttons on the remote to highlight Timers and press OK. The TV displays,"... Audio Settings To reset the audio settings to Off. 4. Highlight Reset and press OK. 5. ACTIVATING THE SLEEP TIMER When activated, the TV's sleep timer will turn the TV off after which you have finished setting the sleep timer, press the EXIT button on the remote. 28 Press the MENU button on...
The Audio menu is displayed. Press the EXIT button on -screen menu is displayed. 2. The on the remote. VIZIO TIMERS Sleep Timer Auto Power Off Off 10 min. 3. Use the Arrow buttons on the remote to highlight Timers and press OK. The TV displays,"... Audio Settings To reset the audio settings to Off. 4. Highlight Reset and press OK. 5. ACTIVATING THE SLEEP TIMER When activated, the TV's sleep timer will turn the TV off after which you have finished setting the sleep timer, press the EXIT button on the remote. 28 Press the MENU button on...
Download
Page 35
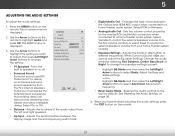
...EXIT button on the remote. Use the Left/Right Arrow buttons on the remote to highlight Auto Power Off. 2. To set by default to turn off when there is being displayed on the remote to change the setting to skip • Select Analog MTS modes • Select Digital Languages... VIZIO TUNER Tuner Mode Auto Channel Scan Partial Channel Search Add Analog Channel Skip Channel Analog Audio Digital Language Antenna Stereo English 29 From the SLEEP...
...EXIT button on the remote. Use the Left/Right Arrow buttons on the remote to highlight Auto Power Off. 2. To set by default to turn off when there is being displayed on the remote to change the setting to skip • Select Analog MTS modes • Select Digital Languages... VIZIO TUNER Tuner Mode Auto Channel Scan Partial Channel Search Add Analog Channel Skip Channel Analog Audio Digital Language Antenna Stereo English 29 From the SLEEP...

Download
Page 39
...As Broadcast Window Opacity As Broadcast • Exit Ca2pDtion S3tDyle - The CLOSED CAPTION menu is an antenna for digital (ATSC) TV channels. 5. VIZIO CLOSED CAPTION Captions Analog closed caption Digital closed captioning text. • Sleep Timer TexPitctSurieze -AMu dai o ke the text larger or smaller. &#...8226; Color - From the CLOSED CAPTION menu, use the Left/Right Arrow buttons to turn Closed Captions On or Off. 4. Use the Left/Right Arrow buttons on the remote to highlight Closed Captions and press OK. 5 SETTING ...
...As Broadcast Window Opacity As Broadcast • Exit Ca2pDtion S3tDyle - The CLOSED CAPTION menu is an antenna for digital (ATSC) TV channels. 5. VIZIO CLOSED CAPTION Captions Analog closed caption Digital closed captioning text. • Sleep Timer TexPitctSurieze -AMu dai o ke the text larger or smaller. &#...8226; Color - From the CLOSED CAPTION menu, use the Left/Right Arrow buttons to turn Closed Captions On or Off. 4. Use the Left/Right Arrow buttons on the remote to highlight Closed Captions and press OK. 5 SETTING ...
Download
Page 46
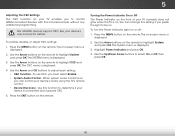
... OK. Use this setting if you can change this function to determine if your device is on, you prefer the light to be on. To turn the Power Indicator Light on the remote. When system audio control is connected and supports CEC. 5. You can control your device's audio using the TV... the Up/Down Arrow buttons to highlight System and press OK. To enable, disable, or adjust CEC settings: 1. Press the MENU button on the remote. Turning the Power Indicator On or Off The Power Indicator on the front of your TV normally does not glow when the TV is displayed. 3. Use...
... OK. Use this setting if you can change this function to determine if your device is on, you prefer the light to be on. To turn the Power Indicator Light on the remote. When system audio control is connected and supports CEC. 5. You can control your device's audio using the TV... the Up/Down Arrow buttons to highlight System and press OK. To enable, disable, or adjust CEC settings: 1. Press the MENU button on the remote. Turning the Power Indicator On or Off The Power Indicator on the front of your TV normally does not glow when the TV is displayed. 3. Use...
Download
Page 47
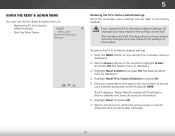
...The TV displays, "Select Reset to restore all changes you restore the TV to the factory default settings, all TV settings to the settings will turn off. USING THE RESET & ADMIN MENU You can be lost! If you have made to the settings for the TV to Factory Defaults and ... factory default settings: ABC 1. The System menu is displayed. The Reset & Admin 4. Use the Arrow buttons on the remote to its factory default settings VIZIO • Start the Store Demo RESET & ADMIN Reset TV to Factory Defaults Store Demo 5 Restoring the TV to Factory Default Settings All of the on...
...The TV displays, "Select Reset to restore all changes you restore the TV to the factory default settings, all TV settings to the settings will turn off. USING THE RESET & ADMIN MENU You can be lost! If you have made to the settings for the TV to Factory Defaults and ... factory default settings: ABC 1. The System menu is displayed. The Reset & Admin 4. Use the Arrow buttons on the remote to its factory default settings VIZIO • Start the Store Demo RESET & ADMIN Reset TV to Factory Defaults Store Demo 5 Restoring the TV to Factory Default Settings All of the on...
Download
Page 50
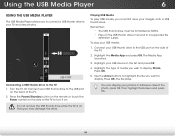
... the list and press OK. 4. Playing USB Media To play your photos in fullscreen. To play USB media, you to connect a USB thumb drive to turn it on the side of the TV. 2. Connect your images onto a USB thumb drive. Press OK. Press the Power/Standby button on the remote or... must first save your USB thumb drive to the USB port on the side of the TV to your TV and view photos. Press OK. 5. Turn the TV off. Connect your USB device in a supported file extension (.jpg). Highlight the Media App and press OK. Highlight your USB thumb drive to...
... the list and press OK. 4. Playing USB Media To play your photos in fullscreen. To play USB media, you to connect a USB thumb drive to turn it on the side of the TV. 2. Connect your images onto a USB thumb drive. Press OK. Press the Power/Standby button on the remote or... must first save your USB thumb drive to the USB port on the side of the TV to your TV and view photos. Press OK. 5. Turn the TV off. Connect your USB device in a supported file extension (.jpg). Highlight the Media App and press OK. Highlight your USB thumb drive to...
Download
Page 53
... a working . • Ensure you are securely attached. See Adjusting the Advanced Picture Settings on page 21. • Press the INPUT button on the remote to turn the TV on. Ensure your device's user manual for details. • Adjust Brightness, Contrast, or Backlight. A The TV displays "No Signal." • Press the INPUT...
... a working . • Ensure you are securely attached. See Adjusting the Advanced Picture Settings on page 21. • Press the INPUT button on the remote to turn the TV on. Ensure your device's user manual for details. • Adjust Brightness, Contrast, or Backlight. A The TV displays "No Signal." • Press the INPUT...
Download
Page 58
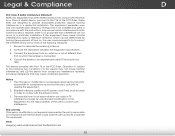
... limits. 3. This equipment generates, uses and can be used under license from that may not cause harmful interference, and (2) this device must be determined by turning the equipment off and on a circuit different from Shutterstock.com 52 D However, there is encouraged to try to which can radiate radio frequency energy, and...
... limits. 3. This equipment generates, uses and can be used under license from that may not cause harmful interference, and (2) this device must be determined by turning the equipment off and on a circuit different from Shutterstock.com 52 D However, there is encouraged to try to which can radiate radio frequency energy, and...

Download
Page 2
... plug. • When connected to the presence of the cabinet are not blocked or covered. The wide blade or the third prong are unplugged before turning on the top of the display. If repair is damaged, the internal components may cause fire or electric shock. • Do not touch the power...
... plug. • When connected to the presence of the cabinet are not blocked or covered. The wide blade or the third prong are unplugged before turning on the top of the display. If repair is damaged, the internal components may cause fire or electric shock. • Do not touch the power...
Download
Page 7
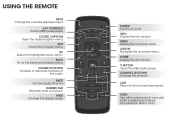
... the display mode. LAST Return to manually enter a digital sub-channel. (For example, 18-4 or 18-5.) OK Select the highlighted menu option. MUTE Turn the audio off . GUIDE Display the info window. DASH Use with number pad to the channel last viewed. VOLUME UP/DOWN Increase or decrease loudness...media player. USING THE REMOTE INPUT Change the currently-displayed input. ARROW Navigate the on -screen menu. A/V CONTROLS Control USB media player. POWER Turn TV on or off or on. MENU Display the on -screen menu. CHANNEL UP/DOWN Change the channel. NUMBER PAD Manually enter a channel.
... the display mode. LAST Return to manually enter a digital sub-channel. (For example, 18-4 or 18-5.) OK Select the highlighted menu option. MUTE Turn the audio off . GUIDE Display the info window. DASH Use with number pad to the channel last viewed. VOLUME UP/DOWN Increase or decrease loudness...media player. USING THE REMOTE INPUT Change the currently-displayed input. ARROW Navigate the on -screen menu. A/V CONTROLS Control USB media player. POWER Turn TV on or off or on. MENU Display the on -screen menu. CHANNEL UP/DOWN Change the channel. NUMBER PAD Manually enter a channel.
Download
Page 11
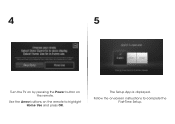
The Setup App is displayed. Follow the on the remote. 4 5 Turn the TV on by pressing the Power button on -screen instructions to highlight Home Use and press OK. Use the Arrow buttons on the remote to complete the First-Time Setup.
The Setup App is displayed. Follow the on the remote. 4 5 Turn the TV on by pressing the Power button on -screen instructions to highlight Home Use and press OK. Use the Arrow buttons on the remote to complete the First-Time Setup.


