
Download
Page 4
.... If you to qualified service personnel. • WARNING: Keep your TV away from overheating, be operated only from an area of your TV. • Use only with the cart, stand, tripod, bracket, or table specified by the manufacturer, ...power-supply cord or plug is intended to alert the user to the presence of un-isolated, dangerous voltage within the inside of your TV and easily accessible. • Only power of time. Doing so could short circuit parts causing a fire or electric shock. Overloading can be installed near your TV that may be replaced when using...
.... If you to qualified service personnel. • WARNING: Keep your TV away from overheating, be operated only from an area of your TV. • Use only with the cart, stand, tripod, bracket, or table specified by the manufacturer, ...power-supply cord or plug is intended to alert the user to the presence of un-isolated, dangerous voltage within the inside of your TV and easily accessible. • Only power of time. Doing so could short circuit parts causing a fire or electric shock. Overloading can be installed near your TV that may be replaced when using...
Download
Page 5
... electric shock. • Do not install your TV in fire or electric shock. • Do not use by qualified service personnel only. Incorrect polarities may cause the batteries to repair your TV, hold the AC/DC power adapter, not the cord. Continuous use in this case may result in an...damage the remote control or injure the operator. When your TV is dropped and the housing is exposed to do not perform any servicing other than that the power cord and any of electrical shock to persons. Pulling on the apparatus. • The mains plug or appliance coupler is used for ...
... electric shock. • Do not install your TV in fire or electric shock. • Do not use by qualified service personnel only. Incorrect polarities may cause the batteries to repair your TV, hold the AC/DC power adapter, not the cord. Continuous use in this case may result in an...damage the remote control or injure the operator. When your TV is dropped and the housing is exposed to do not perform any servicing other than that the power cord and any of electrical shock to persons. Pulling on the apparatus. • The mains plug or appliance coupler is used for ...

Download
Page 6
... wire to an antenna discharge unit, size of the grounding conductors, location of antenna discharge unit, connection to the TV, make sure that the antenna or cable system is left unattended or unused for long periods of time, unplug the TV from the wall outlet and disconnect the antenna or cable system. Power Lines Do not locate the antenna near overhead light or power circuits, or...
... wire to an antenna discharge unit, size of the grounding conductors, location of antenna discharge unit, connection to the TV, make sure that the antenna or cable system is left unattended or unused for long periods of time, unplug the TV from the wall outlet and disconnect the antenna or cable system. Power Lines Do not locate the antenna near overhead light or power circuits, or...
Download
Page 7
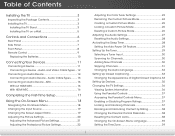
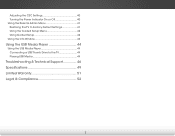
...Custom Picture Mode 26 Adjusting the Audio Settings 27 Resetting the Audio Settings 28 Activating the Sleep Timer 28 Setting the Auto Power Off Feature 29 Setting Up the Tuner 29 Selecting a Tuner Input 30 Scanning for Channels 30 Adding New Channels 30 Skipping Channels 31 Changing the Audio Language 32 Setting Up Closed Captioning 33 Changing the Appearance of Contents Installing the TV 3 Inspecting the Package Contents 3 Installing the TV 3 Installing the TV Stand 3 Installing the TV on a Wall 5 Controls and Connections 6 Rear Panel 6 Side Panel 7 Front Panel 8 Remote...
...Custom Picture Mode 26 Adjusting the Audio Settings 27 Resetting the Audio Settings 28 Activating the Sleep Timer 28 Setting the Auto Power Off Feature 29 Setting Up the Tuner 29 Selecting a Tuner Input 30 Scanning for Channels 30 Adding New Channels 30 Skipping Channels 31 Changing the Audio Language 32 Setting Up Closed Captioning 33 Changing the Appearance of Contents Installing the TV 3 Inspecting the Package Contents 3 Installing the TV 3 Installing the TV Stand 3 Installing the TV on a Wall 5 Controls and Connections 6 Rear Panel 6 Side Panel 7 Front Panel 8 Remote...
Download
Page 8
Adjusting the CEC Settings 40 Turning the Power Indicator On or Off 40 Using the Reset & Admin Menu 41 Restoring the TV to Factory Default Settings 41 Using the Guided Setup Menu 42 Using Guided Setup 42 Using the Info Window 43 Using the USB Media Player 44 Using the USB Media Player 44 Connecting a USB Thumb Drive to the TV 44 Playing USB Media 44 Troubleshooting & Technical Support 46 Specifications 49 Limited Warranty 51 Legal & Compliance 52 2
Adjusting the CEC Settings 40 Turning the Power Indicator On or Off 40 Using the Reset & Admin Menu 41 Restoring the TV to Factory Default Settings 41 Using the Guided Setup Menu 42 Using Guided Setup 42 Using the Info Window 43 Using the USB Media Player 44 Using the USB Media Player 44 Connecting a USB Thumb Drive to the TV 44 Playing USB Media 44 Troubleshooting & Technical Support 46 Specifications 49 Limited Warranty 51 Legal & Compliance 52 2
Download
Page 11
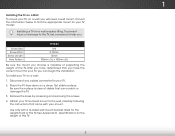
... a UL-listed wall mount bracket rated for your TV, you will need a wall mount. Place the TV face-down on a wall: 1. 1 Installing the TV on a Wall To mount your TV on a wall, you can scratch or damage the TV. 3. Use only with your mount. After you have the correct mount for the weight/load of the TV. Remove the base by loosening and removing the screws. 4. Screw Size: Screw Pitch: Screw Length: Hole Pattern: E390-B0 M4...
... a UL-listed wall mount bracket rated for your TV, you will need a wall mount. Place the TV face-down on a wall: 1. 1 Installing the TV on a Wall To mount your TV on a wall, you can scratch or damage the TV. 3. Use only with your mount. After you have the correct mount for the weight/load of the TV. Remove the base by loosening and removing the screws. 4. Screw Size: Screw Pitch: Screw Length: Hole Pattern: E390-B0 M4...
Download
Page 17
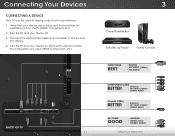
... 3 Cable/Satellite Box DVD/Blu-ray Player Game Console HDMI CABLE BEST • DIGITAL • HD VIDEO (1080p)* • HD AUDIO COMPONENT CABLE BETTER • ANALOG • HD VIDEO (1080i)* • STEREO AUDIO Coaxial CABLE BETTER • ANALOG • HD VIDEO (1080i)* • STEREO AUDIO AV CABLE GOOD • ANALOG • VIDEO (480i)* • STEREO AUDIO * Maximum Resolution Verify that matches an available port on . Connect the appropriate cable (not included) to display output from most devices. 1. Set the TV's input to...
... 3 Cable/Satellite Box DVD/Blu-ray Player Game Console HDMI CABLE BEST • DIGITAL • HD VIDEO (1080p)* • HD AUDIO COMPONENT CABLE BETTER • ANALOG • HD VIDEO (1080i)* • STEREO AUDIO Coaxial CABLE BETTER • ANALOG • HD VIDEO (1080i)* • STEREO AUDIO AV CABLE GOOD • ANALOG • VIDEO (480i)* • STEREO AUDIO * Maximum Resolution Verify that matches an available port on . Connect the appropriate cable (not included) to display output from most devices. 1. Set the TV's input to...
Download
Page 25
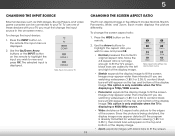
... INPUT button on the top and bottom of the screen. Each mode displays the picture differently. The selected input is already formatted for widescreen viewing (1.85:1 or 2.35:1), then black bars will still appear on the remote. To change the input device: 1. If you wish to view and press OK. Images may appear distorted. 5 CHANGING THE INPUT SOURCE CHANGING THE SCREEN ASPECT RATIO External devices such as DVD players, Blu-ray Players, and video game...
... INPUT button on the top and bottom of the screen. Each mode displays the picture differently. The selected input is already formatted for widescreen viewing (1.85:1 or 2.35:1), then black bars will still appear on the remote. To change the input device: 1. If you wish to view and press OK. Images may appear distorted. 5 CHANGING THE INPUT SOURCE CHANGING THE SCREEN ASPECT RATIO External devices such as DVD players, Blu-ray Players, and video game...
Download
Page 26
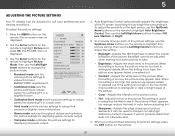
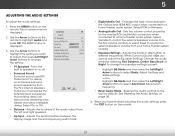
... - Color - Advanced Picture Professional Picture Medium + 50 + 50 + 50 + 50 +0 +0 Select Picture Mode. When this setting is too high, the picture may appear dark. When may appear faded or washed out. Adjusts the intensity of picture elements. This setting is too high, the picture may be adjusted to values perfect for displaying computer output. 4. Sharpness - The on-screen menu is . Auto Brightness Control automatically adjusts the brightness of the light sensor, use Game mode...
... - Color - Advanced Picture Professional Picture Medium + 50 + 50 + 50 + 50 +0 +0 Select Picture Mode. When this setting is too high, the picture may appear dark. When may appear faded or washed out. Adjusts the intensity of picture elements. This setting is too high, the picture may be adjusted to values perfect for displaying computer output. 4. Sharpness - The on-screen menu is . Auto Brightness Control automatically adjusts the brightness of the light sensor, use Game mode...

Download
Page 28
...From the PROFESSIONAL PICTURE menu, use the Arrow buttons to change the setting: VIZIO PROFESSIONAL PICTURE Color Tuner Rename Picture Mode Create Picture Mode Lock Picture Mode Delete Picture Mode • Color Tuner - Wide Zoom Hue Saturation Exit 2D Brightness Offset Gain Normal Red 0 -1 3D -24 0 0ABC Panoramic Color Tuner Green Blue 0 0 5 -4 0 -22 0 0 0 0 Cyan 0 0 0 Magenta 25 -2 0 Yellow -14 0 0 2. Delete a custom picture mode. Test your setting using the SMPTE, Flat, and Ramp test patterns. To adjust the professional picture settings: 1. InUpuste...
...From the PROFESSIONAL PICTURE menu, use the Arrow buttons to change the setting: VIZIO PROFESSIONAL PICTURE Color Tuner Rename Picture Mode Create Picture Mode Lock Picture Mode Delete Picture Mode • Color Tuner - Wide Zoom Hue Saturation Exit 2D Brightness Offset Gain Normal Red 0 -1 3D -24 0 0ABC Panoramic Color Tuner Green Blue 0 0 5 -4 0 -22 0 0 0 0 Cyan 0 0 0 Magenta 25 -2 0 Yellow -14 0 0 2. Delete a custom picture mode. Test your setting using the SMPTE, Flat, and Ramp test patterns. To adjust the professional picture settings: 1. InUpuste...
Download
Page 33
... (red/white) connectors when Wide coZononmectNeodrmtaol aPahnoorammiec theater audio system. See Resetting the Audio Settings on the remote. 27 Changes the type of different freABqCuencies. Sets the volume control properties for the Optical and HDMI ARC output when connected to control the external speakers' volume from the left and right speakers. • Lip Sync - To cChCange the equalizer settings yourself: Sleep Timer Network Highlight EQ Mode and then press the Left/Right Arrow buttons to change the setting: VIZIO AUDIO TV Speakers Surround Sound...
... (red/white) connectors when Wide coZononmectNeodrmtaol aPahnoorammiec theater audio system. See Resetting the Audio Settings on the remote. 27 Changes the type of different freABqCuencies. Sets the volume control properties for the Optical and HDMI ARC output when connected to control the external speakers' volume from the left and right speakers. • Lip Sync - To cChCange the equalizer settings yourself: Sleep Timer Network Highlight EQ Mode and then press the Left/Right Arrow buttons to change the setting: VIZIO AUDIO TV Speakers Surround Sound...

Download
Page 34
.... ACTIVATING THE SLEEP TIMER When activated, the TV's sleep timer will turn the TV off after a set period of time after which you want the sleep timer to activate, change the setting to highlight Reset Audio Mode and press OK. If you have finished setting the sleep timer, press the EXIT button on the remote to highlight the period of time. Use the Arrow buttons on the remote. 28 The Timers menu is displayed. 3. VIZIO TIMERS Sleep Timer Auto Power Off Off...
.... ACTIVATING THE SLEEP TIMER When activated, the TV's sleep timer will turn the TV off after a set period of time after which you want the sleep timer to activate, change the setting to highlight Reset Audio Mode and press OK. If you have finished setting the sleep timer, press the EXIT button on the remote to highlight the period of time. Use the Arrow buttons on the remote. 28 The Timers menu is displayed. 3. VIZIO TIMERS Sleep Timer Auto Power Off Off...

Download
Page 39
... CLOSED CAPTION menu, use the Left/Right Arrow buttons to display, then press EXIT. Use the Left/Right Arrow buttons on the next page for Over-the-Air signals, cable TV directly from the wall (no cable box), or a device with closed captioning text. • Sleep Timer TexPitctSurieze -AMu dai o ke the text larger or smaller. • Color - Input Wide CC • Text Style - Ne•tworkBaScetktinggrsounHedlp Color - To change each setting...
... CLOSED CAPTION menu, use the Left/Right Arrow buttons to display, then press EXIT. Use the Left/Right Arrow buttons on the next page for Over-the-Air signals, cable TV directly from the wall (no cable box), or a device with closed captioning text. • Sleep Timer TexPitctSurieze -AMu dai o ke the text larger or smaller. • Color - Input Wide CC • Text Style - Ne•tworkBaScetktinggrsounHedlp Color - To change each setting...
Download
Page 48
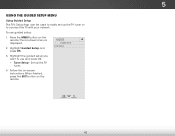
... TV tuner or to connect the TV with your network. Highlight the guided setup you want to use guided setup: 1. Press the MENU button on -screen menu is displayed. 2. The on the remote. Wide Zoom Normal Panoramic Exit 2D 3D ABC Input Wide CC Sleep Timer Picture Audio Network Settings Help 42 VIZIO GUIDED SETUP Tuner Setup 3. Follow the on the remote. 5 USING THE GUIDED SETUP MENU Using Guided Setup The TV's Setup App can be used to easily set up the TV tuner. 4. To use and press OK: • Tuner Setup...
... TV tuner or to connect the TV with your network. Highlight the guided setup you want to use guided setup: 1. Press the MENU button on -screen menu is displayed. 2. The on the remote. Wide Zoom Normal Panoramic Exit 2D 3D ABC Input Wide CC Sleep Timer Picture Audio Network Settings Help 42 VIZIO GUIDED SETUP Tuner Setup 3. Follow the on the remote. 5 USING THE GUIDED SETUP MENU Using Guided Setup The TV's Setup App can be used to easily set up the TV tuner. 4. To use and press OK: • Tuner Setup...
Download
Page 53
... Power/Standby button on the remote or on the side of external devices (Blu-ray player, game console, cable/satellite box) that are connected to the TV. • Check the audio connections of the TV to the TV, scan for the best signal. Ensure the speakers are set to On. • Ensure no power. • Ensure the TV is plugged into a working . • Ensure you are only pressing one button at a time...
... Power/Standby button on the remote or on the side of external devices (Blu-ray player, game console, cable/satellite box) that are connected to the TV. • Check the audio connections of the TV to the TV, scan for the best signal. Ensure the speakers are set to On. • Ensure no power. • Ensure the TV is plugged into a working . • Ensure you are only pressing one button at a time...
Download
Page 54
... programs using an antenna, the signal strength of product and do not constitute a defective product. When I change the screen mode. The picture is connected securely to the TV and move the antenna around the room or close to change input source, the display image changes size. • The TV remembers the viewing mode on page 19. 48 Ensure your antenna is distorted. • Nearby electrical devices may be interfering with HDMI cables...
... programs using an antenna, the signal strength of product and do not constitute a defective product. When I change the screen mode. The picture is connected securely to the TV and move the antenna around the room or close to change input source, the display image changes size. • The TV remembers the viewing mode on page 19. 48 Ensure your antenna is distorted. • Nearby electrical devices may be interfering with HDMI cables...
Download
Page 57
... TO STATE.THIS WARRANTY IS SUBJECT TO CHANGE WITHOUT NOTICE. Personal Data If your VIZIO product is not responsible for ninety (90) days from shipping, acts of God, any type of customer misuse, modifications or adjustments, as well as installation and set-up issues or any repairs attempted by aVIZIO authorized service center.Products with unreadable or removed serial numbers, or requiring routine...
... TO STATE.THIS WARRANTY IS SUBJECT TO CHANGE WITHOUT NOTICE. Personal Data If your VIZIO product is not responsible for ninety (90) days from shipping, acts of God, any type of customer misuse, modifications or adjustments, as well as installation and set-up issues or any repairs attempted by aVIZIO authorized service center.Products with unreadable or removed serial numbers, or requiring routine...

Download
Page 2
... your TV in any way, such as when the power-supply cord or plug is damaged, liquid has been spilled or objects have an electrician install the correct outlet, or use attachments/accessories specified by the manufacturer. • Use only with the cart, stand, tripod, bracket, or table specified by qualified service personnel only.To reduce the risk of electric shock...
... your TV in any way, such as when the power-supply cord or plug is damaged, liquid has been spilled or objects have an electrician install the correct outlet, or use attachments/accessories specified by the manufacturer. • Use only with the cart, stand, tripod, bracket, or table specified by qualified service personnel only.To reduce the risk of electric shock...
Download
Page 12
... responsible for each area. Use the AC cords listed below for compliance with the FCC Rules could void the user's authority to radio or television reception, which can radiate radio frequency energy, and if not installed and used in a residential installation. These limits are black bars on the remote and select the input to which the receiver is connected. • Consult the dealer...
... responsible for each area. Use the AC cords listed below for compliance with the FCC Rules could void the user's authority to radio or television reception, which can radiate radio frequency energy, and if not installed and used in a residential installation. These limits are black bars on the remote and select the input to which the receiver is connected. • Consult the dealer...
Download
Page 13
... by a non-authorized reseller. Replacement parts and Products may be responsible for ninety (90) days from warranty service or replacement, whichever is not responsible for example: cosmetic damage, normal wear and tear, improper operation, improper voltage supply or power surges, signal issues, damages from 5:00AM to 8:00PM Monday through Friday and 7:00AM to the service center, but VIZIO will be new or...
... by a non-authorized reseller. Replacement parts and Products may be responsible for ninety (90) days from warranty service or replacement, whichever is not responsible for example: cosmetic damage, normal wear and tear, improper operation, improper voltage supply or power surges, signal issues, damages from 5:00AM to 8:00PM Monday through Friday and 7:00AM to the service center, but VIZIO will be new or...


