
Download
Page 5
... in accordance with instructions. Incorrect polarities may cause the batteries to rain or other moisture. - Your TV is exposed to leak which can damage the remote control or injure the operator. Do not try to dripping or splashing and no objects filled with arrowhead symbol within the product's enclosure that the...
... in accordance with instructions. Incorrect polarities may cause the batteries to rain or other moisture. - Your TV is exposed to leak which can damage the remote control or injure the operator. Do not try to dripping or splashing and no objects filled with arrowhead symbol within the product's enclosure that the...
Download
Page 7
... 3 Inspecting the Package Contents 3 Installing the TV 3 Installing the TV Stand 3 Installing the TV on a Wall 5 Controls and Connections 6 Back Panel 6 Side Panel 7 Front Panel 8 Remote Control 9 Replacing the Batteries 10 Connecting Your Devices 11 Connecting A Device 11 Connecting a Device -
... 3 Inspecting the Package Contents 3 Installing the TV 3 Installing the TV Stand 3 Installing the TV on a Wall 5 Controls and Connections 6 Back Panel 6 Side Panel 7 Front Panel 8 Remote Control 9 Replacing the Batteries 10 Connecting Your Devices 11 Connecting A Device 11 Connecting a Device -
Download
Page 9
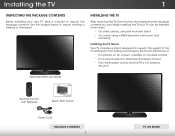
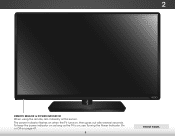
... the TV. Installing the TV 1 Inspecting the Package Contents Before installing your new TV, take a moment to ensure nothing is not properly secured VIZIO LED HDTV with Stand Remote Control with Batteries Quick Start Guide Power Cord Package Contents 3 TV on an uneven, unstable, or non-level surface • It is pushed...
... the TV. Installing the TV 1 Inspecting the Package Contents Before installing your new TV, take a moment to ensure nothing is not properly secured VIZIO LED HDTV with Stand Remote Control with Batteries Quick Start Guide Power Cord Package Contents 3 TV on an uneven, unstable, or non-level surface • It is pushed...
Download
Page 14
The power indicator flashes on when the TV turns on page 47. 8 Front Panel 2 REMOTE SENSOR & POWER INDICATOR When using the remote, aim it directly at this sensor. To keep the power indicator on as long as the TV is on, see Turning the Power Indicator On or Off on , then goes out after several seconds.
The power indicator flashes on when the TV turns on page 47. 8 Front Panel 2 REMOTE SENSOR & POWER INDICATOR When using the remote, aim it directly at this sensor. To keep the power indicator on as long as the TV is on, see Turning the Power Indicator On or Off on , then goes out after several seconds.

Download
Page 15
...Power Turn TV on . Guide Display the info window. Back Go to manually enter a digital sub-channel. (For example, 18-4 or 18-5.) Remote Control 9 Number Pad Manually enter a channel. Dash Use with number pad to the previous on-screen menu. Ok Select the highlighted menu option.... Volume Up/Down Increase or decrease loudness of the audio. V Button Open the VIZIO Internet Apps Plus® dock. Menu Display the on -screen menu. 2 Remote Control App launcher Quickly launch the pictured app. Channel Up/Down Change the channel. Arrow Navigate the ...
...Power Turn TV on . Guide Display the info window. Back Go to manually enter a digital sub-channel. (For example, 18-4 or 18-5.) Remote Control 9 Number Pad Manually enter a channel. Dash Use with number pad to the previous on-screen menu. Ok Select the highlighted menu option.... Volume Up/Down Increase or decrease loudness of the audio. V Button Open the VIZIO Internet Apps Plus® dock. Menu Display the on -screen menu. 2 Remote Control App launcher Quickly launch the pictured app. Channel Up/Down Change the channel. Arrow Navigate the ...
Download
Page 16
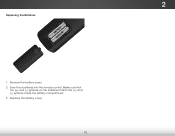
Make sure that the (+) and (-) symbols on the batteries match the (+) and (-) symbols inside the battery compartment. 3. 2 Replacing the Batteries 1. Remove the battery cover. 2. Replace the battery cover. 10 Insert two batteries into the remote control.
Make sure that the (+) and (-) symbols on the batteries match the (+) and (-) symbols inside the battery compartment. 3. 2 Replacing the Batteries 1. Remove the battery cover. 2. Replace the battery cover. 10 Insert two batteries into the remote control.
Download
Page 24
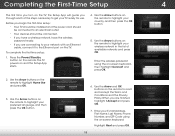
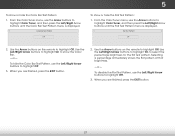
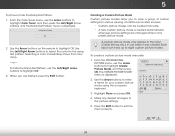
... with an Ethernet cable, connect it to the Ethernet port on the TV. To complete the first-time setup: 1. Use the Arrow buttons on the remote to an electrical outlet. • Your devices should be connected. • If you have a wireless network, have the wireless password ready. • If you... should be installed and the power cord should be connected to highlight your country, and then press the OK button. 5. The TV powers on the remote. Use the Arrow buttons on -screen keyboard, then highlight Connect and press OK. 2. When you through each of available networks and press OK. Enter...
... with an Ethernet cable, connect it to the Ethernet port on the TV. To complete the first-time setup: 1. Use the Arrow buttons on the remote to an electrical outlet. • Your devices should be connected. • If you have a wireless network, have the wireless password ready. • If you... should be installed and the power cord should be connected to highlight your country, and then press the OK button. 5. The TV powers on the remote. Use the Arrow buttons on -screen keyboard, then highlight Connect and press OK. 2. When you through each of available networks and press OK. Enter...

Download
Page 25
If the TV Signal screen appears, the TV will need to highlight Begin Scan and press OK. 10. The First-Time Setup is connected to select the input your TV source and press OK. Completing the First-Time Setup 4 8. Use the arrow buttons on the remote to scan for channels, which takes several minutes. Use the Arrow and OK buttons on the remote to a cable from the wall. 9. If you have cable TV, select whether you have a cable box or if you connect the TV directly to highlight your TV source is complete. 19 Use the Arrow buttons on the remote to .
If the TV Signal screen appears, the TV will need to highlight Begin Scan and press OK. 10. The First-Time Setup is connected to select the input your TV source and press OK. Completing the First-Time Setup 4 8. Use the arrow buttons on the remote to scan for channels, which takes several minutes. Use the Arrow and OK buttons on the remote to a cable from the wall. 9. If you have cable TV, select whether you have a cable box or if you connect the TV directly to highlight your TV source is complete. 19 Use the Arrow buttons on the remote to .

Download
Page 26
... any time to return to the previous menu screen. Input Wide CC Sleep Timer Picture Audio Network Settings Help 20 To open the on the remote. From this menu, you can : • Adjust the Picture settings • Adjust the Audio settings • Set the Sleep Timer • Adjust... • Set up Closed Captioning • Name Inputs • Adjust TV settings • Access the Guided Setup • Access the User Manual VIZIO TV Settings Picture Audio Timers Network Tuner CC Closed Captions Devices System Guided Setup User Manual Navigating the On-Screen Menu To open the on...
... any time to return to the previous menu screen. Input Wide CC Sleep Timer Picture Audio Network Settings Help 20 To open the on the remote. From this menu, you can : • Adjust the Picture settings • Adjust the Audio settings • Set the Sleep Timer • Adjust... • Set up Closed Captioning • Name Inputs • Adjust TV settings • Access the Guided Setup • Access the User Manual VIZIO TV Settings Picture Audio Timers Network Tuner CC Closed Captions Devices System Guided Setup User Manual Navigating the On-Screen Menu To open the on...
Download
Page 27
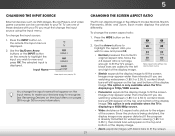
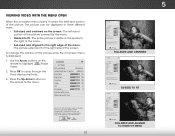
... more information. 21 The TV can be connected to view and press OK. Each mode displays the picture differently. Press the WIDE button on the remote to fit the screen. This option is only available when the TV is displaying a 480i/480p source. • Wide stretches a 4:3 aspect ratio picture to...the screen. If the program is displayed. Use the Arrow buttons to recognize. Use the Up/Down Arrow buttons or the INPUT button on the remote. 2. See Renaming Devices on the Input Menu on the Input menu to make your TV. You change the input source using the Input menu....
... more information. 21 The TV can be connected to view and press OK. Each mode displays the picture differently. Press the WIDE button on the remote to fit the screen. This option is only available when the TV is displaying a 480i/480p source. • Wide stretches a 4:3 aspect ratio picture to...the screen. If the program is displayed. Use the Arrow buttons to recognize. Use the Up/Down Arrow buttons or the INPUT button on the remote. 2. See Renaming Devices on the Input Menu on the Input menu to make your TV. You change the input source using the Input menu....
Download
Page 28
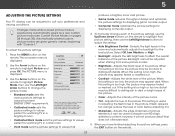
...best picture, use Calibrated mode. The picture can be displayed in Etxhit ree d2Differen3tD ways: • Full-sized and centered on the remote to fit - Contrast - Standard picture mode meets ENERGY STAR® requirements. Contrast - Advanced Picture Professional Picture Standard + 85 + ...Panoramic Exit 2D 3D ABC Input Wide CC Sleep Timer Picture Audio Network Settings Help Full-sized and centered Wide Exit VIZIO Zoom Picture Picture Mode Backlight - Standard picture mode meets ENERGY STAR® requirements. Advanced Picture Professional Picture Wide ...
...best picture, use Calibrated mode. The picture can be displayed in Etxhit ree d2Differen3tD ways: • Full-sized and centered on the remote to fit - Contrast - Standard picture mode meets ENERGY STAR® requirements. Contrast - Advanced Picture Professional Picture Standard + 85 + ...Panoramic Exit 2D 3D ABC Input Wide CC Sleep Timer Picture Audio Network Settings Help Full-sized and centered Wide Exit VIZIO Zoom Picture Picture Mode Backlight - Standard picture mode meets ENERGY STAR® requirements. Advanced Picture Professional Picture Wide ...
Download
Page 29
... best picture, use the Left/Right Arrow buttons to suit your preferences and viewing conditions. To manually change the picture mode: VIZIO Picture Picture Mode Auto Brightness Control Backlight - Backlight cannot be adjusted Wide whZoeomn staNrotrimnagl frPoanmorasmoicme picture modes. • Brightness - Adjusts... picture. When this settingABisC too low, the picture may appear faded Input or wWaideshedCoCut. Use the Arrow buttons on the remote to sharpen non-HD (high definition) content; Detects the light levels in the room and automatically adjusts the backlight for ...
... best picture, use the Left/Right Arrow buttons to suit your preferences and viewing conditions. To manually change the picture mode: VIZIO Picture Picture Mode Auto Brightness Control Backlight - Backlight cannot be adjusted Wide whZoeomn staNrotrimnagl frPoanmorasmoicme picture modes. • Brightness - Adjusts... picture. When this settingABisC too low, the picture may appear faded Input or wWaideshedCoCut. Use the Arrow buttons on the remote to sharpen non-HD (high definition) content; Detects the light levels in the room and automatically adjusts the backlight for ...
Download
Page 30
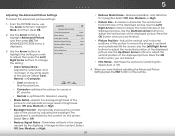
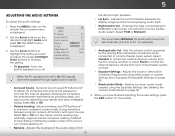
...buttons to adjust the vertical position of the picture. Use the Arrow buttons to change the setting: VIZIO AAddvvaanncceedd PPiiccttuurree CCoolloorr TTeemmppeerraattuurree BBllaacckk DDeettaaiill BBaacckklliigghhtt CCoonnttrrooll RReedduuccee SSiiggnnaall NNooiissee RReedduuccee BBlloocckk NNooiissee PPiiccttuurree SPiozesition PPiiccttuurree PSoizseition...: 1. From the Picture menu, use as a PC monitor. • Normal is controlled by the content on the remote. Select Off, Low, Medium, or High. • Backlight Control - Diminishes artifacts in the image caused by adjusting ...
...buttons to adjust the vertical position of the picture. Use the Arrow buttons to change the setting: VIZIO AAddvvaanncceedd PPiiccttuurree CCoolloorr TTeemmppeerraattuurree BBllaacckk DDeettaaiill BBaacckklliigghhtt CCoonnttrrooll RReedduuccee SSiiggnnaall NNooiissee RReedduuccee BBlloocckk NNooiissee PPiiccttuurree SPiozesition PPiiccttuurree PSoizseition...: 1. From the Picture menu, use as a PC monitor. • Normal is controlled by the content on the remote. Select Off, Low, Medium, or High. • Backlight Control - Diminishes artifacts in the image caused by adjusting ...
Download
Page 31
... settings allow technicians to manually calibrate the TV. Input Wide CC 4. Prevent changes to adjust the value. Use the Arrow buttons on the remote to highlight the Hue, ExSitatura2tDion, Br3iDghtness, Offset, or Gain of picture settings. Use the Left/RAiBgCht Arrow buttons to picture modes. •... are finished press the OK button to save groups of the color you wish to adjust, then press OK to change the setting: VIZIO Professional picture Color Tuner Rename Picture Mode Create Picture Mode Lock Picture Mode Delete Picture Mode • Color Tuner - To adjust the HSB...
... settings allow technicians to manually calibrate the TV. Input Wide CC 4. Prevent changes to adjust the value. Use the Arrow buttons on the remote to highlight the Hue, ExSitatura2tDion, Br3iDghtness, Offset, or Gain of picture settings. Use the Left/RAiBgCht Arrow buttons to picture modes. •... are finished press the OK button to save groups of the color you wish to adjust, then press OK to change the setting: VIZIO Professional picture Color Tuner Rename Picture Mode Create Picture Mode Lock Picture Mode Delete Picture Mode • Color Tuner - To adjust the HSB...
Download
Page 32
... highlight Color Tuner, and then press OK. Press the OK button to turn off or on the remote to turn the color channel off . 4. Use the Arrow buttons on . Use the Arrow buttons to highlight another color channel to highlight the Gain and ...
... highlight Color Tuner, and then press OK. Press the OK button to turn off or on the remote to turn the color channel off . 4. Use the Arrow buttons on . Use the Arrow buttons to highlight another color channel to highlight the Gain and ...
Download
Page 33
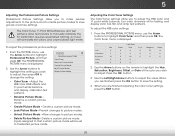
... highlight Color Tuner, and then press the Left/Right Arrow buttons until the Flat Test Pattern menu is displayed. Use the Arrow buttons on the remote to highlight Off. From the Color Tuner menu, use the Left/Right Arrow buttons to highlight Off. 3. Selecting a percentage immediately shows the flat pattern at... that brightness. -or- To show or hide the Flat Test Pattern: 1. Use the Arrow buttons on the remote to highlight Off. When you are finished, press the EXIT button. 2.
... highlight Color Tuner, and then press the Left/Right Arrow buttons until the Flat Test Pattern menu is displayed. Use the Arrow buttons on the remote to highlight Off. From the Color Tuner menu, use the Left/Right Arrow buttons to highlight Off. 3. Selecting a percentage immediately shows the flat pattern at... that brightness. -or- To show or hide the Flat Test Pattern: 1. Use the Arrow buttons on the remote to highlight Off. When you are finished, press the EXIT button. 2.
Download
Page 34
... Mode, and then press OK. Selecting a color immediately shows that color ramp. -or- From the PROFESSIONAL PICTURE menu, use the Arrow buttons to highlight Off. 3. VIZIO Create PICTURE MODE Custom1_ abc def ghi j k l mn o p q r s t u v wx y z 0 123456789 .@# .com Space Done 4. Press the EXIT button to the input (..., Blu-ray, etc.) in any desired changes to save a group of custom settings for your custom picture mode using the on the remote to eight custom picture modes. A custom picture mode only applies to exit the menu screens. 28 Highlight Done and press OK. From the...
... Mode, and then press OK. Selecting a color immediately shows that color ramp. -or- From the PROFESSIONAL PICTURE menu, use the Arrow buttons to highlight Off. 3. VIZIO Create PICTURE MODE Custom1_ abc def ghi j k l mn o p q r s t u v wx y z 0 123456789 .@# .com Space Done 4. Press the EXIT button to the input (..., Blu-ray, etc.) in any desired changes to save a group of custom settings for your custom picture mode using the on the remote to eight custom picture modes. A custom picture mode only applies to exit the menu screens. 28 Highlight Done and press OK. From the...
Download
Page 35
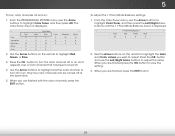
... Mode Custom picture modes can be locked with "Custom 1," but you can rename custom picture modes to make them easy to remember. VIZIO LOCK PICTURE MODE Enter the Picture Control PIN to exit the menu screens. See Adjusting the Picture Settings on -screen keyboard. 4. InPpruet.... Make any desired changes to an existing custom setting. Use the Arrow buttons to enter a custom name using the number keys on your remote to enter your remote to enter a unique 4-digit passcoAdBCe. 3. Set the Picture Mode to the picture modes. 4. Save To unlock all custom picture modes:...
... Mode Custom picture modes can be locked with "Custom 1," but you can rename custom picture modes to make them easy to remember. VIZIO LOCK PICTURE MODE Enter the Picture Control PIN to exit the menu screens. See Adjusting the Picture Settings on -screen keyboard. 4. InPpruet.... Make any desired changes to an existing custom setting. Use the Arrow buttons to enter a custom name using the number keys on your remote to enter your remote to enter a unique 4-digit passcoAdBCe. 3. Set the Picture Mode to the picture modes. 4. Save To unlock all custom picture modes:...
Download
Page 37
...•tworkDeSelettitnegsAudHeilop Mode - Deletes a custom audio mode created using either preset or custom settings. Turns the built-in speakers on the remote. Lip Sync - Surround sound uses DTS TruSurround™ to a home theater audio system. Adjusts the synchronization between program content, AV...the audio output from 31 the left and right speakers. • Lip Sync - Exit 2D 3D • Analog Audio Out - VIZIO Audio TV Speakers Surround Sound Volume Leveling Balance - Select On or Off. • Volume Leveling - See Deleting the Custom Audio Mode ...
...•tworkDeSelettitnegsAudHeilop Mode - Deletes a custom audio mode created using either preset or custom settings. Turns the built-in speakers on the remote. Lip Sync - Surround sound uses DTS TruSurround™ to a home theater audio system. Adjusts the synchronization between program content, AV...the audio output from 31 the left and right speakers. • Lip Sync - Exit 2D 3D • Analog Audio Out - VIZIO Audio TV Speakers Surround Sound Volume Leveling Balance - Select On or Off. • Volume Leveling - See Deleting the Custom Audio Mode ...
Download
Page 38
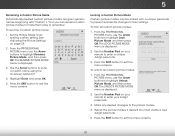
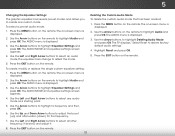
... buttons to select any audio mode as a starting point. 5. The TV displays,"Select Reset to reflect the mode. 5. Press the MENU button on the remote. 32 Deleting the Custom Audio Mode To delete the custom audio mode that has been created: 1. The on -screen menu is displayed. 2. Press the ...(down) for the frequency. 7. To select a pre-set modes and allows you to highlight Audio and press OK. Use the Arrow buttons on the remote to create one custom mode. Use the Up and Down Arrow buttons to highlight Deleting Audio Mode and press OK. 5 Changing the Equalizer Settings The...
... buttons to select any audio mode as a starting point. 5. The TV displays,"Select Reset to reflect the mode. 5. Press the MENU button on the remote. 32 Deleting the Custom Audio Mode To delete the custom audio mode that has been created: 1. The on -screen menu is displayed. 2. Press the ...(down) for the frequency. 7. To select a pre-set modes and allows you to highlight Audio and press OK. Use the Arrow buttons on the remote to create one custom mode. Use the Up and Down Arrow buttons to highlight Deleting Audio Mode and press OK. 5 Changing the Equalizer Settings The...


