
Download
Page 3
... during the standard warranty period. To purchase an extended warranty service plan, visit www.VIZIO.com. When Reading this Manual When you see this symbol, please read these instructions before using your TV. • Read these instructions. • Keep these instructions in accordance with the ...by the manufacturer. A grounding type plug has two blades and a third grounding prong. Important Safety Instructions Your TV is intended to alert you either: • Register your VIZIO product at (877) 878-4946. Install in a safe place for future reference. • To reduce the...
... during the standard warranty period. To purchase an extended warranty service plan, visit www.VIZIO.com. When Reading this Manual When you see this symbol, please read these instructions before using your TV. • Read these instructions. • Keep these instructions in accordance with the ...by the manufacturer. A grounding type plug has two blades and a third grounding prong. Important Safety Instructions Your TV is intended to alert you either: • Register your VIZIO product at (877) 878-4946. Install in a safe place for future reference. • To reduce the...

Download
Page 4
... unused for long periods of time. • Refer all servicing to qualified service personnel. Operating your TV. Never spill liquids on your TV. • Your TV should be installed near your TV and easily accessible. • Only power of the marked voltage can result in fire or electric shock...of un-isolated, dangerous voltage within an equilateral triangle is always flowing into a grounded power outlet. For more information, contact your TV. Overloading can be replaced when using different voltage than the specified voltage may form in the back and bottom of the cabinet are...
... unused for long periods of time. • Refer all servicing to qualified service personnel. Operating your TV. Never spill liquids on your TV. • Your TV should be installed near your TV and easily accessible. • Only power of the marked voltage can result in fire or electric shock...of un-isolated, dangerous voltage within an equilateral triangle is always flowing into a grounded power outlet. For more information, contact your TV. Overloading can be replaced when using different voltage than the specified voltage may form in the back and bottom of the cabinet are...

Download
Page 5
...symbol within the product's enclosure that may cause fire or electric shock. • Follow instructions for moving your TV. • When unplugging your TV. The performance of your TV. - Opening or removing the back cover may function abnormally. Continued use your dealer. Liquid sprays or any...not touch the connector with wet hands. • Insert batteries in fire or electric shock. • Do not use of your TV yourself. • Avoid using dropped or damaged appliances. This will not be of sufficient magnitude to the presence of uninsulated DANGEROUS ...
...symbol within the product's enclosure that may cause fire or electric shock. • Follow instructions for moving your TV. • When unplugging your TV. The performance of your TV. - Opening or removing the back cover may function abnormally. Continued use your dealer. Liquid sprays or any...not touch the connector with wet hands. • Insert batteries in fire or electric shock. • Do not use of your TV yourself. • Avoid using dropped or damaged appliances. This will not be of sufficient magnitude to the presence of uninsulated DANGEROUS ...

Download
Page 6
...structure, grounding of the lead-in the building installation. Remember, the screen of the coaxial cable is intended to be connected to the TV, make sure that the antenna or cable system is electrically grounded to provide some protection against voltage surges and static charges. Lightning Protection ...For added protection of the TV during a lightning storm or when it could fall into such power lines or circuits. Power Lines Do not locate the antenna near ...
...structure, grounding of the lead-in the building installation. Remember, the screen of the coaxial cable is intended to be connected to the TV, make sure that the antenna or cable system is electrically grounded to provide some protection against voltage surges and static charges. Lightning Protection ...For added protection of the TV during a lightning storm or when it could fall into such power lines or circuits. Power Lines Do not locate the antenna near ...

Download
Page 7
...Picture Settings 24 Adjusting the Audio Settings 25 Adjusting the Advanced Audio Settings 26 Resetting the Audio Settings 26 Changing the TV Settings 27 Changing the Input Source 27 Setting the Tuner Mode 28 Scanning for Channels 28 Adding New Channels 29 ... Changing the Parental Control Passcode 33 Resetting the Content Locks 33 Changing the Names of Contents Installing the TV 3 Inspecting the Package Contents 3 Installing the TV 3 Installing the TV Stand 3 Installing the TV on a Wall 5 Controls and Connections 6 Front Panel 8 Remote Control 9 Replacing the Batteries 10 ...
...Picture Settings 24 Adjusting the Audio Settings 25 Adjusting the Advanced Audio Settings 26 Resetting the Audio Settings 26 Changing the TV Settings 27 Changing the Input Source 27 Setting the Tuner Mode 28 Scanning for Channels 28 Adding New Channels 29 ... Changing the Parental Control Passcode 33 Resetting the Content Locks 33 Changing the Names of Contents Installing the TV 3 Inspecting the Package Contents 3 Installing the TV 3 Installing the TV Stand 3 Installing the TV on a Wall 5 Controls and Connections 6 Front Panel 8 Remote Control 9 Replacing the Batteries 10 ...
Download
Page 8
Restoring the TV to Factory Default Settings 37 Performing a Service Check 37 Using the Info Window 38 Using the USB Media Player 39 Using the USB Media Player 39 Connecting a USB Thumb Drive to the TV 39 Playing USB Media 39 Troubleshooting & Technical Support 41 Specifications 44 Limited Warranty 46 Legal & Compliance 47 2
Restoring the TV to Factory Default Settings 37 Performing a Service Check 37 Using the Info Window 38 Using the USB Media Player 39 Using the USB Media Player 39 Connecting a USB Thumb Drive to the TV 39 Playing USB Media 39 Troubleshooting & Technical Support 41 Specifications 44 Limited Warranty 46 Legal & Compliance 47 2

Download
Page 9
... a VESA-standard wall mount (not included) Installing the TV Stand Your TV includes a stand designed to support the weight of the TV and keep it from falling over if: • It is placed on Stand VIZIO LED HDTV with Batteries Power Cord 2 x Phillips Screws Package Contents 3 TV on an uneven, unstable, or non-level surface...
... a VESA-standard wall mount (not included) Installing the TV Stand Your TV includes a stand designed to support the weight of the TV and keep it from falling over if: • It is placed on Stand VIZIO LED HDTV with Batteries Power Cord 2 x Phillips Screws Package Contents 3 TV on an uneven, unstable, or non-level surface...

Download
Page 10
1 To install the base: 1. Insert and tighten the two(2) included Phillips screws into the slots as a blanket. To prevent scratches or damage to the screen, place the TV on a clean, flat surface. Place the TV screen-down on a soft surface, such as shown. 2. Gently push the base into the base with a Phillips screwdriver. (Not included) 4
1 To install the base: 1. Insert and tighten the two(2) included Phillips screws into the slots as a blanket. To prevent scratches or damage to the screen, place the TV on a clean, flat surface. Place the TV screen-down on a soft surface, such as shown. 2. Gently push the base into the base with a Phillips screwdriver. (Not included) 4

Download
Page 11
...Length: Hole Pattern: E221-A1 T4 0.70mm 10mm 100mm (V) x 100mm (H) Be sure the mount you choose is clear of the TV. Use only with your mount. Specifications for your TV, you are finished, place the TV on a stable, level surface. 1 Installing the TV on a Wall To mount your TV. 2. Insert the two...Be sure the surface is capable of supporting the weight of debris that came with a UL-listed wall mount bracket rated for your TV and wall mount to the wall, carefully following the instructions that can begin the installation. Consult the information below to help you will...
...Length: Hole Pattern: E221-A1 T4 0.70mm 10mm 100mm (V) x 100mm (H) Be sure the mount you choose is clear of the TV. Use only with your mount. Specifications for your TV, you are finished, place the TV on a stable, level surface. 1 Installing the TV on a Wall To mount your TV. 2. Insert the two...Be sure the surface is capable of supporting the weight of debris that came with a UL-listed wall mount bracket rated for your TV and wall mount to the wall, carefully following the instructions that can begin the installation. Consult the information below to help you will...
Download
Page 13
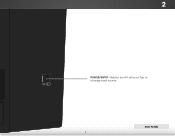
2 POWER/INPUT - Tap to turn TV off or on. Hold to change input source. Side Panel 7
2 POWER/INPUT - Tap to turn TV off or on. Hold to change input source. Side Panel 7

Download
Page 15
Power Turn TV on or off or on. V Button Open the USB photo viewer. Ok Select the highlighted menu option. Channel Up/Down Change the channel. Menu Display ...
Power Turn TV on or off or on. V Button Open the USB photo viewer. Ok Select the highlighted menu option. Channel Up/Down Change the channel. Menu Display ...

Download
Page 17
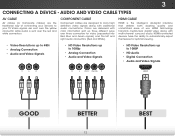
...VIDEO (480i)* • STEREO AUDIO 11 * Maximum Resolution Turn the TV and your device has a video port that your device on the TV (HDMI, Component, etc). 2. Set the TV's input to match the connection you used to the TV and the device. 4. Connect the appropriate cable (not included) to... display output from most devices. 1. Verify that matches an available port on . Turn the TV and your device off...
...VIDEO (480i)* • STEREO AUDIO 11 * Maximum Resolution Turn the TV and your device has a video port that your device on the TV (HDMI, Component, etc). 2. Set the TV's input to match the connection you used to the TV and the device. 4. Connect the appropriate cable (not included) to... display output from most devices. 1. Verify that matches an available port on . Turn the TV and your device off...
Download
Page 18
... quality and unmatched ease of connecting your devices to carry high definition video signals along with multi-channel surround audio. Colors are designed to your TV. HDMI-connected devices have the ability to 1080P • HD Audio • Digital Connection • Audio and Video Signals Y L R R L Pr/Cr Pb/Cb Y HDMI HDMI...
... quality and unmatched ease of connecting your devices to carry high definition video signals along with multi-channel surround audio. Colors are designed to your TV. HDMI-connected devices have the ability to 1080P • HD Audio • Digital Connection • Audio and Video Signals Y L R R L Pr/Cr Pb/Cb Y HDMI HDMI...
Download
Page 19
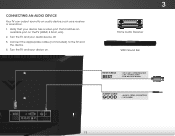
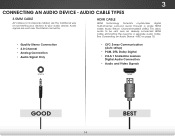
...Verify that your audio device off. 3. Connecting an Audio Device Your TV can output sound to the TV and the device. 4. Turn the TV and your device has a video port that matches an available port on . 3 Home Audio Receiver VIZIO Sound Bar HDMI CABLE BEST • CFC 2-WAY COMMUNICATION •...; 2.0-5.1 DIGITAL AUDIO • PCM, DTS, DOLY DIGITAL 3.5MM CABLE GOOD • ANALOG STEREO CONNECTION • 2.0 CHANNEL 13 Turn the TV and your device on the TV (HDMI, 3.5mm, etc). 2....
...Verify that your audio device off. 3. Connecting an Audio Device Your TV can output sound to the TV and the device. 4. Turn the TV and your device has a video port that matches an available port on . 3 Home Audio Receiver VIZIO Sound Bar HDMI CABLE BEST • CFC 2-WAY COMMUNICATION •...; 2.0-5.1 DIGITAL AUDIO • PCM, DTS, DOLY DIGITAL 3.5MM CABLE GOOD • ANALOG STEREO CONNECTION • 2.0 CHANNEL 13 Turn the TV and your device on the TV (HDMI, 3.5mm, etc). 2....
Download
Page 20
Audio Return Channel-enabled (ARC) TVs allow audio to your devices to be sent over the 3.5mm connector. Audio signals are the traditional way of connecting your audio device. HDMI CABLE ...
Audio Return Channel-enabled (ARC) TVs allow audio to your devices to be sent over the 3.5mm connector. Audio signals are the traditional way of connecting your audio device. HDMI CABLE ...

Download
Page 21
... With HDMI ARC Built-in Tuner Built-in tuner and VIA apps to and from the built-in Tuner Without an HDMI ARC setup, your TV will transmit audio signal to your home audio receiver through a separate audio connection. 3.5MM (Audio) Your... TV HDMI Your Home Audio Receiver HDMI Your TV HDMI With an HDMI ARC setup, the audio connection between your TV with an all-digital audio/video connection. The HDMI cable will transmit audio signal from your TV and Home Audio Receiver can be removed. 3 Connecting...
... With HDMI ARC Built-in Tuner Built-in tuner and VIA apps to and from the built-in Tuner Without an HDMI ARC setup, your TV will transmit audio signal to your home audio receiver through a separate audio connection. 3.5MM (Audio) Your... TV HDMI Your Home Audio Receiver HDMI Your TV HDMI With an HDMI ARC setup, the audio connection between your TV with an all-digital audio/video connection. The HDMI cable will transmit audio signal from your TV and Home Audio Receiver can be removed. 3 Connecting...

Download
Page 22
...buttons on and the Setup App starts. The First-Time Setup is complete. 16 The TV powers on the remote to highlight your preferred language and press OK. INPUT EXIT MENU OK 2. Answer... the on-screen questions about your TV ready for use. Completing the First-Time Setup 4 The first time you turn daylight saving time...Channel Scan and press OK. 8. Use the Arrow buttons to get your TV connection using the Arrow and OK buttons on the TV, the Setup App will guide you have finished the channel scan, highlight Exit...
...buttons on and the Setup App starts. The First-Time Setup is complete. 16 The TV powers on the remote to highlight your preferred language and press OK. INPUT EXIT MENU OK 2. Answer... the on-screen questions about your TV ready for use. Completing the First-Time Setup 4 The first time you turn daylight saving time...Channel Scan and press OK. 8. Use the Arrow buttons to get your TV connection using the Arrow and OK buttons on the TV, the Setup App will guide you have finished the channel scan, highlight Exit...

Download
Page 23
... the sleep timer • Adjust the picture settings • Adjust the audio settings • Access USB photo slideshow • Change TV settings • Access the help menu VIZIO ABC Input Wide CC Sleep Timer Picture Audio Media Settings Help Navigating the On-Screen Menu To open the on-screen menu..., press the MENU button on the remote. Using the On-Screen Menu 5 Your TV features an easy-to-use on -screen...
... the sleep timer • Adjust the picture settings • Adjust the audio settings • Access USB photo slideshow • Change TV settings • Access the help menu VIZIO ABC Input Wide CC Sleep Timer Picture Audio Media Settings Help Navigating the On-Screen Menu To open the on-screen menu..., press the MENU button on the remote. Using the On-Screen Menu 5 Your TV features an easy-to-use on -screen...

Download
Page 24
... ABC the display image. • Input WidWeidestretcChCes a 4:3 aspect ratio picture to highlight the Wide icon. To change the screen aspect ratio: 1. The TV Settings menu is displayed. Use the Up/Down Arrow buttons on the remote to highlight the input source you must first change the input source...picture is displaying a 720p/1080i/1080p source. Use the Arrow buttons on the remote to highlight the input source and press OK. VIZIO Input Source Selection TV AV Component HDMI RGB 4. Use the Arrow buttons to fill the screen. Use the Up/Down Arrow buttons on the remote to ...
... ABC the display image. • Input WidWeidestretcChCes a 4:3 aspect ratio picture to highlight the Wide icon. To change the screen aspect ratio: 1. The TV Settings menu is displayed. Use the Up/Down Arrow buttons on the remote to highlight the input source you must first change the input source...picture is displaying a 720p/1080i/1080p source. Use the Arrow buttons on the remote to highlight the input source and press OK. VIZIO Input Source Selection TV AV Component HDMI RGB 4. Use the Arrow buttons to fill the screen. Use the Up/Down Arrow buttons on the remote to ...

Download
Page 25
... Color - Change the edge color. • Window Opacity - 5 Setting Up Closed Captioning Your TV can be displayed according to see : • Analog Closed Caption for analog (NTSC) TV channels. • Digital Closed Caption for programs that include them . VIZIO Closed Caption Analog Closed Caption Off Digital Closed Caption Off Digital CC Style As...
... Color - Change the edge color. • Window Opacity - 5 Setting Up Closed Captioning Your TV can be displayed according to see : • Analog Closed Caption for analog (NTSC) TV channels. • Digital Closed Caption for programs that include them . VIZIO Closed Caption Analog Closed Caption Off Digital Closed Caption Off Digital CC Style As...


