Quickstart Guide English
Page 2
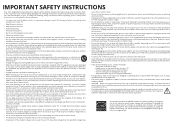
.../DC power adapter, not the cord. To prevent your TV from being walked on your TV to avoid causing fire, electric shock, or component damage. • A distance of at least three feet should be observed for the installation, use attachments/accessories specified by the manufacturer. • Use only with the cart, stand, tripod, bracket, or table specified by qualified service personnel...
.../DC power adapter, not the cord. To prevent your TV from being walked on your TV to avoid causing fire, electric shock, or component damage. • A distance of at least three feet should be observed for the installation, use attachments/accessories specified by the manufacturer. • Use only with the cart, stand, tripod, bracket, or table specified by qualified service personnel...
Quickstart Guide English
Page 3
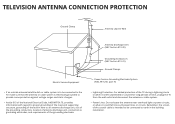
... fall into such power lines or circuits. Remember, the screen of time, unplug the TV from the wall outlet and disconnect the antenna or cable system. • Power Lines: Do not locate the antenna near overhead light or power circuits, or where it is left unattended or unused for long periods of the coaxial cable is intended to be connected to the TV...
... fall into such power lines or circuits. Remember, the screen of time, unplug the TV from the wall outlet and disconnect the antenna or cable system. • Power Lines: Do not locate the antenna near overhead light or power circuits, or where it is left unattended or unused for long periods of the coaxial cable is intended to be connected to the TV...

Quickstart Guide English
Page 5
Friday: 7 am to 11 pm (CST) Saturday - Find answers at SUPPORT.VIZIO.COM Find help with: • New product setup • Connecting your devices • Technical problems • Product updates and more Live chat support available You can also contact our award-winning support team at: Phone: (877) 698-4946 (toll-free) Email: techsupport@VIZIO.com Hours of Operation: Monday - Sunday: 9 am to 6 pm (CST) Se habla Español • Nous parlons Français Do you have questions?
Friday: 7 am to 11 pm (CST) Saturday - Find answers at SUPPORT.VIZIO.COM Find help with: • New product setup • Connecting your devices • Technical problems • Product updates and more Live chat support available You can also contact our award-winning support team at: Phone: (877) 698-4946 (toll-free) Email: techsupport@VIZIO.com Hours of Operation: Monday - Sunday: 9 am to 6 pm (CST) Se habla Español • Nous parlons Français Do you have questions?
Quickstart Guide English
Page 6
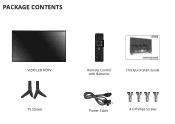
PACKAGE CONTENTS VIZIO LED HDTV TV Stands Remote Control with Batteries This Quick Start Guide Power Cable 4 x Phillips Screws
PACKAGE CONTENTS VIZIO LED HDTV TV Stands Remote Control with Batteries This Quick Start Guide Power Cable 4 x Phillips Screws

Quickstart Guide English
Page 7
... -screen menu. CHANNEL UP/DOWN Change the channel. MUTE Turn the audio off .) POWER Turn TV on -screen menu. WIDE Change the display mode. ARROW Navigate the on . LAST Return to manually enter a digital sub-channel. (For example, 18-4 or 18-5.) DASH Use with number pad to the channel last viewed. BACK Go to the previous on -screen menu. VOLUME UP/DOWN Increase or decrease loudness of the audio. NUMBER PAD Manually enter a channel. USING THE REMOTE INPUT Change the currently-displayed input. A/V CONTROLS Control USB media player and...
... -screen menu. CHANNEL UP/DOWN Change the channel. MUTE Turn the audio off .) POWER Turn TV on -screen menu. WIDE Change the display mode. ARROW Navigate the on . LAST Return to manually enter a digital sub-channel. (For example, 18-4 or 18-5.) DASH Use with number pad to the channel last viewed. BACK Go to the previous on -screen menu. VOLUME UP/DOWN Increase or decrease loudness of the audio. NUMBER PAD Manually enter a channel. USING THE REMOTE INPUT Change the currently-displayed input. A/V CONTROLS Control USB media player and...

Quickstart Guide English
Page 10
The actual number of your devices first. 1 Choose ONE connection type for illustrative purposes only and may vary, depending on the model. CFIORNSTN-TEICMTIENSGETY-OUUPR DEVICES Connect all of ports and their locations may be subject to colored ports. Red White Yellow Red White Red Blue Green BACK OF TV Note: The image shown here is for each device. Match colored connectors to change. CONNECT TO HDMI 5 PORT:
The actual number of your devices first. 1 Choose ONE connection type for illustrative purposes only and may vary, depending on the model. CFIORNSTN-TEICMTIENSGETY-OUUPR DEVICES Connect all of ports and their locations may be subject to colored ports. Red White Yellow Red White Red Blue Green BACK OF TV Note: The image shown here is for each device. Match colored connectors to change. CONNECT TO HDMI 5 PORT:

Quickstart Guide English
Page 11
COMPONENT CABLE* BETTER • ANALOG • HD VIDEO (1080p)** • STEREO AUDIO Match colored connectors to colored ports. Commonly-Connected Devices: Cable or Satellite Boxes Blu-ray™ or DVD Players Game Consoles AV CABLE* GOOD • ANALOG • VIDEO (480i)** • STEREO AUDIO Match colored connectors to colored ports. COAXIAL CABLE* BETTER • ANALOG • HD VIDEO (1080i)** • STEREO AUDIO HDMI CABLE * BEST HDMI CABLE (HDMI 5)* BEST • DIGITAL • UHD VIDEO (4K @ 30 Hz)** • HD AUDIO • DIGITAL • UHD VIDEO (4K @ 60 ...
COMPONENT CABLE* BETTER • ANALOG • HD VIDEO (1080p)** • STEREO AUDIO Match colored connectors to colored ports. Commonly-Connected Devices: Cable or Satellite Boxes Blu-ray™ or DVD Players Game Consoles AV CABLE* GOOD • ANALOG • VIDEO (480i)** • STEREO AUDIO Match colored connectors to colored ports. COAXIAL CABLE* BETTER • ANALOG • HD VIDEO (1080i)** • STEREO AUDIO HDMI CABLE * BEST HDMI CABLE (HDMI 5)* BEST • DIGITAL • UHD VIDEO (4K @ 30 Hz)** • HD AUDIO • DIGITAL • UHD VIDEO (4K @ 60 ...
Quickstart Guide English
Page 12
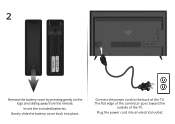
Plug the power cord into place. The flat edge of the connector goes toward the outside of the TV. Gently slide the battery cover back into an electrical outlet. 2 3 Remove the battery cover by pressing gently on the logo and sliding away from the remote. Insert the included batteries. Connect the power cord to the back of the TV.
Plug the power cord into place. The flat edge of the connector goes toward the outside of the TV. Gently slide the battery cover back into an electrical outlet. 2 3 Remove the battery cover by pressing gently on the logo and sliding away from the remote. Insert the included batteries. Connect the power cord to the back of the TV.
Quickstart Guide English
Page 13
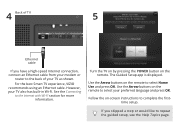
... Demo" para Demostración el la Tienda. The Guided Setup app is displayed. Follow the on the remote to select your preferred language and press OK. If you have a high-speed Internet connection, connect an Ethernet cable from your TV as shown. Turn the TV on by pressing the POWER button on the remote to select Home Use and press OK. Use the Arrow buttons on -screen instructions...
... Demo" para Demostración el la Tienda. The Guided Setup app is displayed. Follow the on the remote to select your preferred language and press OK. If you have a high-speed Internet connection, connect an Ethernet cable from your TV as shown. Turn the TV on by pressing the POWER button on the remote to select Home Use and press OK. Use the Arrow buttons on -screen instructions...
Quickstart Guide English
Page 14
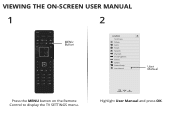
VIZIO TV SETTINGS Picture Audio Timers Network Channels CC Closed Captions Devices System Guided Setup User Manual Wide Zoom Normal Panora Exit 2D 3D ABC User Input Wide CC Manual Sleep Timer Picture Audio Network Settings Help Highlight User Manual and press OK. VIEWING THE ON-SCREEN USER MANUAL 1 2 MENU Button Press the MENU button on the Remote Control to display the TV SETTINGS menu.
VIZIO TV SETTINGS Picture Audio Timers Network Channels CC Closed Captions Devices System Guided Setup User Manual Wide Zoom Normal Panora Exit 2D 3D ABC User Input Wide CC Manual Sleep Timer Picture Audio Network Settings Help Highlight User Manual and press OK. VIEWING THE ON-SCREEN USER MANUAL 1 2 MENU Button Press the MENU button on the Remote Control to display the TV SETTINGS menu.
Quickstart Guide English
Page 15
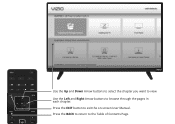
Press the EXIT button to view. Table of Contents Page. Use the Left and Right Arrow buttons to the Table of Contents Installing the TV Controls and Connections Connecting your Devices Completing the First-Time Setup Using the On-Screen Menu Using the USB Media Player Using VIZIO Internet Apps Specifications Limited Warranty Legal & Compliance LED HDTV WITH VIZIO INTERNET APPS PLUS® E50-C1 and E55-C1 Use the Up and Down Arrow buttons to select the chapter you want...
Press the EXIT button to view. Table of Contents Page. Use the Left and Right Arrow buttons to the Table of Contents Installing the TV Controls and Connections Connecting your Devices Completing the First-Time Setup Using the On-Screen Menu Using the USB Media Player Using VIZIO Internet Apps Specifications Limited Warranty Legal & Compliance LED HDTV WITH VIZIO INTERNET APPS PLUS® E50-C1 and E55-C1 Use the Up and Down Arrow buttons to select the chapter you want...
Quickstart Guide English
Page 16
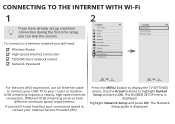
... MENU button to highlight Guided Setup and press OK. Different UHD streaming services have already set up a wireless connection during the first-time setup, you will need: Wireless Router High-speed Internet connection SSID (Wireless network name) Network Password 2 VIZIO TV SETTINGS Picture Audio Timers Network Channels CC Closed Captions Devices System Guided Setup User Manual Wide VIZIO GUIDED SETUP ZooCmhanneNl Soerm tuapl Network Setup Panoramic Exit 2D 3D ABC Input Wide CC Sleep Timer Picture Audio Network Settings Help For the best UHD experience, use an Ethernet cable...
... MENU button to highlight Guided Setup and press OK. Different UHD streaming services have already set up a wireless connection during the first-time setup, you will need: Wireless Router High-speed Internet connection SSID (Wireless network name) Network Password 2 VIZIO TV SETTINGS Picture Audio Timers Network Channels CC Closed Captions Devices System Guided Setup User Manual Wide VIZIO GUIDED SETUP ZooCmhanneNl Soerm tuapl Network Setup Panoramic Exit 2D 3D ABC Input Wide CC Sleep Timer Picture Audio Network Settings Help For the best UHD experience, use an Ethernet cable...
Quickstart Guide English
Page 17
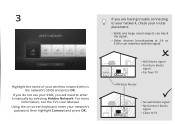
... are having trouble connecting to enter it manually by selecting Hidden Network. For more information, see your SSID, you do not see the TV's User Manual. Using the on-screen keyboard, enter your wireless network (this is the network's SSID) and press OK. If you will need to your network, check your router placement: • Walls and large metal objects can block the signal. •...
... are having trouble connecting to enter it manually by selecting Hidden Network. For more information, see your SSID, you do not see the TV's User Manual. Using the on-screen keyboard, enter your wireless network (this is the network's SSID) and press OK. If you will need to your network, check your router placement: • Walls and large metal objects can block the signal. •...
Quickstart Guide English
Page 18
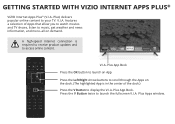
... the V Button twice to access online content. GETTING STARTED WITH VIZIO INTERNET APPS PLUS® VIZIO Internet Apps Plus® (V.I .A. features a selection of the dock.) Press the V Button to launch an App. Plus) delivers popular online content to music, get weather and news information, and more-all on the dock. (The highlighted App is required to receive product updates and to...
... the V Button twice to access online content. GETTING STARTED WITH VIZIO INTERNET APPS PLUS® VIZIO Internet Apps Plus® (V.I .A. features a selection of the dock.) Press the V Button to launch an App. Plus) delivers popular online content to music, get weather and news information, and more-all on the dock. (The highlighted App is required to receive product updates and to...
Quickstart Guide English
Page 21
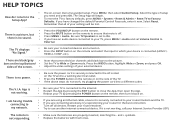
... television channels add black bars to your connected devices are black/gray • bars on -screen menu has guided setup. The Setup App will be lost. The V.I return to the Setup App? • you have an audio device connected to the picture. To reset the TV to factory defaults, press MENU > System > Reset & Admin > Reset TV to Wide or Zoom mode. The TV displays "No Signal." • Be sure your TV, press MENU > Audio and set...
... television channels add black bars to your connected devices are black/gray • bars on -screen menu has guided setup. The Setup App will be lost. The V.I return to the Setup App? • you have an audio device connected to the picture. To reset the TV to factory defaults, press MENU > System > Reset & Admin > Reset TV to Wide or Zoom mode. The TV displays "No Signal." • Be sure your TV, press MENU > Audio and set...

Quickstart Guide English
Page 22
...® enabled device, even when the TV is off. while Bluetooth® connectivity lets you stream music wirelessly from any medium to large-sized HDTV, the VIZIO 5.1 Sound Bar System is easier than you 've been wanting is an easy upgrade to life; The three-channel sound bar, wireless subwoofer and rear satellite speakers bring your favorite TV shows, movies, music and...
...® enabled device, even when the TV is off. while Bluetooth® connectivity lets you stream music wirelessly from any medium to large-sized HDTV, the VIZIO 5.1 Sound Bar System is easier than you 've been wanting is an easy upgrade to life; The three-channel sound bar, wireless subwoofer and rear satellite speakers bring your favorite TV shows, movies, music and...

Quickstart Guide English
Page 24
Available at up to 18 Gbps. VIZIO RECOMMENDS This 8 ft. Supporting 1080p and 4k x 2k Ultra High Definition resolutions, the E-Series HDMI cable provides picture-perfect HD video, 3D, and superior audio, all -in-one cable also supports advanced 7.1 surround sound and Audio Return Channel, eliminating the need for HDTVs. high-speed HDMI® cable is ideal for additional cables. This all at www.VIZIO.com This Product Sold Separately
Available at up to 18 Gbps. VIZIO RECOMMENDS This 8 ft. Supporting 1080p and 4k x 2k Ultra High Definition resolutions, the E-Series HDMI cable provides picture-perfect HD video, 3D, and superior audio, all -in-one cable also supports advanced 7.1 surround sound and Audio Return Channel, eliminating the need for HDTVs. high-speed HDMI® cable is ideal for additional cables. This all at www.VIZIO.com This Product Sold Separately
Quickstart Guide English
Page 25
... relocate the receiving antenna. • Increase the separation between the equipment and receiver. • Connect the equipment into an outlet on the box. The manufacturer is serviced, regardless of commercial use an AC/DC power adapter that interference will not occur in order to be restored to the VIZIO service center. Use the AC cords listed below for parts or labor during the warranty period. This...
... relocate the receiving antenna. • Increase the separation between the equipment and receiver. • Connect the equipment into an outlet on the box. The manufacturer is serviced, regardless of commercial use an AC/DC power adapter that interference will not occur in order to be restored to the VIZIO service center. Use the AC cords listed below for parts or labor during the warranty period. This...
Quickstart Guide English
Page 26
... by a VIZIO authorized service center. Types of the model's product information page www.vizio.ca or look for a period of ninety (90) days of commercial use . Units less than by this Limited Warranty. VIZIO technical support will usually be sent to the VIZIO service center. CANADA ONE-YEAR LIMITED WARRANTY ON PARTS AND LABOR Covers units purchased as installation and set -up issues or any repairs attempted...
... by a VIZIO authorized service center. Types of the model's product information page www.vizio.ca or look for a period of ninety (90) days of commercial use . Units less than by this Limited Warranty. VIZIO technical support will usually be sent to the VIZIO service center. CANADA ONE-YEAR LIMITED WARRANTY ON PARTS AND LABOR Covers units purchased as installation and set -up issues or any repairs attempted...

Quickstart Guide English
Page 27
... to the accompanying instructions for example: cosmetic damage, normal wear and tear, improper operation, improper voltage supply or power surges, signal issues, damages from which it is serviced, regardless of Service Defective Products must exchange parts and components of the Product and include labor and shipping expenses of this warranty is not covered under other rights, which this warranty, VIZIO Sales & Marketing Mé...
... to the accompanying instructions for example: cosmetic damage, normal wear and tear, improper operation, improper voltage supply or power surges, signal issues, damages from which it is serviced, regardless of Service Defective Products must exchange parts and components of the Product and include labor and shipping expenses of this warranty is not covered under other rights, which this warranty, VIZIO Sales & Marketing Mé...


