User Manual
Page 3
... voltage may expose you are qualified to the sound level, which can result in an area with instructions. Overloading can damage the remote control or in accordance with heavy dust or high humidity. Pulling on the power cord may be used for your TV if any...television set and the supporting furniture. • Educating children about the dangers of electric shock to hang onto the product. • Store the accessories remote, batteries, etc. These servicing instructions are unplugged before moving your TV. - Do not expose your TV to repair your TV, unplug the perform...
... voltage may expose you are qualified to the sound level, which can result in an area with instructions. Overloading can damage the remote control or in accordance with heavy dust or high humidity. Pulling on the power cord may be used for your TV if any...television set and the supporting furniture. • Educating children about the dangers of electric shock to hang onto the product. • Store the accessories remote, batteries, etc. These servicing instructions are unplugged before moving your TV. - Do not expose your TV to repair your TV, unplug the perform...

User Manual
Page 6
... Preparing Your USB Drive to Factory Default Settings 38 Using the Info Window 39 Using VIZIO Internet Apps Plus® (V.I .A. Plus 40 Using the Fullscreen V.I .A. Table Of Contents Table Of Contents vi Getting to Know Your TV 7 Remote Control Front 10 Replacing the Batteries 10 Completing The First-Time Setup 11 Using...
... Preparing Your USB Drive to Factory Default Settings 38 Using the Info Window 39 Using VIZIO Internet Apps Plus® (V.I .A. Plus 40 Using the Fullscreen V.I .A. Table Of Contents Table Of Contents vi Getting to Know Your TV 7 Remote Control Front 10 Replacing the Batteries 10 Completing The First-Time Setup 11 Using...

User Manual
Page 7
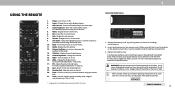
Getting to Know Your TV 1 REMOTE SENSOR & POWER INDICATOR When using the remote, aim it directly at this sensor. To keep the power indicator on as long as the TV is on , then goes out after several seconds. FRONT PANEL 7 The power indicator ashes on when the TV turns on , see Turning the ower Indicator On or Off.
Getting to Know Your TV 1 REMOTE SENSOR & POWER INDICATOR When using the remote, aim it directly at this sensor. To keep the power indicator on as long as the TV is on , then goes out after several seconds. FRONT PANEL 7 The power indicator ashes on when the TV turns on , see Turning the ower Indicator On or Off.
User Manual
Page 10
... - Opens the picture mode menu. Enter - onfirm channel or passcode entered using the number pad. 10. Make sure that came with this remote with household waste. hen needed, VIZIO recommends replacing the batteries that the and - Menu - Info - Select the highlighted option onfirm channel or passcode entered using the number pad. 21...
... - Opens the picture mode menu. Enter - onfirm channel or passcode entered using the number pad. 10. Make sure that came with this remote with household waste. hen needed, VIZIO recommends replacing the batteries that the and - Menu - Info - Select the highlighted option onfirm channel or passcode entered using the number pad. 21...
User Manual
Page 11
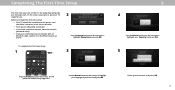
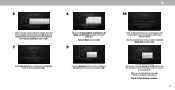
... your language of the steps necessary to get your TV ready for use . Use the Arrow buttons on the remote to highlight your Country and press OK. 5 Press the Power button on the remote. Select Home Use for in -home use . Select your time zone and press OK. 11 Choisissez "Home Use..." pour le Mode Domicile ou "Store Demo" pour la Démo en Magasin. The TV powers on the remote to highlight Home Use and press OK. Select Store Demo for in -store display. Seleccione "Home Use" para Modo de Casa o "Store Demo" para Demostraci...
... your language of the steps necessary to get your TV ready for use . Use the Arrow buttons on the remote to highlight your Country and press OK. 5 Press the Power button on the remote. Select Home Use for in -home use . Select your time zone and press OK. 11 Choisissez "Home Use..." pour le Mode Domicile ou "Store Demo" pour la Démo en Magasin. The TV powers on the remote to highlight Home Use and press OK. Select Store Demo for in -store display. Seleccione "Home Use" para Modo de Casa o "Store Demo" para Demostraci...
User Manual
Page 12
... . Note: Number of available networks and press OK. Otherwise, use the Arrow and OK buttons on the remote to scan for channels, which takes several minutes. will need to highlight your TV source and press OK. The First-Time Setup is complete." hen ... OK. 7 Enter your E-mail Address, First Name, Last Name, and Zip Code using the on the remote to highlight Begin Scan and press OK. Highlight Next and press OK. 9 Use the Arrow buttons on the remote to select the input your TV source is connected to highlight your TV source and press...
... . Note: Number of available networks and press OK. Otherwise, use the Arrow and OK buttons on the remote to scan for channels, which takes several minutes. will need to highlight your TV source and press OK. The First-Time Setup is complete." hen ... OK. 7 Enter your E-mail Address, First Name, Last Name, and Zip Code using the on the remote to highlight Begin Scan and press OK. Highlight Next and press OK. 9 Use the Arrow buttons on the remote to select the input your TV source is connected to highlight your TV source and press...
User Manual
Page 13
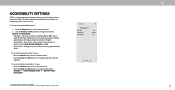
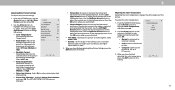
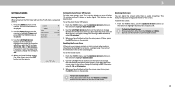
...Text-to navigate and select Closed Captions. Speech Talk Back enables your TV to speak all settings changes adjustments, and status using the remote in which Text-to-Speech is committed to appear in settings menu. To access the Video Description** menu: • Press the Menu... button on the remote control. • Use the Arrow and OK buttons to - To access the Accessibility menu: 1. Press the Menu button on the remote control. 2. ACCESSIBILITY SETTINGS VIZIO is spoken. our new VIZIO TV offers several accessibility features that can help you ...
...Text-to navigate and select Closed Captions. Speech Talk Back enables your TV to speak all settings changes adjustments, and status using the remote in which Text-to-Speech is committed to appear in settings menu. To access the Video Description** menu: • Press the Menu... button on the remote control. • Use the Arrow and OK buttons to - To access the Accessibility menu: 1. Press the Menu button on the remote control. 2. ACCESSIBILITY SETTINGS VIZIO is spoken. our new VIZIO TV offers several accessibility features that can help you ...
User Manual
Page 14
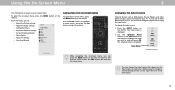
From this menu, you can: • Adjust the Picture settings • Adjust the Audio settings VIZIO • Setting the Timers TV SETTINGS Wide • Adjust the Channel settings Picture Audio • Set up Closed Captioning Timers Network Exit • Name Inputs ... players, Blu-ray Players, and video game consoles can change the input source: 1. Use the Up/Down Arrow buttons or the INPUT button on the remote. HDMI-1 HDMI-2 Input Name COMP Note: Inputs may vary by TV. You can be connected to your TV. See Renaming Devices on the Input menu...
From this menu, you can: • Adjust the Picture settings • Adjust the Audio settings VIZIO • Setting the Timers TV SETTINGS Wide • Adjust the Channel settings Picture Audio • Set up Closed Captioning Timers Network Exit • Name Inputs ... players, Blu-ray Players, and video game consoles can change the input source: 1. Use the Up/Down Arrow buttons or the INPUT button on the remote. HDMI-1 HDMI-2 Input Name COMP Note: Inputs may vary by TV. You can be connected to your TV. See Renaming Devices on the Input menu...
User Manual
Page 15
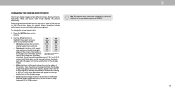
Some programs have black bars on the remote. 2. Examples include wide-screen movies and older television programs. To change the screen aspect ratio: 1. Press the WIDE button on the top or sides of ...
Some programs have black bars on the remote. 2. Examples include wide-screen movies and older television programs. To change the screen aspect ratio: 1. Press the WIDE button on the top or sides of ...

User Manual
Page 16
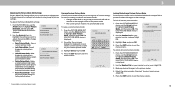
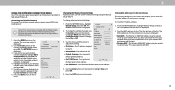
...to values that does not otherwise exist. 5. When this setting is too low, the picture may appear STlim eeeprfadePidctuorer washed Audio out. • Contrast - VIZIO PICTURE Picture Mode Standard Auto Brightness Control Medium Backlight Brightness Contrast Color Tint Sharpness - + 85 -- + 50 - + 50 - + 63 - +0 ... is displayed. 2. If esh appears too orange, reduce the level of the picture. Use the Arrow buttons on the remote. Standard picture mode meets Energy Star® requirements. When this setting is too high, the picture may be adjusted when...
...to values that does not otherwise exist. 5. When this setting is too low, the picture may appear STlim eeeprfadePidctuorer washed Audio out. • Contrast - VIZIO PICTURE Picture Mode Standard Auto Brightness Control Medium Backlight Brightness Contrast Color Tint Sharpness - + 85 -- + 50 - + 50 - + 63 - +0 ... is displayed. 2. If esh appears too orange, reduce the level of the picture. Use the Arrow buttons on the remote. Standard picture mode meets Energy Star® requirements. When this setting is too high, the picture may be adjusted when...
User Manual
Page 17
...Wide Exit Picture Size: Increase or decrease the vertical and horizontal size of image motion content. Use the Arrow buttons on the remote to highlight More Picture, and then press OK. Wide Zoom Exit 2D Input Wid Sleep Timer Pict Network Setti Select , Low,... the setting you have finished ad usting More icture Settings, press the EXIT button on the remote. Select Input AutWoidoer C. hen you are finished. VIZIO COLOR TEMPERATURE Cool Normal Computer 3. VIZIO MORE PICTURE 2. The PICTURE SIZE & POSITION menu is optimized for television viewing. •...
...Wide Exit Picture Size: Increase or decrease the vertical and horizontal size of image motion content. Use the Arrow buttons on the remote to highlight More Picture, and then press OK. Wide Zoom Exit 2D Input Wid Sleep Timer Pict Network Setti Select , Low,... the setting you have finished ad usting More icture Settings, press the EXIT button on the remote. Select Input AutWoidoer C. hen you are finished. VIZIO COLOR TEMPERATURE Cool Normal Computer 3. VIZIO MORE PICTURE 2. The PICTURE SIZE & POSITION menu is optimized for television viewing. •...
User Manual
Page 18
... on your custom picture mode. Save 4. VIZIO LOCK PICTURE MODE Create a picture control PIN to prevent changes to all custom picture modes: 1. Press the EXIT button to enter your remote to exit the menu screens. Vivid* VIZIO PICTURE MODE EDIT - From the PICTURE MODE... EDIT menu, use the Arrow buttons to highlight Lock Picture Mode, and then press OK. VIZIO SAVE PICTURE MODE Custom1_ abc def ghi j k l mn o p q r s t ...
... on your custom picture mode. Save 4. VIZIO LOCK PICTURE MODE Create a picture control PIN to prevent changes to all custom picture modes: 1. Press the EXIT button to enter your remote to exit the menu screens. Vivid* VIZIO PICTURE MODE EDIT - From the PICTURE MODE... EDIT menu, use the Arrow buttons to highlight Lock Picture Mode, and then press OK. VIZIO SAVE PICTURE MODE Custom1_ abc def ghi j k l mn o p q r s t ...
User Manual
Page 20
... Tuner menu is displayed. Use the Arrow buttons to highlight another color channel to turn off or on the remote to highlight Red, Green, or Blue. 3. Use the Arrow buttons on the remote to highlight the Hue, Saturation, Brightness, set colors, and a specialized light meter. 3 Adjusting the Color ...Color Tuner menu is displayed. From the Color Tuner menu, use the Left/Right Arrow buttons to adjust. Use the Arrow buttons on the remote to highlight the Gain and Color values you are finished ad usting the color tuner settings, press the EXIT button. Press the OK button. ...
... Tuner menu is displayed. Use the Arrow buttons to highlight another color channel to turn off or on the remote to highlight Red, Green, or Blue. 3. Use the Arrow buttons on the remote to highlight the Hue, Saturation, Brightness, set colors, and a specialized light meter. 3 Adjusting the Color ...Color Tuner menu is displayed. From the Color Tuner menu, use the Left/Right Arrow buttons to adjust. Use the Arrow buttons on the remote to highlight the Gain and Color values you are finished ad usting the color tuner settings, press the EXIT button. Press the OK button. ...

User Manual
Page 21
..., press the EXIT button. 2. From the Color Tuner menu, use the Left/Right Arrow buttons to highlight . Use the Arrow buttons on the remote to highlight . 3. Selecting a percentage immediately shows the at pattern at test pattern. hen you are finished, press the EXIT button. 21 Use ...Pattern Off To show or hide the Flat Test Pattern: 1. Selecting a color immediately shows that brightness. -or- Use the Arrow buttons on the remote to show or hide the SMPTE Test Pattern: 1. To hide the Ramp Test Pattern, use the Arrow buttons to highlight . Use the Left/Right...
..., press the EXIT button. 2. From the Color Tuner menu, use the Left/Right Arrow buttons to highlight . Use the Arrow buttons on the remote to highlight . 3. Selecting a percentage immediately shows the at pattern at test pattern. hen you are finished, press the EXIT button. 21 Use ...Pattern Off To show or hide the Flat Test Pattern: 1. Selecting a color immediately shows that brightness. -or- Use the Arrow buttons on the remote to show or hide the SMPTE Test Pattern: 1. To hide the Ramp Test Pattern, use the Arrow buttons to highlight . Use the Left/Right...

User Manual
Page 22
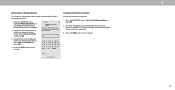
Use the Arrow buttons to highlight the setting you are set audio mode: 1. VIZIO AUDIO TV Speakers Surround Sound Volume Leveling - Select On or . In a few cases, volume leveling may artificially suppress volume increases, making it . 8. Select Variable... if you wish to adjust, then press Left/ Right Arrow buttons to change to highlight Audio and press OK. The on the remote. The AUDIO menu is displayed. 2. The AUDIO menu is displayed. 2. Balance - Select On or . • Volume Leveling - You must select Bitstream for audio ...
Use the Arrow buttons to highlight the setting you are set audio mode: 1. VIZIO AUDIO TV Speakers Surround Sound Volume Leveling - Select On or . In a few cases, volume leveling may artificially suppress volume increases, making it . 8. Select Variable... if you wish to adjust, then press Left/ Right Arrow buttons to change to highlight Audio and press OK. The on the remote. The AUDIO menu is displayed. 2. The AUDIO menu is displayed. 2. Balance - Select On or . • Volume Leveling - You must select Bitstream for audio ...
User Manual
Page 23
Use the Arrow buttons to highlight Audio and press OK. Use the Arrow buttons on -screen menu is displayed. 3. The AUDIO menu is displayed. 2. The TV displays, "To delete the user created custom audio mode, select the Delete button." 4. Press the EXIT button on the remote. Press the MENU button on the remote. 3 23 The on the remote to highlight Delete Audio Mode and press OK. Deleting the Custom Audio Mode To delete the custom audio mode that has been created: 1. Highlight Delete and press OK. 5.
Use the Arrow buttons to highlight Audio and press OK. Use the Arrow buttons on -screen menu is displayed. 3. The AUDIO menu is displayed. 2. The TV displays, "To delete the user created custom audio mode, select the Delete button." 4. Press the EXIT button on the remote. Press the MENU button on the remote. 3 23 The on the remote to highlight Delete Audio Mode and press OK. Deleting the Custom Audio Mode To delete the custom audio mode that has been created: 1. Highlight Delete and press OK. 5.
User Manual
Page 24
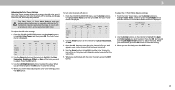
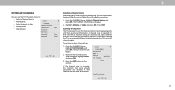
...energy and the life of the screen. From the TIMERS menu, use the Up/Down Arrow buttons on the remote to highlight the period of time. 1. VIZIO TIMERS Timer Auto Power Off Screen Saver Blank Screen Off 10 minutes Off 3. WUidsee thZoeom Left/NRorimgahl t PAarnroroawmicbuttons... on the remote to change the setting to turn off after minutes without a video or audio signal. Otherwise, select 10 ...
...energy and the life of the screen. From the TIMERS menu, use the Up/Down Arrow buttons on the remote to highlight the period of time. 1. VIZIO TIMERS Timer Auto Power Off Screen Saver Blank Screen Off 10 minutes Off 3. WUidsee thZoeom Left/NRorimgahl t PAarnroroawmicbuttons... on the remote to change the setting to turn off after minutes without a video or audio signal. Otherwise, select 10 ...
User Manual
Page 25
...menu, highlight Manual Setup and press OWKid.eTheZoMomANUNAorLmaSlETPUanPormameicnu is displayed. 2. The MANUAL SETUP menu is displayed. 2. TNhoremaIPl aPdandorraemsisc assigned VIZIO MANUAL SETUP DHCP Off IP Address Subnet Mask Default Gateway Pref. The subnet Exit 2D Exit 2D 3D • Default Gateway...networks, is the network's SSID) and press OK. 5. The MAC addresses for Network Setup The security settings on the remote. Sleep Timer Picture Audio Network Settings Help 25 From the NETWORK menu, highlight Manual Setup and press OK. DNS Server RJ45...
...menu, highlight Manual Setup and press OWKid.eTheZoMomANUNAorLmaSlETPUanPormameicnu is displayed. 2. The MANUAL SETUP menu is displayed. 2. TNhoremaIPl aPdandorraemsisc assigned VIZIO MANUAL SETUP DHCP Off IP Address Subnet Mask Default Gateway Pref. The subnet Exit 2D Exit 2D 3D • Default Gateway...networks, is the network's SSID) and press OK. 5. The MAC addresses for Network Setup The security settings on the remote. Sleep Timer Picture Audio Network Settings Help 25 From the NETWORK menu, highlight Manual Setup and press OK. DNS Server RJ45...
User Manual
Page 26
VIZIO ENTER ACCESS POINT NAME Enter your network connection: 1. This is used to connect to a wireless network whose network name (SSID) is displayed. 2. abc def ghi j k l ... the connection method, network name, signal strength, and download speed of your network's name (SSID), then highlight Connect and press OK 3. Using the on the remote. Press the EXIT button on -screen keyboard, enter your network connection. 3. Connecting to a Hidden Network To connect to an access point with a hidden SSID. Using...
VIZIO ENTER ACCESS POINT NAME Enter your network connection: 1. This is used to connect to a wireless network whose network name (SSID) is displayed. 2. abc def ghi j k l ... the connection method, network name, signal strength, and download speed of your network's name (SSID), then highlight Connect and press OK 3. Using the on the remote. Press the EXIT button on -screen keyboard, enter your network connection. 3. Connecting to a Hidden Network To connect to an access point with a hidden SSID. Using...
User Manual
Page 27
...• Select a Channel Source • Find Channels • Select channels to skip • Analog Audio • Digital Audio VIZIO CHANNELS Channels not searched Channel Source Find Channel Skip Channel Analog Audio Digital Audio Cable Stereo English Selecting a Channel Source Select the type... connections. 1. NeWtwaoirtk uSnetttiilngths e cHhelapnnel scan is complete. The CHANNEL SOURCE menu displays. 2. Press the EXIT button on the remote. Wide Zoom Normal Panoramic Wide Zoom Normal Panoramic Exit 2D 3D Exit 2D 3D ABC Input Wide ACBCC Input Wide CC Sleep ...
...• Select a Channel Source • Find Channels • Select channels to skip • Analog Audio • Digital Audio VIZIO CHANNELS Channels not searched Channel Source Find Channel Skip Channel Analog Audio Digital Audio Cable Stereo English Selecting a Channel Source Select the type... connections. 1. NeWtwaoirtk uSnetttiilngths e cHhelapnnel scan is complete. The CHANNEL SOURCE menu displays. 2. Press the EXIT button on the remote. Wide Zoom Normal Panoramic Wide Zoom Normal Panoramic Exit 2D 3D Exit 2D 3D ABC Input Wide ACBCC Input Wide CC Sleep ...


