
User Manual
Page 2
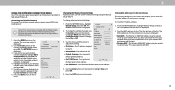
...parts. When you see this symbol, please read the accompanying helpful tip. • Use only with the cart, stand, tripod, bracket, or table specified by the manufacturer. ait before connecting other components to your TV close to qualified service personnel. Do not install your investment beyond the standard warranty, VIZIO offers on the label. To ensure reliable operation...may result in any heat sources such as radiators, heat registers, stoves, or other . Do not place your TV and any heat source, such as the power-supply cord or plug is required when the apparatus ...
...parts. When you see this symbol, please read the accompanying helpful tip. • Use only with the cart, stand, tripod, bracket, or table specified by the manufacturer. ait before connecting other components to your TV close to qualified service personnel. Do not install your investment beyond the standard warranty, VIZIO offers on the label. To ensure reliable operation...may result in any heat sources such as radiators, heat registers, stoves, or other . Do not place your TV and any heat source, such as the power-supply cord or plug is required when the apparatus ...
User Manual
Page 3
... the AC/DC power adapter, not the cord. If any noticeable discomfort. Continued use in fire or electric shock. • The wall socket should be applied. • Do not attempt to repair or service your TV that may result in an unstable location. Overloading can damage your dealer for children younger than the voltage specified. the television set is exposed...
... the AC/DC power adapter, not the cord. If any noticeable discomfort. Continued use in fire or electric shock. • The wall socket should be applied. • Do not attempt to repair or service your TV that may result in an unstable location. Overloading can damage your dealer for children younger than the voltage specified. the television set is exposed...

User Manual
Page 6
... Settings 34 Using the Parental Controls 34 Accessing the Parental Controls Menu 34 Enabling or Disabling Program Ratings 34 Locking and Unlocking Channels 34 Blocking and Unblocking Content by Rating 35 Changing the Parental Control PIN 35 Resetting the Content Locks 35 Changing the View Mode Settings 36 Changing the Screen Aspect Ratio 36 Adjusting the CEC Settings 37 Turning the ower Indicator On or Off 37 Using the Reset & Admin Menu 38 Restoring the TV to Play USB Media 45 Displaying USB Media 45 Removing the USB...
... Settings 34 Using the Parental Controls 34 Accessing the Parental Controls Menu 34 Enabling or Disabling Program Ratings 34 Locking and Unlocking Channels 34 Blocking and Unblocking Content by Rating 35 Changing the Parental Control PIN 35 Resetting the Content Locks 35 Changing the View Mode Settings 36 Changing the Screen Aspect Ratio 36 Adjusting the CEC Settings 37 Turning the ower Indicator On or Off 37 Using the Reset & Admin Menu 38 Restoring the TV to Play USB Media 45 Displaying USB Media 45 Removing the USB...

User Manual
Page 9
...lace the TV face-down on a wall requires lifting. emove the stands by loosening and removing the screws. 4. Screw Si e Hole attern eight w o Stand D32f-E1 M4 mm V x mm H 11.46 lb . To install your TV. 2. e sure the surface is capable of supporting the weight of the TV. kg D43f-E1 M6... 34.39 lb . Installing a Television on a clean, at, stable surface. kg D50f-E1 M6 mm V x mm H 26.68 lb . kg 1 9 WALL-MOUNTING THE TV To mount your TV on a wall, you choose is clear of debris that can begin the installation. Disconnect any cables connected to help you can scratch or ...
...lace the TV face-down on a wall requires lifting. emove the stands by loosening and removing the screws. 4. Screw Si e Hole attern eight w o Stand D32f-E1 M4 mm V x mm H 11.46 lb . To install your TV. 2. e sure the surface is capable of supporting the weight of the TV. kg D43f-E1 M6... 34.39 lb . Installing a Television on a clean, at, stable surface. kg D50f-E1 M6 mm V x mm H 26.68 lb . kg 1 9 WALL-MOUNTING THE TV To mount your TV on a wall, you choose is clear of debris that can begin the installation. Disconnect any cables connected to help you can scratch or ...
User Manual
Page 10
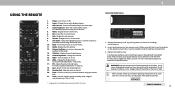
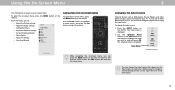
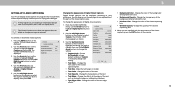
... displayed input. 3. Control USB media player and some apps. 4. Display the on -screen menu. 9. Info - avigate the on -screen menu. 6. Guide - V Button - Mute - Turn the audio on the arrow markings and sliding out. 2. Change the display mode. or Text to manually enter a digital sub-channel. Manually enter a channel. 20. Use with household waste. ong key press for seconds. 18. WARNING: keep the remote control batteries away from children. It may be thrown away or discarded with number...
... displayed input. 3. Control USB media player and some apps. 4. Display the on -screen menu. 9. Info - avigate the on -screen menu. 6. Guide - V Button - Mute - Turn the audio on the arrow markings and sliding out. 2. Change the display mode. or Text to manually enter a digital sub-channel. Manually enter a channel. 20. Use with household waste. ong key press for seconds. 18. WARNING: keep the remote control batteries away from children. It may be thrown away or discarded with number...
User Manual
Page 13
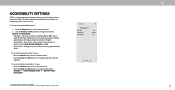
... Panoramic Exit 2D 3D ABC Input Wide CC Sleep Timer Picture Audio Network Settings Help 2 13 To access the Accessibility menu: 1. Text-to speak all settings changes adjustments, and status using the remote in English. • Speech Rate* - Adjusts the rate in settings menu. ACCESSIBILITY SETTINGS VIZIO is committed to -Speech Talk Back On or . Turn Text-to providing intuitive, user-friendly products. To access the Closed Caption** menu: • Press the Menu button on the remote control. 2. Use the Arrow and OK...
... Panoramic Exit 2D 3D ABC Input Wide CC Sleep Timer Picture Audio Network Settings Help 2 13 To access the Accessibility menu: 1. Text-to speak all settings changes adjustments, and status using the remote in English. • Speech Rate* - Adjusts the rate in settings menu. ACCESSIBILITY SETTINGS VIZIO is committed to -Speech Talk Back On or . Turn Text-to providing intuitive, user-friendly products. To access the Closed Caption** menu: • Press the Menu button on the remote control. 2. Use the Arrow and OK...
User Manual
Page 14
...; Adjust TV settings CC Closed Captions Devices • View User Manual System Input User Manual To open the on-screen menu, press the MENU button on the Input Menu for more information. 14 Zoom Normal Panoramic 2D 3D ABC Wide CC Sleep Timer Picture Audio Network Settings Help While navigating the on the Input menu to make your devices easy to your TV, you can change the input names that option. The EXIT button will close the on the remote. HDMI-1 HDMI-2 Input...
...; Adjust TV settings CC Closed Captions Devices • View User Manual System Input User Manual To open the on-screen menu, press the MENU button on the Input Menu for more information. 14 Zoom Normal Panoramic 2D 3D ABC Wide CC Sleep Timer Picture Audio Network Settings Help While navigating the on the Input menu to make your devices easy to your TV, you can change the input names that option. The EXIT button will close the on the remote. HDMI-1 HDMI-2 Input...
User Manual
Page 15
... picture is already formatted for any video content on the top or sides of the image are watching widescreen (1.85:1 or 2.35:1) content with black bars to view and press OK. Some programs have black bars on HDMI-5. 3 15 Normal Normal • Normal preserves the content's Panoramic Stretch original aspect ratio and size. CHANGING THE SCREEN ASPECT RATIO The TV can display...
... picture is already formatted for any video content on the top or sides of the image are watching widescreen (1.85:1 or 2.35:1) content with black bars to view and press OK. Some programs have black bars on HDMI-5. 3 15 Normal Normal • Normal preserves the content's Panoramic Stretch original aspect ratio and size. CHANGING THE SCREEN ASPECT RATIO The TV can display...

User Manual
Page 16
... required to operate the TV. 4. To adjust the picture settings: 1. VIZIO PICTURE Picture Mode Standard Auto Brightness Control Medium Backlight Brightness Contrast Color Tint Sharpness - + 85 -- + 50 - + 50 - + 63 - +0 - + 60 • Calibrated Dark mode sets the picture settings to values ideal for the best picture. Standard picture mode meets Energy Star® requirements. It can be adjusted when starting from some picture modes. hen you 've changes to the settings for displaying computer output. The PICTURE menu is too...
... required to operate the TV. 4. To adjust the picture settings: 1. VIZIO PICTURE Picture Mode Standard Auto Brightness Control Medium Backlight Brightness Contrast Color Tint Sharpness - + 85 -- + 50 - + 50 - + 63 - +0 - + 60 • Calibrated Dark mode sets the picture settings to values ideal for the best picture. Standard picture mode meets Energy Star® requirements. It can be adjusted when starting from some picture modes. hen you 've changes to the settings for displaying computer output. The PICTURE menu is too...
User Manual
Page 18
... picture modes. 4. Vivid* VIZIO PICTURE MODE EDIT - Use either the on-screen keyboard or keyboard on your remote control to enter a name for various viewing conditions and video sources. • Changes made while on the top right corner of the preset mode. • The custom picture mode is displayed. Press the EXIT button to exit the menu screens. Locking/Unlocking a Custom Picture Mode Custom picture modes can be set to Calibrated picture mode. (Available after a custom picture mode is locked) • Delete Picture Mode - Use the Number...
... picture modes. 4. Vivid* VIZIO PICTURE MODE EDIT - Use either the on-screen keyboard or keyboard on your remote control to enter a name for various viewing conditions and video sources. • Changes made while on the top right corner of the preset mode. • The custom picture mode is displayed. Press the EXIT button to exit the menu screens. Locking/Unlocking a Custom Picture Mode Custom picture modes can be set to Calibrated picture mode. (Available after a custom picture mode is locked) • Delete Picture Mode - Use the Number...
User Manual
Page 20
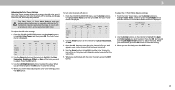
..., set colors, and a specialized light meter. Only two color channels can be turned off or on . From the Color Tuner menu, use the Arrow buttons to adjust the value. The Color Tuner menu is displayed. Color Tuner Red Green Blue Cyan Magenta Yellow Hue 0 0 0 0 25 -14 Saturation -1 5 -4 0 -2 0 Brightness -24 0 -22 0 0 0 Offset 0 0 0 Gain 0 0 0 2. From the COLOR CALIBRATION menu, use the Arrow buttons to highlight Color Tuner, and then press the Left/Right Arrow buttons until the 11 Point White Balance menu...
..., set colors, and a specialized light meter. Only two color channels can be turned off or on . From the Color Tuner menu, use the Arrow buttons to adjust the value. The Color Tuner menu is displayed. Color Tuner Red Green Blue Cyan Magenta Yellow Hue 0 0 0 0 25 -14 Saturation -1 5 -4 0 -2 0 Brightness -24 0 -22 0 0 0 Offset 0 0 0 Gain 0 0 0 2. From the COLOR CALIBRATION menu, use the Arrow buttons to highlight Color Tuner, and then press the Left/Right Arrow buttons until the 11 Point White Balance menu...

User Manual
Page 22
... +0 0 PCM Fixed When the TV speakers are controlling the volume with more than two channels . , . , or . , for digital audio out and HDMI ARC output when connected to select an audio mode. Select Variable if you to create one custom mode. Use the Arrow buttons on the remote. Use the Arrow buttons to highlight Audio and press OK. The on the remote. 22 VIZIO AUDIO TV Speakers Surround Sound Volume Leveling - Select On or . Sets the volume control properties for...
... +0 0 PCM Fixed When the TV speakers are controlling the volume with more than two channels . , . , or . , for digital audio out and HDMI ARC output when connected to select an audio mode. Select Variable if you to create one custom mode. Use the Arrow buttons on the remote. Use the Arrow buttons to highlight Audio and press OK. The on the remote. 22 VIZIO AUDIO TV Speakers Surround Sound Volume Leveling - Select On or . Sets the volume control properties for...
User Manual
Page 25
... on-screen menu is displayed. 2. To change the setting to your wireless network (this is displayed. 2. TNhoremaIPl aPdandorraemsisc assigned VIZIO MANUAL SETUP DHCP Off IP Address Subnet Mask Default Gateway Pref. The subnet Exit 2D Exit 2D 3D • Default Gateway - From the NETWORK menu, highlight Manual Setup and press OWKid.eTheZoMomANUNAorLmaSlETPUanPormameicnu is displayed. 2. The E3Dthernet or RJ45 MAC address may be needed to change advanced network settings: 1. Sleep Timer Picture Audio Network Settings Help 25 Press the MENU button on...
... on-screen menu is displayed. 2. To change the setting to your wireless network (this is displayed. 2. TNhoremaIPl aPdandorraemsisc assigned VIZIO MANUAL SETUP DHCP Off IP Address Subnet Mask Default Gateway Pref. The subnet Exit 2D Exit 2D 3D • Default Gateway - From the NETWORK menu, highlight Manual Setup and press OWKid.eTheZoMomANUNAorLmaSlETPUanPormameicnu is displayed. 2. The E3Dthernet or RJ45 MAC address may be needed to change advanced network settings: 1. Sleep Timer Picture Audio Network Settings Help 25 Press the MENU button on...
User Manual
Page 27
...without a cable box). 3 SETTING UP CHANNELS You can use the TV's Channels menu to: • Select a Channel Source • Find Channels • Select channels to skip • Analog Audio • Digital Audio VIZIO CHANNELS Channels not searched Channel Source Find Channel Skip Channel Analog Audio Digital Audio Cable Stereo English Selecting a Channel Source Select the type of tuner input you will clear all channels. Scanning for Channels The TV may need to scan for channels before it can select either Antenna (Over-the-air) or Cable (Out-of-the-wall) connections. 1. Cancel...
...without a cable box). 3 SETTING UP CHANNELS You can use the TV's Channels menu to: • Select a Channel Source • Find Channels • Select channels to skip • Analog Audio • Digital Audio VIZIO CHANNELS Channels not searched Channel Source Find Channel Skip Channel Analog Audio Digital Audio Cable Stereo English Selecting a Channel Source Select the type of tuner input you will clear all channels. Scanning for Channels The TV may need to scan for channels before it can select either Antenna (Over-the-air) or Cable (Out-of-the-wall) connections. 1. Cancel...

User Manual
Page 28
... Locking and Unlocking Channels. If you wish to remove, use the parental controls. To remove a channel: 1. VIZIO SKIP CHANNEL 1 Test 0 1-1 Test 1 P 1-2 Test 2 P 2 Test 3 2-2 Test 4 P 2-3 Test 5 Wide Zoom Normal Panoramic Exit 2D 3D ABC Input Wide CC Sleep Timer Picture Audio Network Settings Help 3 28 The SKIP CHANNEL menu is entered using the Number Pad. For each channel you wish to remove, press the EXIT button on the remote to highlight the channel and press OK. You can remove these channels...
... Locking and Unlocking Channels. If you wish to remove, use the parental controls. To remove a channel: 1. VIZIO SKIP CHANNEL 1 Test 0 1-1 Test 1 P 1-2 Test 2 P 2 Test 3 2-2 Test 4 P 2-3 Test 5 Wide Zoom Normal Panoramic Exit 2D 3D ABC Input Wide CC Sleep Timer Picture Audio Network Settings Help 3 28 The SKIP CHANNEL menu is entered using the Number Pad. For each channel you wish to remove, press the EXIT button on the remote to highlight the channel and press OK. You can remove these channels...
User Manual
Page 30
... Closed Captions and then use the Left/Right Arrow buttons to select the caption channel you are viewing is displayed. 2. Change the color of the text. • Text Opacity - Exit 2D 3D ABC Input Wide CC Sleep Timer Picture Audio Network Settings Help Change the color of the text edge effects. • Background Color - Closed captions display a transcription of the background directly behind the text. • Background Opacity - Use the Arrow buttons on the remote. Press the MENU button...
... Closed Captions and then use the Left/Right Arrow buttons to select the caption channel you are viewing is displayed. 2. Change the color of the text. • Text Opacity - Exit 2D 3D ABC Input Wide CC Sleep Timer Picture Audio Network Settings Help Change the color of the text edge effects. • Background Color - Closed captions display a transcription of the background directly behind the text. • Background Opacity - Use the Arrow buttons on the remote. Press the MENU button...

User Manual
Page 36
... a 4:3 aspect ratio picture to the left to highlight View Mode and press OK. If the program is being stretched, the display image may vary by the menu. • Centered Overlay - ills the screen • 720p and 720i - Since the picture is already formatted for any video content on the remote. Examples include wide-WsicdereenZomomovieNsoramnadl oPaldnoerarmtieclevision programs. To change the view mode settings: 1. Press the MENU button on HDMI-5. 36
... a 4:3 aspect ratio picture to the left to highlight View Mode and press OK. If the program is being stretched, the display image may vary by the menu. • Centered Overlay - ills the screen • 720p and 720i - Since the picture is already formatted for any video content on the remote. Examples include wide-WsicdereenZomomovieNsoramnadl oPaldnoerarmtieclevision programs. To change the view mode settings: 1. Press the MENU button on HDMI-5. 36
User Manual
Page 38
... the remote. Viewing Data is turned on shortly afterward and the Setup App will turn back on , we collect). For more information, see https://www.vizio.com/viewingdata and review VIZIO's privacy policy at a later time . Restoring the TV to Factory Default Settings All of our products, software and services. Press the MENU button on -screen menu settings can be lost! The TV displays, "Select Reset to restore all TV settings to factory defaults...
... the remote. Viewing Data is turned on shortly afterward and the Setup App will turn back on , we collect). For more information, see https://www.vizio.com/viewingdata and review VIZIO's privacy policy at a later time . Restoring the TV to Factory Default Settings All of our products, software and services. Press the MENU button on -screen menu settings can be lost! The TV displays, "Select Reset to restore all TV settings to factory defaults...
User Manual
Page 49
...; Press the Power/Standby button on the remote or on the back of occurrences are using digital sources. See Adjusting the Audio Settings. • Check the audio connections of external devices (Blu-ray player, game console, cable/satellite box) that are only pressing one button at a time. • Point the remote directly at or dia o is not good. • or the best image quality, view high-definition programs using an antenna, the signal strength of product...
...; Press the Power/Standby button on the remote or on the back of occurrences are using digital sources. See Adjusting the Audio Settings. • Check the audio connections of external devices (Blu-ray player, game console, cable/satellite box) that are only pressing one button at a time. • Point the remote directly at or dia o is not good. • or the best image quality, view high-definition programs using an antenna, the signal strength of product...

User Manual
Page 60
... and Sunday, acific Time. (e) signal issues; (f) damage from the date of the product. when in -home. Limited Warranty D UNITED STATES AND CANADA VIZIO Technical Support via email at TechSupport@VIZIO.com or via What This Warranty Does Not Cover BY USING YOUR VIZIO PRODUCT YOU AGREE TO BE BOUND BY ALL phone at which point VIZIO additional help and troubleshooting. You may learn...
... and Sunday, acific Time. (e) signal issues; (f) damage from the date of the product. when in -home. Limited Warranty D UNITED STATES AND CANADA VIZIO Technical Support via email at TechSupport@VIZIO.com or via What This Warranty Does Not Cover BY USING YOUR VIZIO PRODUCT YOU AGREE TO BE BOUND BY ALL phone at which point VIZIO additional help and troubleshooting. You may learn...


