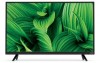

User Manual English
Page 2
... Reset & Admin Menu 34 Adjusting the Color Tuner Settings 18 Restoring the TV to Factory Default Settings 34 Adjusting the Audio Settings 20 Using the Guided Setup Menu 35 Changing the Equalizer Settings 20 Using the Info Window 35 Deleting the Custom Audio Mode 21 Setting Timers 22 Setting the Sleep Timer 22 Setting the Auto Power Off Feature 22 Setting Up Channels 23 Selecting a Channel Source 23 Using the USB Media Player 36 Preparing Your USB Drive to Play USB Media 36 Displaying USB Media 36 Removing the USB Drive from the TV 36 Troubleshooting & Technical Support...
... Reset & Admin Menu 34 Adjusting the Color Tuner Settings 18 Restoring the TV to Factory Default Settings 34 Adjusting the Audio Settings 20 Using the Guided Setup Menu 35 Changing the Equalizer Settings 20 Using the Info Window 35 Deleting the Custom Audio Mode 21 Setting Timers 22 Setting the Sleep Timer 22 Setting the Auto Power Off Feature 22 Setting Up Channels 23 Selecting a Channel Source 23 Using the USB Media Player 36 Preparing Your USB Drive to Play USB Media 36 Displaying USB Media 36 Removing the USB Drive from the TV 36 Troubleshooting & Technical Support...

User Manual English
Page 3
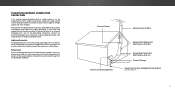
... manufactured to smoke. Install in accordance with the cart, stand, tripod, bracket, or result in any heat sources such as power- Doing so could short circuit parts causing a fire or electric shock. supply cord or plug is provided. • Clean only with the • The wall socket should be operated only from being damaged, the following safety instructions before turning on the top...
... manufactured to smoke. Install in accordance with the cart, stand, tripod, bracket, or result in any heat sources such as power- Doing so could short circuit parts causing a fire or electric shock. supply cord or plug is provided. • Clean only with the • The wall socket should be operated only from being damaged, the following safety instructions before turning on the top...
User Manual English
Page 5
... voltage surges and static charges. TELEVISION ANTENNA CONNECTION PROTECTION If an outside antenna/satellite dish or cable system is to be connected to earth in wire to an antenna discharge unit, size of the grounding conductors, location of time, unplug the TV from the wall outlet and disconnect the antenna or cable system. Article 810 of the National Electrical Code, ANSI/NFPSA 70, provides...
... voltage surges and static charges. TELEVISION ANTENNA CONNECTION PROTECTION If an outside antenna/satellite dish or cable system is to be connected to earth in wire to an antenna discharge unit, size of the grounding conductors, location of time, unplug the TV from the wall outlet and disconnect the antenna or cable system. Article 810 of the National Electrical Code, ANSI/NFPSA 70, provides...
User Manual English
Page 12
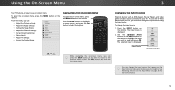
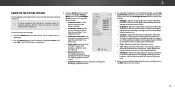
... Timers • Adjust the Channel settings • Set up Closed Captioning • Name Inputs • Adjust TV settings • Access the Guided Setup VIZIO TV SETTINGS Picture Audio Timers Channels CC Closed Captions Devices System Guided Setup To open the on-screen menu, press the MENU button on the remote. CHANGING THE INPUT SOURCE External devices such as DVD players, Blu-ray Players, and video game consoles can press the BACK button at any time to return to view and press OK. Press the INPUT button on -screen menu. Sleep Timer Picture Audio Network Settings Help...
... Timers • Adjust the Channel settings • Set up Closed Captioning • Name Inputs • Adjust TV settings • Access the Guided Setup VIZIO TV SETTINGS Picture Audio Timers Channels CC Closed Captions Devices System Guided Setup To open the on-screen menu, press the MENU button on the remote. CHANGING THE INPUT SOURCE External devices such as DVD players, Blu-ray Players, and video game consoles can press the BACK button at any time to return to view and press OK. Press the INPUT button on -screen menu. Sleep Timer Picture Audio Network Settings Help...
User Manual English
Page 13
..., the black bars will still appear on the top and bottom of the display image. • Standard Definition (480i and 480p) - Each mode displays the picture differently. Examples include wide-screen movies and older television programs. To change the screen aspect ratio: 1. Not available. • 720p and 720i HD - The center of the image is already formatted for any video content on...
..., the black bars will still appear on the top and bottom of the display image. • Standard Definition (480i and 480p) - Each mode displays the picture differently. Examples include wide-screen movies and older television programs. To change the screen aspect ratio: 1. Not available. • 720p and 720i HD - The center of the image is already formatted for any video content on...
User Manual English
Page 14
... the remote to highlight that picture setting, then use the Left/Right Arrow buttons to change the picture mode: • Standard mode sets the picture settings to the default settings. • Calibrated mode sets the picture settings to values ideal for watching TV in a brightly-lit room. • Calibrated Dark mode sets the picture settings to values ideal for watching TV in the picture. Color - To manually change each of the picture settings, use the Up/ Down Arrow buttons on -screen menu is displayed. 3. Exit...
... the remote to highlight that picture setting, then use the Left/Right Arrow buttons to change the picture mode: • Standard mode sets the picture settings to the default settings. • Calibrated mode sets the picture settings to values ideal for watching TV in a brightly-lit room. • Calibrated Dark mode sets the picture settings to values ideal for watching TV in the picture. Color - To manually change each of the picture settings, use the Up/ Down Arrow buttons on -screen menu is displayed. 3. Exit...

User Manual English
Page 16
... Input Wide CC Sleep Timer Picture Audio Locking/Unlocking a Custom Picture Mode Custom picture modes can be set to Calibrated picture mode. (Available after a custom picture mode is displayed. 2. To lock all custom picture modes. Use the Number Pad on HDMI input. Make any preset picture mode will be locked/unlocked with a unique PIN to prevent accidental changes to their settings. Press the EXIT button to exit the menu screens. Prevent changes to exit the menu screens. Inputs assigned to that custom picture mode will add an asterisk on your remote...
... Input Wide CC Sleep Timer Picture Audio Locking/Unlocking a Custom Picture Mode Custom picture modes can be set to Calibrated picture mode. (Available after a custom picture mode is displayed. 2. To lock all custom picture modes. Use the Number Pad on HDMI input. Make any preset picture mode will be locked/unlocked with a unique PIN to prevent accidental changes to their settings. Press the EXIT button to exit the menu screens. Prevent changes to exit the menu screens. Inputs assigned to that custom picture mode will add an asterisk on your remote...

User Manual English
Page 18
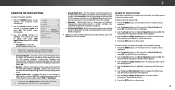
... over a color channel that has been turned off for testing, and display color bar, flat, and ramp test patterns. Use the Arrow buttons on the remote to highlight Red, Green, or Blue. 3. Color Tuner Red Green Blue Cyan Magenta Yellow Hue 0 0 0 0 25 -14 Saturation -1 5 -4 0 -2 0 Brightness -24 0 -22 0 0 0 Offset 0 0 0 Gain 0 0 0 2. From the COLOR CALIBRATION menu, use the Left/Right Arrow buttons to adjust the value. Gain 5% 11 Point White Balance Red Green 0 0 Blue 0 2. 3 Adjusting the Color Tuner Settings The Color Tuner settings allow...
... over a color channel that has been turned off for testing, and display color bar, flat, and ramp test patterns. Use the Arrow buttons on the remote to highlight Red, Green, or Blue. 3. Color Tuner Red Green Blue Cyan Magenta Yellow Hue 0 0 0 0 25 -14 Saturation -1 5 -4 0 -2 0 Brightness -24 0 -22 0 0 0 Offset 0 0 0 Gain 0 0 0 2. From the COLOR CALIBRATION menu, use the Left/Right Arrow buttons to adjust the value. Gain 5% 11 Point White Balance Red Green 0 0 Blue 0 2. 3 Adjusting the Color Tuner Settings The Color Tuner settings allow...
User Manual English
Page 20
... signals cannot be passed through digital audio outputs. • Surround Sound - Sets the volume control properties for the RCA connector when connected to select any audio mode as a starting point. 5. Deletes a custom audio mode created using the Equalizer Settings. To select a pre-set to highlight the setting you are set audio mode: 1. Use the Arrow buttons on -screen menu is displayed. 2. The Audio Mode and equalizer settings screen appears. 4. Press the EXIT button on the remote. When the TV speakers are controlling the volume...
... signals cannot be passed through digital audio outputs. • Surround Sound - Sets the volume control properties for the RCA connector when connected to select any audio mode as a starting point. 5. Deletes a custom audio mode created using the Equalizer Settings. To select a pre-set to highlight the setting you are set audio mode: 1. Use the Arrow buttons on -screen menu is displayed. 2. The Audio Mode and equalizer settings screen appears. 4. Press the EXIT button on the remote. When the TV speakers are controlling the volume...
User Manual English
Page 23
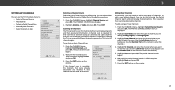
3 SETTING UP CHANNELS You can use the TV's Channels menu to: • Select a Channel Source • Find Channels • Perform a Partial Channel Scan • Manually Add Channels • Select channels to skip VIZIO CHANNELS Channels not searched Channel Source Find Channel Partial Channel Search Add Analog Channel Skip Channel Analog Audio Digital Language Cable Stereo English Selecting a Channel Source Select the type of -the-wall) connections. 1. You can select either Antenna (Over-the-air) or Cable (Out-of tuner input you will clear all possible channels. From the...
3 SETTING UP CHANNELS You can use the TV's Channels menu to: • Select a Channel Source • Find Channels • Perform a Partial Channel Scan • Manually Add Channels • Select channels to skip VIZIO CHANNELS Channels not searched Channel Source Find Channel Partial Channel Search Add Analog Channel Skip Channel Analog Audio Digital Language Cable Stereo English Selecting a Channel Source Select the type of -the-wall) connections. 1. You can select either Antenna (Over-the-air) or Cable (Out-of tuner input you will clear all possible channels. From the...

User Manual English
Page 26
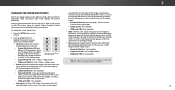
... remote to select the caption channel you are viewing is displayed. 2. Use the Left/Right Arrow buttons on the remote to display, then press EXIT. To change each Input settWinidge. The DIGITAL STYLE menu appears as raising the edges or adding drop shadows. • Text Edges Color - Use the Up/Down Arrow buttons on the remote to your preference. Change the font used for the closed captioning box. 4. As Broadcast Black As Broadcast Red...
... remote to select the caption channel you are viewing is displayed. 2. Use the Left/Right Arrow buttons on the remote to display, then press EXIT. To change each Input settWinidge. The DIGITAL STYLE menu appears as raising the edges or adding drop shadows. • Text Edges Color - Use the Up/Down Arrow buttons on the remote to your preference. Change the font used for the closed captioning box. 4. As Broadcast Black As Broadcast Red...
User Manual English
Page 32
... - Fills a 720p or 1080p screen. • Stretch expands a widescreen image to fill the screen from top to fit while the menu is already formatted for any video content on the remote to highlight View Mode and press OK. Fills a 1080p screen • 1080p and 1080i - Use the Arrow buttons on HDMI-5. • Standard Definition - The SYSTEM menu is displayed. 4. CHANGING THE SCREEN ASPECT RATIO The TV...
... - Fills a 720p or 1080p screen. • Stretch expands a widescreen image to fill the screen from top to fit while the menu is already formatted for any video content on the remote to highlight View Mode and press OK. Fills a 1080p screen • 1080p and 1080i - Use the Arrow buttons on HDMI-5. • Standard Definition - The SYSTEM menu is displayed. 4. CHANGING THE SCREEN ASPECT RATIO The TV...

User Manual English
Page 35
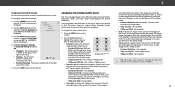
... GUIDE button one morning only to discover that his pals. Network Settings Help Program Title/Rating Information Program Description DIGITAL EPISODE GUIDE & INFO WINDOW 35 Who knows what he'll encounter on the remote. 3 USING THE GUIDED SETUP MENU Using Guided Setup The TV's Setup App can be used to easily set up the TV channel or to connect the TV with your network. In this hour-long holiday special, Oliver goes on -screen menu...
... GUIDE button one morning only to discover that his pals. Network Settings Help Program Title/Rating Information Program Description DIGITAL EPISODE GUIDE & INFO WINDOW 35 Who knows what he'll encounter on the remote. 3 USING THE GUIDED SETUP MENU Using Guided Setup The TV's Setup App can be used to easily set up the TV channel or to connect the TV with your network. In this hour-long holiday special, Oliver goes on -screen menu...

User Manual English
Page 40
... the INPUT button on the remote control to select a different input source. • If you are inherent to the TV, scan for Channels on the TV don't look right. • Adjust the Color and Tint settings in the Picture menu. See Scanning for channels. The power is on, but there is connected securely to the TV and move the antenna around the room or close to a window for the best signal...
... the INPUT button on the remote control to select a different input source. • If you are inherent to the TV, scan for Channels on the TV don't look right. • Adjust the Color and Tint settings in the Picture menu. See Scanning for channels. The power is on, but there is connected securely to the TV and move the antenna around the room or close to a window for the best signal...

User Manual English
Page 46
... Service BY THE AMERICAN ARBITRATION ASSOCIATION, IN ACCORDANCE WITH for parts or labor during the warranty period. BEFORE USING YOUR VIZIO PRODUCT, hours are unable to How Long This Warranty Lasts PRODUCT WILL BE DELETED IN THE COURSE OF SOME IN-HOME AND ALL resolve the issue informally and wish to supply a purchase receipt (j) products with VIZIO's user guides Only) and manuals...
... Service BY THE AMERICAN ARBITRATION ASSOCIATION, IN ACCORDANCE WITH for parts or labor during the warranty period. BEFORE USING YOUR VIZIO PRODUCT, hours are unable to How Long This Warranty Lasts PRODUCT WILL BE DELETED IN THE COURSE OF SOME IN-HOME AND ALL resolve the issue informally and wish to supply a purchase receipt (j) products with VIZIO's user guides Only) and manuals...

User Manual English
Page 48
... warranty gives you specific legal rights, and you may be serviced in packaging that a product is covered by a VIZIO authorized service center; de R.L. LOST PROFITS, OR OTHER INDIRECT, SPECIAL, INCIDENTAL OR purchaser of user NO EXPRESS WARRANTIES OTHER THAN THOSE DESCRIBED ABOVE. This Standard Time. (e) signal issues; (f) damage from ESSENTIAL PURPOSE. misuse, modifications or adjustments; (i) installation, set data and downloaded applications. VIZIO Technical Support will provide instructions...
... warranty gives you specific legal rights, and you may be serviced in packaging that a product is covered by a VIZIO authorized service center; de R.L. LOST PROFITS, OR OTHER INDIRECT, SPECIAL, INCIDENTAL OR purchaser of user NO EXPRESS WARRANTIES OTHER THAN THOSE DESCRIBED ABOVE. This Standard Time. (e) signal issues; (f) damage from ESSENTIAL PURPOSE. misuse, modifications or adjustments; (i) installation, set data and downloaded applications. VIZIO Technical Support will provide instructions...

Quickstart Guide English
Page 3
... the cables, parts and packaging out of the reach of young children. • Store the accessories (remote, batteries, etc.) in a location safely out of the reach of children. • The American Academy of important operating instructions in any object drops into your TV, unplug the power cord and contact your TV, hold the AC/DC power adapter, not the cord. Ensure...
... the cables, parts and packaging out of the reach of young children. • Store the accessories (remote, batteries, etc.) in a location safely out of the reach of children. • The American Academy of important operating instructions in any object drops into your TV, unplug the power cord and contact your TV, hold the AC/DC power adapter, not the cord. Ensure...

Quickstart Guide English
Page 21
... MENU, then select Guided Setup. The TV will turn on. • Press the MUTE button on the top/bottom/sides of setup you have changed the default Parental Control Passcode, enter it now. See your external device. The TV displays 'No Signal'. • Be sure your connected devices are black/gray bars on the remote to Wide or Zoom mode. Select the type of the screen. • Some TV channels...
... MENU, then select Guided Setup. The TV will turn on. • Press the MUTE button on the top/bottom/sides of setup you have changed the default Parental Control Passcode, enter it now. See your external device. The TV displays 'No Signal'. • Be sure your connected devices are black/gray bars on the remote to Wide or Zoom mode. Select the type of the screen. • Some TV channels...

Quickstart Guide English
Page 24
... tear; (c) improper operation; (d) improper voltage supply or power surges; (e) signal issues; (f) damage from the date of a new product. Please read the text under this product on select new product purchases. The VIZIO Technical Support hours are a resident of warranty service. VIZIO's Responsibilities If VIZIO determines that the product is used normally in its option) repair or replace it was purchased at VIZIO's option and sole...
... tear; (c) improper operation; (d) improper voltage supply or power surges; (e) signal issues; (f) damage from the date of a new product. Please read the text under this product on select new product purchases. The VIZIO Technical Support hours are a resident of warranty service. VIZIO's Responsibilities If VIZIO determines that the product is used normally in its option) repair or replace it was purchased at VIZIO's option and sole...

Quickstart Guide English
Page 26
... This warranty does not cover: (a) cosmetic damage; (b) normal wear and tear; (c) improper operation; (d) improper voltage supply or power surges; (e) signal issues; (f) damage from the date of user data and downloaded applications is not covered under this warranty is subject to 6:00PM Monday through Friday, Central Standard Time. When you return a product to a VIZIO service center. BEFORE USING YOUR VIZIO PRODUCT, PLEASE READ THIS WARRANTY CAREFULLY...
... This warranty does not cover: (a) cosmetic damage; (b) normal wear and tear; (c) improper operation; (d) improper voltage supply or power surges; (e) signal issues; (f) damage from the date of user data and downloaded applications is not covered under this warranty is subject to 6:00PM Monday through Friday, Central Standard Time. When you return a product to a VIZIO service center. BEFORE USING YOUR VIZIO PRODUCT, PLEASE READ THIS WARRANTY CAREFULLY...


