User Manual English
Page 2
... 39 Changing the Input Source 21 Enabling or Disabling Program Ratings 39 Changing the Screen Aspect Ratio 22 Locking and Unlocking Channels 39 Adjusting the Picture Settings 23 Blocking ... Mode Edit Settings 25 Changing the View Mode Settings 41 Saving a Custom Picture Mode 25 Changing the Screen Aspect Ratio 41 Locking/Unlocking a Custom Picture Mode 25 Adjusting the CEC Settings 42 Deleting a Custom ...45 Troubleshooting & Technical Support 47 Remote Control Front 12 Replacing the Batteries 12 Connecting Your Devices 13 Connecting A Device 13 Connecting A Device -
... 39 Changing the Input Source 21 Enabling or Disabling Program Ratings 39 Changing the Screen Aspect Ratio 22 Locking and Unlocking Channels 39 Adjusting the Picture Settings 23 Blocking ... Mode Edit Settings 25 Changing the View Mode Settings 41 Saving a Custom Picture Mode 25 Changing the Screen Aspect Ratio 41 Locking/Unlocking a Custom Picture Mode 25 Adjusting the CEC Settings 42 Deleting a Custom ...45 Troubleshooting & Technical Support 47 Remote Control Front 12 Replacing the Batteries 12 Connecting Your Devices 13 Connecting A Device 13 Connecting A Device -
User Manual English
Page 12
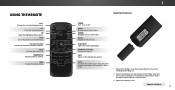
.... Insert two batteries into the remote control. Make sure that the (+) and (-) symbols on -screen menu. Replace the battery cover. USING THE REMOTE INPUT Change the currently-displayed input. EXIT Close the on -screen menu. ARROW Navigate the on -screen menu. DASH Use with the number pad to the channel last viewed. REMOTE CONTROL...
.... Insert two batteries into the remote control. Make sure that the (+) and (-) symbols on -screen menu. Replace the battery cover. USING THE REMOTE INPUT Change the currently-displayed input. EXIT Close the on -screen menu. ARROW Navigate the on -screen menu. DASH Use with the number pad to the channel last viewed. REMOTE CONTROL...
User Manual English
Page 29
... the MENU button on the remote. The AUDIO menu is displayed. 3. Press the EXIT button on -screen menu is displayed. 2. The on the remote. 29 Lip Sync - Select On or Off. If ... to adjust, then press Left/ Right Arrow buttons to change to a home theater audio system. VIZIO AUDIO TV Speakers Surround Sound Volume Leveling Balance - See Changing the Equalizer Settings on page 30. ... dialog. Sets the volume control properties for the frequency. 7. To create, modify, or replace the single custom equalizer setting: 1. Use the Arrow buttons to highlight the setting you to...
... the MENU button on the remote. The AUDIO menu is displayed. 3. Press the EXIT button on -screen menu is displayed. 2. The on the remote. 29 Lip Sync - Select On or Off. If ... to adjust, then press Left/ Right Arrow buttons to change to a home theater audio system. VIZIO AUDIO TV Speakers Surround Sound Volume Leveling Balance - See Changing the Equalizer Settings on page 30. ... dialog. Sets the volume control properties for the frequency. 7. To create, modify, or replace the single custom equalizer setting: 1. Use the Arrow buttons to highlight the setting you to...
User Manual English
Page 49
... and do not constitute a defective product. 49 See Adjusting the Audio Settings on the screen. • Ensure all cables are securely attached to a window for details. • Adjust Brightness, Contrast, or Backlight. VIZIO recommends selecting Calibrated. • Check all cables are always dark. • Your HD... are only pressing one button at a time. • Point the remote directly at the TV when pressing a button. • Replace the remote batteries with fresh ones. Ensure your device's user manual for the best signal. The display image does not cover the entire...
... and do not constitute a defective product. 49 See Adjusting the Audio Settings on the screen. • Ensure all cables are securely attached to a window for details. • Adjust Brightness, Contrast, or Backlight. VIZIO recommends selecting Calibrated. • Check all cables are always dark. • Your HD... are only pressing one button at a time. • Point the remote directly at the TV when pressing a button. • Replace the remote batteries with fresh ones. Ensure your device's user manual for the best signal. The display image does not cover the entire...


