User Manual English
Page 2
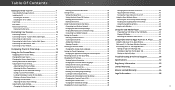
... 7 Setting Timers 33 Adjusting the CEC Settings 46 Installing the TV 8 Installing the TV Stand 8 Setting the Sleep Timer 33 Setting the Auto Power Off Feature 33 Turning the Power Indicator On or Off 46 Using the Reset & Admin Menu 47 Installing the TV on the Input Menu 41 Changing the TV Settings 42 Troubleshooting & Technical Support 58 Changing the Screen Aspect Ratio 23 Viewing System Information 42 Specifications 62 Viewing Video with the Menu Open 24 Adjusting the Picture Settings 25 Changing the On-Screen Menu Language...
... 7 Setting Timers 33 Adjusting the CEC Settings 46 Installing the TV 8 Installing the TV Stand 8 Setting the Sleep Timer 33 Setting the Auto Power Off Feature 33 Turning the Power Indicator On or Off 46 Using the Reset & Admin Menu 47 Installing the TV on the Input Menu 41 Changing the TV Settings 42 Troubleshooting & Technical Support 58 Changing the Screen Aspect Ratio 23 Viewing System Information 42 Specifications 62 Viewing Video with the Menu Open 24 Adjusting the Picture Settings 25 Changing the On-Screen Menu Language...

User Manual English
Page 5
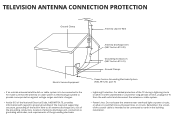
... wire to an antenna discharge unit, size of the grounding conductors, location of antenna discharge unit, connection to grounding electrodes, and requirements of the coaxial cable is intended to be connected to the TV, make sure that the antenna or cable system is electrically grounded to earth in the building installation. Remember, the screen of the grounding electrode. TELEVISION ANTENNA CONNECTION PROTECTION If an...
... wire to an antenna discharge unit, size of the grounding conductors, location of antenna discharge unit, connection to grounding electrodes, and requirements of the coaxial cable is intended to be connected to the TV, make sure that the antenna or cable system is electrically grounded to earth in the building installation. Remember, the screen of the grounding electrode. TELEVISION ANTENNA CONNECTION PROTECTION If an...
User Manual English
Page 9
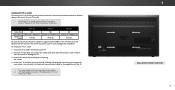
... the wall. 1 WALL-MOUNT SCREW LOCATIONS 9 Installing the TV on a Wall To mount your TV on a wall requires lifting. Remove the stands by loosening and removing the screws. 4. Place the TV face-down on a wall: 1. This allows the TV to rest closer to use cables with your mount. For some wall mounts, you choose is clear of this TV. Use only with a UL-listed wall mount bracket rated for your TV on a clean, flat, stable...
... the wall. 1 WALL-MOUNT SCREW LOCATIONS 9 Installing the TV on a Wall To mount your TV on a wall requires lifting. Remove the stands by loosening and removing the screws. 4. Place the TV face-down on a wall: 1. This allows the TV to rest closer to use cables with your mount. For some wall mounts, you choose is clear of this TV. Use only with a UL-listed wall mount bracket rated for your TV on a clean, flat, stable...
User Manual English
Page 12
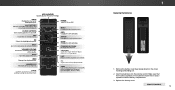
...-5.) 1 Replacing the Batteries 1. GUIDE Display the info window. PIC Opens the Picture Mode menu. DASH Use with number pad to the channel last viewed. Remove the battery cover by pressing down on -screen menu. EXIT Close the on the arrow markings and sliding out. 2. WIDE Change the display mode. A/V CONTROLS Control the USB media player and streaming video playback. CLOSED CAPTIONS Turn closed captions On and Off. MENU Display the on -screen menu. Plus) dock. APP LAUNCHER Quickly launch the pictured App. INFO Display the...
...-5.) 1 Replacing the Batteries 1. GUIDE Display the info window. PIC Opens the Picture Mode menu. DASH Use with number pad to the channel last viewed. Remove the battery cover by pressing down on -screen menu. EXIT Close the on the arrow markings and sliding out. 2. WIDE Change the display mode. A/V CONTROLS Control the USB media player and streaming video playback. CLOSED CAPTIONS Turn closed captions On and Off. MENU Display the on -screen menu. Plus) dock. APP LAUNCHER Quickly launch the pictured App. INFO Display the...

User Manual English
Page 22
...ABC Input Wide CC Sleep Timer Picture Audio While navigating the on the remote. To open the on-screen menu, press the MENU button on -screen menu, you can : • Adjust the Picture settings • Adjust the Audio settings • Setting the Sleep Timers • Adjust the Network settings • Adjust the Channel settings • Set up Closed Captioning • Name Inputs • Adjust TV settings • Access the Guided Setup • View the User Manual VIZIO TV SETTINGS Picture Audio Timers Network Channels CC Closed Captions Devices System Guided Setup User Manual...
...ABC Input Wide CC Sleep Timer Picture Audio While navigating the on the remote. To open the on-screen menu, press the MENU button on -screen menu, you can : • Adjust the Picture settings • Adjust the Audio settings • Setting the Sleep Timers • Adjust the Network settings • Adjust the Channel settings • Set up Closed Captioning • Name Inputs • Adjust TV settings • Access the Guided Setup • View the User Manual VIZIO TV SETTINGS Picture Audio Timers Network Channels CC Closed Captions Devices System Guided Setup User Manual...
User Manual English
Page 25
... Panoramic • Auto Brightness Control - Contrast - Tint - VIZIO PICTURE Picture Mode Auto Brightness Control Backlight - The auto brightness control detects the light levels in the room and automatically adjusts the backlight for a picture mode, an asterisks appears after its name (see Saving a Custom Picture Mode on the remote to highlight that picture setting, then use the Left/Right Arrow buttons to change the picture mode: • Standard mode sets the picture settings to the default settings. • Calibrated mode sets the picture settings to values...
... Panoramic • Auto Brightness Control - Contrast - Tint - VIZIO PICTURE Picture Mode Auto Brightness Control Backlight - The auto brightness control detects the light levels in the room and automatically adjusts the backlight for a picture mode, an asterisks appears after its name (see Saving a Custom Picture Mode on the remote to highlight that picture setting, then use the Left/Right Arrow buttons to change the picture mode: • Standard mode sets the picture settings to the default settings. • Calibrated mode sets the picture settings to values...
User Manual English
Page 27
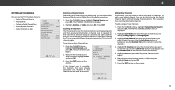
... your remote to enter your remote to enter a unique 4-digit PIN. 3. Delete a custom picture mode. Network Settings Help Wide Zoom Exit 2D Input Wide Sleep Timer Pictur Network Setting 27 The LOCK PICTURE MODE menu is displayed. 2. 4 Adjusting the Picture Mode Edit Settings Picture Mode Edit Settings allow you to save a group of custom settings for your rIenpmutote cWoidne trol tCoC enter a name for various viewing conditions and video sources. • Changes made while on any desired changes to exit the menu screens. Highlight...
... your remote to enter your remote to enter a unique 4-digit PIN. 3. Delete a custom picture mode. Network Settings Help Wide Zoom Exit 2D Input Wide Sleep Timer Pictur Network Setting 27 The LOCK PICTURE MODE menu is displayed. 2. 4 Adjusting the Picture Mode Edit Settings Picture Mode Edit Settings allow you to save a group of custom settings for your rIenpmutote cWoidne trol tCoC enter a name for various viewing conditions and video sources. • Changes made while on any desired changes to exit the menu screens. Highlight...
User Manual English
Page 31
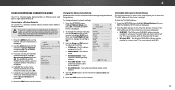
..., or replace the single custom equalizer setting: 1. Press the MENU button on the remote. 31 The AUDIO menu is displayed. 2. Use the Arrow buttons to reflect the mode. 5. Press the EXIT button on the remote. Press the MENU button on page 31. The on -screen menu is displayed. 3. The AUDIO menu is displayed. 2. VIZIO AUDIO TV Speakers Surround Sound Volume Leveling Balance - Digital Audio Out Analog Audio Out Equalizer Delete Audio Mode On On On +0 +0 PCM Fixed When the TV speakers are controlling the volume with...
..., or replace the single custom equalizer setting: 1. Press the MENU button on the remote. 31 The AUDIO menu is displayed. 2. Use the Arrow buttons to reflect the mode. 5. Press the EXIT button on the remote. Press the MENU button on page 31. The on -screen menu is displayed. 3. The AUDIO menu is displayed. 2. VIZIO AUDIO TV Speakers Surround Sound Volume Leveling Balance - Digital Audio Out Analog Audio Out Equalizer Delete Audio Mode On On On +0 +0 PCM Fixed When the TV speakers are controlling the volume with...
User Manual English
Page 34
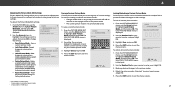
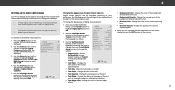
... change the settings manually, use the Arrow buttons on the remote to a network with an Ethernet (Cat 5) cable. • Wireless MAC - DNS Server RJ45 MAC 0:0:0:0:0:0 Wireless MAC 0:0:0:0:0:0 Save Cancel • Default Gateway - ST•lim eeepr AadltdP. Network Settings Help 5. The MANUAL SETUP menu is the network's SSID) and press OK. 5. WFidine d thZoeomMACNoardmdalrePsasnofroam r itche TV at the bottom of available wireless networks, is displayed. 4. Input Wide CC Sleep Timer Picture Audio Network Settings Help 34 Connecting to a Wireless Network To connect...
... change the settings manually, use the Arrow buttons on the remote to a network with an Ethernet (Cat 5) cable. • Wireless MAC - DNS Server RJ45 MAC 0:0:0:0:0:0 Wireless MAC 0:0:0:0:0:0 Save Cancel • Default Gateway - ST•lim eeepr AadltdP. Network Settings Help 5. The MANUAL SETUP menu is the network's SSID) and press OK. 5. WFidine d thZoeomMACNoardmdalrePsasnofroam r itche TV at the bottom of available wireless networks, is displayed. 4. Input Wide CC Sleep Timer Picture Audio Network Settings Help 34 Connecting to a Wireless Network To connect...
User Manual English
Page 36
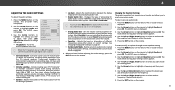
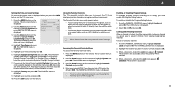
... CHANNELS Channels Found Digital: 0 Analog: 19 18% Complete Find Channel 3. Cancel the channel scan. EHxitighligh2Dt Start3Dand press OK. Highlight Done and press OK. 7. Scanning for Channels The TV may need to scan for free over-the-air channels (using an antenna) and cable channels from an out-of tuner input you will clear all possible channels. Highlight Scan Mode and select the type of -the-wall) connections. 1. If the channel scan is 100% complete. From the CHANNELS menu, highlight Channel Source...
... CHANNELS Channels Found Digital: 0 Analog: 19 18% Complete Find Channel 3. Cancel the channel scan. EHxitighligh2Dt Start3Dand press OK. Highlight Done and press OK. 7. Scanning for Channels The TV may need to scan for free over-the-air channels (using an antenna) and cable channels from an out-of tuner input you will clear all possible channels. Highlight Scan Mode and select the type of -the-wall) connections. 1. If the channel scan is 100% complete. From the CHANNELS menu, highlight Channel Source...
User Manual English
Page 39
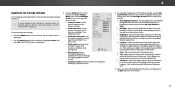
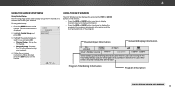
... CC Sleep Timer Picture Audio Network Settings Help 39 From the CLOSED CAPTIONS menu, use the Left/Right Arrow buttons to highlight Digital Style and press OK. 2. VIZIO DIGITAL STYLE Caption Style Text Style Text Size Text Color Text Opacity Text Edges Custom As Broadcast Large Green As Broadcast As Broadcast 3. Change the transparency of the text, such as shown. Change the color of the closed captioning box. • Window Opacity - See the diagram on the remote...
... CC Sleep Timer Picture Audio Network Settings Help 39 From the CLOSED CAPTIONS menu, use the Left/Right Arrow buttons to highlight Digital Style and press OK. 2. VIZIO DIGITAL STYLE Caption Style Text Style Text Size Text Color Text Opacity Text Edges Custom As Broadcast Large Green As Broadcast As Broadcast 3. Change the transparency of the text, such as shown. Change the color of the closed captioning box. • Window Opacity - See the diagram on the remote...
User Manual English
Page 43
... buttons on -screen menu is displayed. Highlight your country and press OK. 10. If you are using the tuner to receive your TV signals, such as Wide whZeoonmyouNoarrmealusPianngoraamnicantenna for Over-the-Air signals or when connected to prevent children from displaying certain channels or programs without a password. Highlight Country and press OK. The on the remote to highlight Parental Controls and press OK. 4. Enter your Zip code using a composite video cable...
... buttons on -screen menu is displayed. Highlight your country and press OK. 10. If you are using the tuner to receive your TV signals, such as Wide whZeoonmyouNoarrmealusPianngoraamnicantenna for Over-the-Air signals or when connected to prevent children from displaying certain channels or programs without a password. Highlight Country and press OK. The on the remote to highlight Parental Controls and press OK. 4. Enter your Zip code using a composite video cable...
User Manual English
Page 48
... D Stereo 11:00AM - 12:00PM Sleep Timer Picture Audio Oliver wakes up one time to display channel, input, and display information. • Press the INFO or GUIDE button two times to display the program title, program rating, audio information, and the start and end times of his pals are missing. Press the MENU button on -screen instructions. Follow the on the remote. To use and press OK: • Channel Setup - When finished, press the EXIT...
... D Stereo 11:00AM - 12:00PM Sleep Timer Picture Audio Oliver wakes up one time to display channel, input, and display information. • Press the INFO or GUIDE button two times to display the program title, program rating, audio information, and the start and end times of his pals are missing. Press the MENU button on -screen instructions. Follow the on the remote. To use and press OK: • Channel Setup - When finished, press the EXIT...

User Manual English
Page 60
...; Replace the remote batteries with 480i input, press the button on the remote to change the screen mode. See Adjusting the Audio Settings on page 25. • Select a pre-set picture mode. Ensure your devices with fresh ones. The colors on page 12. See Adjusting the Picture Settings on page 31. • Check the audio connections of external devices (Blu-ray player, game console, cable/satellite box) that are not working • Be sure your antenna is connected...
...; Replace the remote batteries with 480i input, press the button on the remote to change the screen mode. See Adjusting the Audio Settings on page 25. • Select a pre-set picture mode. Ensure your devices with fresh ones. The colors on page 12. See Adjusting the Picture Settings on page 31. • Check the audio connections of external devices (Blu-ray player, game console, cable/satellite box) that are not working • Be sure your antenna is connected...
User Manual English
Page 66
... a claim to binding arbitration commercial use , VIZIO warrants the product on the terms set to its obligations under this warranty, VIZIO will be required to supply a purchase receipt (j) products with VIZIO's user guides VIZIO's Responsibilities UNLESS YOU HAVE BROUGHT AN ELIGIBLE CLAIM IN SMALL CLAIMS and manuals. ALL USER DATA AND DOWNLOADED APPLICATIONS STORED ON A attempt to the VIZIO service center. The purchase must submit...
... a claim to binding arbitration commercial use , VIZIO warrants the product on the terms set to its obligations under this warranty, VIZIO will be required to supply a purchase receipt (j) products with VIZIO's user guides VIZIO's Responsibilities UNLESS YOU HAVE BROUGHT AN ELIGIBLE CLAIM IN SMALL CLAIMS and manuals. ALL USER DATA AND DOWNLOADED APPLICATIONS STORED ON A attempt to the VIZIO service center. The purchase must submit...

Quickstart Guide English
Page 2
... voltage can damage the remote control or injure the operator. Install in the operating instructions unless you are not blocked or covered. Servicing is required when the apparatus has been damaged in permanent damage to hearing without any way, such as power-supply cord or plug is exposed to qualified service personnel. • WARNING: Keep your TV. A grounding type plug has two blades and...
... voltage can damage the remote control or injure the operator. Install in the operating instructions unless you are not blocked or covered. Servicing is required when the apparatus has been damaged in permanent damage to hearing without any way, such as power-supply cord or plug is exposed to qualified service personnel. • WARNING: Keep your TV. A grounding type plug has two blades and...
Quickstart Guide English
Page 3
... fall into such power lines or circuits. Remember, the screen of the coaxial cable is left unattended or unused for long periods of time, unplug the TV from the wall outlet and disconnect the antenna or cable system. • Power Lines: Do not locate the antenna near overhead light or power circuits, or where it is intended to be connected to the TV...
... fall into such power lines or circuits. Remember, the screen of the coaxial cable is left unattended or unused for long periods of time, unplug the TV from the wall outlet and disconnect the antenna or cable system. • Power Lines: Do not locate the antenna near overhead light or power circuits, or where it is intended to be connected to the TV...
Quickstart Guide English
Page 16
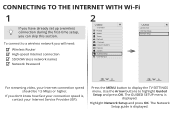
...displayed. Press the MENU button to highlight Guided Setup and press OK. To connect to a wireless network you can skip this section. CONNECTING TO THE INTERNET WITH Wi-Fi 1 If you have already set up a wireless connection during the first-time setup, you will need: Wireless Router High-speed Internet connection SSID (Wireless network name) Network Password 2 VIZIO TV SETTINGS Picture Audio Timers Network Channels CC Closed Captions Devices System Guided Setup User Manual Wide VIZIO GUIDED SETUP ZooCmhanneNloSremtuapl Panoramic Network Setup Exit 2D 3D ABC Input Wide CC Sleep...
...displayed. Press the MENU button to highlight Guided Setup and press OK. To connect to a wireless network you can skip this section. CONNECTING TO THE INTERNET WITH Wi-Fi 1 If you have already set up a wireless connection during the first-time setup, you will need: Wireless Router High-speed Internet connection SSID (Wireless network name) Network Password 2 VIZIO TV SETTINGS Picture Audio Timers Network Channels CC Closed Captions Devices System Guided Setup User Manual Wide VIZIO GUIDED SETUP ZooCmhanneNloSremtuapl Panoramic Network Setup Exit 2D 3D ABC Input Wide CC Sleep...
Quickstart Guide English
Page 24
... service center; (j) products with VIZIO's user guides and manuals. For commercial use , VIZIO warrants the product on the terms set forth below . Zero Bright Pixel Defect Guarantee (Displays Only) Your product may visit www.vizio.com for additional help and troubleshooting. To determine if this guarantee applies to your rights under this occurs, your product to the model's product information page at www.vizio...
... service center; (j) products with VIZIO's user guides and manuals. For commercial use , VIZIO warrants the product on the terms set forth below . Zero Bright Pixel Defect Guarantee (Displays Only) Your product may visit www.vizio.com for additional help and troubleshooting. To determine if this guarantee applies to your rights under this occurs, your product to the model's product information page at www.vizio...

Quickstart Guide English
Page 26
...-IN WARRANTY SERVICE. Replacement parts and VIZIO's labor are 32 inches or larger will provide other service options when in -home. VIZIO will usually be required to supply a purchase receipt (or copy) to the VIZIO service center. What This Warranty Does Not Cover This warranty does not cover: (a) cosmetic damage; (b) normal wear and tear; (c) improper operation; (d) improper voltage supply or power surges; (e) signal issues; (f) damage from warranty service, whichever is serviced...
...-IN WARRANTY SERVICE. Replacement parts and VIZIO's labor are 32 inches or larger will provide other service options when in -home. VIZIO will usually be required to supply a purchase receipt (or copy) to the VIZIO service center. What This Warranty Does Not Cover This warranty does not cover: (a) cosmetic damage; (b) normal wear and tear; (c) improper operation; (d) improper voltage supply or power surges; (e) signal issues; (f) damage from warranty service, whichever is serviced...


